Philips Lifeline User Manual
Communicator
Hide thumbs
Also See for Lifeline:
- Instructions for use manual (82 pages) ,
- Quick setup manual (28 pages) ,
- Quick setup manual (11 pages)
Table of Contents
Advertisement
Collateral Standards for the
Philips Lifeline Cordless Phone Communicator
IMPORTANT SAFETY INSTRUCTIONS
When using your telephone equipment, basic
safety precautions should always be followed to
reduce the risk of fire, electric shock and injury
to persons, including the following:
1. Do not use this product near water, for
example, near a bath tub, wash bowl, kitchen
sink or laundry tub, in a wet basement or near
a swimming pool.
2. Avoid using a telephone (other than a cordless
type) during an electrical storm. There may be
a remote risk of electric shock from lightning.
3. Do not use the telephone to report a gas leak
in the vicinity of the leak.
SAVE THESE INSTRUCTIONS
Federal Communications Commission (FCC):
Specific Absorption Rate (SAR):
Caution - To maintain the compliance with the FCC's
RF exposure guideline, place the base unit and voice
extension unit at least 20 cm from nearby persons.
For body worn operation, this handset has been tested
and meets the FCC RF exposure guidelines. Use of
accessories may not ensure compliance with FCC RF
exposure guidelines.
47 CFR 15:
Privacy of communications may not be ensured when
using this phone.
Note: This equipment has been tested and found to
comply with the limits for a Class B digital device,
pursuant to part 15 of the FCC Rules. These limits
are designed to provide reasonable protection against
harmful interference in a residential installation. This
0940838 CORDLESS Supplement NOTICE.indd 1
equipment generates, uses and can radiate radio
frequency energy and, if not installed and used in
accordance with the instructions, may cause harmful
interference to radio communications. However, there
is no guarantee that interference will not occur in a
particular installation. If this equipment does cause
harmful interference to radio or television reception,
which can be determined by turning the equipment off
and on, the user is encouraged to try to correct the
interference by one or more of the following measures:
—Reorient or relocate the receiving antenna.
—Increase the separation between the equipment and
receiver.
—Connect the equipment into an outlet on a
circuit different from that to which the receiver is
connected.
—Consult the dealer or an experienced radio/TV
technician for help.
47 CFR 68:
This equipment is hearing aid compatible.
Alarm Dialers:
WHEN PROGRAMMING EMERGENCY NUMBERS
AND(OR) MAKING TEST CALLS TO
EMERGENCY NUMBERS:
1. Remain on the line and briefly explain to the
dispatcher the reason for the call.
2. Perform such activities in the off-peak hours, such as
early morning or late evenings.
Caution - To ensure proper operation, this equipment
must be installed according to the enclosed installation
instructions. To verify that the equipment is operating
properly and can successfully report an alarm,
this equipment must be tested immediately after
installation, and periodically thereafter, according to the
enclosed test instructions.
8/30/12 4:28 PM
Advertisement
Table of Contents

Related Manuals for Philips Lifeline


Summary of Contents for Philips Lifeline
- Page 1 Collateral Standards for the Philips Lifeline Cordless Phone Communicator IMPORTANT SAFETY INSTRUCTIONS equipment generates, uses and can radiate radio frequency energy and, if not installed and used in When using your telephone equipment, basic accordance with the instructions, may cause harmful safety precautions should always be followed to interference to radio communications.
- Page 2 à la seule condition que la somme d’indices d’équivalence de la sonnerie de tous les dispositifs n’excède pas cinq. Philips Lifeline Philips Lifeline Canada 111 Lawrence Street 95 Barber Greene Road, Suite 105 Framingham, MA 01702-8156...
- Page 3 Philips Lifeline Cordless Phone Communicator User’s Manual...
- Page 4 Important Phone Numbers List of My Responders and People to Notify: Responders are people whom Lifeline will call in case of an emergency. People to Notify are people who will be notified that you required help but who are not involved in coming to your assistance.
-
Page 5: Table Of Contents
Switching Between the Handset and Phone Base ..........25 Redialing Calls ..........................25 Chapter 6: Answering Telephone Calls Answering Calls with the Handset ..................28 Answering Calls with Your Lifeline Help Button .............28 Answering Calls with the Phone Base ................29 Caller ID ............................29 Call Waiting ...........................30... - Page 6 Speaker Volume ..........................37 Chapter 9: Tips and Techniques Finding the Handset ........................40 Attaching the Belt Clip to the Handset ................40 Adjusting Your Lifeline Help Button Neck Cord ............41 Cleaning ............................42 Turning On Enunciated Dialing ..................44 Chapter 10: Reference Troubleshooting ...........................46 Equipment Service ........................48...
-
Page 7: Welcome
Welcome Thank you for choosing Philips Lifeline. We are leaders in the medical alert industry, having served more than 6 million people since 1974. We are committed to developing innovative products that help people maintain their independence. We strive to develop products that are attractive, practical, and easy to use. - Page 8 Lifeline Service...
-
Page 9: Chapter 1: Lifeline Service
Chapter 1 Lifeline Service Topics described in this chapter include: Getting Started ..................4 Lifeline Help Button ................. 4 Responders and People to Notify ............6... -
Page 10: Getting Started
Center, and a Personal Response Associate will come on the line to see if you need assistance. Always wear your Lifeline Help Button. Your Lifeline Help Button is waterproof and should be worn at all times – even when bathing and sleeping. It is your direct connection to Lifeline. Important Reminders • Wear your Lifeline Help Button in your home at all times, especially... - Page 11 Lifeline Cordless Phone will provide up to 1 hour of backup power for regular phone calls and 30 hours of backup power for Help Calls. Your Lifeline Service will not work if there is a power outage of more than 30 hours.
-
Page 12: Responders And People To Notify
Responders and People to Notify As a Lifeline subscriber, you should identify one or more people who will agree to respond in the event of an incident. These are called Responders. Typically, Responders are family members, friends or neighbors who are nearby and can come to assist you. - Page 13 Chapter 2 Your Lifeline Cordless Phone Topics described in this chapter include: Phone Base ....................8 Cordless Handset ...................12 Voice Extension ..................14 Additional Handset with Charger ............16...
-
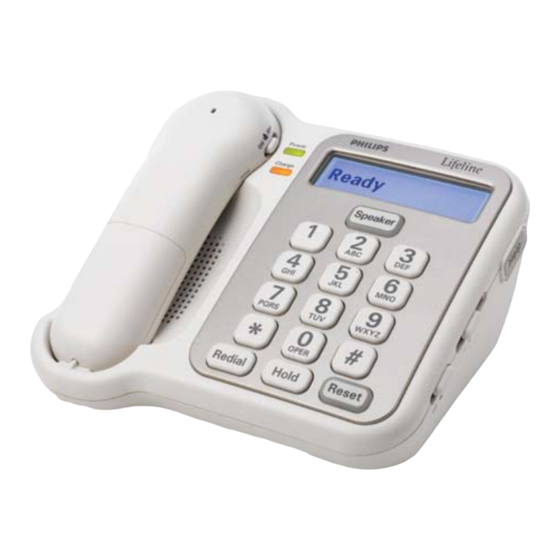
Page 14: Phone Base
As the heart of your system, the phone base has several functions. First and foremost, it is your Lifeline Communicator, which means that it receives the signal when you press your Lifeline Help Button and automatically calls Lifeline. Additionally, it is the speaker and microphone you use to communicate with the Personal Response Associate. - Page 15 This easy-to-read indicates that the display shows handset is being information about your charged. phone calls and the status of the Lifeline Cordless Phone. Microphone The microphone that is used to hear your voice is located on the bottom of the...
- Page 16 Phone Base, Side View Help button Press Help to send a Help Call to the Lifeline Response Center. Speaker volume switch This controls the volume of the speaker on the phone base. Ringer volume switch This controls the volume of the ring on the phone base.
- Page 17 Phone Base, Back View Phone cord jack Power switch This is used to connect the This allows the Lifeline Cordless phone to a jack on the wall. Phone to be turned on or off. Phone accessory jack Power cord jack/plug...
-
Page 18: Cordless Handset
Redial button Press Redial to call the most recently dialed number. Hold button Used for Call Waiting, Hold is pressed to put one call on hold and answer a second incoming call. Microphone Your Lifeline Cordless Phone... - Page 19 Cordless Handset, Back View Ringer volume switch This controls the volume of the ring on the handset. Earpiece volume switch This controls the volume of the earpiece. Belt clip connectors Belt clip The belt clip attaches to the back of the handset.
-
Page 20: Voice Extension
Voice Extension, Front View The Voice Extension provides another speakerphone from which you can speak with Lifeline or anyone else. Ideal for large and multi-floor homes, it has a microphone to pick up your voice and a speaker so you can clearly hear the other party. - Page 21 Voice Extension, Back View Power cord jack/plug Power switch This is used to connect the voice This allows the Voice extension to an electrical outlet on Extension to be turned the wall. on or off.
-
Page 22: Additional Handset With Charger
This allows you to keep the handsets charging and available in two locations. This is an optional item. If you would like to order an additional handset with charger, please contact Lifeline. Charge indicator An orange light indicates that the handset is being charged. -
Page 23: Chapter 3: Calling For Help
Chapter 3 Calling for Help Topics described in this chapter include: Calling for Help ..................18... -
Page 24: Calling For Help
Hello, Mrs. Smith. Do you need help? If you need help, press your Lifeline Help Button or press the Help button on the side of the phone base. You will hear beeping and the Speaker button will start blinking red. - Page 25 Associate will try calling you back. If you cannot answer the phone or if the Personal Response Associate cannot hear you, help will be sent to your home. 3. The Lifeline Response Center will listen to you and send help if needed. The Personal Response Associate will speak with you and send the help you want.
- Page 26 Monthly Check-in Call...
-
Page 27: Chapter 4: Monthly Check-In Call
Chapter 4 Monthly Check-in Call Topics described in this chapter include: Check-in Call....................22 Check-in Reminder .................22... -
Page 28: Check-In Call
For example, if your birthday is January 8th, you might make your check-in call on the 8th day of every month. The monthly check-in call is the ideal time to tell Lifeline about any changes to your health or contact information. - Page 29 Chapter 5 Making Telephone Calls Topics described in this chapter include: Making Calls with the Handset ............24 Making Calls with the Phone Base ............24 Switching Between the Handset and the Phone Base ....25 Redialing Calls ..................25...
-
Page 30: Making Calls With The Handset
Making Calls with the Handset With the handset, you can make calls from any location in your home. To make a phone call using the handset: 1. Press the Talk button on the handset. The Talk button will light up and you will hear a dial tone through the earpiece. -
Page 31: Switching Between The Handset And Phone Base
Switching Between the Handset and the Phone Base During a call you can easily switch between the handset and the phone base. If you have made a call with the phone base and want to switch to the handset: • Press the Talk button on the handset. There will be a very short delay while the call is switched. -
Page 32: Chapter 6: Answering Telephone Calls
Answering Telephone Calls... - Page 33 Chapter 6 Answering Telephone Calls Topics described in this chapter include: Answering Calls with the Handset .............28 Answering Calls with Your Lifeline Help Button ......28 Answering Calls with the Phone Base ..........29 Caller ID ....................29 Call Waiting ....................30 Switching Between the Handset and the Phone Base ....30...
-
Page 34: Answering Calls With The Handset
Answering Calls with Your Lifeline Help Button You can also use your Lifeline Help Button to answer a phone call. This feature is useful when you are close enough to the phone base to have a conversation, but you can’t get there quickly enough to answer the call. -
Page 35: Answering Calls With The Phone Base
Answering Calls with the Phone Base You can answer a call and have a hands-free conversation using the phone base. When there is an incoming call, the phone will ring and the Speaker button will start blinking. If you subscribe to Caller ID through your telephone service provider, the caller’s name and number will be displayed. -
Page 36: Call Waiting
Call Waiting You can put one call on hold and answer a second incoming call by pressing the Hold button. There is a Hold button on both the phone base and the handset. Call Waiting is a service offered by many telephone companies. If you are on a call and have Call Waiting, you will hear a tone when a second call comes in. -
Page 37: Chapter 7: Charging The Handset
Chapter 7 Charging the Handset Topics described in this chapter include: Low Battery Message ................32 Recharging the Handset ................33... -
Page 38: Low Battery Message
6 hours of talk time or 96 hours of standby time before it requires recharging. Your Lifeline Cordless Phone will automatically test the battery power in the handset and inform you when the handset battery needs to be recharged. -
Page 39: Recharging The Handset
Recharging the Handset To recharge the handset, place it in the phone base cradle or in the optional charger. When this is done: • You will hear a beep. • The orange charge indicator on the phone base or the optional charger will light up. • “Handset Charging” will be displayed on the phone base and the handset. - Page 40 Adjusting the Volume...
-
Page 41: Chapter 8: Adjusting The Volume
Chapter 8 Adjusting the Volume Topics described in this chapter include: Ringer Volume ..................36 Speaker Volume ..................37... -
Page 42: Ringer Volume
Ringer Volume You can adjust the volume of the ringer on both the phone base and the handset. The ringer volume switch is indicated by a bell symbol and has three positions: Off, Standard and Maximum. • To set the ring as loud as possible, move the switch to Max. • To set the ring to a standard volume, move the switch to the middle position. -
Page 43: Speaker Volume
Speaker Volume You can adjust the volume of the speaker on the phone base, handset and optional Voice Extension. The speaker volume control is a sliding switch, indicated by the word “Volume.” • To make the volume louder, slide the control towards “+.” • To make the volume softer, slide the control towards “–.” Speaker volume... -
Page 44: Chapter 9: Tips And Techniques
Tips and Techniques... - Page 45 Chapter 9 Tips and Techniques Topics described in this chapter include: Finding the Handset ................40 Attaching the Belt Clip to the Handset ..........40 Adjusting Your Lifeline Help Button Neck Cord ......41 Cleaning .....................42 Turning On Enunciated Dialing ............44...
-
Page 46: Finding The Handset
Finding the Handset To locate your handset, press the Find button on the phone base. The handset will start to beep and will continue beeping for up to 5 minutes. Once you have located the handset, press any key on it to stop the beeping. -
Page 47: Adjusting Your Lifeline Help Button Neck Cord
Adjusting Your Lifeline Help Button Neck Cord To shorten: With a tab between your first finger and thumb of each hand, slide both tabs apart in line with your shoulders. Help Button not actual size – enlarged to show detail. To lengthen: Pull one strand of the neck cord while sliding the tab to the back. -
Page 48: Cleaning
Lifeline Help Button Your Lifeline Help Button is completely waterproof, so you can submerge it in warm water for easy cleaning. But first, please turn off your Lifeline Cordless Phone to avoid sending a false Help Call. 1. Move the power switch on the back of the phone base to the OFF position. - Page 49 3. Reconnect the power cord to the electrical outlet, reconnect the telephone cord to the wall jack, and then turn the power switch back to ON. 4. Test your system by pressing your Lifeline Help Button. Tell the Personal Response Associate that you are just testing your equipment after cleaning.
-
Page 50: Turning On Enunciated Dialing
Turning On Enunciated Dialing Your Lifeline Cordless Phone has the ability to announce each number as it is pressed. With this feature, you can be sure that you are dialing correctly. To turn the enunciated dialing feature on or off, please follow... - Page 51 Chapter 10 Reference Topics described in this chapter include: Troubleshooting ..................46 Equipment Service ..................48 Batteries ....................49 Safety Information...................50...
-
Page 52: Troubleshooting
If you have any questions about your Lifeline Cordless Phone, Lifeline Help Button or other aspects of the Lifeline Service, please press your Lifeline Help Button, press the Help Button on the side of your phone base or call Lifeline. - Page 53 Press Reset and What to Do Display Display You Will Hear... Time to Test Time to Test Time to test your Lifeline. Press your Lifeline Help Your Lifeline Your Lifeline Please press the Lifeline Button to perform your button that you are monthly check-in.
-
Page 54: Equipment Service
Refer to the chart above. Equipment Service The Lifeline Cordless Phone and the Lifeline Help Button are manufactured to high quality standards. Philips Lifeline equipment can only be factory- serviced by Philips Lifeline. For information on obtaining service or repairs, please call Lifeline. -
Page 55: Batteries
• 1 hour of backup power for regular phone calls The Voice Extension battery will provide up to: • 5 hours of backup power for Help Calls Important: Your Lifeline Service will not work if there is a power outage of more than 30 hours! Handset Battery The handset has a rechargeable battery. When fully charged, the handset provides up to 6 hours of talk time or 96 hours of standby time before it requires recharging. -
Page 56: Safety Information
• Make sure that the phone base is away from any clutter or any object that might block its ability to receive a signal from your Lifeline Help Button. The phone should not be placed on or near your refrigerator or any type of metal cabinet or bookcase, since this may limit the effective range of the Lifeline Help Button. - Page 57 Chapter 11 Frequently Asked Questions Topics described in this chapter include: Lifeline Service ..................52 Your Lifeline Cordless Phone ...............54 Calling for Help ..................56 Monthly Check-in Call ................56 Answering Telephone Calls ..............57 Charging the Handset ................58...
-
Page 58: Lifeline Service
Just give Lifeline a few weeks’ notice to make the change. Please contact Lifeline to arrange this. Can the Lifeline Service be used if I have DSL Internet service from the phone company on the same telephone line? Yes, but a simple filter must be installed on the phone line. Contact your phone company to obtain a DSL filter, or purchase one from a local electronics store (e.g., Radio Shack). - Page 59 When you received your Philips Lifeline Cordless Phone Communicator, you may have been given a neck cord, since that is the most popular way to wear the Lifeline Help Button. If you would like to order a wrist strap, please contact Lifeline.
-
Page 60: Your Lifeline Cordless Phone
Reset button is not blinking. If the yellow Reset button is blinking, please press the Reset button to hear what is wrong. How far away from the phone will the Lifeline Help Button work? Your Help Button provides coverage inside your home and may provide coverage in the area immediately outside (yard, porch, etc.). - Page 61 Do I need to change batteries? Lifeline will contact you when the battery in the phone base needs to be replaced. If the handset or Voice Extension cannot take a charge, please contact Lifeline. Is there a difference between the Help Button on the phone base and...
-
Page 62: Calling For Help
The Personal Response Associate will probably be able to hear you through the highly sensitive microphone. However, if you cannot be heard or if you cannot speak, Lifeline will place another call to your home. If no one answers, help will be sent quickly. -
Page 63: Answering Telephone Calls
You have Caller ID, but the caller has requested that his/her information not be displayed. If I use my Lifeline Help Button to answer a call, will it call the Lifeline Response Center? If you press your Lifeline Help Button while the phone is ringing, it will simply answer the incoming call. -
Page 64: Charging The Handset
Why isn’t my handset working? If you have just set up your new Lifeline Cordless Phone, you may have to activate the handset. Press the Talk button and “Ready” should be displayed on the handset. -
Page 65: Chapter 12: Regulatory Compliance
Chapter 12 Regulatory Compliance Topics described in this chapter include: FCC and Canadian ACTA Regulations ..........60 Requirements for the United States...........60 Requirements for Canada ..............64... -
Page 66: Fcc And Canadian Acta Regulations
Upon request of your local telephone company, you are required to provide them with the following information: 1. The “Line” to which you will connect your Lifeline Cordless Phone (that is, your phone number); and 2. The Lifeline Cordless Phone’s FCC Registration Number and Ringer Equivalence Number (REN). - Page 67 Interference Information: FCC Rules Part 15 Your Lifeline Cordless Phone complies with Part 15 of the FCC Rules. Operation is subject to the following two conditions: (1) this device may not cause harmful interference;...
- Page 68 If your home has specially wired alarm equipment connected to the telephone line, ensure that the installation of the Lifeline Cordless Phone does not disable your alarm equipment. If you have questions about what will disable alarm equipment, consult your telephone company or a qualified installer.
- Page 69 NOTICE TO THE USER: Any changes or modifications not expressly approved by Philips Lifeline for compliance could void your authority to operate the equipment. UL1637 The maximum separation (range) of the equipment, under test conditions and for comparative purposes only, is seven hundred feet.
-
Page 70: Requirements For Canada
Upon request of your local telephone company, you are required to provide them with the following information: 1. The “Line” to which you will connect your Lifeline Cordless Phone (that is, your phone number); and 2. The Lifeline Cordless Phone’s FCC Registration Number and Ringer Equivalence Number (REN). - Page 71 NOTE: Your Lifeline Cordless Phone has been tested and found to comply with the limits for a Class B digital device, pursuant to RSS-210 of Industry Canada. These limits are designed to provide reasonable protection against harmful interference in a residential installation.
- Page 72 If your home has specially wired alarm equipment connected to the telephone line, ensure that the installation of the Lifeline Cordless Phone does not disable your alarm equipment. If you have questions about what will disable alarm equipment, consult your telephone company or a qualified installer.
- Page 73 Customer Premises Equipment and Wiring Network Service Computer Provider’s Facilities RJ31X Jack Unused Alarm Dialing RJ-11 Jack Equipment Telephone Line Telephone Network Unused Demarcation RJ-11 Jack Fax Machine Point Telephone Answering System Telephone Caution: If the above diagram is not used, this equipment cannot report an alarm when other equipment (telephone, answering system, computer modem, etc.) connected to the same phone line is in use.
- Page 74 Philips Lifeline Philips Lifeline Canada 111 Lawrence Street 95 Barber Greene Road, Suite 105 Framingham, MA 01702-8156 Toronto, Ontario, Canada M3C 3E9 Tel: 1-800-451-0525 Tel: 1-800-387-8120 www.lifelinesystems.com www.lifeline.ca P/N 0940597, Rev. 03 © 2009. All rights reserved. Signal range may vary due to environmental factors.