Advertisement
PAGE 1 (COVER)
Clock Radio Time & Weather Butler
Instruction Manual and Warranty Information EC-B130
1 YEAR LIMITED WARRANTY
PAGE 2-3
Introducing the smartest alarm clock around.
Thank you for purchasing The Sharper Image® Clock Radio Time & Weather Butler.
This product, along with entire The Sharper Image collection, connects high-tech innovation
with high-quality design to provide you with years of dependability and enjoyment. Wake up to
an alarm clock that's twice as smart! Get your daily weather report before you even get out of
bed with your personal Weather Butler on your side.
IMPORTANT SAFETY INSTRUCTIONS:
When using an electrical appliance, basic precautions should always be followed, including the
following:
READ ALL INSTRUCTIONS BEFORE USING
DANGER
- To reduce the risk of electric shock:
• Always unplug the appliance from the electrical outlet immediately after using and before
cleaning.
• Do not reach for an appliance that has fallen into water. Unplug it immediately.
• Do not place or store appliance where it can fall or be pulled into a tub or sink.
• Do not place in or drop into water or other liquid.
Advertisement
Table of Contents

Related Manuals for Sharper Image EC-B130


Summary of Contents for Sharper Image EC-B130
- Page 1 PAGE 2-3 Introducing the smartest alarm clock around. Thank you for purchasing The Sharper Image® Clock Radio Time & Weather Butler. This product, along with entire The Sharper Image collection, connects high-tech innovation with high-quality design to provide you with years of dependability and enjoyment. Wake up to an alarm clock that’s twice as smart! Get your daily weather report before you even get out of...
- Page 2 • Never operate this appliance if it has a damaged cord, plug, cable or housing. If it is not working properly, if it has been dropped or damaged, return it to THE SHARPER IMAGE Service Center for examination and repair.
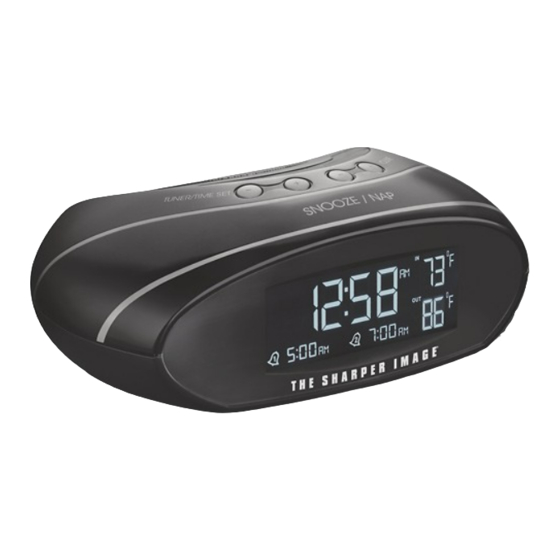
- Page 3 PAGE 4 [INSERT LINE DRAWING OF FRONT OF IMAGE] Clock Radio Time & Weather Butler Features: • Indoor & Outdoor Temperature Display • Male voice announces time reporting and alarm mode • Easy-to-read display with illuminated LCD/3-level white backlight (HI/MED/LO) •...
-
Page 4: Battery Installation
Battery installation: • Alarm clock uses AC adaptor and 1 CR2032 (included). • Outdoor Temperature Remote Sensor (Transmitter) requires a total of 2 (two) AAA batteries (not included). 1. Remove compartment cover. Insert battery/batteries into the compartment on the bottom of the unit according to the polarity direction indicated. -
Page 5: Setting The Alarm
Setting the Alarm: For your convenience, two separate alarms may be set to accompany individual wake-up times: ALARM 1 & ALARM 2 Alarm 1 button Short press: Set Alarm mode Beep Radio Voice The display will show the Alarm 1 bell icon next to your selected mode. Press and hold: 1. -
Page 6: Daylight Savings Time
TUNER/TIME SET: 1. In “DATE SET” mode or “ALARM SET” mode, press the [+] button to increase and press [-] to decrease digital values. 2. In RADIO mode, short press the [+] & [-] buttons to manually adjust the frequency. Long press to auto search forward [+] and for backward [-] selection. -
Page 7: Maintenance And Care Instructions
Remote Sensor Battery Installation: 1. Loosen the 4 screws securing the battery cover with a small screwdriver (included) and remove. Insert 2 alkaline AAA batteries according to the polarity direction indicated. 2. Place the home receiver (Clock Radio Time & Weather Butler) as close as possible to the remote sensor. -
Page 8: Troubleshooting
• Do not subject the units to extremely severe temperatures - DO NOT PLACE UNITS INTO OVENS, FREEZERS or MICROWAVE UNITS. NOTE: Opening the housing (other than the battery compartment) of the Remote Sensor or the Clock Radio Time & Weather Butler Unit will invalidate your warranty. Do not attempt to repair this unit - There are no consumer serviceable parts. -
Page 9: Maintenance
PAGE 10-11 Maintenance To Store You may leave the unit on display, or you can store it in its box in a cool, dry place. To Clean Use only a soft dry cloth to clean the enclosure of the unit. NEVER use liquids or abrasive cleaner to clean. -
Page 10: Limited One-Year Warranty
LIMITED ONE YEAR WARRANTY The Sharper Image sells its products with the intent that they are free of defects in manufacture and workmanship for a period of one year from the date of original purchase, except as noted below. The Sharper Image warrants that its products will be free of defects in material and workmanship under normal use and service. - Page 11 For more information regarding our product line in the USA, please visit: www.siproducts.com ©2009 The Sharper Image and its affiliated companies, all rights reserved. The Sharper Image® is a registered trademark of The Sharper Image and its affiliated companies. IB-EC-B130 The Sharper Image Service Center 1.888.856.6781...