Table of Contents
Advertisement
Quick Links
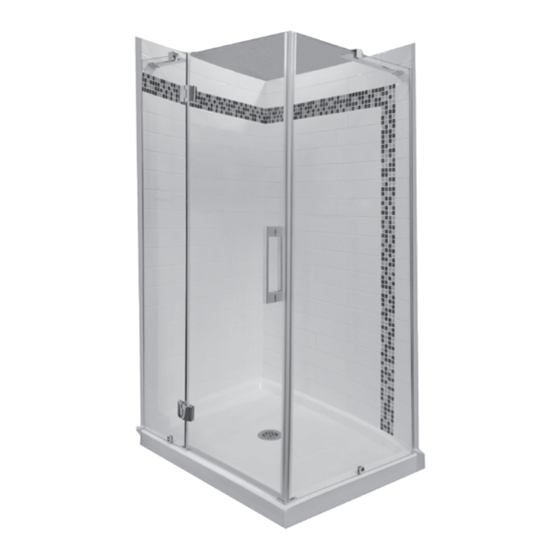
Installation en alcôve
optionnelle
Pour obtenir ce montage,
veuillez noter que vous
devez vous procurer le
panneau de verre latéral.
Optional L-shaped
installation
This shower installation
requires the purchase
of the glass wall.
LÉO
KD3114 / KD3115
CMG09-2014
GUIDE DE MISE EN PLACE
INSTALLATION GUIDE
DOUCHE RECTANGULAIRE
À PORTE PIVOTANTE
RECTANGULAR SHOWER WITH
PIVOTING DOOR
KD3114
40 po x 32 po
(1016 mm x 813 mm)
Ensemble de douche /
Shower kit
Base 3011032
Porte /
3011030
Door
OPTIONNEL :
panneau de verre
(3011031)
OPTIONAL: glass wall
KD3115
48 po x 32 po
(1219 mm x 813 mm)
Ensemble de douche /
Shower kit
Base 3011028
Porte /
3011029
Door
OPTIONNEL :
panneau de verre
(3011031)
OPTIONAL: glass wall
Advertisement
Table of Contents

Summary of Contents for Tassili Supra LEO KD3114
- Page 1 GUIDE DE MISE EN PLACE INSTALLATION GUIDE DOUCHE RECTANGULAIRE À PORTE PIVOTANTE RECTANGULAR SHOWER WITH PIVOTING DOOR Installation en alcôve Recessed U-shaped installation KD3114 KD3115 Installation en coin 40 po x 32 po 48 po x 32 po optionnelle (1016 mm x 813 mm) (1219 mm x 813 mm) Ensemble de douche / Ensemble de douche / Pour obtenir ce montage,...
- Page 2 Veuillez lire attentivement toutes les instructions conte- Carefully read all the instructions contained in this guide nues dans ce guide avant de procéder à l’installation et before proceeding with the installation, and keep this guide conservez-le pour usage ultérieur. handy for future reference. Avant de commencer Before you start Veuillez vous assurer que vous avez en main toutes les...
- Page 3 WARNINGS MISES EN GARDE - To allow the door to open and shut effortlessly, and to ensure the glass panel is properly entrenched in the base, it is of the - Pour que l’ouverture et la fermeture de la porte se fassent utmost importance that all parts be level, set on a level floor aisément et pour que le panneau de verre soit bien assis and on walls that are also level.
- Page 4 Outils et accessoires requis Required tools and accessories Ruban à mesurer Niveau Tournevis Tape measure Level Screwdriver Perceuse Maillet en caoutchouc Clefs Allen Drill Rubber mallet Allen keys Crayon Mèches pour percer la céramique Fusil à calfeutrer Pencil Ceramic drill bits Silicone gun Scellant à...
- Page 5 Description des pièces Description of parts for shower with pivoting door pour la douche à porte pivotante Recessed U-shaped installation Installation en alcôve (3 tiled walls) (3 murs de tuiles) Panneau de verre fixe avant / Front fixed glass panel Charnières de la porte (2) / Door hinges (2) Panneau de verre de la porte / Door glass panel Ensemble de poignées / Handle set...
- Page 6 Description des pièces Description of parts for shower with pivoting door pour la douche à porte pivotante Optional L-shaped installation Installation en coin This setup requires the purchase the glass wall (S5). Pour ce montage, vous devez vous procurer le panneau de verre (S5).
- Page 7 Selon l’endroit où vous installez cette The shower door installs BOTH WAYS, douche, l’ouverture de la porte peut être depending on the shower’s location INVERSÉE Illustration A Illustration B Conformément à l’illustration A, l’ouverture de la porte Illustration A shows the door opening from left to right. peut se faire de gauche à...
- Page 8 Drain assembly Assemblage du drain Partially assemble the drain to the shower base (see the Faites un assemblage partiel du drain avec la base de manufac turer’s drain assembly and installation instruc- douche (veuillez consulter les instructions du fabricant tions). You will complete the assembly later once the shower pour l’assemblage et l’installation du drain).
- Page 9 L’entrée et la sortie d’eau doivent être en place et la tuyau- All raw plumbing must be in place and properly positioned terie doit être correctement localisée avant d’installer la before installing the shower in the desired location. douche à l’emplacement choisi. Before continuing, verify the drain installation and make sure Avant de poursuivre l’installation, vérifiez l’installation du it is watertight.
- Page 10 Installing the vertical aluminum tracks Installation des montants verticaux en aluminium 1. Position the tracks (S8) where they belong on each side of the stall. Use the level and place the tracks about 1/2” 1. Positionnez les montants (S8) à leur emplacement (13 mm) from the base flange (ill.
- Page 11 Installation du panneau de verre fixe Installing the fixed glass panel (S1) (S1) douche en coin L-shape shower Installez la pièce d’ancrage (S17) au bas du panneau de Install the chrome bracket (S17) at the bottom of the glass verre, mais ne la fixez pas immédiatement à la base de panel without fastening it to the shower base should adjust- la douche, pour permettre l’ajustement de l’ensemble.
- Page 12 Installation de la barre de soutien Installing the support bar on the fixed sur le panneau de verre fixe glass panel Si vous installez une douche en coin, vous devrez installer L-shaped shower installations require two bars. deux barres de soutien. Place the support bar (S6) and its brace where they belong Placez la barre de soutien (S6) et son support à...
- Page 13 Installing door hinges and watertight seals Installation des charnières de la porte et des bandes d’étanchéité Place the PVC protectors on each side of the glass panel and install the hinges (S2). Make sure you insert the plastic tubes En plaçant les protecteurs de PVC de chaque côté du pan- in the holes before fastening everything (ill.
- Page 14 Installing the screws on the vertical tracks Installation des vis aux montants verticaux Adjust the support bar and glass panel according to how far they will go inside the track. This allows for a perfect fit of Vous devrez procéder à un ajustement des barres de sou- the door (ill.
- Page 15 Installation des poignées Installation of the handle Désassemblez les poignées (S4) à l’aide d’un tournevis. Take the handles (S4) apart with a screwdriver. Il est important de mettre les bandes et les rondelles de It is important to put the nylon strips and washers on each nylon de chaque côté...
- Page 16 Installing the glass support brackets Installation des attaches de soutien des panneaux Since the chrome brackets were not installed during the glass panel assembly, you will have to perform this task Comme ces pièces n’ont pas été installées lors du now (ill.
- Page 17 Final adjustments and watertightness Derniers réglages et étanchéité You must ensure that the door shuts completely and that Vous devez vous assurer que la porte ferme très bien it opens easily. et qu’elle s’ouvre facilement. Also, make sure that the glass panel holds firmly in De même, assurez-vous que le panneau de verre est bien the track.
- Page 18 Dessins techniques Technical drawings 3011032 3011028 Base 40 po x 32 po (1016 mm x 813 mm) Base 48 po x 32 po (1219 mm x 813 mm) Base Base 4,73” ( 120) 4,73” ( 120) 0,47” (12) 0,47” (12) 3,35”...
- Page 19 Dessins techniques Technical drawings 3011030 3011029 Porte de douche pivotante Porte de douche pivotante 39 po (1016 mm) 47 po (1193 mm) Pivoting shower door Pivoting shower door 3011031 Panneau de verre Glass wall Veuillez noter que les mesures sont exprimées en pouces All measurements are expressed in inches and (millimeters).
- Page 20 LIMITED ONE (1) YEAR WARRANTY GARANTIE LIMITÉE D’UN (1) AN Novelca offers this limited warranty for one (1) year from the date of purchase of this TASSILI product (hereafter : the “Product”). A list of NOVELCA offre la présente Garantie limitée, celle-ci étant valide all the TASSILI products covered by this limited warranty is given at pour une période d’un (1) an à...
- Page 21 9) lorsque les dommages, défectuosités, défauts ou autres f. a negligence by the purchaser, his employee, officer or repre- problèmes sont causés par : sentative ; a. un usage anormal du Produit ; g. an accident ; b. un entretien inadéquat du Produit ; h.