Table of Contents
Advertisement
Available languages
Available languages
Quick Links
Advertisement
Chapters
Table of Contents

Subscribe to Our Youtube Channel
Related Manuals for KaVo PROTAR evo


Summary of Contents for KaVo PROTAR evo
- Page 1 Documents PROTAR evo. ® Always on the safe side.
- Page 2 KaVo Dental GmbH Hersteller/manufacturer: Bismarckring 39 Kaltenbach & Voigt GmbH D-88400 Biberach Bismarckring 39 Tel.: 0 73 51 / 56-0 • Fax: 0 73 51 / 56 -14 88 D-88400 Biberach...
- Page 3 Gebrauchsanweisung PROTAR evo. ® Immer auf der sicheren Seite. KaVo Dental GmbH. D-88400 Biberach/Riss...
- Page 4 Hersteller/manufacturer: Vertrieb/distribution: Kaltenbach & Voigt GmbH KaVo Dental GmbH Bismarckring 39 Bismarckring 39 • D-88400 Biberach D-88400 Biberach Tel.: 0 73 51 / 56-0 • Fax: 0 73 51 / 1488...
-
Page 5: Table Of Contents
A 6.6 Mittelwertige Methode mit dem KaVo Oberkiefermodellpositionierer Mat.-Nr. 0.622.1781 APFnt Methode ....23 A 6.7 Mittelwertige Methode mit der KaVo Montage- und Aufstellhilfe für den Oberkiefer ..........24 A 6.8 Mittelwertige Methode mit der KAVo Eingipslehre Mat.- Nr. 0.622.1171 für das Unterkiefermodell ......25 A 6.8.1 Montage eines unbezahnten Unterkiefermodelles ....................25 A 6.9 Einartikulieren des Unterkiefermodelles ........................27... -
Page 6: A 1 Benutzerhinweise
Sofern weitere Sprachaus- gegeben. Ausserdem sind zu beachten: Beschädigung von Material oder zu führungen erforderlich sind, bitten wir Sie Betriebsstörungen führen kann. diese bei Ihrer zuständigen KaVo-Nieder- • die Arbeitsschutzvorschriften, lassung anzufordern. Vervielfältigung und • die Unfallverhütungsvorschriften. Wichtige Informationen für Bediener Weitergabe der Gebrauchsanweisung (GA) und Techniker. -
Page 7: A 1.4 Verwendungszweck Und Einsatzmöglichkeit
PROTAR evo. ® A 1.4 Verwendungszweck und Einsatzmöglichkeit Das Kauorgan ist aufgrund seiner drei- dimensionalen räumlichen Bewegungen das komplizierteste Bewegungssystem des menschlichen Körpers. Bei größeren Defekten in diesem System ist eine funktionell orientierte Therapie unabdingbar. Da derartige Therapieschritte überwiegend nicht in der Mundhöhle durchgeführt werden können, besteht die Notwendigkeit der Simulation von Unterkieferbewegungen nicht nur in der zahnärztlichen Praxis,... -
Page 8: A 1.5 Betrachtung Der Bewegungs-Möglichkeiten Des Unterkiefers In Der Horizontalebene
PROTAR evo. ® A 1.5 Betrachtung der Bewegungs- möglichkeiten des Unterkiefers in der Horizontalebene Die Protrusion Bei der Protrusion bewegt sich der Unterkiefer nach vorne. Die beiden Kondylen bewegen sich nach ventral und caudal. Es werden auf den Zähnen die Bewegungs- spuren des Oberkieferzahns im Unterkiefer- zahn dargestellt. -
Page 9: A 1.6 Systemphilosophie
PROTAR evo. ® A 1.6 Systemphilosophie Das Artikulator- und Gesichtsbogensystem von KaVo, ist so aufgebaut, daß wahlweise mit der Frankfurter Horizontale (FH) wie auch mit der Camperschen Ebene (CE) gearbeitet werden kann. Die Nasenstütze 1 richtet den Gesichtsbo- gen mittelwertig nach beiden Ebenen aus. -
Page 10: A 2 Lieferumfang-Zubehör
A 2 Lieferumfang-Zubehör A 2.1 Lieferumfang Artikulator PROTAR ® evo 2 bestehend aus: Artikulator-Oberteil Mat.-Nr. 1.002.3303 Artikulator-Unterteil Mat.-Nr. 1.002.3265 oder PROTAR evo 2 Artikulator PROTAR ® evo 3 mit Split- Cast bestehend aus: Artikulator-Oberteil Mat.-Nr. 1.002.3307 Artikulator-Unterteil Mat.-Nr. 1.002.3266 oder Artikulator PROTAR ®... - Page 11 Artikulator-Unterteil Mat.-Nr. 1.002.3266 oder Artikulator PROTAR ® evo 7 ohne Split- Cast bestehend aus: Artikulator-Oberteil Mat.-Nr. 1.002.3318 Artikulator-Unterteil Mat.-Nr. 1.002.3265 PROTAR evo 7 oder Artikulator PROTAR ® evo 9 mit Split- Cast bestehend aus: Artikulator-Oberteil Mat.-Nr. 1.002.3323 Artikulator-Unterteil Mat.-Nr. 1.002.3266...
-
Page 12: A 2.2 Zubehör
PROTAR ® evo. A 2.2 Zubehör Zubehör auf Wunsch lieferbar: @ Inzisalzeiger Mat.-Nr. 0.622.1021 ” Inzisalteller 10 ° Mat.-Nr. 0.622.1922 Inzisalteller 20 ° Mat.-Nr. 0.622.1932 Inzisalteller 30 ° Mat.-Nr. 0.622.1942 62 2 11 41 Inzisalteller 40 ° Mat.-Nr. 0.622.1952 Inzisalteller 50 ° Mat.-Nr. 0.622.1962 Split-Cast Einbausatz Mat.-Nr. - Page 13 PROTAR evo. ® Zubehör auf Wunsch lieferbar: p Stützstift “E “ Mat.-Nr.0.622.1181 Stützstift “P “ Mat.-Nr.0.622.1791 Stützstift “T “ Mat.-Nr.0.622.1891 “E“ a Einstellbarer Inzisaltisch Mat.-Nr.0.622.1701 s Halter Mat.-Nr.0.622.1161 “T“ d Bißgabelträger Mat.-Nr.0.622.0901 “P“ f PDR-Einsatz (Paar)Mat.-Nr.0.622.1001 g Shift-Winkel-Einsatz (Paar) Mat.-Nr. 0.622.1111 h Transportkoffer Mat.-Nr.
- Page 14 PROTAR ® evo. Verbrauchsmaterial: 1 Kontrollplatten Packung mit 10 Stück Mat.-Nr.0.622.0791 2 Retentionsadapter Packung mit 10 Stück Mat.-Nr.1.001.0887 Retentionsadapter Packung mit 50 Stück Mat.-Nr.1.001.0953 3 Montageplatten (nicht für Split-Cast) Packung mit 10 Stück Mat.-Nr.0.622.1871 4 Gewindeeinsätze Packung mit 20 Stück Mat.-Nr.0.622.0781 5 Eingipsscheiben Packung mit 20 Stück Mat.-Nr.0.622.1481...
-
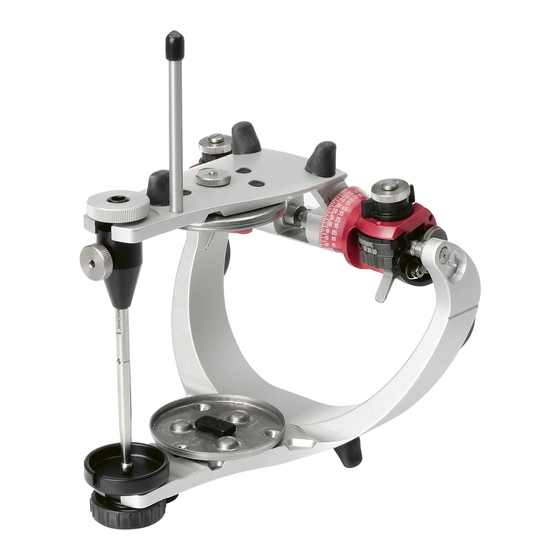
Page 15: A 3 Bedien- Und Funktionsteile
PROTAR ® evo. A 3 Bedien- und Funktionsteile PROTARevo 2 ö @ Artikulator-Oberteil 2 Auflagefüße 3 Gelenkbox rechts 4 Zentrik-Verriegelung rechts 5 Zentrik-Verriegelung links 6 Kontrollsockel PROTARevo 3 7 Artikulator-Unterteil 8 Inzisalteller 20 ° 9 Inzisaltisch eben 0 Stützstift q Kontrollplatte unten w Kontrollplatte oben e Fixierung Bennettwinkel und Seitenbeweglichkeit (ISS) rechts... - Page 16 PROTAR evo. ® PROTARevo 7 @ Artikulator-Oberteil 2 Auflagefüße 3 Gelenkbox rechts 4 Zentrik-Verriegelung rechts 5 Zentrik-Verriegelung links 6 Kontrollsockel 7 Artikulator-Unterteil 8 Inzisalteller 20 ° 9 Inzisaltisch eben 0 Stützstift q Kontrollplatte unten w Kontrollplatte oben PROTARevo 9 e Fixierung Bennettwinkel und Seitenbeweglichkeit (ISS) rechts r ISS -Einstellung rechts t Gelenkachse...
-
Page 17: A 4 Vorbereitung Zur Inbetriebnahme
PROTAR evo. ® A 4 Vorbereitung zur Inbetriebnahme A 4.1 Stützstift Stützstift 6 wahlweise in Artikulator- Ober-bzw. Unterteil einsetzen und festschrauben. Inzisaltisch eben 1 mit Inzisal-Teller 2 20° je nach Arbeitsweise in Ober - bzw. Unterteil einsetzen. Anstelle des 20 ° Tellers können auch Teller mit 10 -50 °... - Page 18 PROTAR evo. ® Position “2“ = geöffnet 1 In dieser Position kann das Oberteil abgenommen werden. “2“ “1“ “0“ Nach dem Aufsetzen des Artikulatorober- teils und schließen der beiden Zentrik- schlösser ist der Artikulator komplett. Die Zentrikschlösser 2 können nur dann geschlossen werden, wenn das Artikulatoroberteil bis auf Anschlag mit den Kondylenkugeln gebracht wird.
-
Page 19: A 4.3 Protar Evo Mit Splitcast (Werksjustierung)
PROTAR evo. ® A 4.3 PROTAR ® evo mit Splitcast (Werksjustierung) Ist der Artikulator werkseitig mit KaVo- Splitcast ausgerüstet, so dient die magnetisch gehaltene Kontrollplatte 2 zur Modellaufnahme. Der Retensionsadapter 1 dient als Gipsretension. Nach Beendigung der Arbeit wird das Modell mit Hilfe der Sterngriff-Schraube 4 von der Kontrollplatte 3 abgedrückt. -
Page 20: A 4.5.1 Protar Evo Mit Magnetbefestigung
PROTAR ® evo. A 4.5.1 PROTAR ® evo mit Magnetbefestigung Mit Hilfe der Magnetbefestigung 1.002.4686 kann an Stelle der Knebel- schraube ein Magnet 3 in den PROTAR ® evo eingesetzt werden. Zusammen mit den 3PS Montageplatten 4 ist ein schneller Modellwechsel möglich. Diese Art der Modellbefestigung ist keine Gleichschaltung. -
Page 21: A 4.6.1 Justierung 1.002.2080
PROTAR ® evo. A 4.6.1 Justierung 1.002.2080 Dichtringe 1 aus Schaumstoff (1.003.3998) von Träger abnehmen und auf Justierplatte 2 zentrisch aufkleben. Mess-und Justierlehre 6 in das Artikula- torunterteil 5 einsetzen. Der Magnet fixiert die Mess- und Justierlehre. Justierplatte 2 auf die Justierlehre 6 auflegen. -
Page 22: A 5 Einstellmöglichkeiten Der Protar Evo Artikulatoren
PROTAR ® evo. A 5 Einstellmöglichkeiten der PROTAR ® evo Artikulatoren... -
Page 23: A 6 Einartikulieren Der Zahnmodelle
PROTAR evo. ® A 6 Einartikulieren der Zahnmodelle A 6.1 Einartikulieren des Oberkiefermodelles mit dem KaVo Gesichtsbogen ARCUS Klemmhebel 4 öffnen und Gesichtsbogen 3 auseinanderziehen. Der Stützstift 2 muß zuvor in das Artikulatorunterteil eingesetzt und auf Null gestellt werden. (Inzisaltisch 6 entfernen und die Zentrik- Verriegelungen zuerst links und an- schließend rechts des Oberteils... -
Page 24: A 6.2 Einartikulieren Des Oberkiefermodelles Mit Hilfe Des Transferstandes
PROTAR ® evo. A 6.2 Einartikulieren des Oberkiefer- modelles mit Hilfe des Transfer- standes Soll im Dentalabor einartikuliert werden, so genügt es, nur den Bissgabelträger mit Bissgabel zu versenden. Stützstift und Inzisalteller aus dem Artikulator entfernen. Transferstand 1 in das Unterteil des Artikulators einsetzen. -
Page 25: A 6.4 Einartikulieren Des Oberkiefermodelles Mit Gesichtsbogen Anderer Hersteller
PROTAR ® evo. 62 2 11 41 A 6.4 Einartikulieren des Oberkiefer- modelles mit Gesichtsbogen anderer Hersteller Folgendes Zubehör wird benötigt: Fremdbogenreferenz Mat.-Nr. 0.622.1151 bestehend aus: 1 Referenzebene (Hülse + Schraube) 2 Gesichtsbogenhalter 3 Adapter Referenzstift Mit diesem Hilfsmittel besteht die Möglichkeit andere Gesichtsbogen-Systeme in den PROTAR ®... -
Page 26: A 6.5 Einstellwerte Bei Verwendung Von Fremdbögen Im Protarevo Artikulator
PROTAR evo. ® A 6.5 Einstellwerte bei Verwendung von Fremdbögen im PROTARevo Artikulator Folgendes Zubehör wird benötigt: 1 Transferstand Mat.-Nr. 0.622.1141 2 Fremdbogenreferenz Mat.-Nr. 0.622.1151 bestehend aus: Referenzebene (Hülse + Schraube) Gesichtsbogenhalter Adapter Referenzstift Fabrikat Einsatz- mit Nasenstütze Referenzzeiger Benötigtes Zubehör möglichkeit Skalenwert auf Infraorbitalpunkt... -
Page 27: A 6.6 Mittelwertige Methode Mit Dem Kavo Oberkiefermodellpositionierer Mat.-Nr. 0.622.1781 Apfnt Methode
Oberkiefermodell erlaubt das Einartikulieren, wenn kein Gesichtsbogen zur Verfügung steht. Als Referenzpunkte dienen die Umschlag- falten und die tiefste Erscheinung hinter den beiden Tubern. 1 Fixierschraube 2 Einstellmarkierung wenn kein KaVo Split- Cast montiert. 3 Einstellmarkierung wenn KaVo Split- Cast montiert. Referenzpunkte... -
Page 29: A 6.8.1 Montage Eines Unbezahnten Unterkiefermodelles
Mit der Eingipslehre können un- / teil- bezahnte Unterkiefermodelle mittelwertig in den PROTAR Artikulator einartikuliert werden. Ist der KaVo Artikulator mit einem Split- Cast ausgerüstet, muß die Eingipslehre in Position 1 fixiert werden (Schraube 3 lösen) Ist kein Split- Cast montiert muß in Position 2 fixiert werden. - Page 30 PROTAR ® evo. Die Symphysengabel 9 auf Höhe des unteren Wachswall 8 einstellen. 3 oberer Wachswall 4 Feststellschraube 5 Mittelwertige Eingipslehre 6 Retromolares Polster 7 Verschiebefuß auf retromolaren Polster 8 unterer Wachswall 9 Symphysengabel 0 Kauebene q Campersche Ebene Nach dem lösen der Feststellschraube w, daß...
-
Page 31: A 6.9 Einartikulieren Des Unterkiefermodelles
PROTAR ® evo. A 6.9 Einartikulieren des Unterkiefer- modelles Artikulator auf den Kopf stellen (Zentrik- Verriegelungen 2 bleiben geschlossen). Artikulator aufklappen. Das Unterkiefermodell wird schaukelfrei auf das Oberkiefermodell gelegt. Der Stützstift 1 wird, wenn ohne Zentrikregistrat gearbeitet wird, auf Null eingestellt. -
Page 32: A 7 Programmieren Des Artikulators
PROTAR ® evo. A 7 Programmieren des Artikulators A 7.1 Justieren der Gelenkbahn- neigung mittels Protrusionsregistrat (für PROTAR 5, 5B, 7, 9) Die beiden Zentrik-Verriegelungen 3 öffnen und das Protrusionsregistrat 5 zwischen die Zahnreihen der Gipsmodelle legen. Hierbei wird das Artikulator- unterteil gegenüber dem Artikulator- oberteil nach vorne verschoben. -
Page 33: A 7.3 Einstellung Der Seitenbeweg
PROTAR evo. ® A 7.3 Einstellung der Seitenbeweg- lichkeit (für PROTAR 5B, 7, 9) Immediate Side Shift (ISS) Die unmittelbare Seitenbeweglichkeit (ISS) des Mediotrusionskondylus kann von “0 “bis “1,5 mm“ (in 0,5 mm Schritten) vorgewählt werden. Die Fixierungsschraube 1 der Bennett- winkelführungen muß... -
Page 34: A 7.4 Justieren Des Shift- Winkels
PROTAR ® evo. A 7.4 Justieren des Shift- Winkels Sind im PROTAR 7 die Shift- Winkelein- sätze (0.622.1111) eingesetzt, so können Bewegungen auf der Arbeitsseite (Laterotrusionsseite) exakt eingestellt werden. Rändelschraube 3 lösen, damit der Shift- Winkeleinsatz 2 durch drehen am Stift 1 eingestellt werden kann. -
Page 35: A 7.5 Einstellen Einer Protrusionsposition / Distraktionsposition
PROTAR evo. ® A 7.5 Einstellen einer Protrusions- position / Distraktionsposition PROTARevo 9 Der PROTARevo 9 ist baugleich mit dem PROTARevo 7. Zusätzlich hat der "9er" einen P/D/R- Einsatz. Mat.-Nr. 0.622.1001 rechts / links Definierte Einstellung der Protrusion. Definierte Einstellung der Distraktion. Definierte Einstellung der Retrusion. -
Page 36: A 7.6 Einstellen Der Retrusion / Protrusion
PROTAR evo. ® A 7.6 Einstellen der Retrusion / Protrusion Zum Erzeugen von retrusiven Freiräumen ® beim Aufwachsen, ist beim PROTAR eine retrusive Bewegung möglich. Dadurch werden Einschleifarbeiten beim Zahnarzt reduziert. Retrusive Freiräume werden bereits in der Modellation berücksichtigt. Nullstellung der Retrusion Wird die Seitenbeweglichkeit 3 (ISS) auf 1,5 mm eingestellt, so läßt sich eine retrusive Bewegung von 1 mm durchführen... -
Page 37: A 7.7 Erstellung Eines Individuellen Inzisalführungstellers
PROTAR evo. ® A 7.7 Erstellung eines individuellen Inzisalführungstellers Aus dem flachen Inzisaltisch des Protars kann der Anwender einen individuellen Inzisalführungsteller gestalten. Die Zentrikschlösser des Artikulators auf die Stellung “1“ setzen und den Artikulator nach hinten aufklappen. Den Inzisaltisch und die Spitze des Stützstiftes mit einem Trennmittel (Vaseline) einstreichen. -
Page 38: A 7.8 Programmieren Des Einstellbaren Inzisaltisches
PROTAR ® evo. A 7.8 Programmieren des einstellba- ren Inzisaltisches A 7.8.1 Über Situationsmodell Vor dem Beschleifen der Zähne wird vom Patienten ein Situationsmodell erstellt. Mit diesem Situationsmodell wird dann der einstellbare Inzisaltisch programmiert. Zur korrekten Montage des Inzisaltisches wird die mittlere Führung auf einen Wert von ca. -
Page 39: A 8 Einbau Des Shift- Winkel- Einsatzes Am Protar®Evo 7
PROTAR evo. ® A 8 Einbau des Shift- Winkel- Einsatzes am PROTAR ® evo 7 Zunächst muss der bestehende / Pro/Retru- sionszylinder 1 entfernt werden. Hierzu wird mit Hilfe des beigelegten Inbusschlüssels 2 der Sperrstift 5 mit etwas Druck aus dem Antriebsrad 3 herausgedrückt. -
Page 40: A 9 Programmierung Des Artikulators Mit Messdaten Des Arcusdigma
PROTAR ® evo. A 9 Programmierung des Artikulators mit Messdaten des ARCUSdigma (Mat. Nr. 1.000.8232) Der PROTARevo 7 mit dem Shift- Winkeleinsatz ( Mat.- Nr. 0.622.1111) und dem einstellbaren Inzisaltisch (Mat.- Nr. 0.622.1701) kann alle berechneten Einstellwerte exakt reproduzieren. -
Page 41: A 10 Aufstellhilfen Für Totalprothesen
PROTAR evo. ® A 10 Aufstellhilfen für Totalprothesen A 10.1 Aufstellhilfen für Unterkiefer- modell nach der APFnt- Methode (Mat.- Nr. 0.622.2071) Okklusionsneigungsanzeiger 1 auf die Achzentrierung des Artikulators fixieren. Schraube 4 festziehen. Artikulator auf den Kopf stellen. Kalotte 3 auf das Zahnmodell legen. Im messalen Bereich des Frontinsert 2 auf die beiden 1er Frontzähne auflegen. -
Page 42: A 10.2 3D Aufstellhilfe Für Unterkiefermodell Nach Apf Methode
PROTAR ® evo. GEBRAUCHSANWEISUNG A 10.2 3D Aufstellhilfe für Unter- kiefermodell nach APF Methode 1 Aufnahme 2 Kalotteträger 3 Kalotte lang Mat.- Nr. 0.622.1211 4 Kalotte kurz Mat.- Nr. 0.622.1201 5 Stellschraube Dieses Kalottensystem kann generell eingesetzt werden, egal nach welchen Gesichtspunkten das Modell in den Artikulator einartikuliert wurde (Gesichts- bogen bzw. - Page 43 PROTAR evo. ® Die Kalotte 1 wird zur Ausrichtung auf den Wachswall 2 aufgelegt. Der Wachswall muß hierzu okklusal so modifiziert werden, daß die Kalotte im Bereich der Inzisiven und im Bereich der unteren Molaren ausgerichtet wird. Die plane Fläche der Kalotte kann z.B. für die Gerber Methode angewendet werden.
-
Page 44: A 10.3 3D Aufstellkalotte Für Oberkiefermodell (Mat.- Nr. 1.002.4919)
PROTAR ® evo. A 10.3 3D Aufstellkalotte für Ober- kiefermodell (Mat.- Nr. 1.002.4919) Diese plane Aufstellhilfe für das zahnlose Oberkiefermodell wird durch den oberen Wachswall ausgerichtet. Hierzu wird die Aufstellhilfe über ein Gummiband gegen den oberen Wachswall gedrückt. Mit etwas Gips wird die Aufstellhilfe dann ins Artikulator- Unterteil individuell fixiert. -
Page 45: A 10.4 2D Aufstellhilfe Für Den Oberkiefer (Mat.- Nr. 1.001.9452)
PROTAR ® evo. A 10.4 2D Aufstellhilfe für den Ober- kiefer (Mat.- Nr. 1.001.9452) Dieses Zubehör ist sowohl Eingips- wie auch Aufstellhilfe für den zahnlosen Oberkiefer. Nach dem zurückdrehen der Papillen- schraube 1 und dem zurückschieben des Auflageschiebers 2, kann mit dem Aufstellen des Oberkiefermodelles begonnen werden. -
Page 46: A 11 Modelltisch Mit Split-Cast
PROTAR evo. ® A 11 Modelltisch mit Split-Cast Für zahntechnische Arbeiten, die Arbeitschritte auf dem Fräsgerät erfordern, besteht oft die Notwendigkeit, das Modell zwischen Artikulator und Fräsgerät im Wechsel zu übertragen. 1 Magnet 2 Kontrollsockel 3 Hebel Durch die Magnetkraft ist ein sicherer Halt der Arbeit auch bei Fräsarbeiten gewährlei- stet. - Page 47 PROTAR evo. ® Okklusare Strukturen können im Artikulator erstellt werden. Die notwendigen Fräßarbeiten können zu jedem Zeitpunkt durchgeführt werden. Alle Arbeitschritte können durch paßgenaues Umsetzen zwischen Artikulator und Fräßgerät immer wieder kontrolliert werden.
-
Page 48: A 12 Transportbox Kavo Logicase
Folgende Bestückung ist möglich: - 4 Modelle - oder 4 Abdrucklöffel - KaVo ARCUS Bißgabelträger - 2 Boxen für Registrate - 2 Dosen für Kleinteile Spezielle Halterung 8 für KaVo Labor- möbelprogramm. Universeller Einsatz für alle weiteren Möbelprogramme 8. -
Page 49: A 13 Technische Daten
PROTAR evo. ® A 13 Technische Daten ® Artikulatoren PROTARevo 2, 3, 5, 5B, 6, 7 und 9 Unterteil Interkondylar-Abstand = fix 110 mm Stützstift Verstellbereich von + 10 bis - 10 mm mit - 10 Arretierung Inzisaltisch eben (plan) Inzisalteller 20°... -
Page 50: A 14 Pflege Und Justierung
PROTAR ® evo. A 14 Pflege und Justierung Vor Inbetriebnahme Artikulator mit handelsüblichen Artikulator- Trennmitteln (Silikonsprays) einsprühen, nicht fetten. Keine Oxydations-Löser oder Gips-Löser verwenden. Gelenkkugeln 8, Magnet-Haftsystem 9 bzw. Kontrollplatten-Gewinde bei Bedarf leicht einölen. Sollten die Spannhebel für die HCN nicht mehr richtig spannen, besteht die Möglichkeit der Nachjustierung. -
Page 51: Garantiebedingungen
Im Falle des Verzuges und des groben Verschuldens oder Vorsatzes gilt dies nur, soweit nicht zwingende gesetzliche Vorschriften entgegenstehen. KaVo haftet nicht für Defekte und deren Folgen, die entstanden sind durch natürliche Abnutzung, unsachgemäße Reinigung oder Wartung, Nichtbeachtung der Bedienungs-,... -
Page 52: Protar®Evo 3
Verk.-Nr. PROTARevo 2 06/02003 Mat.-Nr. 1.002.3306 09.21 PROTAR ® evo. Ersatzteile PROTAR ® evo 2 Mat.-Nr. 1.002.3305 ohne Split-Cast 0.622.0981 1.002.4686 3PS 1.002.2074 0.200.6034 0.200.6093 0.622.1363 0.622.1373 1.001.0889 0.200.6301 Verk.-Nr. PROTARevo 3 06/2003 (10x) 1.002.2096 10x Mat.-Nr. 1.002.3307 mit Split-Cast 09.22 Mat.-Nr. -
Page 53: Protar Evo 5B
Verk.-Nr. PROTARevo 5 06/2003 Mat.-Nr. 1.002.3311 mit Split-Cast 09.23 Mat.-Nr. 1.002.3310 ohne Split-Cast PROTAR evo. ® PROTAR ® evo 5 Mat.-Nr. 1.002.3311 mit Splitcast Mat.-Nr. 1.002.3310 ohne Splitcast 0.622.0981 3x 0.201.1459 0.200.6034 1.002.2074 1.001.0889 10x 0.622.2652 0.622.0791(10x) 1.002.4686 3PS 0.622.2682 0.622.2702 0.411.1212 0.622.1822... -
Page 54: Protar®Evo 9
Verk.-Nr. PROTARevo 7 09/2004 Mat.-Nr. 1.002.3319 mit Split-Cast 09.24 Mat.-Nr. 1.002.3318 ohne Split-Cast PROTAR ® evo. PROTAR ® evo 7 Mat.-Nr. 1.002.3319 mit Splitcast Mat.-Nr. 1.002.3318 ohne Splitcast 0.250.0031 1.002.0508 0.222.4043 0.622.2032 (L) 0.622.2042 (R) 0.622.2542 0.622.2532 0.622.2502 3x 0.201.1459 0.622.2082 (R) 0.622.2092 (L) 1.002.2074 0.622.0981... -
Page 55: Protar Evo Unterteil
Verk.-Nr. PROTARevo Unterteil 06/2003 Mat.-Nr. 1.002.3265 ohne Splitcast 09.26 PROTAR evo. ® Mat.-Nr. 1.002.3266 mit Splitcast PROTAR ® evo Unterteil Mat.-Nr. 1.002.3265 ohne Splitcast Mat.-Nr. 1.002.3266 mit Splitcast 0.222.5045 (8x12x0,15) 0.222.5046 (8x12x0,18) 0.222.5047 (8x12x0,20) 0.622.2022 1.001.0889 10x 0.622.1852 0.200.6034 0.622.1181 0.622.0981 0.622.0791 10x 0.622.3142... - Page 56 KaVo Dental GmbH. D-88400 Biberach/Riss Telefon +49 7351 56-0 Fax +49 7351 56-1488 Internet: www.kavo.com...
- Page 57 Operating Instructions PROTAR evo. ® Always on the safe side. KaVo Dental GmbH. D-88400 Biberach/Riss...
- Page 58 Hersteller/manufacturer: Vertrieb/distribution: Kaltenbach & Voigt GmbH KaVo Dental GmbH Bismarckring 39 Bismarckring 39 • D-88400 Biberach D-88400 Biberach Tel.: 0 73 51 / 56-1600 • Fax: 0 73 51 / 1488...
- Page 59 A 6.5 Programme data when using non –KaVo face bows in the PROTAR Articulator ............22 A 6.6 Average value method using the KaVo upper jaw model positioner Mat. No. 0.622.1781 APFnt Method ....23 A 6.7 Average value method using the KaVo Mounting and Setup Aid for the upper jaw ..........24 A 6.8 Average value method for the lower jaw model using the KaVo Plastering Gauge Mat.
-
Page 60: A 1 User Notes
The following are authorized to repair and Disconnect mains plug service KaVo products: the engineers of the KaVo agents through- out the world the engineers of the KaVo dealers who have been specially trained by KaVo independent engineers specially trained by KaVo. -
Page 61: A 1.4 Purpose And Applications
PROTAR evo. ® A 1.4 Purpose and applications The Gnathostomatic System is one of the most complex locomotor organs in the human body, largely due to its three dimensional spatial movements. In the event where a therapeutic, prosthetic or orthognathic treatment is required, a function-oriented therapy is essential. -
Page 62: A 1.5 Observation Of The Movements Of The Mandible In The Horizontal Plane
PROTAR evo. ® A 1.5 Observation of the movements of the mandible in the horizontal plane Protrusion With protrusion, the mandible moves forward. There is ventral and caudal movement of the two condyles. The movement tracks of the maxillary tooth are shown on the mandibular tooth. -
Page 63: A 1.6 System Philosophy
® A 1.6 System philosophy The articulator and face bow system from KaVo is designed so that work can be carried out using either the Frankfurt horizontal plane (FH) or Camper’s plane (CP). The nasal support 1 provides an average alignment of the face bow with respect to the two planes. -
Page 64: A 2 Scope Of Delivery - Accessories
Articulator PROTAR ® evo 2 Cast consisting of: Articulator upper section Mat. No. 1.002.3305 Articulator lower section Mat. No. 1.002.3265 PROTAR evo 2 Articulator PROTAR ® evo 3 with-Split- Cast consisting of: Articulator-upper section Mat. No. 1.002.3307 Articulator-lower section Mat. No. 1.002.3266 Artikulator PROTAR ®... - Page 65 Articulator PROTAR ® evo 7 with-out Split-Cast consisting of: Articulator-upper section Mat. No. 1.002.3318 Articulator-lower section Mat. No. 1.002.3265 PROTAR evo 7 Articulator PROTAR ® evo 9 with-Split- Cast consisting of: Articulator-upper section Mat. No. 1.002.3323 Articulator-lower section Mat. No. 1.002.3266 Articulator PROTAR ®...
- Page 66 Incisal guidance 50°Mat. No. 0.622.1962 Split-cast-built-in set Mat.-No. 0.622.1031 (without drawing) # Transfer stand Mat. No. 0.622 1141 £ Orbital plane guide for non-KaVo face bows Mat.-No. 0.622 1151 £b face bow holder £c Adapter referenz pin 5 Jigs for average value articulator mounting Mat.
- Page 67 PROTAR evo. ® Available on request: p Support pin “E “ Mat.-Nr.0.622.1181 Support pin “P “ Mat.-Nr.0.622.1791 Support pin “T “ Mat.-Nr.0.622.1891 “E“ a Adjustable incisal plate Mat. No. 0.622.1701 s Holder Mat. No. 0.622.1161 d Bitefork holder Mat. No. 0.622.0901 “T“...
- Page 68 PROTAR ® evo. Consumable materials 1 Mounting plates pack of 10 Mat. No. 0.622.0791 2 Retention adapters pack of 10. Mat. No. 1001.0887 Retention adapters pack of 50. Mat. No. 1.001.0953 Retention adapters pack of 50. Mat. No. 1.001.0953 3 Mounting plates (not for Split-cast) pack of 10 Mat.
-
Page 69: A 3 Controls And Functional Elements
PROTAR ® evo. PROTARevo 2 A 3 Controls and functional elements ö 1 Articulator upper section 2 Support feet 3 Hinge box, right 4 Centric lock, right 5 Centric lock, left PROTARevo 3 6 Control base 7 Articulator lower section 8 Incisal tray, 20°... - Page 70 PROTAR evo. ® PROTARevo 7 1 Articulator upper section 2 Support feet 3 Hinge box, right 4 Centric lock, right 5 Centric lock, left 6 Control base 7 Articulator lower section 8 Incisal tray, 20° 9 Incisal disc, flat 0 Support pin PROTARevo 9 q Mounting plate, bottom w Mounting plate, top...
-
Page 71: A 4 Preparations For Start-Up Operation
PROTAR evo. ® A 4 Preparations for start-up operation A 4.1Support pin Insert support pin 6 into top or bottom part of articulator and screw in firmly. Fit flat incisal plate 1 with 20° incisal tray 2 in the top or lower section. 10° - 50° trays can also be used instead of the 20°... - Page 72 PROTAR evo. ® Position “2“ = open 1 In this position, the upper section can be removed. “2“ “1“ “0“ After positioning the articulator upper sections and closing the two centric locks, the articulator is now complete. The centric locks 2 can only be closed when the articulator upper section is firmly located into the condylar- ball.
-
Page 73: A 4.3 Protarevo With Splitcast (Factory Adjustment)
• After each use, immediately clean the mounting set thoroughly under running water. • If necessary, use KaVo Separating Material (Order No. 0.622.4442). Blow off superfluous separating material. Never use plaster solvents to clean the mounting set. -
Page 74: A 4.5.1 Protarevo With Magnetic Fixing
PROTAR ® evo. A 4.5.1 PROTARevo with magnetic fixing By use of the magnetic fixing 1.002.4686, a magnet 3 can be located in the PROTA- Revo in place of the capstan-head screw.Together with the 3PS mounting plates 4 a fast change of model is possible. This method of fixing the model does not allow synchronization. -
Page 75: A 4.6.1 Calibration 1.002.2080
PROTAR ® evo. A 4.6.1 Calibration 1.002.2080 Remove foam washer 1 (1.003.3998) from holder and glue centrally on calibration plate 2. Insert measuring and calibration gauge 6 in the articulator lower part 5. The magnet holds the gauge. Place calibration plate 2 on the gauge 6. Adjust articulator support pin 7 to 0 (or “zero“... -
Page 76: A 5 Programming Possibilities For Kavo Protarevo Articulators
PROTAR ® evo. A 5 Programming possibilities for KaVo PROTARevo articulators... -
Page 77: A 6 Articulation Of The Model
® A 6 Articulation of the model A 6.1 Articulation of the upper model with the KaVo Face bow ARCUS Release clamping lever 4 and pull face bow 3 apart. The support pin 2 must already be located in the articulator lower section and set to the zero position. -
Page 78: A 6.2 Articulation Of The Upper Model With The Help Of The Transfer Stand
Insert bite fork 3 with bitefork holder 2 into the transfer stand 1. A 6.3 Articulation of the upper model with KaVo Facebow ARCUS light Attach face bow ARCUS light with its ear- pieces 4 to the orientation pins on PROTARevo. -
Page 79: A 6.4 Articulation Of The Upper Model With Face Bows Of Other Manufacturers
A 6.4 Articulation of the upper model with face bows of other manufactu- rers The following accessories are required: Non-KaVo face bow reference kit Mat. No. 0.622.1151 Consisting of: 1 Reference plane (collar + screw) 2 Face bow holder... -
Page 80: A 6.5 Programme Data When Using Non -Kavo Face Bows In The Protar Articulator
PROTAR evo. ® A 6.5 Programme data when using non –KaVo face bows in the PROTAR Articulator The following accessories are required: 1 Transfer stand Mat. No. 0.622.1141 2 Non-KaVo reference kit Mat. No. 0.622.1151 consisting of: Reference plane (collar + screw) -
Page 81: A 6.6 Average Value Method Using The Kavo Upper Jaw Model Positioner Mat. No. 0.622.1781 Apfnt Method
PROTAR evo. ® A 6.6 Average value method using the KaVo upper jaw model positioner Mat. No. 0.622.1781 APFnt Method The medium-value model positioner for an edentulous upper jaw model makes articulation possible, if no face bow is available. The edentulous flaps and the lowest points behind the two tubercles serve as reference points. -
Page 83: A 6.8 Average Value Method For The Lower Jaw Model Using The Kavo Plastering Gauge Mat. No. 0.622.1171
PROTAR articulator. If the KaVo articulator is equipped with the Split-Cast, the plastering gauge must be fixed in Position 1 (loosen screw 3) If no Split-Cast is mounted, the gauge must be fixed in Position 2. - Page 84 PROTAR ® evo. Adjust the symphysis fork 9 to the height of the lower wax rim 8. 3 Upper wax rim 4 Locking screw 5 Average value plastering gauge 6 Retro-molar protuberance 7 Sliding foot to retro-molar protuberance 8 Lower wax rim 9 Symphysis fork 0 Occlusal plane q Camper’s plane...
-
Page 85: A 6.9 Articulation Of The Lower Jaw Model
PROTAR ® evo. A 6.9 Articulation of the lower jaw model Turn the articulator upside down. (centric locks 2 remain closed). Fold out the articulator. Set the lower jaw model on the upper jaw model, with no rocking movement. When working without centric registration, the support pin 1 is set at zero. -
Page 86: A 7 Programming The Articulator
PROTAR ® evo. A 7 Programming the articulator A 7.1 Adjusting the condylar path inclination with protrusion recording block (for PROTAR 5, 5B, 7, 9) Open the two centric locks 3 and place the protrusion recording block 5 between the dentition of the plaster models. -
Page 87: A 7.3 Setting The Immediate Side Shift (Iss)
PROTAR evo. ® A 7.3 Setting the immediate Side Shift (ISS) (für PROTAR 5B, 7, 9) The immediate side shift (ISS) of the mediotrusion condyle can be preselected from “0“ to “1.5 mm“ (in 0.5 mm steps). The fixing screw 1 of the Bennett angle guides must be slackened by about 1/4 of a turn to make the adjustment. -
Page 88: A 7.4 Adjusting The Shift-Angle
PROTAR ® evo. A 7.4 Adjusting the Shift-angle If PROTAR 7 is equipped with the shift angle inserts (0.622.1111), movements on the working side (Laterotrusion side) can be exactly adjusted. Slacken knurled screw 3 so that the shift- angle insert 2 can be adjusted by turning the pin 1. -
Page 89: A 7.5 Setting Of A Protrusion / Distraction Position
PROTAR evo. ® A 7.5 Setting of a protrusion / distraction position PROTARevo 9 The PROTARevo 9 is constructed in the same way as the PROTARevo 7. Supplementary the PROTARevo 9 has a P/D/R-insert. Mat. No. 0.622.1001 right / left Defined Protrusion setting Defined Distraction setting Defined Retrusion setting... -
Page 90: A 7.6 Setting The Retrusion
PROTAR evo. ® A 7.6 Setting the retrusion To produce retrusive free spaces when waxing, a retrusive movement is possible in PROTARevo 7/9. This reduces grinding-in work on the part of the dentist. Retrusive free spaces have already been provided in the modelling. Zero position of the Retrusion When the lateral movement 3 (ISS) is set to 1.5 mm, the retrusive movement can be... -
Page 91: A 7.7 Producing An Individual Incisal Guidance
PROTAR evo. ® A 7.7 Producing an individual incisal guidance The user can shape an individual incisal guidance from the flat PROTAR incisal plate. Set the articulator centric lock to position “1“ and fold open the articulator towards the rear. Apply a release agent (petroleum jelly) to the incisal plate and the tip of the support pin. -
Page 92: A 7.8 Programming The Adjustable Incisal Plate
PROTAR ® evo. A 7.8 Programming the adjustable incisal plate A 7.8.1 By use of a situation model Before cutting the teeth, a situation model from the patient is produced. The adjustable incisal plate is then programmed with this situation model. For correct installation of the incisal plate, the middle guidance is set to a value of approx. -
Page 93: A 8 Installation Of The Shift Angle Insert In Protarevo 7
PROTAR evo. ® A 8 Installation of the shift angle insert in PROTARevo 7 First the existing protrusion/retrusion cylinder 1 has to be removed. This is achieved with the help of the provided hexagonal-slot wrench 2 by using some some pressure to push out the locking pin 5 from the drive wheel 3. -
Page 94: A 9 Programming The Articulator With Data From Arcusdigma
PROTAR ® evo. A 9 Programming the articulator with data from ARCUSdigma (Mat. No. 1.000.8232) PROTAR 7 together with shift angle insert (Order No. 0.622.1111) and the adjustable incisal plate (Order No. 0.622.1701) can exactly reproduce all calculated settings. -
Page 95: A 10 Setup Aid For Full Dentures
PROTAR evo. ® A 10 Setup aid for full dentures A 10.1 Setup aid for lower jaw models according to the APFnt method (Mat. No. 0.622.2071) Attach the occlusion inclination indicator 1 to the centering axis of the articulator. Tighten screw 4. Turn the articulator upside down. -
Page 96: A 10.2 3D Setup Aid For Lower Jaw Models According To The Apf Method
PROTAR ® evo. GEBRAUCHSANWEISUNG A 10.2 3D Setup aid for lower jaw models according to the APF method 1 Receptacle 2 Template holder 3 Long template Mat. No. 0.622.1211 4 Short template Mat. No. 0.622.1201 5 Positioning screw This template system can be applied generally no matter which aspects have governed mounting of the model in the articulator (face bow or jig for average-... - Page 97 PROTAR evo. ® For alignment, the template 1 is placed on the wax rim 2. To achieve this, the wax rim must be occlusally modified so that the template is aligned in the areas of the incisors and the lower molars. The flat surface of the template can be used, for example, for the Gerber method.
-
Page 98: A 10.3 3D Setup Template For Upper Jaw Model (Mat. No. 1.002.4919)
PROTAR ® evo. A 10.3 3D Setup template for upper jaw model (Mat. No. 1.002.4919) This flat setup aid for the edentulous upper jaw model is aligned by the upper wax rim. To achieve this, the setup aid is held against the upper wax rim by a rubber band. -
Page 99: A 10.4 2D Setup Aid For The Upper Jaw (Mat. No. 1.001.9452)
PROTAR ® evo. A 10.4 2D Setup aid for the upper jaw (Mat. No. 1.001.9452) This accessory is both a plastering and a setup aid for the edentulous upper jaw. After retracting the papilla screw 1 and pushing back the setdown slider 2, settting up of the upper jaw model can now begin. -
Page 100: A 11 Milling Table With Transfer Plate Split System
PROTAR evo. ® A 11 Milling table with transfer plate Split system For dental laboratory work required milling operations, it is often necessary to transfer the model alternately between articulator and milling machine. 1 Magnet 2 control bases 3 lever The magnetic force provides secure holding of the work also during milling operations. - Page 101 PROTAR evo. ® Occlusal features can be constructed in the articulator. The necessary milling work can be carried out at any time. By accurate fit of the transfer between articulator and milling machine, all work stages can be continuously controlled.
-
Page 102: A 12 Transport Box Kavo Logicase
A 12 Transport Box KaVo LOGICase KaVo LOGICase the economic stackable transport box between the dental practice and laboratory. KaVo LOGICase is a transport box and work tray in one unit. 1 Foam sponge for holding the models (50 pieces. 1.000.9351) 2 For the first application at ERGOspace the side latches are opened. -
Page 103: A 13 Technical Data
PROTAR evo. ® A 13 Technical data PROTAR ® evo 3, 5, 7 and 9 articulators Lower section Intercondylar distance = fixed 110 mm Support pin Adjustment range from + 10 mm to - 10 mm with locking facility - 10 Incisal table flat Incisal tray... -
Page 104: A 13 Maintenance And Adjustment
PROTAR ® evo. A 13 Maintenance and adjustment Before starting up operation, spray the articulator with commercially available release agents (silicone sprays) - do not apply grease. Apply a light film of oil to ball joints 8, magnet retention system 9 or mounting plate thread as required. -
Page 105: Guarantee Conditions
12 months from the date of purchase under the following conditions: In the case of valid complaints due to defects or a short delivery, KaVo will make good its warranty by replacing the product free of cost or repairing it according to your wishes. -
Page 106: Protarevo 3
Verk.-Nr. PROTARevo 2 06/02003 Mat.-Nr. 1.002.3306 09.21 PROTAR ® evo. Spare parts PROTARevo 2 Mat. No. 1.002.3905 without Split-Cast Mat.-Nr. 1.002.3305 ohne Split-Cast 0.622.0981 1.002.4686 3PS 1.002.2074 0.200.6034 0.200.6093 0.622.1363 0.622.1373 1.001.0889 0.200.6301 (10x) 1.002.2096 10x Verk.-Nr. PROTARevo 3 06/2003 Mat.-Nr. -
Page 107: Protarevo 5B
Verk.-Nr. PROTARevo 5 06/2003 Mat.-Nr. 1.002.3311 mit Split-Cast 09.23 Mat.-Nr. 1.002.3310 ohne Split-Cast PROTAR evo. ® PROTARevo 5 Mat. No. 1.002.3310 without Split-Cast Mat. No. 1.002.3311 with Split-Cast Mat.-Nr. 1.002.3311 mit Splitcast Mat.-Nr. 1.002.3310 ohne Splitcast 0.622.0981 3x 0.201.1459 0.200.6034 1.002.2074 1.001.0889 10x 0.622.2652... -
Page 108: Protarevo 7
Verk.-Nr. PROTARevo 7 09/2004 Mat.-Nr. 1.002.3319 mit Split-Cast 09.24 Mat.-Nr. 1.002.3318 ohne Split-Cast PROTAR ® evo. PROTARevo 7 Mat.-Nr. 1.002.3319 mit Splitcast Mat. No. 1.002.3318 without Split-Cast Mat. No. 1.002.3319 with Split-Cast Mat.-Nr. 1.002.3318 ohne Splitcast 0.250.0031 1.002.0508 0.222.4043 0.622.2032 (L) 0.622.2042 (R) 0.622.2542 0.622.2532 0.622.2502... -
Page 109: Protarevo Lower Section
Verk.-Nr. PROTARevo Unterteil 06/2003 Mat.-Nr. 1.002.3265 ohne Splitcast 09.26 PROTAR ® evo. Mat.-Nr. 1.002.3266 mit Splitcast PROTARevo lower section Mat. No. 1.002.3265 without Split-Cast Mat. No. 1.002.3266 with Split-Cast Mat.-Nr. 1.002.3265 ohne Splitcast Mat.-Nr. 1.002.3266 mit Splitcast 0.222.5045 (8x12x0,15) 0.222.5046 (8x12x0,18) 0.222.5047 (8x12x0,20) 0.622.2022 1.001.0889 10x... - Page 110 KaVo Dental GmbH. D-88400 Biberach/Riss Telefon +49 7351 56-0 Fax +49 7351 56-1488 Internet: www.kavo.com...
- Page 111 Instructions d’utilisation PROTAR evo. ® Toujours à votre écoute.
- Page 112 Hersteller/manufacturer: Vertrieb/distribution: Kaltenbach & Voigt GmbH KaVo Dental GmbH Bismarckring 39 Bismarckring 39 • D-88400 Biberach D-88400 Biberach Tel.: 0 73 51 / 56-1600 • Fax: 0 73 51 / 1488...
- Page 113 A 6.7 Méthode de montage (selon les valeurs moyennes) avec l’accessoire de montage pour le maxillaire supérieur 24 A 6.8 Technique d’utilisation (selon les valeurs moyennes) du gabarit de mise en plâtre du maxillaire inférieur KaVo (N° d’article 0.622.1171) ................................25 A 6.8.1 Montage d’un modèle mandibulaire édenté...
-
Page 114: A 1 Instructions D'utilisation
De plus, vous devez respecter : des dysfonctionnements en cas de non- PRODUCT PRODUCT demande auprès de votre distributeur KaVo observation des instructions SERVICE geprüfte SERVICE compétent. Toute reproduction et distribu- •... -
Page 115: A 1.4 But D'utilisation
PROTAR evo. ® A 1.4 But d’utilisation Du fait de ses mouvements dans les trois dimensions, l’appareil manducateur est le plus compliqué des systèmes moteur du corps humain. En cas de dysfonctionnement de cet appareil, une thérapie fonctionnelle est indispensable. La majeure partie des étapes de ce genre de thérapie ne pouvant se faire en bouche, il est indispensable de pouvoir simuler –... -
Page 116: A 1.5 Les Mouvements Mandibulaires Dans Le Plan Horizontal
PROTAR evo. ® A 1.5 Les mouvements mandibulai- res dans le plan horizontal La propulsion C’est le mouvement de la mandibule vers l’avant. Lors de ce mouvement, les deux condyles se déplacent vers l’avant et vers le bas. Au niveau des arcades dentaires, on retrouve sur les dents mandibulaires les trajectoires des mouvements effectués par les dents maxillaires. -
Page 117: A 1.6 La Philosophie Du Système
PROTAR evo. ® A 1.6 La philosophie du système Le système KaVo “articulateur + arc facial“ a été conçu pour pouvoir être utilisé aussi bien par rapport au plan de Francfort (FH) qu’au plan de Camper (CE). L’appui nasal 1 permet de positionner selon les valeurs moyennes l’arc facial par... -
Page 118: A 2 Programme De Livraison -Accessoires
N° de article 1.002.3306 la partie inférieure de l’articulateur N° de article 1.002.3265 L’articulateur PROTAR ® evo 3 sans “Split- PROTAR evo 2 Cast“ comprend: la partie supérieure de l’articulateur N° de article 1.002.3307 la partie inférieure de l’articulateur N° de article 1.002.3266 L’articulateur PROTAR... - Page 119 7 avec “Split-Cast“ comprend: la partie supérieure de l’articulateur N° de article 1.002.3318 la partie inférieure de l’articulateur N° de article 1.002.3265 PROTAR evo 7 L’articulateur PROTAR ® evo 9 sans “Split-Cast“ comprend: la partie supérieure de l’articulateur la partie supérieure de l’articulateur N°...
-
Page 120: A 2.2 Accessoires
N° d’article 0.622.1031 (pas d‘ illustration) # Module de transfert N° d’article 0.622 1141 £ Indicateur pour arcs faciaux autres que KaVo N° d’article 0.622 1151 £b Support pour arc facial £c Adaptateur reference goupille 5 Table montage selon valeur moyenne N°... - Page 121 PROTAR evo. ® Les accessoires disponibles sur simple demande : p Tige d’appui “E “ N° d’article 0.622.1181 Tige d’appui “P “ N° d’article 0.622.1791 “E“ Tige d’appui “T “ N° d’article 0.622.1891 a Plateau incisif (réglable) N° d’article 0.622.1701 s Fixation N°...
- Page 122 PROTAR ® evo. Verbrauchsmaterial: 1 Plaques de contrôle, lot de 10 N° d’article 0.622.0791 2 Adaptateur rétentif (lot de 10) N° d’article 1.001.0887 Adaptateur rétentif (lot de 50) N° d’article 1.001.0953 3 Plaques de montage (pas pour Split-Cast) (lot de 10 plaques) N° d’article 0.622.1871 4 Inserts magnétiques paquet de 20 N°...
-
Page 123: A 3 Pièces De Commande Et De Fonctionnement
PROTAR ® evo. A 3 Pièces de commande et de fonc- PROTARevo 2 ö tionnement 1 Partie supérieure de l’articulateur 2 Pieds d’appui 3 Boîtier d’articulation droit 4 Verrou centrique droit 5 Verrou centrique gauche PROTARevo 3 6 Socle de contrôle 7 Partie inférieure de l’articulateur 8 Plateau d’incisive à... - Page 124 PROTAR evo. ® PROTARevo 7 1 Partie supérieure de l’articulateur 2 Pieds d’appui 3 Boîtier d’articulation droit 4 Verrou centrique droit 5 Verrou centrique gauche 6 Socle de contrôle 7 Partie inférieure de l’articulateur 8 Plateau d’incisive à 10° 9 Table d’incisive plate 0 Broche support q Plaques de contrôle du bas PROTARevo 9...
-
Page 125: A 4 Préparatifs Pour La Mise En Service
PROTAR evo. ® A 4 Préparatifs pour la mise en ser- vice A 4.1 Broche support Insérer la broche support 6 dans la partie supérieure ou inférieure de l’articulateur et visser à bloc. Insérer la table d’incisive plate 1 et le plateau d’incisive 2 à... - Page 126 PROTAR evo. ® Position “2“ = ouvert 1 Dans cette position vous pouvez retirer la partie supérieure de l’articulateur. “2“ “1“ “0“ Une fois que l’on a monté sa partie supérieure et fermé les deux verrous de centrée, l’articulateur est considéré comme “entier“.
-
Page 127: A 4.3 Protar Evo Avec Splitcast (Réglage Usine)
® evo avec Splitcast (réglage usine) Concernant les articulateurs PROTAR ® équipés (en usine) d’un Splitcast KaVo : la plaque de contrôle aimantée 2 sert de réceptacle au modèle. L’adaptateur rétentif 1 sert, lui, à la rétention du plâtre. Une fois le travail terminé, on expulse le modèle de la plaque de contrôle 3 à... -
Page 128: A 4.5.1 Protar Evo Avec Système De Fixation Magnétique
PROTAR ® evo. A 4.5.1 PROTAR ® evo avec système de fixation magnétique La fixation magnétique 1.002.4686 permet de remplacer la vis à garrot du PROTAR ® evo par un aimant 3. Ce qui, avec les plaques de montage 3PS 4 permet de changer le modèle plus rapidement. -
Page 129: A 4.6.1 Procédure De Réglage 1.002.2080
PROTAR ® evo. A 4.6.1 Procédure de réglage 1.002.2080 Sortir les joints d'étanchéité en mousse 1 (réf.1.003.3998) du support puis les coller, de façon centrée, sur la plaque de réglage Introduire ensuite le gabarit de mesure et de réglage 6 dans la branche inférieure de l'articulateur 5. -
Page 130: A 5 Possibilités De Programmation Pour Des Articulators De Kavo Protarevo
PROTAR ® evo. A 5 Possibilités de programmation pour des articulators de KaVo PROTARevo... -
Page 131: A 6 Mise En Articulateur Des Modèles
® A 6 Mise en articulateur des modè- A 6.1 Mise en articulateur du modèle maxillaire avec l’arc facial KaVo ARCUS Mettre en position “ouvert“ le levier de blocage 4 puis dégager l’arc facial 3. Mais avant, installer la tige d’appui 2 dans la partie inférieure de l’articulateur... -
Page 132: A 6.2 Mise En Articulateur Du Modèle Maxillaire À L'aide Du Système De Transfert
Monter le porte-fourchette 2, muni de la fourchette 3, sur le système de transfert A 6.3 Mise en articulateur du modèle maxillaire avec l’arc facial KaVo ARCUS light Positionner les olives 4 de l’arc facial ARCUS light sur les tiges de référence du PROTAR ®... -
Page 133: A 6.4 Mise En Articulateur Du Modèle Maxillaire Avec Des Arcs Faciaux D'autres Marques
PROTAR ® evo. A 6.4 Mise en articulateur du modèle maxillaire avec des arcs faciaux d’autres marques Les accessoires requis sont les suivants : Référence arc facial N° d’article 0.622.1151 comprenant : 1 plan de référence (douille + vis) 2 support pour arc facial 3 adaptateur reference goupille Ces accessoires permettent de monter des arcs faciaux d’autres types dans le... -
Page 134: A 6.5 Paramètres De Réglage Dans Le Cas Où L'articulateur Protarevo Est Utilisé Avec Un Arc Facial D'une Autre Marque
PROTAR evo. ® A 6.5 Paramètres de réglage dans le cas où l’articulateur PROTARevo est utilisé avec un arc facial d’une autre marque Les accessoires requis sont les suivants : 1 Système de transfert N° d’article 0.622.1141 2 Référence pour arc facial d’autre marque N°... -
Page 135: A 6.6 Manière De Procéder Avec Le Positionneur (Selon Valeurs Moyennes) De Modèle Maxillaire Kavo N° D'article 0.622.1781 (Méthode Apfnt)
® A 6.6 Manière de procéder avec le positionneur (selon valeurs moyen- nes) de modèle maxillaire KaVo N° d’article 0.622.1781 (méthode APFnt) Ce positionneur pour modèle maxillaire édenté permet la mise en articulateur quand on n’a pas d’arc facial. -
Page 137: A 6.8 Technique D'utilisation (Selon Les Valeurs Moyennes) Du Gabarit De Mise En Plâtre Du Maxillaire Inférieur Kavo (N° D'article 0.622.1171)
Protar, selon les valeurs moyennes, des modèles mandibu- laires partiellement ou totalement édentés. Si l’articulateur KaVo est équipé d’un Split-Cast , fixer le gabarit de mise en plâtre à la position 1 (desserrer la vis 3). S’il n’y a pas de Split-Cast de monté, fixer le gabarit à... - Page 138 PROTAR ® evo. Régler la fourchette symphysale 9de façon à ce qu’elle soit à hauteur du bourrelet de cire inférieur 8. 3 bourrelet de cire supérieur 4 vis de serrage 5 gabarit de mise en plâtre (selon valeurs moyennes) 6 bourrelet rétromolaire 7 pied (mobile) sur bourrelet rétromolaire 8 bourrelet de cire inférieur 9 fourchette symphysale...
-
Page 139: A 6.9 Mise En Articulateur Du Modèle Mandibulaire
PROTAR ® evo. A 6.9 Mise en articulateur du modèle mandibulaire Retourner l’articulateur (laisser les verrous de centrée AL et AM fermés.). Ouvrir l’articulateur. Positionner de façon stable le modèle mandibulaire sur l’enregistrement du modèle maxillaire (ou sur l’enregistrement de centrée). Si vous n’utilisez pas d’enregistrement de centrée, réglez la tige d’appui 1 sur “0“. -
Page 140: A 7 Programmation De L'articulateur
PROTAR ® evo. A 7 Programmation de l’articulateur A 7.1 Réglage de la pente condylien- ne avec l’enregistrement de la pro- pulsion (pour modèles PROTAR 5, 5B, 7, 9) Ouvrir les deux verrous de centrée 3 puis insérer l’enregistrement de propulsion 5entre les deux modèles. -
Page 141: A 7.3 Réglage Du Déport Latéral Immédiat (Immediate Side Shift (Iss)
PROTAR evo. ® A 7.3 Réglage du déport latéral immédiat (Immediate Side Shift (ISS) (pour les modèles PROTAR 5B, 7, 9) Immediate Side Shift (ISS) Le déport latéral immédiat (ISS) du condyle côté non travaillant est réglable de 0 à 1,5 mm par tranches de 0,5 mm. Pour procéder à... -
Page 142: A 7.4 Réglage De L'angle De Shift
PROTAR ® evo. A 7.4 Réglage de l’angle de Shift Une fois que les inserts d’angle de Shift (0.622.1111) sont en place dans le PROTAR 7, vous pouvez procéder au réglage précis des mouvements côté travaillant. Desserrer la vis moletée 3 afin de pouvoir ensuite régler l’insert d’angle de shift 2 à... -
Page 143: A 7.5 Réglage De La Propulsion/De L'écartement
PROTAR evo. ® A 7.5 Réglage de la propulsion/de l’écartement PROTARevo 9 Le PROTARevo 9 est de même conception que le PROTARevo 7, sauf qu’il possède en plus un insert “P/D/R“. N° d’article 0.622.1001 côté droit/côté gauche Réglage (défini) de la propulsion (P). Réglage (défini) de l’écartement (D) Réglage (défini) de la rétrusion/rétroposi- tion (R). -
Page 144: A 7.6 Réglage De La Rétroposition
PROTAR evo. ® A 7.6 Réglage de la rétroposition Pour obtenir des espaces libres pour rétropositions lors du moulage à la cire, la ® rétroposition est possible sur le PROTAR 7/9. Ainsi, on réduit les opérations de fraisage chez le dentiste. Les espaces libres pour rétropositions ont déjà... -
Page 145: A 7.7 Réalisation D'un Guide Incisif Individuel
PROTAR evo. ® A 7.7 Réalisation d’un guide incisif individuel L’utilisateur a la possibilité de réaliser un guide individuel sur le plateau incisif (plat) du Protar en procédant comme indiqué ci- après : Régler sur “1“ les verrous de centrée de l’articulateur puis ouvrir l’articulateur. -
Page 146: A 7.8 Programmation Du Plateau Incisif Réglable
PROTAR ® evo. A 7.8 Programmation du plateau inci- sif réglable A 7.8.1 Le modèle d’étude Avant la taille des dents on réalise un modèle d’étude (situation clinique). Avec ce modèle on programme ensuite le plateau incisif (réglable). Afin de garantir un montage correct du plateau incisif : régler le guide médian sur 70°... -
Page 147: A 8 Mise En Place De L'insert D'angle De Shift Sur Le Protar®Evo 7
PROTAR evo. ® A 8 Mise en place de l’insert d’angle de shift sur le PROTAR ® evo 7 Commencer par retirer le cylindre de propulsion/rétrusion 1. Pour ce faire, chasser l’axe de blocage 5 hors du pignon 3 à l’aide de la clé Allen 2 en exerçant une légère pression. -
Page 148: A 9 Programmation De L'articulateur À Partir Des Valeurs Fournies Par L'arcusdigma
PROTAR ® evo. A 9 Programmation de l’articulateur à partir des valeurs fournies par l’ARCUSdigma (N° d’article : 1.000.8232) Toutes les valeurs de réglage calculées peuvent être reportées de façon exacte sur le PROTARevo 7 à l’aide de l’insert d’angle de shift (N° d’article 0.622.1111) et du plateau incisif réglable (N°... -
Page 149: A 10 Accessoires De Montage (Prothèse Complète)
PROTAR evo. ® A 10 Accessoires de montage (pro- thèse complète) A 10.1 Accessoires de montage pour modèle mandibulaire selon méthode “APFnt”(N° d’article 0.622.2071) Monter l’indicateur de pente d’occlusion 1 sur le centreur d’axe de l’articulateur. Serrer la vis 4. Retourner l’articulateur. -
Page 150: A 10.2 3D Accessoire De Montage Pour Modèle Maxillaire (Selon Méthode Apf)
PROTAR ® evo. GEBRAUCHSANWEISUNG A 10.2 3D Accessoire de montage pour modèle maxillaire (selon méthode APF) 1 support 2 porte-calotte 3 calotte petit format N° d’article 0.622.1211 4 calotte grand format N° d’article 0.622.1201 5 vis de réglage Ces calottes peuvent être utilisés dans tous les cas, quels que soient les conditions de montage du modèle dans l’articulateur (arc facial/gabarit de mise en plâtre selon... - Page 151 PROTAR evo. ® Positionner la calotte 1 sur le bourrelet de cire 2. Retoucher le bourrelet en occlusal de façon à ce que la calotte soit placée correctement au niveau des incisives ainsi qu’au niveau des molaires mandibulaires. La surface plane de la calotte sert , entre autres, pour la méthode Gerber.
-
Page 152: A 10.3 3D Calotte De Montage Pour Le Modèle Maxillaire (N° D'article 1.002.4919)
PROTAR ® evo. A 10.3 3D Calotte de montage pour le modèle maxillaire (N° d’article 1.002.4919) Cet accessoire de montage plat pour modèle maxillaire édenté se positionne par rapport au bourrelet de cire du haut. Pour ce faire, plaquer l’accessoire contre ce bourrelet à... -
Page 153: A 10.4 2D Accessoire De Montage Pour Le Maxillaire Supérieur (N° D'article 1.001.9452)
PROTAR ® evo. A 10.4 2D Accessoire de montage pour le maxillaire supérieur (N° d’ar- ticle 1.001.9452) Cet accessoire sert aussi bien pour la mise en plâtre que comme accessoire de montage (pour le maxillaire supérieur édenté). Après avoir desserré la vis papillaire 1 et reculé... -
Page 154: A 11 Table De Montage Avec Split-Cast
PROTAR evo. ® A 11 Table de montage avec Split- Cast Pour les étapes de laboratoire nécessitant le recours à la fraiseuse, on est souvent amené à transférer le modèle de l’articulateur à la fraiseuse et vice-versa. 1 aimant 2 socle de contrôle 3 levier La force de l’aimant garantit un maintien efficace de la pièce prothétique pendant le... - Page 155 PROTAR evo. ® Le relief occlusal peut être réalisé dans l’articulateur. Et les travaux de fraisage être effectués à n’importe quel moment. Toutes les étapes sont, du fait de la précision du transfert entre l’articulateur et la fraiseuse, faciles à contrôler.
-
Page 156: A 12 Boîtes De Transport Kavo Logicase
KaVo LOGICase : des boîtes économiques (et empilables entre elles) pour les transferts entre le laboratoire et le cabinet. KaVo LOGICase : des boîtes de transport et de travail en un. 1 mousse pour la fixation du modèle (lot de 50 unités. 1.000.9351) 2 à... -
Page 157: A 13 Caractéristiques Techniques
PROTAR evo. ® A 13 Caractéristiques techniques Articulateurs PROTHÉ PLUS 3, 5, 7 et 9 Partie inférieure Distance intercondylienne fixe = 110 mm Broche support Plage de réglage de + 10 à -10 mm avec butée d’arrêt - 10 Table d’incisive plate (plane) Plateau d’incisive 20°... -
Page 158: A 14 Cuidados Y Ajuste
PROTAR ® evo. A 14 Cuidados y ajuste Antes de la puesta en servicio del articulador, rociarlo con un agente aislante corriente para articuladores (spray a base de silicona); no engrasarlo. Si se hace necesario, se aceitará ligeramen- te las esferas de articulation 8, el sistema magnético de retención 9 o bien la rosca de placa de control. -
Page 159: Conditions De Garantie
Conditions de garantie KaVo prend en charge les prestations de garantie vis-à-vis du client final pour le produit cité dans le protocole de remise en ce qui concerne le bon fonctionnement, un matériel sans défaut ou la transformation pour une durée de 12 mois à partir de la date d'achat sous les conditions suivantes : En cas de réclamation fondée en raison de défauts ou d'insuffisances à... -
Page 160: Protar®Evo 3
Verk.-Nr. PROTARevo 2 06/02003 Mat.-Nr. 1.002.3306 09.21 PROTAR ® evo. Pièces de rechange PROTAR ® evo 2 N° d’article 1.002.3305 sans “Split-Cast“ Mat.-Nr. 1.002.3305 ohne Split-Cast 0.622.0981 1.002.4686 3PS 1.002.2074 0.200.6034 0.200.6093 0.622.1363 0.622.1373 1.001.0889 Verk.-Nr. PROTARevo 3 06/2003 0.200.6301 (10x) Mat.-Nr. -
Page 161: Protar Evo 5B
Verk.-Nr. PROTARevo 5 06/2003 Mat.-Nr. 1.002.3311 mit Split-Cast 09.23 Mat.-Nr. 1.002.3310 ohne Split-Cast PROTAR evo. ® PROTAR ® evo 5 N° d’article 1.002.3313 sans “Split-Cast“ Mat.-Nr. 1.002.3311 mit Splitcast N° d’article 1.002.3310 acec “Split-Cast“ Mat.-Nr. 1.002.3310 ohne Splitcast 0.622.0981 3x 0.201.1459 0.200.6034 1.002.2074 1.001.0889 10x... -
Page 162: Protar®Evo 9
Verk.-Nr. PROTARevo 7 09/2004 Mat.-Nr. 1.002.3319 mit Split-Cast 09.24 Mat.-Nr. 1.002.3318 ohne Split-Cast PROTAR ® evo. PROTAR ® evo 7 N° d’article 1.002.3319 sans “Split-Cast“ N° d’article 1.002.3318 acec “Split-Cast“ Mat.-Nr. 1.002.3319 mit Splitcast Mat.-Nr. 1.002.3318 ohne Splitcast 0.250.0031 1.002.0508 0.222.4043 0.622.2032 (L) 0.622.2042 (R) 0.622.2542... -
Page 163: Protar Evo La Partie Inférieure
Verk.-Nr. PROTARevo Unterteil 06/2003 Mat.-Nr. 1.002.3265 ohne Splitcast 09.26 PROTAR evo. ® Mat.-Nr. 1.002.3266 mit Splitcast PROTAR ® evo la partie inférieure N° d’article 1.002.3266 avec “Split-Cast“ N° d’article 1.002.3265 acec “Split-Cast“ Mat.-Nr. 1.002.3265 ohne Splitcast Mat.-Nr. 1.002.3266 mit Splitcast 0.222.5045 (8x12x0,15) 0.222.5046 (8x12x0,18) 0.222.5047 (8x12x0,20) - Page 164 KaVo Dental GmbH. D-88400 Biberach/Riss Telefon +49 7351 56-0 Fax +49 7351 56-1488 Internet: www.kavo.com...
- Page 165 Instrucciones de uso PROTAR evo. ® Siempre en el lado correcto. KaVo Dental GmbH. D-88400 Biberach/Riss...
- Page 166 Hersteller/manufacturer: Vertrieb/distribution: Kaltenbach & Voigt GmbH KaVo Dental GmbH Bismarckring 39 Bismarckring 39 • D-88400 Biberach D-88400 Biberach Tel.: 0 73 51 / 56-1600 • Fax: 0 73 51 / 1488...
- Page 167 A 6.7 Método valor promedio con la ayuda de montaje / colocación de KaVo para el maxilar superior ......24 A 6.8 Método valor promedio con el KAVo calibre de enyesar No. de mat. 0.622.1171 para el modelo de maxilar inferior A 6.8.1 Montaje de un modelo de maxilar inferior sin dientes ..................25...
-
Page 168: A 1 Indicaciones Para El Usuario
Esto no da derecho a una ampliación posterior de los equipos ya existentes. menos, más bajo - ¨ ∞ ∞ La empresa KaVo no responde de daños Servicio continuo provocados por Hora, desarrollo temporal • influencias externas (mala calidad de los medios o instalación defectuosa),... -
Page 169: A 1.4 Uso Previsto Y Posibilidad De Aplicación
PROTAR evo. ® A 1.4 Uso previsto y posibilidad de aplicación A causa de sus movimientos tridimensiona- les el órgano masticatorio es el sistema de movimiento más complicado del cuerpo humano. En caso de defectos de mayor alcance en este sistema es imprescindible una terapia orientada funcionalmente. -
Page 170: A 1.5 Observación De Las Posibilidades De Movimiento Del Maxilar Inferior En El Plano Horizontal
PROTAR evo. ® A 1.5 Observación de las posibilida- des de movimiento del maxilar infe- rior en el plano horizontal La protrusión Durante la protrusión el maxilar inferior se mueve hacia delante. Los dos cóndilos se mueven hacia ventral y caudal. Sobre los dientes se reproducen las huellas de movimiento del diente de maxilar superior en el diente de maxilar inferior. -
Page 171: A 1.6 Filosofía Del Sistema
® A 1.6 Filosofía del sistema El sistema de articulador y arco facial de KaVo están construidos de tal forma que se puede trabajar tanto con la horizontal de Francfort (FH) como también con el plano de Camper (CE). -
Page 172: A 2 Volumen De Suministro - Accesorios
Brazo superior del articulador No. de mat. 1.002.3303 Brazo inferior del articulador No. de mat. 1.002.3265 PROTAR evo 2 Articulador PROTARevo 3 con split-cast compuesto de: Brazo superior del articulador No. de mat. 1.002.3307 Brazo inferior del articulador No. - Page 173 Brazo superior del articulador No. de mat. 1.002.3318 Brazo inferior del articulador No. de mat. 1.002.3265 PROTAR evo 7 Articulador PROTARevo 9 con split-cast compuesto de: Brazo superior del articulador No. de mat. 1.002.3323 Brazo inferior del articulador No.
-
Page 174: A 2.2 Accesorios
PROTAR ® evo. A 2.2 Accesorios suministrables a petición: @ Indicador incisalN° de mat. 0.622.1021 ” Platillo incisivo de 10° N° de mat. 0.622.1922 Platillo incisivo de 20° N° de mat. 0.622.1932 Platillo incisivo de 30° N° de mat. 0.622.1942 Platillo incisivo de 40°... - Page 175 PROTAR evo. ® suministrables a petición: p Espiga de apoyo“E “ N° de mat. 0.622.1181 Espiga de apoyo“P “ N° de mat. 0.622.1791 Espiga de apoyo “T “ “E“ N° de mat. 0.622.1891 a Plato incisal ajustable N° de mat. 0.622.1701 s Soporte N°...
- Page 176 PROTAR evo. ® Material consumible: 1 Placas de control Pq. con 10 unidades N° de mat. 0.622.0791 2 Adaptador de retención paquete con Mat.-Nr. 1.001.0887 10 unidades Adaptador de retención paquete con 50 unidades N° de mat. 1.001.0953 3 Placas de montaje (no para Split-Cast) Paquete con 10 unidades N°...
-
Page 177: A 3 Componentes De Servicio Y Piezas Funcionales
PROTAR ® evo. A 3 Componentes de servicio y pie- PROTARevo 2 ö zas funcionales @ Brazo superior del articulador 2 Patas de apoyo 3 Caja de articulación derecha 4 Enclavamiento céntrico derecha 5 Enclavamiento céntrico izquierda PROTARevo 3 6 Zócalo de control 7 Brazo inferior del articulador 8 Platillo incisivo 20°... - Page 178 PROTAR evo. ® PROTARevo 7 @ Brazo superior del articulador 2 Patas de apoyo 3 Caja de articulación derecha 4 Enclavamiento céntrico derecha 5 Enclavamiento céntrico izquierda 6 Zócalo de control 7 Brazo inferior del articulador 8 Platillo incisivo 20° 9 Mesa incisiva plana 0 Espiga de apoyo q Placa de control abajo...
-
Page 179: A 4 Preparación Para Servicio
PROTAR evo. ® A 4 Preparación para servicio A 4.1 Espiga de apoyo Colocar la espiga de apoyo 6 en el brazo superior o inferior del articulador y atornillarla firmemente. Colocar la mesa incisiva plana 1 con el platillo incisivo 2 de 20°, de acuerdo con la modalidad de trabajo, en el brazo superior o inferior. - Page 180 PROTAR evo. ® Posición “2“ = abierto 1 En esta posición se puede quitar el brazo superior. “2“ “1“ “0“ Después de poner el brazo superior del articulador y cerrar los dos cierres céntricos el articulador está completo. Los cierres céntricos 2 sólo se pueden cerrar, cuando el brazo superior del articulador se lleva hasta el tope con las bolas condilares.
-
Page 181: A 4.3 Protar Evo Con Splitcast (Ajuste De Fábrica)
® evo con Splitcast (ajuste de fábrica) Si el articulador está equipado por la fábrica con KaVo – Splitcast, entonces la placa de control 2 sujetada magnéticamen- te sirve de alojamiento de modelo. El adaptador de retención 1 sirve de retención de escayola. -
Page 182: A 4.6 Protar Evo Con Splitcast (Ajuste De Laboratorio)
PROTAR ® evo. A 4.5.1 PROTAR ® evo con fijación magnética Con la ayuda de la fijación magnética 1.002.4686 se puede insertar en lugar del tornillo de muletilla un imán 3 en el PROTAR ® evo. Junto con las placas de montaje 3 PS 4 se puede cambiar el modelo rápidamente. -
Page 183: A 4.6.1 Ajuste 1.002.2080
PROTAR ® evo. A 4.6.1 Ajuste 1.002.2080 Quitar los anillos de junta 1 de goma espuma (1.003.3998) del soporte y pegar sobre el platillo de ajuste 2 de forma céntrica. Insertar el calibre de medición y ajuste 6 en la parte inferior del articulador 5. El imán fija el calibre de medición y ajuste. - Page 184 PROTAR ® evo. A 5 Posibilidades de ajuste de los articuladores PROTAR ®...
-
Page 185: A 6 Articulación De Los Modelos De Diente
A 6 Articulación de los modelos de diente A 6.1 Articulación del modelo de maxilar superior con el arco facial ARCUS de KaVo Abrir la palanca de apriete 4 y separar el arco facial 3. Antes la espiga de apoyo 2 se tiene que insertar en el brazo inferior del articulador y poner a cero. -
Page 186: A 6.3 Articulación Del Modelo De Maxilar Superior Con Kavo
2 en el soporte de transfer 1. A 6.3 Articulación del modelo de maxilar superior con KaVo arco facial light Poner el ARCUS light con sus apoyos de oído 4 sobre las espigas de referencia del PROTAR ®... -
Page 187: A 6.4 Articulación Del Modelo De Maxilar Superior Con Arco Facial De Otros Fabricantes
PROTAR ® evo. A 6.4 Articulación del modelo de maxilar superior con arco facial de otros fabricantes Se requieren los accesorios siguientes: Referencia de arco ajeno No. de mat. 0.622.1151 compuesto de: 1 Plano de referencia (casquillo + tornillo) 2 Soporte de arco facial 3 Adaptador referencia pin Con estos medios auxiliares existe la posibilidad de poder insertar otros sistemas... -
Page 188: A 6.5 Valores De Ajuste Al Utilizar Arcos Ajenos En El Articulador Protarevo
PROTAR evo. ® A 6.5 Valores de ajuste al utilizar arcos ajenos en el articulador PROTARevo Se requieren los accesorios siguientes: 1 Soporte de transfer No. de mat. 0.622.1141 2 Referencia a arco ajeno No. de mat. 0.622.1151 compuesto de: Plano de referencia (casquillo + tornillo) Soporte de arco facial Adaptador referencia pin... -
Page 189: Do Apfnt
® A 6.6 Método valor promedio con el posicionador de modelo de maxilar superior de KaVo No. de mat. 0.622.1781 método APFnt El posicionador de modelo de valor promedio para modelo de maxilar superior sin dientes permite la articulación, si no se dispone de un arco facial. -
Page 191: A 6.8.1 Montaje De Un Modelo De Maxilar Inferior Sin Dientes
PROTAR evo. ® A 6.8 Método valor promedio con el KAVo calibre de enyesar No. de mat. 0.622.1171 para el modelo de maxilar inferior (Método APF) Con el calibre de enyesar se pueden articular modelos de maxilar inferior sin dientes o parcialmente dentados con valor promedio en el articulador PROTAR. - Page 192 PROTAR ® evo. Colocar la horquilla de sínfisis 9 a la altura del dique de cera inferior 8. 3 Dique de cera superior 4 Tornillo de fijación 5 Calibre de enyesar de valor promedio 6 Cojín retromolar 7 Base corredera sobre cojín retromolar 8 Dique de cera superior 9 Horquilla de sínfisis 0 Plano oclusal...
-
Page 193: A 6.9 Articulación Del Modelo De Maxilar Inferior
PROTAR ® evo. A 6.9 Articulación del modelo de maxilar inferior Poner el articulador sobre la cabeza (cierres céntricos 2 quedan cerrados). Abrir el articulador. El modelo de maxilar inferior se pone sobre el modelo de maxilar superior sin balanceo. La espiga de apoyo 1 se ajusta a cero, si se trabaja sin registro céntrico. -
Page 194: A 7 Programación Del Articulador
PROTAR ® evo. A 7 Programación del articulador A 7.1 Ajuste de la inclinación de la trayectoria articular mediante el regi- stro de protrusión (para PROTAR 5, 5B, 7, 9) Abrir los dos cierres céntricos 3 y meter el registro de protrusión 5 entre las filas de dientes de los modelos de escayola. -
Page 195: A 7.3 Ajuste De La Movilidad Lateral
PROTAR evo. ® A 7.3 Ajuste de la movilidad lateral (para PROTAR 5B, 7, 9) Immediate Side Shift (ISS) La movilidad lateral inmediata (ISS) del cóndilo de mediotrusión se puede pre-seleccionar desde “0“ hasta “1,5 mm“ (en pasos de 0,5 mm). La rueda de fijación 1 de las guías del ángulo de Bennett se tiene que aflojar para el ajuste aprox. -
Page 196: A 7.4 Ajustar El Ángulo - Shift
PROTAR ® evo. A 7.4 Ajustar el ángulo – Shift Si los insertos de ángulo – Shift (0.622.1111) están insertados en el PROTAR 7, entonces se pueden ajustar movimientos en el lado de trabajo (lado de laterotrusión) exactamente. Aflojar el tornillo moleteado 3 para poder ajustar el inserto de ángulo –... -
Page 197: A 7.5 Ajuste De Una Posición De Protrusión / Distracción
PROTAR evo. ® A 7.5 Ajuste de una posición de pro- trusión / distracción PROTARevo 9 El PROTARevo 9 tiene la misma forma constructiva que el PROTARevo 7. El “9” dispone adicionalmente de un inserto – P/D/R. No. de mat. 0.622.1001 derecha / izquierda Ajuste definido de la Protrusión. -
Page 198: A 7.6 Ajuste De La Retrusión / Protrusión
PROTAR evo. ® A 7.6 Ajuste de la retrusión / protru- sión Para generar espacios libres retrusivos durante la recarga de cera, en el PROTAR 7/9 es posible un movimiento retrusivo. Con ello se reducen los trabajos de esmerilado en la consulta del odontólogo. Espacios libres retrusivos ya se tienen en cuenta durante el modelado. -
Page 199: A 7.7 Elaboración De Una Mesilla-Guía Incisal Individual
PROTAR evo. ® A 7.7 Elaboración de una mesilla- guía incisal individual Partiendo de la mesilla incisal plana del Protar el usuario puede configurar un platillo-guía incisal individual. Poner los cierres céntricos del articulador a la posición “1“ y abrir el articulador hacia atrás. -
Page 200: A 7.8 Programación De La Mesilla Incisal Ajustable
PROTAR ® evo. A 7.8 Programación de la mesilla incisal ajustable A 7.8.1 A través de modelo de situa- ción Antes del afilado de los dientes se elabora un modelo de situación del paciente. Con este modelo de situación se puede programar a continuación la mesilla incisal programable. -
Page 201: A 8 Montaje Del Inserto De Ángulo-Shift En El Protar®Evo 7
PROTAR evo. ® A 8 Montaje del inserto de ángulo- Shift en el PROTAR ® evo 7 Primero se tiene que quitar el Pro/cilindro de retrusión 1 existente. Para ello se saca la espiga de bloqueo 5 con la ayuda de la llave Allen adjunta 2 con un poco de presión de la rueda de presión 3. -
Page 202: A 9 Programación Del Articulador Con Datos De Medición Del Arcusdigma
PROTAR ® evo. A 9 Programación del articulador con datos de medición del ARCUSdigma (No. de mat. 1.000.8232) El PROTARevo 7 con el inserto de ángulo- Shift (No. de mat. 0.622.1111) y la mesilla incisal ajustable (No. de mat. 0.622.1701) puede reproducir exactamente todos los valores de ajuste calculados. -
Page 203: A 10 Ayudas De Colocación Para Prótesis Totales
PROTAR evo. ® A 10 Ayudas de colocación para pró- tesis totales A 10.1 Ayudas de colocación para el modelo de maxilar inferior según el método – APFnt- Methode (No. de mat. 0.622.2071) Fijar el indicador – inclinación de oclusión 1 sobre el centraje de eje del articulador. -
Page 204: A 10.2 Ayuda De Colocación 3D Para El Modelo De Maxilar Inferior Según El Método - Apfnt
PROTAR ® evo. GEBRAUCHSANWEISUNG A 10.2 Ayuda de colocación 3D para el modelo de maxilar inferior según el método – APFnt 1 Alojamiento 2 Soporte de calota 3 Calota larga No. de mat. 0.622.1211 4 Calota corta No. de mat. 0.622.1201 5 Tornillo de ajuste Este sistema de calota se puede emplear de forma universal, no importa según qué... - Page 205 PROTAR evo. ® Para la alineación la calota 1 se pone sobre el dique de cera 2. Para ello el dique de cera se tiene que modificar oclusal de tal forma que la calota se alinea en la zona de los incisivos y en la zona de los molares inferiores.
-
Page 206: A 10.3 Calota De Colocación - 3D Para El Modelo De Maxilar Superior (No. De Mat. 1.002.4919)
PROTAR ® evo. A 10.3 Calota de colocación – 3D para el modelo de maxilar superior (No. de mat. 1.002.4919) Esta ayuda de colocación plana para el modelo de maxilar superior sin dientes se alinea mediante el dique de cera superior. Para ello se aprieta la ayuda de colocación por medio de una cinta de goma contra el dique de cera superior. -
Page 207: A 10.4 Ayuda De Colocación - 2D Para El Maxilar Superior (No. De Mat. 1.001.9452)
PROTAR ® evo. A 10.4 Ayuda de colocación – 2D para el maxilar superior (No. de mat. 1.001.9452) Este accesorio es tanto ayuda de enyesado como también de colocación para maxilar superior sin dientes. Después de girar el tornillo de papila 1 y descorrer la corredera de apoyo 2 se puede empezar con la colocación del modelo de maxilar superior. -
Page 208: A 11 Mesilla De Modelo Con Split-Cast
PROTAR evo. ® A 11 Mesilla de modelo con Split- Cast Para trabajos protésicos que requieren pasos de trabajo sobre el aparato de fresar, a menudo existe la necesidad de alternar el modelo entre el articulador y el aparato de fresar. - Page 209 PROTAR evo. ® Estructuras oclusales se pueden establecer en el articulador. Los trabajos de fresado necesarios se pueden realizar en cualquier momento. Todos los pasos de trabajo se pueden controlar reiteradamente a causa del cambio preciso entre el articulador y el aparato de fresar.
-
Page 210: A 12 Caja De Transporte Kavo Logicase
LOGICase KaVo LOGICase la caja de transporte económica y apilable entre consulta y laboratorio. KaVo LOGICase es caja de transporte y bandeja de trabajo en uno. 1 Gomaespuma para la fijación de modelo (50 unidades. 1.000.9351) 2 Para el primer empleo en el ERGOspace se abren las escotaduras laterales. -
Page 211: A 13 Datos Técnicos
PROTAR evo. ® A 13 Datos técnicos Articuladores PROTARevo‚ 2, 3, 5, 5B, 6, 7 y 9 Brazo inferior Distancia - intercondilar = fija 110 mm Espiga de apoyo Campo de ajuste de + 10 hasta - 10 mm - 10 con bloqueo Mesilla incisal plana (plan) -
Page 212: A 14 Cuidado Y Ajuste
PROTAR ® evo. A 14 Cuidado y ajuste Antes de la puesta en servicio rociar el articulador con un agente de separación - articulador corriente (espray de silicona, no engrasar. No emplear disolventes – oxidación o disolvente - escayola. En caso necesario engrasar las bolas articulares 8, sistema de adhesión magnético 9 o las roscas –... -
Page 213: Condiciones De Garantía
Condiciones de garantía KaVo asume ante el cliente final la prestación de garantía para el correcto funcionamiento y la ausencia de defectos en el material o en el procesamiento del producto mencionado en el justificante de entrega durante un período de 12 meses a partir de la fecha de compra según las siguientes condiciones:... -
Page 214: Protar®Evo 3
Verk.-Nr. PROTARevo 2 06/02003 Mat.-Nr. 1.002.3306 09.21 PROTAR ® evo. Piezas de recambio PROTAR ® ® evo 2 N° de mat. 1.002.3303 sin Split-Cast Mat.-Nr. 1.002.3305 ohne Split-Cast 0.622.0981 1.002.4686 3PS 1.002.2074 0.200.6034 0.200.6093 0.622.1363 0.622.1373 1.001.0889 0.200.6301 Verk.-Nr. PROTARevo 3 06/2003 (10x) 1.002.2096 10x... -
Page 215: Protar Evo 5B
Verk.-Nr. PROTARevo 5 06/2003 Mat.-Nr. 1.002.3311 mit Split-Cast 09.23 Mat.-Nr. 1.002.3310 ohne Split-Cast PROTAR evo. ® PROTAR ® evo 5 N° de mat. 1.002.3311 con Split-Cast Mat.-Nr. 1.002.3311 mit Splitcast N° de mat. 1.002.3310 sin Split-Cast Mat.-Nr. 1.002.3310 ohne Splitcast 0.622.0981 3x 0.201.1459 0.200.6034... -
Page 216: Protar®Evo 9
Verk.-Nr. PROTARevo 7 09/2004 Mat.-Nr. 1.002.3319 mit Split-Cast 09.24 Mat.-Nr. 1.002.3318 ohne Split-Cast PROTAR ® evo. PROTAR ® evo 7 N° de mat. 1.002.3318 sin Split-Cast Mat.-Nr. 1.002.3319 mit Splitcast N° de mat. 1.002.3319 con Split-Cast Mat.-Nr. 1.002.3318 ohne Splitcast 0.250.0031 1.002.0508 0.222.4043... -
Page 217: Protar Evo Brazo Inferior
Verk.-Nr. PROTARevo Unterteil 06/2003 Mat.-Nr. 1.002.3265 ohne Splitcast 09.26 PROTAR evo. ® Mat.-Nr. 1.002.3266 mit Splitcast PROTAR ® evo Brazo inferior N° de mat. 1.002.3265 sin Split-Cast N° de mat. 1.002.3266 con Split-Cast Mat.-Nr. 1.002.3265 ohne Splitcast Mat.-Nr. 1.002.3266 mit Splitcast 0.222.5045 (8x12x0,15) 0.222.5046 (8x12x0,18) 0.222.5047 (8x12x0,20) - Page 218 KaVo Dental GmbH. D-88400 Biberach/Riss Telefon +49 7351 56-0 Fax +49 7351 56-1488 Internet: www.kavo.com...
- Page 219 Istruzioni per l´uso PROTAR evo. ® Sempre dalla giusta parte. KaVo Dental GmbH. D-88400 Biberach/Riss Telefon +49 7351 56-0 Fax +49 7351 56-1488...
- Page 220 Hersteller/manufacturer: Vertrieb/distribution: Kaltenbach & Voigt GmbH KaVo Dental GmbH Bismarckring 39 Bismarckring 39 • D-88400 Biberach D-88400 Biberach Tel.: 0 73 51 / 56-0 • Fax: 0 73 51 / 1488...
- Page 221 A 6.4 Montaggio del modello superiore in articolatore con arco facciale non KaVo ............21 A 6.5 Regolazioni per l’uso di archi non KaVo con l’articolatore PROTARevo ..............22 A 6.6 Metodica di montaggio a valori medi con la croce di fissaggio per modelli di arcata superiore KaVo, Codice 0.622.1781, sistema APFnt ..............................23 A 6.7 Metodica di montaggio a valori medi con lo strumento di montaggio per modelli di arcata superiore KaVo ..24...
-
Page 222: A 1 Informazioni Per L'utente
PRODUCT riproduzione e la diffusione delle istruzioni Nota! SERVICE geprüfte SERVIC E deve essere autorizzata a priori dalla KaVo. • norme sulla sicurezza del lavoro Informazioni e suggerimenti impor- Sicherheit • norme antinfortunistiche. tanti per l'utilizzatore e per il personale I dati tecnici, le informazioni e le del'assistenza tecnica. -
Page 223: A 1.4 Ambito Di Utilizzo
PROTAR evo. ® A 1.4 Ambito di utilizzo Per i suoi movimenti spaziali tridimensio- nali l’organo masticatorio è il sistema motorio più complesso del corpo umano. Se sussistono gravi anomalie del sistema è indispensabile intervenire con una terapia funzionale. Poiché tali misure terapeutiche vanno eseguite prevalentemente al di fuori del cavo orale, risulta necessario simulare i movimenti mandibolari non solo nello... -
Page 224: A 1.5 Osservazione Dei Possibili Movimenti Della Mandibola Sul Piano Orizzontale
PROTAR evo. ® A 1.5 Osservazione dei possibili movimenti della mandibola sul piano orizzontale Protrusione In protrusione la mandibola si sposta in avanti. I due condili si muovono in direzione ventrale e caudale. Sui denti i tracciati di movimento del dente superiore vengono rappresentati sul dente inferiore. -
Page 225: A 1.6 Filosofia Del Sistema
® A 1.6 Filosofia del sistema Il sistema di articolatori e archi facciali KaVo è costruito in modo che l’utente possa optare indifferentemente per il riferimento all’orizzontale di Francoforte (OF) o al piano di Camper (PC). Il supporto nasale 1 orienta l’arco facciale a valori medi in base ai due piani. -
Page 226: A 2 Fornitura - Accessori
A 2.1 Fornitura ® Articolatore PROTAR evo 2 composto da: branca superiore Codice 1.002.3303 branca inferiore Codice 1.002.3265 oppure PROTAR evo 2 ® Articolatore PROTAR evo 2 con Split-Cast composto da: branca superiore Codice 1.002.3307 branca inferiore Codice 1.002.3266 oppure Articolatore PROTAR ®... - Page 227 Codice 1.002.3266 oppure ® Articolatore PROTAR evo 7 senza Split-Cast composto da: branca superiore Codice 1.002.3318 branca inferiore Codice 1.002.3265 PROTAR evo 7 oppure ® Articolatore PROTAR evo 9 con Split-Cast composto da: branca superiore Codice 1.002.3323 branca inferiore Codice 1.002.3266 oppure ®...
-
Page 228: A 2.2 Accessori
Kit di montaggio per Split-Cast Codice 0.622.1031 (senza illustrazione) 3 Supporto di trasferimento Codice 0.622 1141 4 Adattatore per archi facciali non KaVo, Codice 0.622 1151 4b Sostegno per arco facciale 4c adattatore riferimento perno 5 Croce di fissaggio modelli a valori medi dell’arcata inferiore,... - Page 229 PROTAR evo. ® Accessori disponibili su richiesta: pAsta incisale “E “ Codice 0.622.1181 Asta incisale “P “ Codice 0.622.1791 Asta incisale “T “ Codice 0.622.1891 a Tavolato incisale regolabile, “E“ Codice 0.622.1701 s Supporto per calotta Codice 0.622.1161 d Supporto forchetta Codice 0.622.0901 f Inserti PDR (coppia) “T“...
- Page 230 PROTAR ® evo. Materiale di consumo: 1 Piastre di controllo, confezione da 10 pezzi Codice 0.622.0791 2 Cappette ritentive, confezione da Codice 1.001.0887 10 pezzi Cappette ritentive, confezione da 50 pezzi Codice 1.001.0953 3 Piastre di montaggio (non per Split-Cast) Confezione da 10 pezzi Codice 0.622.1871 4 Piattini di gessatura filettati, confezione...
-
Page 231: A 3 Comandi E Parti Funzionali
PROTAR ® evo. A 3 Comandi e parti funzionali PROTARevo 2 ö PROTARevo 2, 3, 5, 5B 1 Branca superiore dell’articolatore 2 Piedini d’appoggio 3 Cesta condiloidea ds. 4 Chiusura in centrica ds. PROTARevo 3 5 Chiusura in centrica sin. 6 Zoccolo di controllo 7 Branca inferiore dell’articolatore 8 Piatto incisale 20 °... - Page 232 PROTAR evo. ® PROTARevo 7 PROTARevo 7, 9 1 Branca superiore dell’articolatore 2 Piedini d’appoggio 3 Cesta condiloidea ds. 4 Chiusura in centrica ds. 5 Chiusura in centrica sin. 6 Zoccolo di controllo 7 Branca inferiore dell’articolatore 8 Piatto incisale 20 ° 9 Tavolato incisale piano PROTARevo 9 0 Asta incisale...
-
Page 233: A 4 Preparazione Alla Messa In Funzione
PROTAR evo. ® A 4 Preparazione alla messa in fun- zione A 4.1 Asta incisale Inserire l’asta incisale 6 a scelta nella branca superiore o inferiore dell’articolato- re e serrarla in posizione. Inserire il tavolato incisale piano 1 con piatto incisale 2 di 20°, a seconda del lavoro, nella branca superiore o inferiore dell’articolatore. - Page 234 PROTAR evo. ® Posizione “2“ = aperto 1 In questa posizione è possibile estrarre la branca superiore dell’articolatore. “2“ “1“ “0“ Dopo il montaggio della branca superiore e la chiusura delle due leve di centrica l’articolatore è completo. Le leve per il bloccaggio in centrica 2 possono essere chiuse soltanto se la branca superiore dell’articolatore viene portata a contatto con i condili.
-
Page 235: A 4.3 Protar®Evo Con Splitcast (Taratura In Fabbrica)
A 4.4 Lavorazione con il kit di gessa- tura Codice 0.622.1121 Il kit di gessatura serve per la realizzazione di basi in gesso di precisione per KaVo Split-Cast. Indicazioni pratiche per l’uso: • Far scattare in posizione il piattino di gessatura 5 sul kit di gessatura 6. -
Page 236: A 4.5.1 Protar Evo Con Fissaggio Magnetico
PROTAR ® evo. A 4.5.1 PROTAR ® evo con fissaggio magnetico Con l’aiuto del fissaggio magnetico 1.002.4686 è possibile utilizzare sul PROTAR ® evo un magnete 3 al posto della vite ad alette. Con le piastre di montaggio 3PS 4 è possibile un rapido scambio dei modelli. -
Page 237: A 4.6.1 Taratura 1.002.2080
PROTAR ® evo. A 4.6.1 Taratura 1.002.2080 Togliere l’anello di tenuta 1 dal supporto in schiumato (1.003.3998) ed incollarlo sulla piastra di regolazione 2. Introdurre il calibro di misurazione-taratura 6 nella branca inferiore dell’articolatore Il magnete blocca il calibro di regolazione. Applicare la piastra 2 sul calibro misurazione-taratura 6. -
Page 238: A 5 Possibili Regolazioni Degli Articolatori Protar Evo
PROTAR ® evo. A 5 Possibili regolazioni degli articolatori PROTAR ®... -
Page 239: A 6 Montaggio In Articolatore Dei Modelli
A 6 Montaggio in articolatore dei modelli A 6.1 Montaggio in articolatore del modello superiore con l’arco faccia- le ARCUS KaVo Aprire la leva di bloccaggio 4 e separare l’arco facciale 3. Inserire prima l’asta incisale 2 nella branca inferiore dell’articolatore e metterla a zero. -
Page 240: A 6.2 Montaggio Del Modello Superiore In Articolatore Mediante Il Supporto Di Trasferimento
PROTAR ® evo. A 6.2 Montaggio del modello super- iore in articolatore mediante il sup- porto di trasferimento Se il montaggio dei modelli viene effettuato in laboratorio, è sufficiente inviare solo il sostegno con la relativa forchetta. Estrarre l’asta e il piatto incisale dall’artico- latore. -
Page 241: A 6.4 Montaggio Del Modello Superiore In Articolatore Con Arco Facciale Non Kavo
A 6.4 Montaggio del modello super- iore in articolatore con arco facciale non KaVo Sono necessari i seguenti accessori: Adattatore per archi facciali non KaVo, Codice 0.622.1151, composto da: 1 piano di riferimento (guaina + vite) 2 sostegno per arco facciale 3 adattatore riferimento perno Con questo strumento è... -
Page 242: A 6.5 Regolazioni Per L'uso Di Archi Non Kavo Con L'articolatore Protarevo
PROTAR evo. ® A 6.5 Regolazioni per l’uso di archi non KaVo con l’articolatore PROTARevo Sono necessari i seguenti accessori: 1 supporto di trasferimento Codice 0.622.1141 2 adattatore per archi facciali non KaVo Codice 0.622.1151, composto da: piano di riferimento (guaina + vite) -
Page 243: A 6.6 Metodica Di Montaggio A Valori Medi Con La Croce Di Fissaggio Per Modelli Di Arcata Superiore Kavo, Codice 0.622.1781, Sistema Apfnt
® A 6.6 Metodica di montaggio a valori medi con la croce di fissaggio per modelli di arcata superiore KaVo, Codice 0.622.1781, sistema APFnt La croce di fissaggio per modelli di arcata superiore edentuli consente il montaggio a valori medi in articolatore se non si dispone di arco facciale. -
Page 245: A 6.8 Metodica Di Montaggio A Valori Medi Con La Croce Di Fissaggio Modelli Dell'arcata Inferiore Kavo, Codice 0.622.1171
PROTAR. Se l’articolatore KaVo è dotato di Split- Cast, la croce di fissaggio modelli dell’arcata inferiore deve essere fissata nella posizione 1 (allentare la vite 3). - Page 246 PROTAR ® evo. Regolare la forchetta della sinfisi 9 all’altezza del vallo in cera inferiore 8. 3 vallo in cera superiore 4 vite di arresto 5 croce di fissaggio a valori medi per modelli dell’arcata inferiore 6 cuscinetto retromolare 7 elemento scorrevole sul cuscinetto retromolare 8 vallo in cera inferiore 9 forchetta della sinfisi...
-
Page 247: A 6.9 Montaggio In Articolatore Del Modello Dell'arcata Inferiore
PROTAR ® evo. A 6.9 Montaggio in articolatore del modello dell’arcata inferiore Capovolgere l’articolatore (le leve di bloccaggio in centrica 2 rimangono chiuse). Aprire l’articolatore. Il modello inferiore viene poggiato sul modello superiore in posizione stabile. L’asta incisale 1 viene messa a zero se si lavora senza registrazione di centrica. -
Page 248: A 7 Programmazione Dell'articolatore
PROTAR ® evo. A 7 Programmazione dell’articolatore A 7.1 Regolazione dell’angolo di emi- nenza mediante la registrazione di protrusione (per PROTAR 5, 5B, 7, 9) Aprire le due leve di bloccaggio in centrica 3 e porre la registrazione di protrusione 5 tra le arcate dei modelli in gesso: in questa fase la branca inferiore dell’articola- tore viene dislocata in avanti rispetto alla... -
Page 249: A 7.3 Regolazione Dell'escursione In Lateralità
PROTAR evo. ® A 7.3 Regolazione dell’escursione in lateralità (per PROTAR 5B, 7, 9) Immediate Side Shift (ISS) o Bennett immediato Lo spostamento laterale immediato (ISS) del condilo di mediotrusione può essere definito da “0“ a “1,5 mm“ (con incrementi di 0,5 mm). -
Page 250: A 7.4 Regolazione Dell'angolo Di Shift
PROTAR ® evo. A 7.4 Regolazione dell’angolo di Shift Se nel PROTAR 7 sono inseriti gli inserti dell’angolo di Shift (0.622.1111), è possibile regolare con esattezza i movimenti sul lato lavorante (lato di laterotrusione). Allentare la vite a testa zigrinata 3, per poter regolare l’inserto dell’angolo di Shift 2 ruotando il perno 1. -
Page 251: A 7.5 Regolazione Di Una Posizione Di Protrusione/Posizione Di Distrazione
PROTAR evo. ® A 7.5 Regolazione di una posizione di protrusione/posizione di distrazio- PROTARevo 9 Il PROTARevo 9 ha la stessa costruzione del PROTARevo 7. Inoltre il “9“ ha un inserto P/D/R. Codice 0.622.1001 destra/sinistra Regolazione definita della Protrusione Regolazione definita della Distrazione Regolazione definita della Retrusione Nel PROTARevo 7 è... -
Page 252: A 7.6 Regolazione Della Retrusione/Protrusione
PROTAR evo. ® A 7.6 Regolazione della retrusione/protrusione Per creare svincoli in retrusione durante la ® ceratura, il PROTAR 7/9 consente un movimento retrusivo. Ciò permette di ridurre il molaggio finale da parte del clinico, in quanto gli svincoli in retrusione vengono considerati già in fase di modellazione. -
Page 253: A 7.7 Costruzione Di Un Piatto Incisale Individuale
PROTAR evo. ® A 7.7 Costruzione di un piatto inci- sale individuale Dal tavolato incisale piatto del Protar l’odontotecnico può modellare una guida incisale individuale. Porre le leve di chiusura in centrica dell’articolatore in posizione “1“ e aprire l’articolatore all’indietro. Spalmare di isolante (vaselina) il tavolato incisale e la punta dell’asta incisale. -
Page 254: A 7.8 Programmazione Del Tavolato Incisale Regolabile
PROTAR ® evo. A 7.8 Programmazione del tavolato incisale regolabile A 7.8.1 Mediante il modello di studio Prima del molaggio dei denti si esegue un modello di studio del paziente. Mediante tale modello di studio si procede alla programmazione del tavolato incisale regolabile. -
Page 255: A 8 Inserimento Dell'inserto Dell'angolo Di Shift Sul Protar®Evo 7
PROTAR evo. ® A 8 Inserimento dell’inserto dell’an- golo di Shift sul PROTAR ® evo 7 Rimuovere innanzi tutto il cilindro di pro/retrusione 1 dall’articolatore. A tale scopo, con l’aiuto della chiave per viti ad esagono cavo 2 in dotazione, spingere fuori con una leggera pressione il perno di bloccaggio 5 dalla ruota motrice 1. -
Page 256: A 9 Programmazione Dell'articolatore Con I Dati Di Misurazione Dell'arcusdigma
PROTAR ® evo. A 9 Programmazione dell’articolatore con i dati di misurazione dell’ARCUSdigma (Codice 1.000.8232) Il PROTARevo 7 con l’inserto dell’angolo di Shift (Codice 0.622.1111) e il tavolato incisale regolabile (Codice 0.622.1701) è in grado di riprodurre esattamente tutti i valori calcolati con ARCUSdigma (vedi figura: valori di regolazione del PROTAR 7) -
Page 257: A 10 Strumenti Di Montaggio Per La Protesi Totale
PROTAR evo. ® A 10 Strumenti di montaggio per la protesi totale A 10.1 Strumenti di montaggio per il modello dell’arcata inferiore secon- do il sistema APFnt (Codice 0.622.2071) Fissare lo strumento di montaggio per piano protesico 1 sulla centratura dell’asse dell’articolatore. -
Page 258: A 10.2 Strumento Di Montaggio 3D Per Modello Dell'arcata Inferiore Secondo Il Sistema Apf
PROTAR ® evo. GEBRAUCHSANWEISUNG A 10.2 Strumento di montaggio 3D per modello dell’arcata inferiore secondo il sistema APF 1 Alloggiamento 2 Supporto calotta 3 Calotta lunga Codice 0.622.1211 4 Calotta corta Codice 0.622.1201 5 Vite di regolazione Questo sistema di calotte può essere utilizzato in generale, indipendentemente dai criteri di montaggio del modello in articolatore (arco facciale o croce di... - Page 259 PROTAR evo. ® La calotta 1 viene posta sul vallo in cera 2 per essere orientata. A tale scopo il vallo in cera deve essere modificato nella parte occlusale in modo da orientare la calotta nella regione degli incisivi e nella regione dei molari inferiori. La superficie piana della calotta può...
-
Page 260: A 10.3 Calotta Di Montaggio 3D Per Il Modello Dell'arcata Superiore (Codice 1.002.4919)
PROTAR ® evo. A 10.3 Calotta di montaggio 3D per il modello dell’arcata superiore (Codice 1.002.4919) Questo strumento di montaggio piano per il modello superiore edentulo viene orientato mediante il vallo in cera superiore. A tale scopo lo strumento di montaggio viene spinto a contatto con il vallo in cera superiore per mezzo di un elastico. -
Page 261: A 10.4 Strumento Di Montaggio 2D Per L'arcata Superiore (Codice 1.001.9452)
PROTAR ® evo. A 10.4 Strumento di montaggio 2D per l’arcata superiore (Codice 1.001.9452) Questo accessorio è sia uno strumento di gessatura che di montaggio per l’arcata superiore edentula. Dopo avere aperto la vite papillare 1 e spinto indietro il piano scorrevole 2, si può... -
Page 262: A 11 Base Per Modello Con Split-Cast
PROTAR evo. ® A 11 Base per modello con Split- Cast Per le fasi protesiche che prevedono il lavoro con il fresatore è spesso necessario trasferire il modello dall’articolatore al fresatore e viceversa. 1 magnete 2 zoccolo di controllo 3 leva Grazie alla forza magnetica è... - Page 263 PROTAR evo. ® Le strutture occlusali possono essere realizzate in articolatore. Le necessarie operazioni di fresaggio possono essere eseguite in ogni momento. Tutte le fasi di lavoro possono essere ripetutamente controllate grazie al preciso trasferimento dall’articolatore al fresatore e viceversa.
-
Page 264: A 12 Contenitore Per Il Trasporto Kavo Logicase
KaVo LOGICase KaVo LOGICase: il contenitore economico e sovrapponibile per il trasporto dallo studio al laboratorio e viceversa. KaVo LOGICase è contenitore per il trasporto e scatola portalavoro in uno. 1 gommapiuma per il fissaggio dei modelli (50 pezzi 1.000.9351) -
Page 265: A 13 Dati Tecnici
PROTAR evo. ® A 13 Dati tecnici ® Articolatori PROTARevo 2, 3, 5, 5B, 6, 7 Branca inferiore distanza intercondilare = fissa 110 mm Asta incisale - 10 range di regolazione da + 10 a – 10 con arresto Tavolato incisale piano Piatto incisale 20°... -
Page 266: A 14 Manutenzione E Regolazione
PROTAR ® evo. A 14 Manutenzione e regolazione Prima di utilizzare l’articolatore per la prima volta spruzzarlo con un apposito isolante (spray al silicone) in commercio, non ingrassare. Non utilizzare antiossidanti o solventi per gesso. Se necessario lubrificare leggermente i condili 8, il sistema di fissaggio magnetico 9 e la filettatura delle piastre di controllo. -
Page 267: Condizioni Di Garanzia
Condizioni di garanzia KaVo garantisce al cliente finale prestazioni in garanzia per il prodotto menzionato nel documento di consegna in relazione a funzionamento ineccepibile, assenza di difetti di materiale o lavorazione, per una durata di 12 mesi dalla data di acquisto,... -
Page 268: Protar®Evo 3
Verk.-Nr. PROTARevo 2 06/02003 Mat.-Nr. 1.002.3306 09.21 PROTAR ® evo. Parti di ricambio PROTAR ® evo 2 Codice 1.002.3305 senza Split-Cast Mat.-Nr. 1.002.3305 ohne Split-Cast 0.622.0981 1.002.4686 3PS 1.002.2074 0.200.6034 0.200.6093 0.622.1363 0.622.1373 1.001.0889 0.200.6301 Verk.-Nr. PROTARevo 3 06/2003 (10x) 1.002.2096 10x Mat.-Nr. -
Page 269: Protar Evo 5B
Verk.-Nr. PROTARevo 5 06/2003 Mat.-Nr. 1.002.3311 mit Split-Cast 09.23 Mat.-Nr. 1.002.3310 ohne Split-Cast PROTAR evo. ® PROTAR ® evo 5 Codice 1.002.3311 con Split-Cast Codice 1.002.3310 senza Split-Cast Mat.-Nr. 1.002.3311 mit Splitcast Mat.-Nr. 1.002.3310 ohne Splitcast 0.622.0981 3x 0.201.1459 0.200.6034 1.002.2074 1.001.0889 10x 0.622.2652... -
Page 270: Protar®Evo 9
Verk.-Nr. PROTARevo 7 09/2004 Mat.-Nr. 1.002.3319 mit Split-Cast 09.24 Mat.-Nr. 1.002.3318 ohne Split-Cast PROTAR ® evo. PROTAR ® evo 7 Codice 1.002.3319 senza Split-Cast Codice 1.002.3318 senza Split-Cast Mat.-Nr. 1.002.3319 mit Splitcast Mat.-Nr. 1.002.3318 ohne Splitcast 0.250.0031 1.002.0508 0.222.4043 0.622.2032 (L) 0.622.2042 (R) 0.622.2542 0.622.2532 0.622.2502... -
Page 271: Protar Evo Branca Inferiore
Verk.-Nr. PROTARevo Unterteil 06/2003 Mat.-Nr. 1.002.3265 ohne Splitcast 09.26 PROTAR evo. ® Mat.-Nr. 1.002.3266 mit Splitcast PROTAR ® evo branca inferiore Codice 1.002.3266 senza Split-Cast Codice 1.002.3265 senza Split-Cast Mat.-Nr. 1.002.3265 ohne Splitcast Mat.-Nr. 1.002.3266 mit Splitcast 0.222.5045 (8x12x0,15) 0.222.5046 (8x12x0,18) 0.222.5047 (8x12x0,20) 0.622.2022 1.001.0889 10x... - Page 272 KaVo Dental GmbH. D-88400 Biberach/Riss Telefon +49 7351 56-0 Fax +49 7351 56-1488 Internet: www.kavo.com...
- Page 274 K12 4940...
Need help?
Do you have a question about the PROTAR evo and is the answer not in the manual?
Questions and answers