Philips FWM417/55 User Manual
Philips mp3 mini hi-fi system fwm417 280w 3-disc changer multisource ripping
Hide thumbs
Also See for FWM417/55:
- Quick start manual (2 pages) ,
- Service manual (33 pages) ,
- Service manual (33 pages)

Related Manuals for Philips FWM417/55


Summary of Contents for Philips FWM417/55
- Page 1 Register your product and get support at www.philips.com/welcome FWM417 EN User manual...
- Page 2 LEA CUIDADOSAMENTE ESTE INSTRUCTIVO ANTES DE USAR SU APARATO. AVISO IMPORTANTE Philips Mexicana, S.A. de C.V. no se hace responsable por daños o desperfectos causados por: – Maltrato, descuido o mal uso, presencia de insectos o roedores (cucarachas, ratones etc.).
-
Page 3: Table Of Contents
Contenido 1 Important Safety Notice 2 Your Mini Hi-Fi System Introduction What’s in the box Overview of the main unit Overview of the remote control 3 Get started Connect FM antenna Connect AM antenna Connect speakers Connect power Prepare the remote control Auto install radio stations Set clock Turn on... -
Page 4: Important
1 Important Safety a Read these instructions. b Keep these instructions. c Heed all warnings. d Follow all instructions. e Do not use this apparatus near water. f Clean only with dry cloth. g Do not block any ventilation openings. Install in accordance with the manufacturer’s instructions. -
Page 5: Notice
Notice Any changes or modifi cations made to this device that are not expressly approved by Philips Consumer Lifestyle may void the user’s authority to operate the equipment. The making of unauthorized copies of copy-protected material, including computer programs, fi... -
Page 6: Your Mini Hi-Fi System
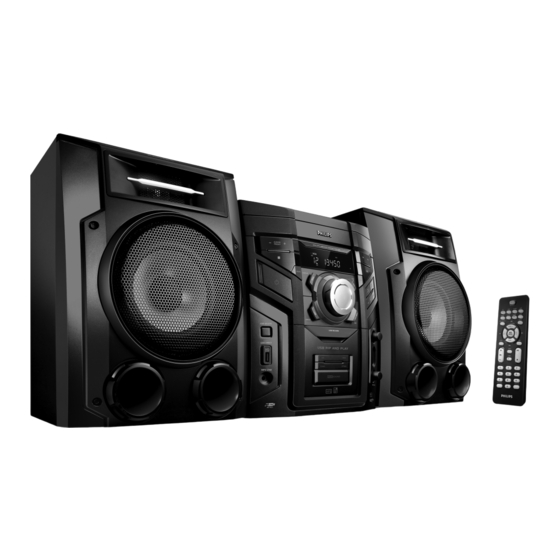
2 Your Mini Hi-Fi System Congratulations on your purchase, and welcome to Philips! To fully benefi t from the support that Philips offers, register your product at www.Philips.com/welcome. Introduction With this unit, you can enjoy audio from discs, USB devices, external devices, or radio stations. -
Page 7: Overview Of The Main Unit
Overview of the main unit a Disc compartment door b DISPLAY • Select display information. c ALBUM/PRESET+/- • Skip to the previous/next album. • Select a preset radio station. • Adjust time. • Select 12 hour or 24 hour format. •... -
Page 8: Overview Of The Remote Control
l MP3 LINK • Audio input jack (3.5mm ) for an external audio device. m MAX SOUND • Turn on or off instant power boost for sound. n MIC VOL • Adjust microphone volume. o MIC 1/2 • Jack for a microphone. p DSC •... - Page 9 c CLOCK • Set the clock. d MODE • Select repeat play or random play. e USB DELETE • Delete audio fi les stored on a USB device. f TITLE+/- / • Skip to the previous/next track. • Select a preset radio station. •...
-
Page 10: Get Started
Always follow the instructions in this chapter in sequence. If you contact Philips, you will be asked for the model and serial number of this apparatus. The model number and serial number are on the back of the apparatus. Write the numbers here: Model No. -
Page 11: Connect Power
Hold down the socket fl ap. Insert the stripped part of the wire completely. • Insert the right speaker wires to “ left speaker wires to “ L ”. • Insert the red wires and blue wires to “ + ”, black wires to “ - ”. •... -
Page 12: Auto Install Radio Stations
Auto install radio stations When you connect power and no radio stations are stored, the unit automatically begins to store radio stations. Connect the unit to the power supply. [AUTO INSTALL - PRESS PLAY] (auto » install - press the PLAY button) is displayed. -
Page 13: Play
4 Play Play disc Press CD 1/2/3 to select the disc source. Press OPEN/CLOSE on the main unit to open the disc compartment. Load up to two discs on the disc trays, with the printed side facing up. • To load the third disc, press CHANGE on the main unit to rotate to the disc tray. -
Page 14: Play Options
5 Play options Repeat and random play Press MODE repeatedly to select: • : the current track is played repeatedly. • : all tracks are played repeatedly. • : all tracks are played randomly and repeatedly. • : all tracks are played randomly. To return to normal play, press MODE repeatedly until play mode is no longer displayed. -
Page 15: Adjust Volume Level And Sound Effect
6 Adjust volume level and sound effect Note • MAX sound and DSC (Digital Sound Control) cannot be activated at the same time. Adjust volume level During play, press VOL +/- to increase/ decrease the volume level. Mute sound During play, press MUTE to mute/unmute sound. -
Page 16: Listen To Radio
7 Listen to radio Tune to a radio station Press TUNER repeatedly to select FM or Press and hold ALBUM +/- more than 2 seconds. [SEARCH] (search) is displayed. » The radio tunes to a station with » strong reception automatically. Repeat step 2 to tune to more stations. -
Page 17: Usb Record
WMA fi les are recorded in .wma format. The fi rst time you record to USB, a folder called ‘PHILIPS’ is automatically created in the USB device. Each time you record to USB, the recorded fi les are stored in a sub-folder in the ‘PHILIPS’... -
Page 18: Other Features
9 Other features Set the alarm timer This unit can be used as an alarm clock. The disc, radio or USB is activated to play at a preset time. Note • If you have set a record timer and an alarm timer, only the latest timer is activated. -
Page 19: Delete From Usb Device
Delete from USB device During USB play, press TITLE+/- / to select an audio fi le. • To delete an audio folder, in the stop position, press ALBUM +/- select an audio folder. Press USB DELETE . A confi rmation message is displayed. »... -
Page 20: Product Information
10 Product information Note • Product information is subject to change without prior notice. Specifi cations Amplifi er Total output power 280W RMS Frequency response 60 - 16kHz Signal-to- noise ratio >67dB A (IEC) Aux input 1500mV/2000mV Disc Laser type Semiconductor Disc diameter 12cm/8cm... -
Page 21: Usb Playability Information
Clean the disc lens • After prolonged use, dirt or dust may accumulate at the disc lens. To ensure good play quality, clean the disc lens with Philips CD lens cleaner or any commercially available cleaner. Follow the instructions supplied with cleaner. -
Page 22: Troubleshooting
If you encounter problems when using this apparatus, check the following points before requesting service. If the problem remains unsolved, go to the Philips web site www. philips.com/welcome. When you contact Philips, ensure that the apparatus is nearby and the model number and serial number are available. - Page 26 ACRE RIO BRANCO 68 3224-0558 ALAGOAS ARAPIRACA 82 3522-2321 MACEIO 82 3221-0168 PENEDO 82 3551-3693 AMAPÁ MACAPA 96 3223-2837 AMAZONAS ITACOATIARA 92 3521-2509 MANAUS 92 3233-2578 MANAUS 92 3236-1238 MANAUS 92 3239-0313 MANAUS 92 3644-6977 BAHIA BARREIRAS 77 3611-2845 BARREIRAS 77 3612-4254 BOM JESUS LAPA 77 3481-0359...
- Page 27 ISTA DE RIO DE JANEIRO 21 2527-9532 URUGUAIANA RIO DE JANEIRO 21 2545-7526 VACARIA RIO DE JANEIRO 21 2558-3109 VENANCIO AIRES RIO DE JANEIRO 21 2589-9276 VERANOPOLIS RIO DE JANEIRO 21 2595-5583 RIO DE JANEIRO 21 3297-2300 RONDÔNIA RIO DE JANEIRO 21 3332-7563 ARIQUEMES RIO DE JANEIRO...
- Page 31 © 2009 Koninklijke Philips Electronics N.V. All rights reserved.