
Related Manuals for Saeco RI9752/43


Summary of Contents for Saeco RI9752/43
- Page 1 The manufacturer reserves the right to change the features of the product without prior notice. O fabricante reserva-se o direito de efectuar qualquer alteração sem aviso prévio.
- Page 2 Operation and maintenance manual Before using the machine, please read the attached operating instructions. Carefully read the safety rules. Manual de uso e manutenção Antes de utilizar a máquina consulte estas instruções. Leia atentamente as normas de segurança.
-
Page 3: Table Of Contents
CONTENTS - ÍNDICE TECHNICAL DATA ...3 IMPORTANT PRECAUTIONARY MEASURES ...4 APPLIANCE ...8 ACCESSORIES ... 8 INSTALLATION ...9 STARTING THE MACHINE ... 9 RINSING OF THE INTERNAL CIRCUITS ... 10 FIRST USE - USE AFTER A LONG PERIOD OF INACTIVITY ...11 INSTALLING THE INTENZA WATER FILTER (OPTIONAL) ... -
Page 4: Technical Data
TECHNICAL DATA - DADOS TÉCNICOS TECHNICAL DATA • Nominal voltage • Power rating • Power supply • Shell material • Size (w x h x d) • Weight • Cable length • Control panel • Water tank • Pump pressure (bars) •... -
Page 5: Important Precautionary Measures
IMPORTANT PRECAUTIONARY MEASURES During use, every precaution must be taken to limit the risk of fi re, electric shock and/or accidents. • Read carefully all the instructions and information listed in this manual and in any other booklet contained in the packaging before turning on or using the espresso machine. -
Page 6: Precauções Importantes
Durante a utilização da maquina, aconselha-se a tomar algumas precauções a fi m de limitar o risco de incêndios, choques eléctricos e/ou acidentes. • Leia atentamente todas as instruções e informações indicadas neste manual e em qualquer outro folheto contido na embalagem antes de ligar ou utilizar a máquina de café expresso. •... -
Page 7: General Information
IMPORTANT PRECAUTIONARY MEASURES INSTRUCTIONS FOR THE ELECTRICAL CORD • A short electrical cord has been provided to keep it from twisting or causing tripping. • Extension cords can be used, but must be used with great care. When an extension cord is used, check that: a. - Page 8 INSTRUÇÕES SOBRE O CABO ELÉCTRICO • É fornecido um cabo eléctrico bastante curto para evitar enrolamentos ou de tropeçar nele. • É possível utilizar, com muito cuidado, extensões. Quando for utilizada uma extensão, certifi que-se de que: a. a voltagem indicada na extensão corresponda à voltagem eléctrica do electrodoméstico; b.
-
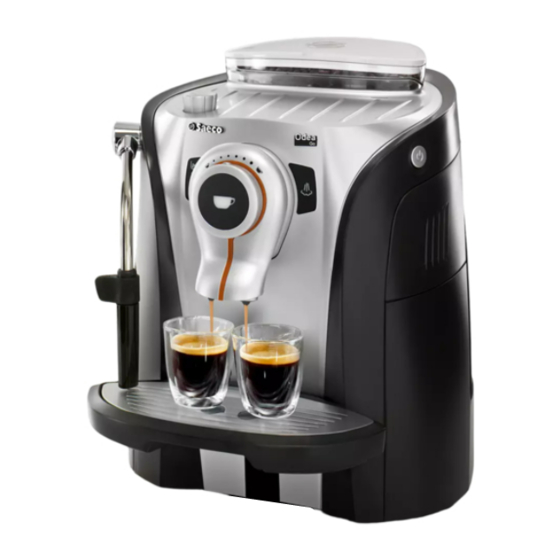
Page 9: Appliance
APPLIANCE - APARELHO Cup warming surface Plano de apoio para chávenas Control panel Painel de comando Dispensing head Distribuidor Drip tray + grill Bandeja de limpeza + grelha Hot water / steam knob Botão da torneira água quente/vapor Hot water / steam wand Tubo de distribuição de água quente/vapor Water tank... -
Page 10: Installation
STARTING THE MACHINE - LIGAÇÃO DA MÁQUINA Make sure the power button is not pressed and that the machine is turned off. Check the machine features on the label on the bottom of the appliance. Assegure-se de que o interruptor geral não esteja pressionado. Verifi que as características da máquina, indicadas na plaqueta de dados posicionada na parte inferior. -
Page 11: Rinsing Of The Internal Circuits
INSTALLATION - INSTALAÇÃO Place a container beneath the steam spout. Coloque um recipiente por baixo do tubo do vapor. Turn the knob until it is in the rest position ( ). Vire o botão até a posição de repouso ( ). RINSING OF THE INTERNAL CIRCUITS ENXÁGÜE DOS CIRCUITOS INTERNOS When the correct temperature is reached, the machine performs a rinse cycle of the internal circuits. -
Page 12: First Use - Use After A Long Period Of Inactivity
FIRST USE - USE AFTER A LONG PERIOD OF INACTIVITY PRIMEIRA UTILIZAÇÃO - APÓS UM LONGO PERÍODO DE INUTILIZAÇÃO These operations ensure an optimum brewing and must be performed: 1) At fi rst start-up - 2) When the machine remains inactive for a long time (more than 2 weeks). Estas operações asseguram-lhe uma óptima distribuição e devem ser realizadas: 1) Na primeira utilização - 2) Quando a máquina permanecer inutilizada por um longo período de tempo (por mais de 2 semanas). -
Page 13: Installing The Intenza Water Filter (Optional)
INTENZA WATER FILTER (OPTIONAL) FILTRO ÁGUA INTENZA (OPCIONAL) WATER FILTER (OPTIONAL) - FILTRO ÁGUA INTENZA (OPCIONAL) To improve the quality of the water used, it is recommended to install the water fi lter. Remove the water fi lter from its packaging, immerse it vertically (with the opening facing upwards) in cold water and gently press the sides so as to let the air bubbles out. -
Page 14: Control Panel
CONTROL PANEL - PAINEL DE COMANDO LED Light - Tecla / LED Description - Descrição Coffee button: • the button has been pushed once: 1 coffee has been selected. • the button has been pushed twice: 2 coffees have been selected. Botão de distribuição do café: •... - Page 15 CONTROL PANEL - PAINEL DE COMANDO LED Light - Tecla / LED Description - Descrição Alarm light: • permanently on : signals the machine is out of coffee, the water tank is empty, the drip tray is full or the dregdrawer is full (in this case, also empty the coffee grounds drawer in order to prevent failures).
-
Page 16: Adjustments
COFFEE VOLUME ADJUSTMENT PER CUP ALTURA DO CAFÉ NA CHÁVENA The coffee volume knob adjusts the amount of coffee brewed per cup. This adjustment has an immediate effect on the selected type of brewing. Para seleccionar a quantidade de café a ser distribuído na chávena. Este ajuste tem um efeito imediato na distribuição seleccionada. -
Page 17: Standby
ADJUSTMENTS - AJUSTES STAND-BY - STAND-BY The machine is designed for energy saving. After 60 minutes of inactivity, the machine goes into stand-by mode, the boiler is no longer heated and all the lights turn off with the exception of the temperature light which will blink slowly. -
Page 18: Saeco Adapting System
SAECO ADAPTING SYSTEM SAECO ADAPTING SYSTEM Coffee is a natural product and its characteristics may change according to its origin, blend and roast. The Saeco coffee machine is equipped with a self-adjusting system that allows the use of all types of coffee beans available on the market (not including fl... -
Page 19: Coffee Grinder Adjustment
ADJUSTMENTS - AJUSTES COFFEE GRINDER ADJUSTMENT - AJUSTE DO MOINHO DE CAFÉ The machine enables a slight adjustment of the coffee grinder. Coffee may be ground according to your own tastes. The adjustment must be performed using the small pin located inside the coffee bean hopper. This must be pressed and turned using the supplied grinder adjustment key only. -
Page 20: Coffee Brewing
COFFEE BREWING - DISTRIBUIÇÃO CAFÉ The coffee brewing cycle can be interrupted at any moment by pushing the the machine dispenses half of the entered quantity and briefl y interrupts dispensing in order to grind the second serving of coffee. Coffee dispensing is then restarted and completed. O ciclo de distribuição de café... -
Page 21: Hot Water Dispensing
HOT WATER DISPENSING DISTRIBUIÇÃO DE ÁGUA QUENTE HOT WATER DISPENSING - DISTRIBUIÇÃO DE ÁGUA QUENTE Dispensing may be preceded by short sprays of hot water, and scalding is possible. The hot water/steam wand may reach high temperatures: do not touch it with bare hands. Use the appropriate handle only. -
Page 22: Cappuccino
CAPPUCCINO Dispensing may be preceded by short sprays of hot water, and scalding is possible. The hot water/steam spout may reach high temperatures: do not touch it with bare hands. Use the appropriate handle only. No início da distribuição podem-se verifi car breves jactos de água quente com perigo de queimaduras. - Page 23 CAPPUCCINO Drain any residual water and wait until the spout ejects steam only. Descarregue a eventual presença de condensação e aguarde sair apenas vapor. Turn the knob until the position is reached. Vire o botão até a marca Press the button to dispense water.
- Page 24 When the machine ready indicator is permanently on, turn the knob until it is in the rest position. Quando o indicador luminoso se acender de modo fi xo, vire o botão até a posição de repouso. Remove the container. When the wand is cold, disassemble it and wash it carefully.
-
Page 25: Descaling
DESCALING - DESCALCIFICAÇÃO In case of confl ict, priority must be given to what is indicated in the operation and maintenance manual over the instructions provided on separately sold accessories and materials. Warning! Never drink the descaling solution or any products dispensed until the cycle has been carried out to the end. - Page 26 Descaling must be performed when the light blinks. Quando o indicador luminoso piscar, será preciso realizar a descalcifi cação. Place a large container (about 500 ml capacity) under the steam wand. Coloque um recipiente grande (cerca de 500 ml) debaixo do tubo de vapor.
- Page 27 DESCALING - DESCALCIFICAÇÃO Empty the descaling solution out of the container. Esvazie o recipiente da solução descalcifi cante. Once the solution is fi nished, rinse and fi ll the tank with fresh drinking water. Terminada a solução, enxagúe e encha o reservatório com água fresca potável.
- Page 28 Once fi nished, turn the knob until it reaches the off position ( ). Depois de terminado, coloque-o na posição de repouso ( ). Fill the tank again with fresh drinking water. Encha novamente o reservatório com água fresca potável. Reinstall the Intenza water fi...
-
Page 29: Cleaning And Maintenance
CLEANING AND MAINTENANCE LIMPEZA E MANUTENÇÃO MAINTENANCE DURING OPERATION MANUTENÇÃO DURANTE O FUNCIONAMENTO During normal operation, the message for emptying the coffee grounds may appear on the display (see page 13). This operation must be performed when the machine is on. Durante o normal funcionamento pode aparecer a sinalização que indica de esvaziar as borras (veja pág.13). -
Page 30: How To Clean The Machine
HOW TO CLEAN THE MACHINE - LIMPEZA DA MÁQUINA The machine must be cleaned at least once a week. Do not immerse the machine in water or place any of its parts in a dishwasher. Do not use alcohol, solvents, benzene and/or abrasive objects to clean the machine. The water left in the tank for several days must be disposed of. -
Page 31: Cleaning The Brew Group
CLEANING AND MAINTENANCE LIMPEZA E MANUTENÇÃO CLEANING THE BREW GROUP LIMPEZA DO GRUPO DE DISTRIBUIÇÃO The brew group must be cleaned at least once a week. Before removing the brew group, remove the dregdrawer as shown in fi g. 1 on page 28. Once you have washed and inserted the brew group, insert the dregdrawer and close the service door. - Page 32 Apply the grease evenly on both side guides. Distribua a graxa uniformemente nas duas guias laterais. The lever on the rear part of the group must be in contact with the Brew Group base. A alavanca posicionada na parte traseira do grupo deve fi...
-
Page 33: Troubleshooting
TROUBLESHOOTING Problems The machine does not turn on. The machine is not connected to the power source. The plug has not been plugged into the back of the machine. Machine in stand-by. Coffee is not hot enough. The cups are cold. Hot water or steam is not dispensed. -
Page 34: Problemas - Causas - Soluções
PROBLEMAS - CAUSAS - SOLUÇÕES Problemas A máquina não se liga. A máquina não está ligada à rede eléctrica. Não foi ligada a fi cha na tomada posicionada na parte traseira da máquina. Máquina em Stand-by. O café não está bastante quente. As chávenas estão frias. Não sai água quente ou vapor. -
Page 35: Safety Rules
SAFETY RULES N CASE OF EMERGENCY Immediately unplug the cable from the outlet. SE THE APPLIANCE ONLY - Indoors. - To prepare coffee, dispense hot water, froth milk or heat beverages using steam. EVER USE THE APPLIANCE For purposes other than those indicated above, in order to avoid danger. Do not introduce any substances other than those indicated in the instruction manual. -
Page 36: Normas De Segurança
M CASO DE EMERGÊNCIA Retire imediatamente a fi cha da tomada de rede. TILIZE EXCLUSIVAMENTE O APARELHO - Em lugar fechado - Para preparar café, água quente, para bater o leite ou para aquecer bebidas utilizando o vapor. UNCA UTILIZE O APARELHO para fi... - Page 37 SAFETY RULES AILURES - Do not use the appliance in case of sure or suspected faults such as after falls. - Any repairs must be performed by an authorized customer service center. - Do not use the appliance with a defective power cable. If damaged, the power cable must be replaced by the manufacturer or authorized service centre.
- Page 38 VARIAS - Não utilize o aparelho no caso de avaria verifi cada ou suspeita, por exemplo após uma queda. - Consertos eventuais deverão ser realizados pelo serviço de assistência autorizado. - Não utilize um aparelho com cabo de alimentação defeituoso. Se o cabo de alimentação estiver danifi cado, deverá...