
Related Manuals for ION Pro Glow 8


Summary of Contents for ION Pro Glow 8
- Page 1 Pro Glow 8 Quickstart Guide English ( 3 – 9 ) Guía de inicio rápido Español ( 10 – 16 ) Guide d’utilisation rapide Français ( 17 – 23 ) Appendix English ( 24 – 25 )
- Page 3 Safety Instructions & Warranty Information Booklet Support For the latest information about this product (system requirements, compatibility information, etc.) and product registration, visit ionaudio.com. For additional product support, visit ionaudio.com/support. Caution: Do not expose Pro Glow 8 to rain or standing water.
-
Page 4: Quick Setup
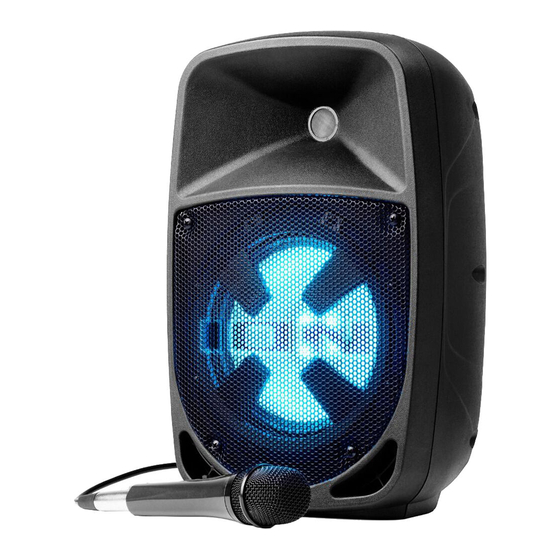
Quick Setup Connection Diagram Items not listed under Introduction > Box Contents are sold separately. USB drive SD Card Smartphone Microphone Power Tablet... - Page 5 Features Rear Panel 1. Media Panel: Controls for the USB, SD, FM radio, and Bluetooth sources. The Media Panel Mode source symbol will illuminate when that source is playing. Note: A USB drive or SD card must contain playable files in order for it to appear properly in the media panel’s display.
- Page 6 17. Light Mode Button: Press this button to select how the lights on the front panel function: • Color Cycle: The lights slowly glow and cycle through colors. Press and hold the light mode button to freeze the lights on one color. This is the default mode when Pro Glow 8 is first powered on. •...
- Page 7 Media Panel Remote Note: Aim the remote straight at the front of the speaker woofer. Room lighting and battery life can affect the operating range of the remote control. Note: In order to use the remote control for the first time, first pull out the tab attached to the battery compartment.
- Page 8 2. Power on Pro Glow 8. 3. Use the Mode button to select Bluetooth mode, which appears as "bt" in the display. Pro Glow 8 will automatically go into pairing mode to search for Bluetooth devices. You will know you are in pairing mode when the Bluetooth icon is flashing.
-
Page 9: Troubleshooting
Also, try to reduce the overall volume of Pro Glow 8. If there is too much bass: Try adjusting the tone or EQ control from Pro Glow 8 or your sound source to lower the bass level. This will allow you to play the music louder before clipping (distortion) occurs. - Page 10 Para obtener la información más completa acerca de este product (los requisitos del sistema, compatibilidad, etc) y registro del producto, visite ionaudio.com. Para obtener soporte adicional del producto, visite ionaudio.com/support. Precaución: No exponga el Pro Glow 8 a lluvia ni lo coloque en agua.
- Page 11 Instalación rápida Diagrama de conexión Los elementos que no se enumeran en Introducción > Contenido de la caja venden por separado. Unidad flash USB Tarjeta SD Teléfono inteligente (smartphone) Micrófono Alimentación Tableta...
- Page 12 Características Panel trasero 1. Panel de medios: Controles para fuentes de USB, SD, radio FM y Bluetooth. El símbolo de fuente del modo panel de medios se iluminará cuando se esté reproduciendo esa fuente. Nota: Una unidad USB o tarjeta SD debe contener archivos reproducibles para poder visualizarse de manera correcta en la pantalla del panel de medios.
- Page 13 18. Entrada del cable de corriente (IEC): Inserte aquí el cable de corriente incluido para alimentar la unidad. 19. Fusible: La orientación del portafusibles determina el ajuste de voltaje actual del Pro Glow 8. Si el fusible de la unidad está roto, levante esta lengüeta para reemplazar el fusible. Reemplácelo por un fusible con especificación apropiada (impresa debajo de la entrada del cable de alimentación de la...
- Page 14 Control remoto del panel de medios Nota: El símbolo de fuente del modo panel de medios se iluminará cuando se esté reproduciendo esa fuente. La iluminación de la sala y la vida útil de la pila pueden afectar al alcance operacional del control remoto.
- Page 15 1. Enchufe un cable XLR en la salida de mezcla ubicada en el panel trasero de uno de los Pro Glow 8. 2. Enchufe el otro extremo del cable USB en la entrada XLR del otro Pro Glow 8. 3. Encienda ambos altavoces. Utilice el volumen de la entrada auxiliar del segundo altavoz para...
- Page 16 Si esto no funciona y ya se había conectado al Pro Glow 8 anteriormente, busque Pro Glow 8 en la lista de dispositivos disponibles o previamente conectados en el menú Bluetooth de su dispositivo de audio, toque el icono de engranaje o "i"...
- Page 17 Pour les dernières informations concernant ce produit (la configuration système minimale requise, la compatibilité, etc) et l'enregistrement du produit, veuillez visitez le site ionaudio.com. Pour de l'assistance supplémentaire, veuillez visiter ionaudio.com/support. Mise en garde : Ne pas exposer le Pro Glow 8 aux intempéries ou reposer dans l'eau.
- Page 18 Démarrage rapide Schéma de connexion Les éléments qui ne figurent pas dans Présentation > Contenu de la boîte sont vendus séparément. Clé USB Carte mémoire SD Téléphone intelligente (smartphone) Microphone Alimentation Tablette...
- Page 19 Caractéristiques Panneau arrière 1. Panneau des médias : Commandes pour les sources USB, SD, radio FM et Bluetooth. Le symbole du panneau des médias s'allume lorsque cette source est en cours de lecture. Remarque : La clé USB ou la carte SD doit contenir des fichiers lisibles par l'appareil afin que derniers s’affichent...
- Page 20 18. Câble d'alimentation (IEC) : Branchez le câble d'alimentation inclus ici afin d'alimenter l'appareil. 19. Fusible : L'orientation du porte-fusible détermine le réglage de tension de la Pro Glow 8. Si le fusible de l'appareil est endommagé, soulevez cette languette afin de remplacer le fusible. Remplacez-le par un fusible de calibre approprié...
- Page 21 Télécommande du panneau des médias Remarque : Pointez la télécommande vers le haut-parleur d'extrêmes graves de l'enceinte. L'éclairage de la pièce et la charge de la pile peuvent affecter la plage de fonctionnement de la télécommande. Remarque : Avant d'utiliser la télécommande pour la première fois, retirez la languette du compartiment à pile.
- Page 22 Pro Glow 8 passera automatiquement en mode jumelage afin de rechercher les appareils Bluetooth. Vous saurez que le mode jumelage est activé lorsque l’icône Bluetooth clignotera. 4. Accédez à l'écran de configuration de votre appareil Bluetooth, recherchez « PRO GLOW 8 » et lancez le jumelage. L'icône Bluetooth demeurera allumée.
- Page 23 Bluetooth de votre appareil audio, puis appuyer sur l'icône engrenage ou « i » située à côté de « Oublier cet appareil ». Mettez la Pro Glow 8 hors tension et de nouveau sous tension et réessayez de la jumeler une fois qu’elle apparaît dans la liste des appareils disponibles.
-
Page 24: Technical Specifications
Appendix (English) Technical Specifications Output Power 150 W (peak) 103 dB (peak) Max SPL (@ 1 m) 8.0” / 203 mm woofer; 1.5” / 38.1 mm voice coil Low Frequency High Frequency 0.98” / 25 mm Ti. Diap, 8Ω Crossover 3 kHz Frequency Response 50 Hz –... - Page 25 ION Audio is a trademark of ION Audio, LLC, registered in the U.S. and other countries. The Bluetooth word mark and logos are owned by the Bluetooth SIG, Inc. and any use of such marks by ION Audio is under license. All other product names,...
- Page 28 i o n a u d i o . c o m Manual Version 1.0...