
Related Manuals for KAP ROiK-MIB2


Summary of Contents for KAP ROiK-MIB2
- Page 1 Instruction Manual Cayenne,Touareg ROiK-MIB2 ANDROID INTERFACE DATE. 2019.02.25 Korea Auto Parts www.kaptrade.com...
- Page 2 COMPONENTS ROiK-MIB2 Power/CAN Cable Universal Cable LVDS Cable AV Cable IR Cable External GLONASS Speaker WiFi/BT Antenna x 2 GPS Antenna Key Pad...
- Page 3 SPEC ※ ANDROID Android 7.1.2(Nougat) Six-Core 64bit Server Class Cortex-A72 Core @2.0Ghz, Mali-T860 Quad-Core GPU (Total Ten-Core) H.264/H.265/VP9 up to 4Kx2K@60fps (4K Video) Memory 2GB DDR3 USB2.0 High Speed Port x 1 USB 3.0 USB3.0 5.0Gbps Port x 1 Wireless 2.4GHz/5GHz Dual-Band WiFi, Support 802.11a/b/g/n/ac, Bluetooth 4.1 Ublox8 GPS(GLONASS/BEIDOU/GALILEO/QZSS/SBAS)
-
Page 4: Connector Pin Assignment
CONNECTOR PIN ASSIGNMENT Power Cable 11 13 8 10 12 14 (POWER/CAN) Yellow Purple Green White Purple Orange ECU_CAN_ MON_CAN_ MON_CAN_ BATTERY VDD-12V REVERSE IN_H IN_H OUT_H Black Orange Blue Brown Green ECU_CAN_ MON_CAN_ MON_CAN_ REAR_12V IN_L IN_L OUT_L POWER/CAN AV IN/OUT AV IN AV Cable... - Page 5 DIP S/W INFORMATION ON 1 Pin No. HDMI Mode Skip HDMI Mode Navigation Mode Skip Navigation Mode External Rear Camera Orignal Rear Camera Using 360 AVM Off Only DVBT Mode Skip DVBT Mode DVD Mode Skip DVD Mode Using 360 AVM 360 AVM not used IR For ASUKA Touch IR for Remote Controller...
- Page 6 DIP S/W INFORMATION Pin No. 1200x720 1280x720 (Same Ratio 800x480) Use External GPS Antenna Use Car GPS Cable (DIP S/W 2 Must ON) (Option)
- Page 7 CABLE CONNECTION PORSCHE(CAYENNE) / VOLKSWAGEN(TOUAREG) Cut our LVDS cable plastic lock. (This cable connect to Interface) Cut Interface "LVDS OUT" connector. No need to cut OEM cable and connector.
-
Page 8: Cable Connection
CABLE CONNECTION PORSCHE(CAYENNE) / VOLKSWAGEN(TOUAREG) POWER/CAN KEYPAD LVDS IN/OUT AV IN AV IN/OUT WIFI/BT Black LVDS Cable from command AV Cable Universal Cable LVDS cable from Interface to command... - Page 9 OEM BUTTON USAGE PORSCHE(CAYENNE) / VOLKSWAGEN(TOUAREG) PORSCHE CAYENNE VOLKSWAGEN TOUAREG Button Press Function Radio Button Long Press ( 2sec ) HDMI->NAVI->DVBT->DVD->OEM HOME Short Press Back to oem screen Jog Wheel Dial, Push Remote menu choice and move (DVBT,DVD) Change ratio of Screen ( for Cayenne ) OPTION Long Press ( 2sec ) Ratio : Full , 4 : 3...
- Page 10 SCREEN RATIO PORSCHE(CAYENNE) FULL SCREEN 4 : 3 RATIO ※ RATIO Press the option button for 2 sec. CAYENNE The screen is working in 2 steps ( Full, 4 :3 Ratio )
-
Page 11: Screen View
SCREEN VIEW – Split Screen Mode ※ Split Screen Press and hold the multi-tasking button to enter the split screen mode. In the split screen mode, press center to reverse the direction. ※ Some apps are not work on Split Screen Mode Long Press Normal... - Page 12 DVB-T CONNECTION DIAGRAM FOR AV INPUT IR – DVB-T DO NOT USE. DO NOT USE. Open the cover of DVB-T. Connect ‘DVBT-IR’ provided to ‘A’ on picture DO NOT USE. 1 3 5 7 11 13 19 21 1 3 5 7 9 11 13 15 2 4 6 8 10 12 14 16 20 22 2 4 6 8 10 12 14 16...
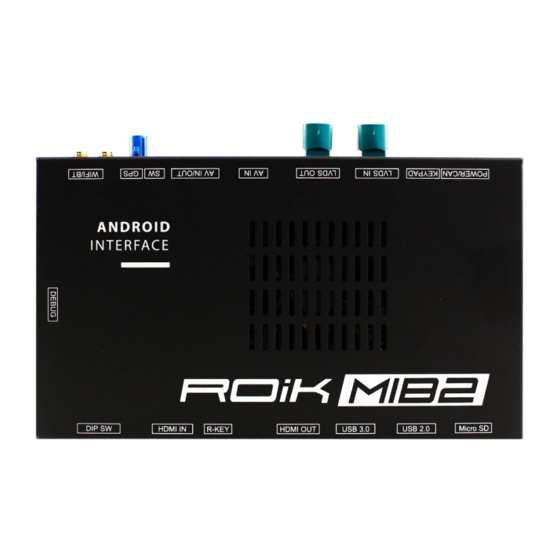
- Page 13 HEADREST MONITOR ※ Headrest Monitor (HDMI Out) HDMI ANDROID INTERFACE MIB2P DIP SW HDMI IN R-KEY HDMI OUT USB 3.0 USB 2.0 MicroSD...
-
Page 14: Device Settings
DEVICE SETTINGS Function Button RESET SETTINGS Reset settings to default RESTART DEVICE System Reboot External Speaker Turn on/off external speaker Softkey Enable Use soft key or disable (Floating button when disabled) Softkey Position Soft key position setting (side, bottom) Softkey Auto Hiding Set softkey auto-hide time Zoom Button Enable Enable or Disable the Zoom Button on the Soft Key... - Page 15 DEVICE SETTINGS - FMT Settings 1. FMT Settings 2. Press 'OFF' in the FMT Setting screen. 3. Setting...
- Page 16 DEVICE SETTINGS – CALIBRATION (RESISTIVE TOUCH) ※ Capacitive touch panel no need set calibration Device Settings > Touch Calibration Calibration mode Press and hold the center of '+‘, 5 times. DEVICE SETTINGS - USER LOGO UPDATE Set User Boot Logo Activate 1.
-
Page 17: Firmware Upgrade
FIRMWARE UPGRADE Recommend Copy ‘system_roik10’ folder to USB Memory root and insert to USB1 Port. Select Upgrade Menu, it will start upgrade *‘/usb disk/system_roik10’ Folder have ‘update.img’ file * If there is no update file, "Upgrade Device" menu is not show ※... -
Page 18: Factory Reset
FACTORY RESET Recommend Setting ▶ Backup & Reset ▶ Factory data Reset Select “RESET DEVICE” = Factory Reset Wait until restart unit ※ After reboot system, it takes 3~4 min... -
Page 19: Interface Setting
INTERFACE SETTING ANDROID INTERFACE MIB2P DIP SW HDMI IN R-KEY HDMI OUT USB 3.0 USB 2.0 MicroSD Enter the setting menu MENU Select setting menu Moving Up Moving Down DOWN... -
Page 20: Quick Info
USE PAS-LINE SETTING Select “REAR” To use pas line, you can use it after selecting line on the setting screen Select “Parking guide line” QUICK INFO ANDROID INTERFACE MIB2P DIP SW HDMI IN R-KEY HDMI OUT USB 3.0 USB 2.0 MicroSD To Enter Quick Info. - Page 21 A-912 RM Tera-Tower2, 201 Songpa-Daero, Songpa-gu, Seoul, Korea T. (+82) 6204-0912 F. (+82) 6204-0913 E. kap@kaptrader.com...