
Related Manuals for Toshiba SD-P2700


Summary of Contents for Toshiba SD-P2700
- Page 1 VIDEO AUDIO DIGITAL VIDEO PORTABLE DVD PLAYER SD-P2700 OWNER’S MANUAL © 2004 TOSHIBA CORPORATION Introduction Basic playback Advanced playback Function setup Connections Others...
-
Page 2: Introduction
Operation with non-compliant peripherals or peripherals not recommended by Toshiba is likely to result in interference to radio and TV reception. Changes or modifications made to this equipment, not expressly approved by Toshiba, or parties authorized by Toshiba, could void the user’s authority to operate the equipment. - Page 3 In the spaces provided below, record the Model and Serial No. located on the bottom of your DVD player. Model No. Serial No. Retain this information for future reference. Location of the required label...
-
Page 4: Important Safety Instructions
Introduction IMPORTANT SAFETY INSTRUCTIONS CAUTION: PLEASE READ AND OBSERVE ALL WARNINGS AND INSTRUCTIONS GIVEN IN THIS OWNER’S MANUAL AND THOSE MARKED ON THE UNIT. RETAIN THIS BOOKLET FOR FUTURE REFERENCE. This set has been designed and manufactured to assure personal safety. Improper use can result in electric shock or fire hazard. - Page 5 Take the battery pack to an authorized Toshiba service provider. f) Keep the battery pack away from heat or fire, if...
- Page 6 Introduction IMPORTANT SAFETY INSTRUCTIONS c) Do not charge, heat, open, or short-circuit the batteries. Do not throw the batteries into a fire. d) Do not leave a dead or exhausted battery in the remote control. e) If you do not use the remote control for a long period of time, remove the battery to avoid possible damage from battery corrosion.
-
Page 7: Precautions
Precautions Notes on handling Do not shock the LCD monitor. It may cause unit damage and malfunction. Do not use the player in a place subject to vibration. Neglecting this may cause malfunction of the player or damage to the disc. Do not leave the player in a vehicle. -
Page 8: Notes And Information
Introduction Notes and Information Structure of disc contents Normally, DVD video discs are divided into titles, and the titles are sub-divided into chapters. DVD audio discs are divided into groups, and the groups are sub-divided into tracks. VIDEO CDs/audio CDs are divided into tracks. DVD video disc Title 1 Chapter 1... -
Page 9: Playable Discs
DVD players with the highest standards of quality and, as a result, such incompatibilities are rare. If you happen to experience and difficulty playing a DVD on a Toshiba DVD player, please feel free to call our Contact listed in “How to Obtain Service” Disc... - Page 10 Saving data • It is recommended that you back up your memory card data. Toshiba is not liable for any damage caused by the use of any memory card with this DVD player. Toshiba will not compensate for any lost data or recording(s) caused by the use of such cards.
-
Page 11: Table Of Contents
Table of Contents Introduction SAFETY PRECAUTIONS ... 2 IMPORTANT SAFETY INSTRUCTIONS ... 4 Precautions ... 7 Notes and Information ... 8 Notes on region numbers ... 9 Table of Contents ... 11 Identification of Controls ... 12 Main unit ... 12 Side view ... -
Page 12: Identification Of Controls
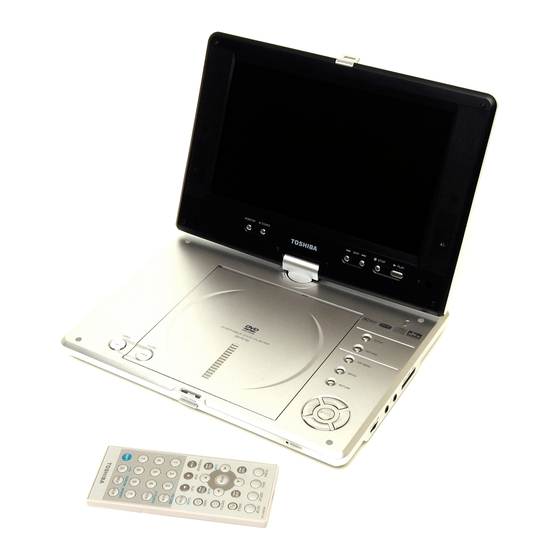
Introduction Identification of Controls See the page in for details. Main unit LCD monitor swivels 180 degrees around to the left. MONITOR button AV SOURCE button Disc cover Disc cover OPEN button Open switch POWER indicator 18 61 SETUP button PICTURE button TOP MENU button MENU button... -
Page 13: Side View
Side view DC IN jack Power switch Volume control Headphone jack 1 Memory card slot Headphone jack 2 Rear view AV OUT jack COMPONENT VIDEO connector AV IN jack S VIDEO jack BITSTREAM/PCM jack 58 59 60... -
Page 14: Remote Control
Introduction Identification of Controls (continued) The instructions in this manual describe the functions of the remote control. See the page in Remote control MENU button (see below) TOP MENU button SKIP button ENTER button Direction buttons REV button SLOW button PAUSE/STEP button STOP button Number buttons... -
Page 15: Loading The Remote Control Battery
Loading the remote control battery While pushing the holder in direction 1 , simultaneously slide it out in direction 2 . Backside Place a coin-shaped battery (CR2025) with the side up on the holder. Keep the holder horizontal so that the battery does not fall through. -
Page 16: Power Connection
Introduction Power Connection Connect the supplied AC adapter to power the player. For mobile use, the battery pack (supplied) is also available. When using the battery pack, follow the instructions on page CAUTION • Do not connect the power plug to a power outlet other than that indicated on the label, as this can result in a risk of fire or electric shock. - Page 17 About this manual • The numbers indicated by lines on the illustrations correspond to the associated steps of the operation. • Aside from the section “Playing a Disc”, explanations of operations only include illustrations of the corresponding buttons on the remote control. The buttons sharing the same name on the main unit can also be used in an identical manner.
-
Page 18: Playing A Disc
Basic playback Playing a Disc This section shows you the basics on how to play a disc. indicates a reference page of this manual. See the page in for details. DVD-V DVD-A Basic playback Preparations • Connect the AC adapter or the battery pack player. -
Page 19: Start Playback
This type of damage is not covered by your Toshiba Warranty. To avoid this, be sure to press the STOP button once the movie is completed. NOTICE Never operate the player in a moving vehicle. - Page 20 Basic playback Playing a Disc (continued) Basic playback (continued) Power switch OPEN button To adjust the volume of the speakers or the connected headphones Turn volume control. Right : Increase volume. Left : Decrease volume. To pause playback (still mode) Press PAUSE/STEP during playback.
- Page 21 Still pictures included on DVD audio discs DVD audio discs may include still pictures, which are classified into two large groups. • Slideshow: Still pictures appear one after another automatically consistent with the disc program. Their order, or viewing time cannot be modified.
-
Page 22: Variable Speed Playback
Basic playback Variable Speed Playback You can play discs at various speeds, and resume playback from the location where you stopped playback. DVD-V DVD-A Playing in fast reverse or fast forward directions Press REV or FWD on the remote control during playback. -
Page 23: Playing In Slow-Motion
DVD-V DVD-A Playing in slow-motion Press SLOW while pressing SHIFT during playback. Each time you press the SLOW button, the slow-motion speed SHIFT SHIFT changes. If you press the SLOW SLOW SLOW during playback, you can view the picture in reverse slow-motion. (Only when using a DVD video disc.) Each time you press the SLOW... -
Page 24: Locating A Specific Title, Chapter, Or Track
Basic playback Locating a Specific Title, Chapter, or Track Normally, DVD video discs are divided into titles, and the titles are sub-divided into chapters. Contents of DVD audio discs are divided into groups, and the groups are sub-divided into tracks. VIDEO CDs and audio CDs are divided into tracks. You can quickly locate any specific title, chapter, or track. -
Page 25: Locating A Desired Section By Entering Its Corresponding Number
DVD-V DVD-A Locating a desired section by entering its corresponding number Press T several times. The display changes each time this button is pressed. If you want to locate a title, chapter or track, display “Title,” “Chapter,” or “Track” respectively. You can also enter the time counter of the desired location. -
Page 26: Locating A Specific Chapter Or Track
Basic playback Locating a Specific Title, Chapter, or Track (continued) DVD-V DVD-A Locating a specific chapter or track Press SKIP ( ) repeatedly to locate the chapter or track you want. Playback starts from the selected chapter or track. To locate succeeding chapters or tracks. SKIP Playback starts from the beginning of the SKIP... -
Page 27: Playing Mp3/Wma Files
MP3 and WMA formats, prior to the downloading thereof. Toshiba has no right to grant and does not grant permission to download any copyrighted content. -
Page 28: Viewing Jpeg Files
Basic playback Viewing JPEG Files You can play JPEG files that have been recorded on a CD-R or memory card on this player. Viewing JPEG Files Preparation Prepare a CD or memory card that contains JPEG files you want to view Insert a CD or memory card that contains JPEG files into the player. - Page 29 To pause the slide show Press PAUSE/STEP during playback. PAUSE/STEP To resume the slide show, press the PLAY button. To switch pictures Press SKIP ( ) during playback. SKIP : Switch to the previous picture : Switch to the next picture SKIP Notes •...
- Page 30 • Be sure to stop playing the disc before changing the mode. JPEG files compatibility Discs and pixels whose compatibility with this unit has been confirmed by TOSHIBA are as follows. Kodak Picture CD JPEG disc compatibility with this unit is limited as follows: •...
-
Page 31: Advanced Playback
Advanced playback Customizing the performance of your player. Directly Accessing a Specific Location Repeat Play Playing in a Favorite Order Playing in Random Order Zooming a Picture Selecting the Sound Enhancement (E.A.M.) Selecting a Camera Angle Selecting Subtitles Selecting a Language Operating in the On-screen Display Mode Adjusting the Picture... -
Page 32: Directly Accessing A Specific Location
Advanced playback Directly Accessing a Specific Location You can access a specific location by entering its corresponding time (hours, minutes, seconds). DVD-V DVD-A Entering the time counter of the desired location Press T several times. The display changes each time this button is pressed. -
Page 33: Repeat Play
Repeat Play You can play a specific title, chapter, track, or segment repeatedly. (Title repeat, chapter/track repeat, A-B repeat) DVD-V DVD-A Repeating a title, chapter, or track Press REPEAT. Each time you press the REPEAT RANDOM button, the repeat mode changes as REPEAT follows. -
Page 34: Playing In A Favorite Order
Advanced playback Playing in a Favorite Order You can combine your favorite titles, chapters, or tracks and play them in the order you determine. You can program up to 20 selections into the memory. (Memory playback) DVD-V DVD-A Setting titles, chapters, or tracks in a favorite order Press MEMORY while pressing SHIFT during stop. -
Page 35: Playing In Random Order
Playing in Random Order You can play chapters or tracks in random order. (Random playback) DVD-V DVD-A Playing chapters or tracks in random order Press RANDOM while pressing SHIFT. Each time you press the RANDOM SHIFT button, the random mode changes as follows. -
Page 36: Zooming A Picture
Advanced playback Zooming a Picture You can magnify areas within a picture. DVD-V DVD-A Zooming a picture During normal, slow, still, fast reverse or fast forward playback, press ZOOM. The player enters the zoom AV SOURCE playback mode, and the zoom icon ZOOM appears. -
Page 37: Selecting The Sound Enhancement (E.a.m.)
Selecting the Sound Enhancement (E.A.M.*) You can easily select a preferred audio enhancement. *E.A.M.: Enhanced Audio Mode DVD-V DVD-A Selecting the sound enhancement Press E.A.M. The sound enhancement menu PICTURE appears. E.A.M. E.A.M. : Normal Select the sound enhancement by pressing E.A.M. -
Page 38: Selecting A Camera Angle
Advanced playback Selecting a Camera Angle If a scene was recorded with multiple angles, you can easily change the camera angle of the scene you are viewing. DVD-V DVD-A Changing the camera angle Press ANGLE while playing a scene recorded with multiple angles. While playing a scene recorded with ANGLE multiple angles, the angle icon (... -
Page 39: Selecting Subtitles
Selecting Subtitles You can display subtitles on the screen and select a subtitle language from those included on the DVD video disc. Good evening! Bonsoir! ¡Buenas tardes! DVD-V DVD-A Selecting a subtitle language Press SUBTITLE during playback. The current subtitle setting is SUBTITLE displayed. -
Page 40: Advanced
Advanced playback Selecting a Language You can select a preferred language and sound recording system from those included on the disc. Good morning! Bonjour! DVD-V DVD-A DVD-A Selecting a playback audio setting Press AUDIO during playback. The current audio setting is AUDIO displayed. - Page 41 Output sound conversion table (sampling frequency/quantization bit) Sound recording system Discs Dolby Digital 48 kHz/16 bit 48 kHz/20 bit Linear 48 kHz/24 bit video discs 96 kHz/16 bit 96 kHz/20 bit 96 kHz/24 bit MPEG1, MPEG2 VIDEO CDs MPEG1 Linear PCM 44.1 kHz/16 bit Audio CDs 44.1 kHz/16 bit 48 kHz/16 bit...
-
Page 42: Operating In The On-Screen Display Mode
Advanced playback Operating in the On-screen Display Mode When you turn on the on-screen display, you can view information on operational status and access features and settings. DVD-V DVD-A On-Screen Display Operation Press DISPLAY during playback. The following display appears. DISPLAY e.g. - Page 43 When playing a VIDEO CD or audio CD To select a track. To select the audio channel (Stereo, Mono L&R, Left, Right). To select a playback audio setting. To repeat a track or entire disc. e.g. Current track number Note Some discs may not be compatible with a set of these operations.
-
Page 44: Adjusting The Picture
Advanced playback Adjusting the Picture You can easily select a preferred picture. DVD-V DVD-A Adjusting the picture Press PICTURE while pressing SHIFT. Alternatively press PICTURE on the main unit. The picture setting display SHIFT appears. PICTURE Brightness ||||||||... 08 E.A.M. Each time you press the button, the setup items changes as follows. -
Page 45: Function Setup
Function setup You can change the default settings to customize performance to your preference. Customizing the Function Settings... -
Page 46: Customizing The Function Settings
Function setup Customizing the Function Settings You can change the default settings to customize performance to your preference. DVD-V DVD-A Setting procedure Press SETUP during stop. The following on-screen display SETUP appears. e.g. TV Shape Press ENTER to select Press to select the setting you want to change, then press ENTER. - Page 47 Setting Setting TV Shape TV Shape Language On-screen Audio Subtitle Disc Menu Audio E.A.M. D.R.C. Audio Out Select Operation Parental Screen Saver Default Priority Contents Equalizer EQ Mode Mode • When using a DVD audio disc that includes pictures, some settings marked effective.
-
Page 48: Setting Details
Function setup Customizing the Function Settings (continued) Setting details TV Shape TV Shape DVD-V 4:3 Normal: Select when a standard 4:3 TV is connected. Displays pictures cropped to fill your TV screen. Either or both sides of the picture are cut off. 4:3 Letterbox: Select when a standard 4:3 TV is connected. - Page 49 AUDIO MENU E.A.M. D.R.C. Audio Out Select E.A.M. DVD-V You can obtain expansive virtual surround sound effects from just two speakers. Normal: Normal sound. To obtain expansive virtual surround sound effects from just two speakers. 3D (Headphone): To obtain expansive virtual surround sound effects when using headphone.
- Page 50 Function setup Customizing the Function Settings (continued) Setting details Parental Screen Saver Default Priority Contents Parental DVD-V DVD video discs equipped with the parental lock function are rated according to their content. The contents allowed by a parental lock level and the way a DVD video disc can be controlled may vary from disc to disc.
-
Page 51: Pbc Vcd
ON : To use the menu when playing a PBC-featured VIDEO CD. OFF : When playing a VIDEO CD without using the menu. Screen Saver DVD-V ON : The screen saver operates. OFF : The screen saver is disengaged. Default DVD-V DVD-A Reset : To restore settings to the factory set. -
Page 53: Connections
Connections You can connect the player to a TV or audio system. Also, you can connect a battery pack to power the player. Connecting to a TV or audio system Connecting to Headphones Viewing Pictures From Connected Video Equipment Connecting to Audio Equipment Using the Battery Pack Using the automobile/vehicle adapter or power port... -
Page 54: Connecting To A Tv Or Audio System
Connections Connecting to a TV or audio system Connect the player to your TV or audio system. For details of output sound, see Connecting to a TV To S VIDEO OUT If the TV has an S video input, connect the player with an S video cable. -
Page 55: Connecting To An Audio System And Tv Equipped With Component Video Inputs
Connecting to these inputs allows you to view the highest quality pictures with less flicker. ColorStream is a registered trademark of Toshiba America Consumer Products, L.L.C. To AV OUT... -
Page 56: Connecting To Headphones
Connections Connecting to Headphones You can listen to movies and music privately by connecting headphones. Headphones (not supplied) (headphone) jack Viewing Pictures From Connected Video Equipment You can use the LCD of this player to monitor pictures of video equipment connected via the AV IN jack. To select the external AV input mode, press the AV SOURCE button. -
Page 57: Connecting To Audio Equipment
Connecting to Audio Equipment You can enjoy high quality dynamic sounds by connecting the player to audio equipment. • For connection to your TV, see “Connecting to a TV” • For details of output sound, see • This section uses the following reference marks. : Front speaker : Rear speaker : Sub woofer... -
Page 58: Connecting To An Amplifier Equipped With A Dolby Digital Decoder
Connections Connecting to Audio Equipment (continued) Connecting to an amplifier equipped with a Dolby Digital decoder Dolby Digital Dolby Digital is the surround sound technology used in theaters showing the latest movies, and is now available to reproduce this realistic effect in the home. You can enjoy motion picture and live concert DVD video discs with this dynamic realistic sound by connecting the player to a 6 channel amplifier equipped with a Dolby Digital decoder or Dolby Digital processor. -
Page 59: Connecting To An Amplifier Equipped With A Dts Decoder
Connecting to an amplifier equipped with a DTS decoder Digital Theater Systems (DTS) DTS is a high quality surround technology used in theaters and now available for home use, on DVD video discs or audio CDs. If you have a DTS decoder or processor, you can obtain the full benefit of 5.1 channel DTS encoded sound tracks on DVD video discs or audio CDs. -
Page 60: Connecting To An Amplifier Equipped With A Digital Audio Input
Connections Connecting to Audio Equipment (continued) Connecting to an amplifier equipped with a digital audio input 2 channel digital stereo You can enjoy the dynamic sound of 2 channel digital stereo by connecting an amplifier equipped with a digital audio input and speaker system (right and left front speakers). -
Page 61: Using The Battery Pack
Using the Battery Pack Warning • Do not use a battery pack other than one specified as it can result in a fire or damage to the unit. • Do not heat, open, or short-circuit the battery pack. Do not throw the battery pack into a fire. Doing so may cause an explosion or a fire. - Page 62 Connections Using the Battery Pack (continued) Detaching the battery pack 1 Turn the player off. 2 Disconnect the AC adapter and the power cord from the player. 3 Turn the player upside down. 4 Slide the battery pack’s lock switch in the direction of the arrow , then slide the battery pack in the direction of the arrow...
-
Page 63: Using The Automobile/Vehicle Adapter Or Power Port
Using the automobile/vehicle adapter or power port For use of the DVD player in a car, this adapter can power the DVD player from the cigarette lighter socket. WARNING • NEVER operate the DVD player or view a DVD Video while operating an automobile or other vehicle. Note: doing so is illegal in many jurisdictions. - Page 64 Connections Instructions for Use 1 Turn off the DVD player. 2 Insert the pin plug of the adapter into the DC IN 12V jack of the DVD player. The LED illuminates when powered. 3 Insert the plug of the adapter into the cigarette lighter socket or power port fully.
-
Page 65: To Turn The Lcd Monitor
To turn the LCD monitor You can turn the LCD monitor 180 degrees to the left. In addition, you can also fold up the player to operate it with the LCD monitor side up. To turn the LCD monitor 1 Put the player on a level place such as a desk. 2 Open up the LCD monitor vertically. -
Page 67: Others
Others Before Calling Service Personnel Specifications Limited United States Warranty for Portable DVD Player... -
Page 68: Before Calling Service Personnel
Others Before Calling Service Personnel Check the following guide for the possible cause of a problem before contacting service. Symptoms and correction Symptom Cause No power. • The AC adapter or power plug is disconnected. • The battery pack has been removed. •... - Page 69 Symptom Cause The remote control does not • The remote control is not pointed at the work properly. remote sensor of the player. • The remote control is too far from the player. • The batteries in the remote control are exhausted.
-
Page 70: Specifications
Others Specifications Player / Connectors / Liquid crystal display / Supplied accessories Player Power supply Mass External dimensions Signal system Laser Frequency range Operating conditions Connectors Video output (AV OUT) S video output (S VIDEO) Component video output (COMPONENT VIDEO) Audio output (BITSTREAM/PCM) Audio output (AV OUT) Video input (AV IN) -
Page 71: Limited United States Warranty For Portable Dvd Player
Limited United States Warranty for Portable DVD Player Toshiba America Consumer Products, L.L.C. (“TACP”) makes the following limited warranties to original consumers in the United States. THESE LIMITED WARRANTIES EXTEND TO THE ORIGINAL CONSUMER PURCHASER OR ANY PERSON RECEIVING THIS PORTABLE DVD PLAYER AS A GIFT FROM THE ORIGINAL CONSUMER PURCHASER AND TO NO OTHER PURCHASER OR TRANSFEREE. - Page 72 (1) To find the nearest TACP Authorized Service Station for Portable DVD Players purchased in the United States, visit TACP’s web site at www.toshiba.com/tacp, or call toll free 1-800-631-3811. (2) Present your bill of sale or other proof of purchase to the TACP Authorized Service Station, together with the entire Portable DVD Player.
-
Page 73: Canadian Warranty Information
Toshiba of Canada Limited 191 McNabb Street Markham, Ontario L3R 8H2 - IMPORTANT - GARANTIE CANADIENNE GARANTIE NORMALE TYPE D’APPAREIL... - Page 74 Others Memo...
- Page 75 Memo...
- Page 76 Printed in China...