Table of Contents
Advertisement
Advertisement
Table of Contents

Related Manuals for Timex Expedition 810-095009-NA


Summary of Contents for Timex Expedition 810-095009-NA
-
Page 1: User Manual
USER MANUAL W253 810-095009-NA... - Page 2 English page 1 Français page 51 Español página 99...
-
Page 3: Table Of Contents
INTRODUCTION ........5 TIMEX ®... - Page 4 GLOSSARY......... . . 40 TIMEX INTERNATIONAL WARRANTY ......43...
-
Page 5: Introduction
INTRODUCTION Some of the best places on the planet are the hardest to get to. Your new Timex ® Expedition ® ™ watch will help you get there. Equipped with essential outdoor features, the WS4 ™ watch takes a fresh approach to wrist-top adventure instruments. -
Page 6: Timex ® Expedition ® Ws4
Enjoy your new instrument, yet keep in mind it is like a pet dog that needs exercise. Take it outdoors and put it and yourself through the paces.” -Conrad Anker World-Renowned Mountaineer Timex ® Expedition TIMEX ®... -
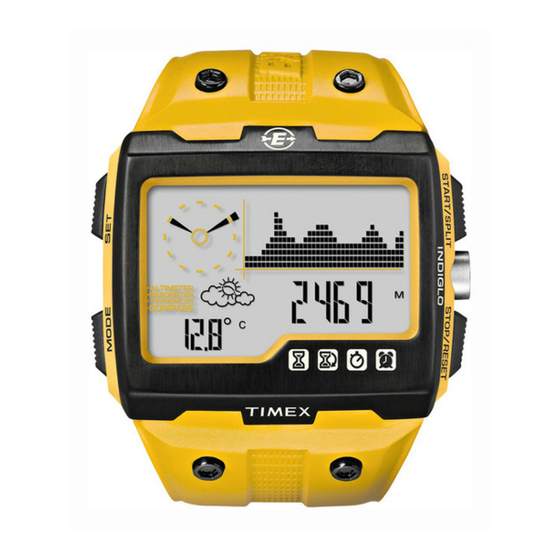
Page 7: Watch Features
WATCH FEATURES Time • Hours, minutes, and seconds displayed in 12- or 24-hour format. • Date displayed in MM-DD or DD.MM formats. • Second time zone, with independent hours, minutes, date, and format settings. • Hourly chime (optional). • Button beep (optional). •... -
Page 8: Timer
• Option to display lap or split time in larger digits. • During chronograph use, the WS4 ™ watch records key activity statistics that can be seen in Review Mode. Timer Countdown timer works up to 100 hours, with the option to repeat countdown up to 99 times. -
Page 9: Calibrating Altitude Or Barometer And Setting The Weather
3. Keeping the watch level and facing up, rotate it twice (taking at least 15 seconds per revolution) and then press MODE. 4. Press START/SPLIT (+) or STOP/RESET (-) to increase or decrease setting values to match your chosen declination angle. 5. -
Page 10: Instructions
INSTRUCTIONS TIME MODE Your watch shows the time for two time zones. In this mode, you can also choose measurement units (i.e., feet or meters; Fahrenheit or Celsius) and pick from three different display options. Setting the Time and Measurements 1. -
Page 11: Setting The Target Altitude Or Altitude Alarm
When the watch reaches the current altitude display you can also: Press START/SPLIT: view numeric current altitude or graphic display of altitude over the last 36 hours. Press and hold STOP/RESET: Reset accumulated altimeter statistics to zero to clear the memory. Setting the Target Altitude or Altitude Alarm Altimeter settings include: •... -
Page 12: Barometer Mode
4. Press MODE (NEXT) to advance to the next setting option. 5. Press SET (DONE) to finish. NOTE: The altimeter will display in either FT (feet) or M (meters) depending on which display unit you chose in Time Mode. See page 14 for information on setting units of measurement. ATTENTION: Your altimeter is sensitive to weather changes! Sudden changes in barometric pressure can change your altimeter reading by +/- 100 meters even if you have stayed in the same location. -
Page 13: Temperature And Forecast
• Current barometric pressure and the corrected sea level pressure. When the watch reaches the current barometric display you can also: Press START/SPLIT: Displays numeric current barometer reading or graphic display of the sea level pressure over the last 36 hours. Press and hold STOP/RESET: Reset accumulated barometer statistics to zero to clear the memory. -
Page 14: Compass Mode
NOTE: At low temperatures, the display could appear sluggish. Refer to page 9 for operating temperature range. Increase temperature surrounding watch to resume normal operation. NOTE: For more accurate temperature readings, try wearing the watch outside your jacket or clipping it to your belt or pack (ideally in an area not constantly exposed to the sun). - Page 15 CITY DEC. ANGLE CITY Amsterdam 0° W Chicago Anchorage 19° E Dallas Auckland 18° E Denver Beijing 3° W Dubai Berne 0° E Hong Kong Bogota 5° W Jerusalem Bozeman 13° E London Buenos Aires 8° W Los Angeles Calgary 15°...
-
Page 16: Using The Compass
4. Press START/SPLIT or STOP/RESET to increase or decrease setting values to match your chosen declination angle. 5. Press MODE to advance to the next setting option. 6. Press SET to finish. If you see CAL OK at the end of the calibration process you have successfully calibrated the compass. -
Page 17: Laps And Splits
BUTTON • Enter or exit the mode. MODE • Quickly display a lap or split after pressing START/SPLIT when chrono is running. • Stop the chrono. STOP/RESET • Switch between altimeter or barometer display information (if chrono is at 00:00:00). •... -
Page 18: Review Mode
ATTENTION: To save the life of your watch battery, when the chrono reaches 100 hours the watch will stop timing and the START/SPLIT button will not function. REVIEW MODE The Activity Review Mode on the watch captures lows, highs and adventure averages. -
Page 19: Timer Mode
NOTE: Press and hold START/SPLIT to quickly scroll through all data. ATTENTION: You will see the message NO DATA STORED if the Chrono has never been run. TIMER MODE Your WS4 ™ watch includes a standard countdown timer that you can use for both outdoor and indoor activities. -
Page 20: Alarm Mode
NOTE: While setting the timer, quickly scroll through the setting values by holding down START/SPLIT (+) or STOP/RESET (-). When the timer is running, a bar is shown in timer and time of day modes above the timer icon. If the timer is set to repeat, the bar is shown above the timer with arrow icon. -
Page 21: Calibration Mode
NOTE: While setting an alarm, quickly scroll through the setting values by holding down START/SPLIT (+) or STOP/RESET (-). — The AM/PM value will (+) only appear if you have set the watch to display the 12-hour format. When the alarm is armed, a bar is shown in alarm and time of day modes above the alarm icon. -
Page 22: Setting And Calibrating Your Reference Points
Setting and Calibrating Your Reference Points 1. Press MODE until CAL is shown. 2. Hold SET to begin the calibration. 3. Press START/SPLIT (+) to scroll among the reference points (HOME ALTI, BASE 1 ALTI, BASE 2 ALTI, BASE 3 ALTI, MANUAL ALTI, BARO, and WEATHER). 4. -
Page 23: Glossary
GLOSSARY This glossary provides definitions for some of the features and functions of the watch described throughout this manual. Altimeter: An instrument used to determine the altitude of an object with respect to a fixed level. Typically altitude is measured with respect to sea level. Analog: As it relates to a watch, analog tells time with the use of hands. -
Page 24: Timex International Warranty
Group USA, Inc. for a period of ONE YEAR from the original purchase date. Timex and its worldwide affiliates will honor this International Warranty. Please note that Timex may, at its option, repair your watch by installing new or thoroughly reconditioned and inspected components or replace it with an identical or similar model. - Page 25 To obtain warranty service, please return your watch to Timex, one of its affili- ates or the Timex retailer where the watch was purchased, together with a completed original Watch Repair Coupon or, in the U.S.