
Related Manuals for Olympus FL-900R


Summary of Contents for Olympus FL-900R
- Page 1 FL-900R 取扱説明書 INSTRUCTIONS MODE D’EMPLOI INSTRUCCIONES 사용설명서 使⽤說明書 คํ า แนะนํ า การใช ง าน NÁVOD K POUŽITÍ BEDIENUNGSANLEITUNG KÄYTTÖOHJEET INSTRUKCJA ИНСТРУКЦИЯ...
- Page 2 fi re, electric shock, or injury to persons. SAVE THESE INSTRUCTIONS The following importer description applies to products imported into the EU directly by OLYMPUS EUROPA SE & Co. KG only. OLYMPUS EUROPA SE & Co. KG Wendenstrasse 14-18, 20097 Hamburg, Germany...
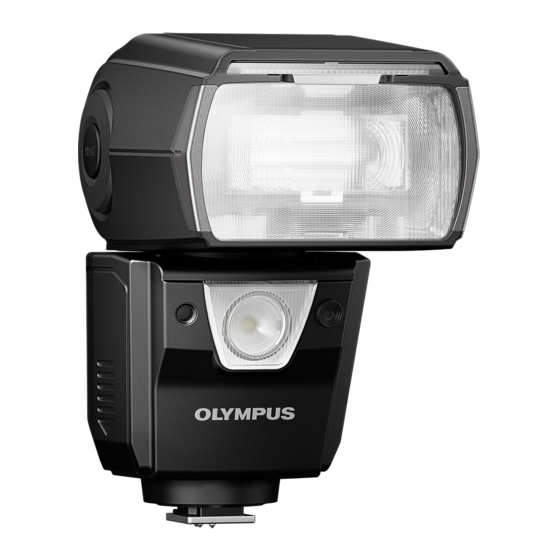
- Page 3 Thank you for purchasing this Olympus product. To ensure your safety, please read this instruction manual before use, and keep it handy for future reference. Names of Parts 1 Wide panel ........P. 32 d Latch release ......P. 24, 30 2 Light-emitting area e Latch ........
-
Page 4: Table Of Contents
Control Panel Control Panel MODE ZOOM Slave mode MODE MODE RANGE 2.09~12.3 TTL-AUTO and AUTO modes M mode DISTANCE RANGE 16.7 2.09~12.3 MULTI mode RC mode TIME GROUP 1 Super FP fl ash 0 Control lock ........P. 28 2 Flash control mode ....... P. 26 a Slave .......... - Page 5 Readying the Flash Preparing a Battery (Sold Separately) Preparing a Battery (Sold Separately) Choose from the below batteries: AA (R6) NiMH batteries (× 4) AA (R6) alkaline batteries (× 4) • AA (R6) manganese batteries cannot be used. Loading Batteries Loading Batteries Open the battery compartment cover.
-
Page 6: Flash Control Mode
Turning on the Electronic Flash Turning on the Electronic Flash Attach an electronic fl ash to the camera, and then turn the camera on. Press the ON/OFF button. Control AUTO CHECK panel lamp • The control panel display will turn on. •... - Page 7 Press the shutter button the rest of the way down to take the picture. • The AUTO CHECK lamp blinks for about 5 s after shooting to indicate that the fl ash has fi red successfully. • When using a fl ash, fl ash light may be blocked by the lens body, lens hood, etc. •...
- Page 8 Flash Control Control panel Control operation Mode display The fl ash will be adjusted based on the brightness captured by auto light receptor MODE ZOOM on the electronic fl ash. If the camera AUTO has communication capability, this mode RANGE 0.7~8.0 can be used only when the camera is an AUTO-compatible model.
-
Page 9: Zoom Mode
Adjusting Settings Using the Selector Using the Selector Frequently-used options can be accessed via the selector. Button Function Press ZOOM (F) button to display settings and rotate the dial to adjust the angle of illumination manually. Press OK button to put the changes ZOOM into effect. -
Page 10: Zoom Position (Angle Of Illumination)
• Settings will be displayed. ZOOM Value DIAL Rotate the dial to change the highlighted ZOOM item. • Other settings (if displayed) can be selected by pressing HI. Value DIAL Press OK button to put the changes into effect. Available Options Available Options Option Description... - Page 11 Wireless Flash Control Wireless control is available with Olympus digital cameras that support RC mode. The unit is controlled by means of a fl ash mounted on the camera. It can also be mounted on a camera for wireless control of multiple remote fl ash units.
- Page 12 • Slide the fl ash securely onto the stand ( 2 ). • Slide the latch to the [LOCKD] position to latch the fl ash in place. • To remove the fl ash, undo the latch and slide the unit from the stand. Position the fl...
- Page 13 Other Flash Options Fixing the Irradiation Angle Fixing the Irradiation Angle Point the fl ash head at a wall or ceiling for 90° bounce fl ash photography. The area illuminated at ranges of 0.6–1.0 m (2.0–3.3 ft.) will not be 6°...
- Page 14 Using the Bounce Adapter Using the Bounce Adapter Attaching the supplied bounce adapter diffuses the light from the fl ash over a wider area for softer bounce lighting. • Insert the tabs on the interior of the bounce adapter into the matching slots on top of the fl...
-
Page 15: Led Light Mode
Using the Menus Use the menus to adjust settings for ease of use. Press the MENU/ (G) button. AF Illuminator AF Illum. Mode Auto Auto LED Mode • The menu will be displayed. LED Brightness Front Charge Ind. Auto Value DIAL Use FG to highlight items and rotate the dial AF Illum. -
Page 16: Slave
Function Option Description Flash control display shows slave mode. Slave Mode (slave mode Flash control display does not show slave display) mode. Flash cable used. Flash Cable (fl ash cable) Flash cable not used. Display focal length values for FOUR Zoom Display THIRDS lenses. - Page 17 Cameras That Do Not Communicate with the Flash When the unit is attached to a camera that does not supply shooting information, fl ash output can be set to the value metered by the fl ash or adjusted in advance using fl...
- Page 18 • If you notice any abnormalities such as odor, noise, or smoke, stop using this device. Otherwise a fi re or burn may result. Remove the batteries carefully to avoid burning yourself, and contact your dealer or consult an Olympus Authorized Service Station.
-
Page 19: Guide Number (Gn)
(excluding protrusions) Weight 382 g (13.5 oz.) (excluding batteries) * Measurements obtained from in-house tests at Olympus. Actual fi gures may vary depending on shooting conditions. Specifi cations are subject to change without any notice or obligation on the part... - Page 20 Technical Support (U.S.A. / Canada) 24/7 online automated help: http://www.olympusamerica.com/support Phone customer support: Tel.1-800-260-1625 (Toll-free) Our phone customer support is available from 9 am to 9 pm (Monday to Friday) ET E-Mail: distec@olympus.com European Technical Customer Support Please visit our homepage http://www.olympus-europa.com or call: Tel.
- Page 21 date of issue 2016.07. WD196201 Printed in China © 2016...