Table of Contents
Advertisement
Quick Links
Advertisement
Table of Contents

Summary of Contents for Tapco MP3 Player
-
Page 2: Important Safety Instructions
IMPORTANT SAFETY INSTRUCTIONS 1. Read these instructions. 2. Keep these instructions. 3. Heed all warnings. 4. Follow all instructions. 5. Do not use this apparatus near water. 6. Clean only with dry cloth. 7. Do not block any ventilation openings. Install in accordance with the manufacturer’s instructions. - Page 3 Please write your Tracktion 2.0 License Number here (packaged with the Link.USB CD): ____–____–____–____–____ Enter your my.mackie.com Login information here: Login email address _____________________________________ Password ______________________________________________ Don’t forget to visit our website at www.tapcogear.com for more information about this and other TAPCO products.
- Page 4 LOUD TECHNOLOGIES INC. END USER LICENSE AGREEMENT By clicking on the “I Accept” button, installing, copying or otherwise using the Software, you agree to be bound by the terms of this License Agreement. If you do not agree to the terms of this License Agreement, click on the “I Do Not Accept” button and/or do not install the Software.
- Page 5 WARRANTIES, EITHER EXPRESS OR IMPLIED, INCLUDING BUT NOT LIMITED TO IMPLIED WARRANTIES OF MERCHANTABILITY, FITNESS FOR A PARTICU- LAR PURPOSE AND NON-INFRINGEMENT OF THIRD PARTY RIGHTS WITH RESPECT TO THE SOFTWARE. SHOULD THE SOFTWARE PROVE DEFECTIVE, YOU (AND NOT LOUD Technologies Inc. OR AN AUTHORIZED REPRESENTA- TIVE) ASSUME THE ENTIRE COST OF ALL NECESSARY SERVICING, REPAIR OR CORRECTION.
-
Page 6: Table Of Contents
CONTENTS IMPORTANT SAFETY INSTRUCTIONS ...2 INTRODUCTION ...7 The Link.USB Interface ...7 Bundled Software ...7 GETTING STARTED ...8 Installing the Software ...8 On a PC ...9 On a Mac ...12 Authorizing Tracktion 2 ...13 Connecting the Link.USB ...13 Hookup Diagram ...14 Making a Recording ...15... -
Page 7: Introduction
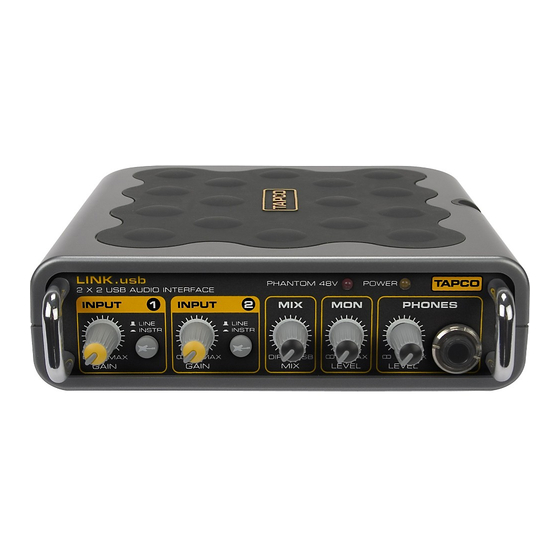
INTRODUCTION Thank you for purchasing the TAPCO Link.USB Audio Interface for digital recording systems. This is a complete, compact solution for computer-based music production on either a Macintosh or a PC. The Link.USB is a 2x2 USB interface that is powered directly off... -
Page 8: Getting Started
“No, I want to create an account.” Then click “Continue.” Enter the information to set up your profile. Then click “Create My Account.” Then proceed to register your Link.USB by clicking “TAPCO Product Registration.” • Your computer must meet the following minimum system... -
Page 9: On A Pc
To install the software on a PC running Windows XP (SP2): 1. Turn off any (non-essential) applications. 2. Insert the Link.USB CD-ROM into your PC’s CD-ROM drive. 3. The CD should begin automatically, bringing up the Link.USB installer. If not, click Start in the task bar, then click Run and click Browse. Browse to your CD drive and double-click SETUP.EXE. - Page 10 5. Next you will see the Tracktion License Agreement. Read through the text and click “I Agree.” 6. The next window lets you choose the Destination folder for installing the software files. We recommend you use the default location used by the installer, but you can choose a different location if you want by clicking the Browse button.
- Page 11 7. When the installer has completed copying the files into the destination folder, the All Installed dialog box opens. Click OK to continue. 8. A window opens asking if you want to install QuickTime. Click “Yes” if you want to install it, or “No” to continue. 9.
-
Page 12: On A Mac
To install the software on a Macintosh running OS X (version 10.3 or later): 1. Turn off any (non-essential) applications. 2. Insert the Link.USB CD-ROM into the CD-ROM drive. 3. Double-click the Link USB CD icon on the desktop. 4. To install Tracktion 2, simply drag the Tracktion application fi le into your Applications directory. -
Page 13: Authorizing Tracktion 2
Authorizing Tracktion 2 There is an authorization code on the sleeve of the CD-ROM that came with your Link.USB. You can authorize the software from within Tracktion or by going to http://my.tapcogear.com. From Tracktion 2: 1. Open Tracktion 2. 2. Tracktion detects that the software is unregistered and notifies you that it is running in Demo Mode. -
Page 14: Hookup Diagram
• Connect guitars or other instruments using the XLR/TRS connectors on the back of the Link.USB. Press the front panel LINE/INSTR button (guitar icon) if you are connecting your guitar or instrument directly to the Link.USB without using a preamplifier or direct box. •... -
Page 15: Making A Recording
Making a Recording The following example of a recording session uses a guitar plugged directly into the Link.USB channel 1 input, and a microphone plugged into the channel 2 input, to record audio tracks in the Tracktion 2 software. Before starting, make sure you have correctly installed the Tracktion 2 software. - Page 16 Latency describes the amount of time it takes for audio LOOK to get in and out of your software application. The lower the latency setting, the faster audio can get into and out of the software application. However, a low latency CLOSER setting requires more resources from your computer, so you need to find a happy balance between finding the...
- Page 17 5. “New edit #1” appears at the top of the item list. An edit is Tracktion’s way of keeping a version of your song. You can rename the song by clicking on the edit and entering the new name in the properties panel at the bottom of the screen.
- Page 18 8. Click on the Input 1 icon, and drag it to track 1. As it gets close, an arrow pops out and connects the icon to the track. This indicates that the track is armed for recording. To disconnect an icon (and disarm the track), drag it to the left and the arrow will disappear.
- Page 19 CD or creating an MP3 file. “TAPCO” is a registered trademark of LOUD Technologies Inc. All other brand names mentioned are trademarks or registered trademarks of their respective holders, and are hereby acknowledged.