Table of Contents
Advertisement
User Manual
SMX5819USM
147.32cm
58" LED SMART UHD TV
THE OPERATION OF THIS EQUIPMENT IS SUBJECT TO THE FOLLOWING TWO CONDITIONS:
1) IT IS POSSIBLE THAT THIS DEVICE OR DEVICE WILL NOT CAUSE HARMFUL INTERFERENCE AND
2) THIS EQUIPMENT MUST ACCEPT ANY INTERFERENCE INCLUDING THE ONE THAT CAN CAUSE
YOUR OPERATION NOT DESIRED.
BEFORE USING THIS PRODUCT READ THE INSTRUCTION AND CONSERVE FOR FUTURE REFERENCE,
IF THE POWER CORD BECOMES A TOTAL OR PARTIAL DAMAGE, DO NOT TRY TO REPAIR IT
GO TO THE SERVICE CENTER MARKED IN YOUR GUARANTEE; WITH A SPECIALIST TECHNICIAN,
OR, WITH YOUR MANUFACTURER..
IMPORTED BY:
CTM DIGITAL S.A. de C.V.
Av. Lago Zurich No. 219, 12th floor, Plaza Carso Building, Col. Amplicon Granada, 11529
Mexico, Mexico City. Tel. (55) 4124-0114
ELECTRICAL SPECIFICATIONS: 100-240 See 50/60 Hz 70W
THE REMOTE CONTROL USES 2 "AAA" TYPE BATTERIES OF 1.5 V DC each (3 Vcc)
1
Advertisement
Table of Contents

Summary of Contents for Sansui SMX5819USM
- Page 1 User Manual SMX5819USM 147.32cm 58” LED SMART UHD TV THE OPERATION OF THIS EQUIPMENT IS SUBJECT TO THE FOLLOWING TWO CONDITIONS: 1) IT IS POSSIBLE THAT THIS DEVICE OR DEVICE WILL NOT CAUSE HARMFUL INTERFERENCE AND 2) THIS EQUIPMENT MUST ACCEPT ANY INTERFERENCE INCLUDING THE ONE THAT CAN CAUSE YOUR OPERATION NOT DESIRED.
- Page 2 Safety information High voltages are used in the CAUTION operation of this product, to avoid the risk of electric shock, do not remove the back cover of the TV. Please go to the RISK OF ELECTRIC SHOCK qualified personnel for service. DO NOT OPEN The use of controls, adjustments or carrying out procedures other than those specified here, may cause dangerous...
- Page 3 Important security 1. Read these instructions. 2. Keep this instruction manual. 3. Follow all warnings. 4. Follow all instructions. 5. Do not use this equipment near water. 6. Clean only with soft and dry cloth. 7. Do not block the ventilation slots. Install according to the manufacturer's instructions.
- Page 4 Important security instructions Installing the TV on the wal 1. First, put the TV on a flat table, on which you must put something soft to prevent the panel from being scratched or damaged. 2. Use the screwdriver to remove the 4 screws that hold the base of the TV (the direction of the arrows, reference image 1) and, remove the base (guard the screws and the base carefully).
- Page 5 TV buttons and connection TV buttons Note: The following is a functional diagram only, the arrangement and position of the buttons between the different models, may vary. : To turn on / off the TV. SOURCE: To select the external input signal. MENU: To show the main MENU and confirm the selected menu option.
- Page 6 Installation and Connection of the TV TV installation Put the TV in a firm place, which must support the weight of the TV. To avoid risks, please do not expose the TV to hot or humid places (as well as near lights, candles heaters), and do not block the ventilation on the back of the TV.
- Page 7 Remote Control Operation of the remote control POWER NUMERIC BUTTONS Turn on or off (standby) the TV Press 0-9 to select a channel directly when it is watching TV. Mute The channel changes after 2 Press to suspend the sound, seconds.
- Page 8 Installation of the batteries in the remote control 1. Open the back cover. 2. Use AAA batteries. When inserting the batteries, make sure that the polarity is correct, that is, that the "+" marks are oriented as indicated in the compartment. 3.
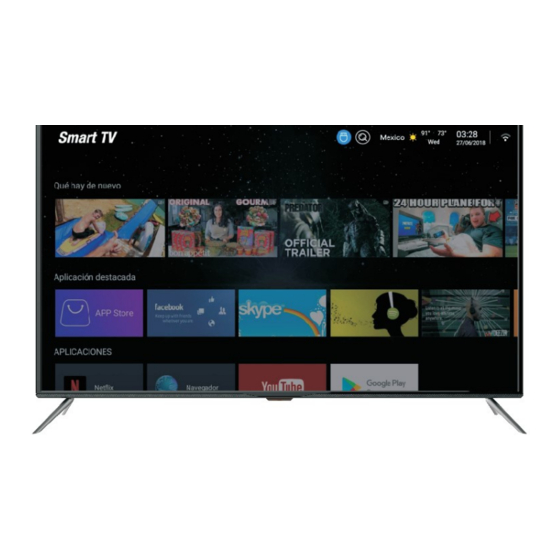
- Page 9 Main Screen On the main screen, press the navigation arrows to select the icon memory and press ENTER to enter the file browser, and select the file wanted.
- Page 10 On the main screen, press the navigation arrows to select the icon search, press ENTER to enter and perform the desired search. On the main screen, press the navigation arrows to select the icon weather information, and press ENTER to display the weather information page. Press ENTER, to search and set the desired city.
- Page 11 Press the navigation arrows to select the information bar WHAT YOU NEED NEW, with the navigation arrows select the desired video and press ENTER to reproduce it Press the navigation arrows to select OUTSTANDING APPLICATION, with the navigation arrows select the desired app and press ENTER to view or to install.
- Page 12 Press the navigation arrows to select APPLICATIONS, with the arrows of navigation select the desired app that you have previously installed and press ENTER to start it Press the navigation arrows to select MUSICA, with the navigation arrows select the desired Music Video and press ENTER to play it.
- Page 13 Press the navigation arrows to select SOURCE, with the navigation arrows select the desired Video Input Signal Source, Press ENTER to change the Source. Press the navigation arrows to select the SETTINGS option, press ENTER to visualize the characteristics to configure; as a network, language, among others. Settings...
- Page 14 Press the navigation arrows to select SETTINGS, with the navigation arrows select the features to configure and press ENTER to adjust the values. 1) About: Local system update: press ENTER to enter the interface of local update of the system. System network update: press ENTER to enter the interface of system network update.
- Page 15 TV Menu Functions: (1) Power: ENC / OFF (On: ON / OFF) (2) Menu: Press the MENU button to display the TV menu. Press <EX1T>, to return to the previous menu or to exit. Source: You can change the font by pressing up / down buttons. Submenu: You can modify some features by pressing left / right.
- Page 16 Image mode: includes standard mode, soft, user, game, lived, natural, sports, bright, where in user mode you can customize brightness, contrast, tint, and sharpness, between others. Color Temperature: Allows you to adjust the temperature of the color you feel comfortable, such as standard, warm, cold.
- Page 17 Aspect ratio: Adjusts the image's viewing scale. Includes 16: 9, 4: 3, Auto, Zoom 1, Zoom 2 mode. Noise reduction: It allows to improve the image quality by reducing the noise in the image. The available modes are: auto, off, weak, medium and strong.
- Page 18 MPEG NR: Allows softening the video on the screen to reduce noise and improve the image quality. The available modes are: weak, medium, strong. Audio Configuration Press <MENU> to display the main menu, press ◄ / ► to select AUDIO, press ▲ / ▼ to select the desired option, press <MENU>...
- Page 19 Equalizer setting (EQ): Select the equalizer setting to adjust the gain of the corresponding frequencies, the adjustment range is from 0 to 100. Balance: Adjust the speaker audio output balance (left / right), the adjustment range is 0-100. Automatic volume: On / Off, when the volume exceeds the set value, it will automatically reduce the volume to protect the amplifier.
- Page 20 Surround Sound: Select to activate / deactivate. SPDIF Mode: Select Coaxial Output Mode (PCM / Off / Auto). Channel Configuration...
- Page 21 Press <MENU> to display the main menu, press ◄ / ► to select the menu CHANNEL, press ▲ / ▼ to select and set the desired option, press <MENU> to return or press <EXIT> to exit the menu. Antenna: Select the type of antenna (Air / Cable). Automatic Tuning: Select Auto Tuning, in the submenu, you can select the type of search.
- Page 22 Edit program: Select to enter the submenu, press ▲ / ▼ to select the channel you want to adjust with the following options: Skip, allows you to skip the selected channel. Edit, rename the channel.1; AV, allows you to add or delete channels to the list of favorite channels.
- Page 23 Press <MKNU> to display the main menu, press ◄ / ► to select the menu SETTINGS, press ▲ / ▼ to select and adjust the desired option, press <MENU> to return or press <EXIT> to exit the menu. OSD language: Sets the menu language. Audio Language: Sets the Audio language.
- Page 24 Subtitles: Activate / Deactivate subtitles. CC Mode: Sets the CC Mode (Subtitles). Start Mode: Sets the mode of use of the TV. Home Mode (Home), Shop Mode (Store).
- Page 25 Purchase Mode: Show / Hide EPOP (Electronic Tag) HDMI_CEC: On / Off CEC. HDMI_ARC: On / Off CEC.
- Page 26 Standby system: On / Off system in standby mode, (If activated, the TV will turn off automatically when the Standby mode is started) Device list: Select to show the list of devices. Blue screen: On / Off blue screen.
- Page 27 Reset: Resets all settings to the default values. When this option is selected, it will show a box to confirm the action. Hour Press <MENU> to display the main menu, press ◄ / ► to select the TIME menu, press ▲...
- Page 28 Bedtime: Set the sleep time, you can select from 10 minutes to 240 or cancel the action. Menu time: The time to display the on-screen menu can be adjusted, in 5s / 10s / 15s / 20s / 30s / and always (always display). To block...
- Page 29 Press <MENU> to display the main menu, press * / ► to select the LOCK menu, press ▼ / A to select and set the desired option, press <MENU> to return or press <EXIT> to exit the menu. Blocking system: activate / deactivate system lock. It allows to enter the blocked system, change lock password, and block channel and parental control.
- Page 30 Block unrated TV: Block or unblock unrated TV shows. USA Parental control: Restriction of movies and TV shows by US parental control classification. Canadian Parental Control: Restriction of movies and TV shows by Canadian parental control rating. RRT5 Configuration: Shows advanced classification table of V-Chip for digital channels. This function is available only when the transmission has downloadable classification data.
- Page 31 Hotel Mode: Select to enter Hotel Mode.
- Page 32 OTA Local Update It can be useful in several situations: 1) Depuration of the engineer 2) Customers to update NOTE: This method is applied to the card to start the program with an Android system, as follows. 1) The update file is placed in the root directory of U and then changes the name of the file to "update_LDM538.zip".
- Page 33 Faults Guide It does not turn on Check that the AC power cord of the TV is connected. If the continuous problem, disconnect the TV and connect it again after 60 seconds and try to turn on the TV again. The received The cause of double image or ghosts is caused by tall signal is not...
- Page 34 The image is very Adjust the contrast or brightness level in the main menu. light or very dark (PC mode) The PC function Check the computer settings if the resolution is does not respond compatible. Interference lines Make sure the good quality of the cables. in the RCA connection source If the problem...
- Page 35 User Manual...