Table of Contents
Advertisement
Available languages
Available languages
Advertisement
Table of Contents

Related Manuals for HoMedics mychill plus PERSONAL SPACE COOLER 2.0


Summary of Contents for HoMedics mychill plus PERSONAL SPACE COOLER 2.0
- Page 1 PLEASE TAKE A MOMENT NOW REGISTER YOUR PRODUCT AT: www.homedics.com/register Your valuable input regarding this product will help us create the products you will want in the future. INSTRUCTION MANUAL AND WARRANTY INFORMATION 1-YEAR LIMITED WARRANTY PAC-35...
-
Page 2: Important Safety Instructions
• NEVER operate the appliance if it has a damaged cord or plug, if it is not working properly, if it has been dropped or damaged, or if it has been dropped into water. Return the appliance to a HoMedics Service Center for examination and repair. - Page 3 SAVE THESE INSTRUCTIONS CAUTION – PLEASE READ ALL INSTRUCTIONS CAREFULLY BEFORE OPERATING. • Perform regular maintenance and cleaning of the Personal Space Cooler water reservoir and cooling cartridge. • Never use detergent to clean the cooling cartridge. • Never clean the cooling cartridge and/or the Personal Space Cooler water reservoir by scraping with a hard object.
- Page 4 INDOOR PERSONAL SPACE COOLING This HoMedics MyChill™ Plus Personal Space Cooler 2.0 is designed to reduce the temperature up to 12°F / 6.6°C and has a relaxing cooling effect up to 6 FT / 1.8 M from the front of the unit. The cooling effect increases as the relative humidity decreases.
-
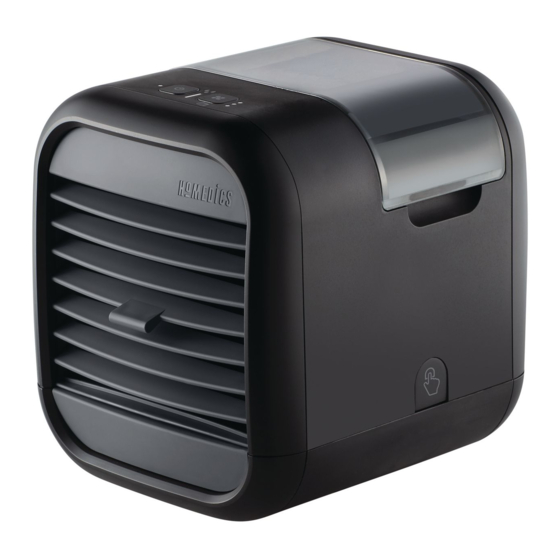
Page 5: Control Panel
WATER TANK TANK CAP CONTROL PANEL (Detail Below) TOP COVER ADJUSTABLE VENT RELEASE BUTTONS (2) COOLING CARTRIDGE WATER RESERVOIR POWER ADAPTER LOW WATER LED FAN SPEED - LOW / MEDIUM / HIGH REPLACE HIGH SPEED LED COOLING MEDIUM SPEED LED CARTRIDGE LOW SPEED LED COOLING... -
Page 6: How To Fill
HOW TO FILL CAUTION: Before filling the unit with water, unplug the power adapter from the wall and from the unit. NOTE: Always use 2 hands to carry the unit. PERSONAL SPACE COOLER LOCATION Place the Personal Space Cooler in the desired location prior to filling with water. The front of the unit should be located within 6 FT / 1.8 M of the desired personal cooling zone. - Page 7 HOW TO FILL 4. Replace the tank cap by 5. Place the tank into the 6. Once the water stops turning clockwise until MyChill cavity, making sure emptying into the water tight. Do not overtighten. the tank is firmly seated. reservoir, remove the water Water will begin to transfer tank and refill following...
-
Page 8: How To Use
POWER ADAPTER HOW TO USE LOW WATER LED FAN SPEED - LOW / MEDIUM / HIGH REPLACE HIGH SPEED LED COOLING MEDIUM SPEED LED CARTRIDGE LOW SPEED LED COOLING CARTRIDGE POWER BUTTON REPLACEMENT ON/OFF POWER Plug the power adapter into the back of the unit and the other end into a household electrical outlet. Press the POWER button to turn the unit ON/OFF. -
Page 9: Cleaning And Care
CLEANING AND CARE CAUTION: Before cleaning the unit, turn power OFF and unplug the power adapter from the wall and the unit. TO CLEAN THE TANK AND RESERVOIR Remove the water tank from the Personal Space Cooler by lifting it from the main unit. - Page 10 540 hours of use, indicating the cooling cartridge needs to be replaced. To purchase a genuine HoMedics replacement cooling cartridge, Model # PAC-35CC, go to the retailer where you purchased your MyChill Plus Personal Space Cooler, or visit www.homedics.com. For Canada, please visit www.homedics.ca.
- Page 11 REPLACING THE COOLING CARTRIDGE 5. Replace the top cover onto the 6. Refill the water tank and water reservoir. Be sure the top reservoir as described in the cover snaps onto the water “How to Fill” section. reservoir. 7. Plug the power adapter into the back 8.
-
Page 12: Troubleshooting
TROUBLESHOOTING PROBLEM POSSIBLE CAUSE SOLUTION No power • Unit is not plugged in • Plug unit in • No power at unit • Press the POWER button to turn • Top cover not seated properly the unit on • Check circuits and fuses or try a different outlet •... -
Page 13: Fcc Statement
FCC STATEMENT For Adapter Only This device complies with Part 15 of the FCC Rules. Operation is subject to the following two conditions: (1) this device may not cause harmful interference, and (2) this device must accept any interference received, including interference that may cause undesired operation. The manufacturer is not responsible for any radio or TV interference caused by unauthorized modifications to this equipment. -
Page 14: Year Limited Warranty
HoMedics sells its products with the intent that they are free of defects in manufacture and workmanship for a period of 1 year from the date of original purchase, except as noted below. HoMedics warrants that its products will be free of defects in material and workmanship under normal use and service. -
Page 15: Garantie Limitée D'un An
VEUILLEZ PRENDRE QUELQUES INSTANTS ENREGISTREZ VOTRE PRODUIT SUR: US: www.homedics.com/register CAN: www.homedics.ca/product-registration Votre contribution concernant ce produit est précieuse et nous permettra de mieux êtreà même de concevoir les produits auxquels vous aspirez. UIDE D’UTILISATION ET RENSEIGNEMENTS SUR LA GARANTIE GARANTIE LIMITÉE D’UN AN... -
Page 16: Instructions De Sécurité Importantes
• Cet appareil ne doit être utilisé qu’aux fins décrites dans ce manuel. Ne pas utiliser d’accessoires non recommandés par HoMedics, en particulier tout accessoire non fourni avec cet appareil. Toute autre utilisation non recommandée par le fabricant peut provoquer un incendie, un choc électrique ou des blessures. - Page 17 à un centre de réparation HoMedics pour qu’il soit examiné et réparé. Retourner l’appareil à un centre de réparation HoMedics pour qu’il soit examiné et réparé. • Éloigner le cordon des surfaces chaudes. • Toujours débrancher l’appareil avant de le remplir, de le nettoyer ou de le déplacer.
- Page 18 CARACTÉRISTIQUES ET SPÉCIFICATIONS UNIQUES REFROIDISSEUR D’AIR INDIVIDUEL POUR UTILISATION EN INTÉRIEUR Le refroidisseur d’air individuel MyChill™ Plus de HoMedics est conçu pour réduire la température jusqu’à 6,6 °C/12 °F et produit un effet rafraîchissant et relaxant jusqu’à 1,8 m/6 pi à l’avant de l’appareil.
- Page 19 RÉSERVOIR D’EAU BOUCHON DU RÉSERVOIR PANNEAU DE COMMANDE (détail ci-dessous) COUVERCLE SUPÉRIEUR ÉVENT RÉGLABLE BOUTONS DE DÉVERROUILLAGE (2) CARTOUCHE DE REFROIDISSEMENT RÉSERVOIR D'EAU ADAPTATEUR D'ALIMENTATION INDICATEUR DE VITESSE DU NIVEAU D’EAU BAS VENTILATEUR - BASSE / MOYENNE / HAUTE INDICATEUR DE INDICATEUR DE HAUTE VITESSE REMPLACEMENT DE INDICATEUR DE VITESSE MOYENNE...
- Page 20 REMPLISSAGE ATTENTION : Avant de remplir l’appareil avec de l’eau, débrancher l’adaptateur secteur de la prise murale et de l’appareil. REMARQUE : Toujours utiliser les deux mains pour transporter l’appareil. EMPLACEMENT DU REFROIDISSEUR D’AIR INDIVIDUEL Placer le refroidisseur d’air individuel à l’emplacement souhaité avant de le remplir avec de l’eau. L’avant de l’appareil doit être situé...
- Page 21 REMPLISSAGE 4. Replacer le bouchon du 5. Placer le réservoir dans la 6. Lorsque le transfert de réservoir en le tournant à la cavité MyChill en s’assurant l’eau dans le réservoir main dans le sens horaire. que le réservoir est bien en d’eau s’arrête, retirer le Ne pas trop serrer.
-
Page 22: Adaptateur D'alimentation
ADAPTATEUR D'ALIMENTATION UTILISATION INDICATEUR DE VITESSE DU NIVEAU D’EAU BAS VENTILATEUR - BASSE / MOYENNE / HAUTE INDICATEUR DE INDICATEUR DE HAUTE VITESSE REMPLACEMENT DE INDICATEUR DE VITESSE MOYENNE LA CARTOUCHE DE REFROIDISSEMENT INDICATEUR DE BASSE VITESSE REMPLACEMENT DE LA CAR- TOUCHE DE REFROIDISSEMENT BOUTON MARCHE/ARRÊT MISE SOUS TENSION... -
Page 23: Nettoyage Et Entretien
NETTOYAGE ET ENTRETIEN ATTENTION : Avant de nettoyer l’appareil, l’éteindre et débrancher l’adaptateur secteur de la prise murale et de l’appareil. NETTOYAGE DE LA CUVE ET DU RÉSERVOIR Retirer le réservoir d’eau du refroidisseur d’air individuel en le soulevant. Dévisser le bouchon du réservoir. Rincer le bouchon du réservoir et l’intérieur du réservoir avec de l’eau propre, puis les sécher. - Page 24 540 heures d’utilisation, indiquant que la cartouche doit être remplacée. Pour acheter une cartouche de refroidissement de rechange HoMedics d’origine, modèle n° PAC-35CC, visiter le détaillant auprès duquel le refroidisseur d’air individuel MyChill Plus a été acheté ou visiter www.homedics.com.
- Page 25 REMPLACEMENT DE LA CARTOUCHE DE REFROIDISSEMENT 5. Replacer le couvercle supérieur 6. Remplir le réservoir d’eau et la sur le réservoir d’eau. S’assurer cuve comme indiqué dans la que le couvercle supérieur section « Remplissage ». s’enclenche bien sur le réservoir d’eau.
-
Page 26: Dépannage
DÉPANNAGE PROBLÈME CAUSE POSSIBLE SOLUTION Pas d’alimentation • L’appareil n’est pas branché • Brancher l’unité • L’appareil n’est pas alimenté • Appuyer sur le bouton Marche/Arrêt • Le couvercle supérieur n’est pour mettre l’appareil en marche pas bien installé • Contrôler les circuits et les fusibles ou essayer une autre prise •... -
Page 27: Déclaration De La Fcc
DÉCLARATION DE LA FCC Pour l’adaptateur uniquement Cet appareil est conforme à la Partie 15 du règlement de la FCC. Le fonctionnement est soumis aux deux conditions suivantes : (1) cet appareil ne doit pas provoquer d’interférences nuisibles, et (2) cet appareil doit accepter toute interférence reçue, y compris les interférences pouvant entraîner un fonctionnement indésirable. - Page 28 Cette garantie ne s’applique qu’aux consommateurs et ne s’étend pas aux détaillants. Pour obtenir un service de garantie sur le produit HoMedics, appeler un représentant du service à la clientèle pour obtenir de l’aide. Prière d’avoir le numéro de modèle du produit à disposition.
-
Page 29: Garantía Limitada De Un Año
TÓMESE UN MOMENTO AHORA REGISTRE SU PRODUCTO EN: US: www.homedics.com/register CAN: www.homedics.ca/product-registration Su valioso aporte sobre este producto nos ayudará a crear los productos que usted desee en el futuro. MANUAL DE INSTRUCCIONES E INFORMACIÓN SOBRE LA GARANTÍA GARANTÍA LIMITADA DE UN AÑO... -
Page 30: Instrucciones Importantes De Seguridad
Devuelva el aparato a un Centro de Servicio de HoMedics para su revisión y reparación. Devuelva el aparato a un Centro de Servicio de HoMedics para su revisión y reparación. - Page 31 • NO lo utilice en exteriores. Para uso en interiores únicamente. • Precaución: Todo el mantenimiento a este enfriador personal debe ser realizado únicamente por personal de servicio autorizado por HoMedics. GUARDE ESTAS INSTRUCCIONES PRECAUCIÓN –...
- Page 32 CARACTERÍSTICAS Y ESPECIFICACIONES ÚNICAS ENFRIADOR PERSONAL PARA INTERIORES Este Enfriador Personal Plus 2.0 de HoMedics MyChill™ está diseñado para reducir la temperatura hasta en 6.6°C/12°F y tiene un efecto relajante de enfriamiento hasta a 1.8 M/6 Pies desde la parte frontal de la unidad.
-
Page 33: Cubierta Superior
TANQUE DE AGUA TAPA DEL TANQUE PANEL DE CONTROL (detalle a continuación) CUBIERTA SUPERIOR VENTILACIÓN AJUSTABLE BOTONES DE LIBERACIÓN (2) CARTUCHO DE ENFRIAMIENTO DEPÓSITO DE AGUA ADAPTADOR DE CORRIENTE LED DE NIVEL VELOCIDAD DEL VENTILADOR - BAJO DE AGUA BAJA / MEDIA /ALTA LED DE LED DE VELOCIDAD ALTA CAMBIO DEL... - Page 34 CÓMO LLENARLA PRECAUCIÓN: Antes de llenar la unidad con agua, desconecte el adaptador de energía de la pared y de la unidad. NOTA: Utilice siempre dos manos para transportar la unidad. UBICACIÓN DEL ENFRIADOR PERSONAL Coloque el enfriador de espacio personal en la ubicación deseada antes de llenarlo con agua. El frente de la unidad debe ubicarse dentro de 1.8 m/6 pies de la zona de enfriamiento personal deseada.
- Page 35 CÓMO LLENARLO 4. Vuelva a colocar el tapón 5. Coloque el tanque en 6. Una vez que el agua del tanque girando en la cavidad del MyChill, deje de vaciarse dentro sentido de las manecillas asegurándose de que esté del recipiente de agua, del reloj hasta que quede colocado firmemente.
-
Page 36: Ajuste De Velocidad
ADAPTADOR DE CORRIENTE CÓMO UTILIZARLO LED DE NIVEL VELOCIDAD DEL VENTILADOR - BAJO DE AGUA BAJA / MEDIA /ALTA LED DE LED DE VELOCIDAD ALTA CAMBIO DEL LED DE VELOCIDAD MEDIA CARTUCHO DE LED DE VELOCIDAD BAJA ENFRIAMIENTO REEMPLAZO DEL CARTUCHO DE BOTÓN ENCENDIDO ENFRIAMIENTO... -
Page 37: Limpieza Y Cuidado
LIMPIEZA Y CUIDADO PRECAUCIÓN: Antes de limpiar la unidad, apague y desenchufe el adaptador de corriente de la pared y de la unidad. PARA LIMPIAR EL TANQUE Y EL DEPÓSITO Retire el tanque de agua de la base del enfriador personal levantándolo de la unidad principal. - Page 38 Para comprar un cartucho de enfriamiento de reemplazo original de HoMedics, modelo # PAC-35CC, vaya con el minorista en donde compró su enfriador personal MyChill o visite www.homedics.com. Para Canadá, por favor visite: www.homedics.ca. NOTA: Si vive en un área con agua dura, el cartucho de enfriamiento podría tener que ser reemplazado con mayor frecuentemente.
- Page 39 SUSTITUCIÓN DEL CARTUCHO DE ENFRIAMIENTO 5. Vuelva a colocar la tapa superior 6. Vuelva a llenar el tanque de agua en el depósito de agua. Asegúrese y el depósito como se describe en de que la tapa superior encaje en la sección “Cómo llenarlo”.
-
Page 40: Solución De Problemas
SOLUCIÓN DE PROBLEMAS PROBLEMA POSIBLE CAUSA SOLUCIÓN No hay energía • La unidad no está conectada • Conecte la unidad • No hay energía en la unidad • Presione el botón de ENCENDIDO • La cubierta superior no está (POWER) para encender la unidad. bien colocada •... -
Page 41: Declaración De Conformidad Con La Fcc
DECLARACIÓN DE CONFORMIDAD CON LA FCC Sólo para el adaptador Este dispositivo cumple con la parte 15 de las reglas de la FCC. El funcionamiento está sujeto a las siguientes dos condiciones: (1) este dispositivo no puede causar interferencia perjudicial, y (2) este dispositivo debe aceptar cualquier interferencia recibida, incluyendo aquellas interferencias que puedan provocar un funcionamiento no deseado. - Page 42 HoMedics vende sus productos con la intención de que estén libres de defectos de fabricación y mano de obra por un período de 1 año a partir de la fecha de compra original, con excepción de lo que se indica a continuación. HoMedics garantiza que sus productos estarán libres de defectos en materiales y mano de obra bajo uso normal y servicio normales.