Table of Contents
Advertisement
Advertisement
Table of Contents

Related Manuals for natus Otometrics Bio-logic AuDX PRO FLEX


Summary of Contents for natus Otometrics Bio-logic AuDX PRO FLEX
- Page 1 Bio-logic ® Bio-logic AuDX PRO FLEX ® ® Quick start Quick start guide Doc. No.7-26-1370-EN/00 Part No.7-26-13700-EN Natus Medical Denmark ApS. +45 45 75 55 55. otoinfo@natus.com Natus Medical Incorporated. 1-800-289-2150. otoorder.us@natus.com www.otometrics.com...
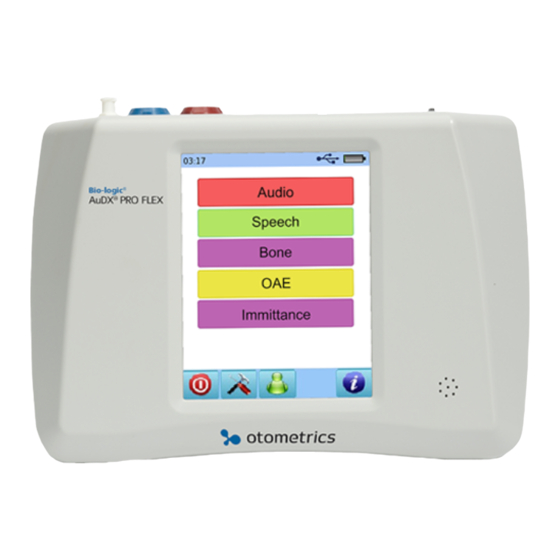
- Page 2 Bio-logic Quick Guide: ® Bio-logic AuDX PRO FLEX Quick start ® ® Device connectors Headphones or On/Off button Power supply USB cable Probe second transducer Label printer Patient response Air Pump button Start menu Note: not all Start Menu options will be available depending on the configuration of your device Battery status Current time Select patient...
- Page 3 Bio-logic Quick Guide: ® Bio-logic AuDX PRO FLEX Quick start ® ® Testing: Tympanometry Connect the probe to the red connector and the air cable to the pump connector. From the start menu, select the Immittance button, then select Tymp, and select Clinical. Select the test ear by pressing either the Right or Left button.
- Page 4 Bio-logic Quick Guide: ® Bio-logic AuDX PRO FLEX Quick start ® ® Eustachian Tube Function (ETF) testing Connect the probe to the red connector and the air cable to the pump connector and select the ETF button from the start menu. Select the test ear by pressing either the Right or Left button. Select the appropriate ear tip size and place it on the probe tip.
- Page 5 Bio-logic Quick Guide: ® Bio-logic AuDX PRO FLEX Quick start ® ® Non Perforated Eardrum: This Perforated Eardrum: This test Patulous Eustachian Tube: test records three tympanograms, pressurizes the ear canal (and This test is performed without with the patient performing the middle ear when the eardrum is stimulus.
- Page 6 Bio-logic Quick Guide: ® Bio-logic AuDX PRO FLEX Quick start ® ® Select the appropriate ear tip size and place it on the probe tip. Insert the probe in the ear making sure that the ear tip fits tightly into the ear canal. Select one of the available Presets.
- Page 7 Bio-logic Quick Guide: ® Bio-logic AuDX PRO FLEX Quick start ® ® DPOAE screening test results Basic results view Please note that the initial result screen depends on the module settings in "DPOAE Preferences" If the required criteria were met, the result will be PASS.
- Page 8 Bio-logic Quick Guide: ® Bio-logic AuDX PRO FLEX Quick start ® ® DPOAE diagnostic / high resolution Select the appropriate ear tip size and place it on the probe Select one of the Presets for tip. Insert the probe in the ear DPOAE Diagnostic and connect making sure that the ear tip fits the red probe to the red...
- Page 9 Bio-logic Quick Guide: ® Bio-logic AuDX PRO FLEX Quick start ® ® DPOAE diagnostic / high resolution test results Note: These circles indicate that other Red or blue bars screens are available indicate response, Outcome for Numeric values to view. Swipe your grey bars each test sorted High resolution...
- Page 10 Bio-logic Quick Guide: ® Bio-logic AuDX PRO FLEX Quick start ® ® DPOAE diagnostic / high resolution test results Progress for each tested frequency in each ear Noise floor level Stop test Skip a frequency Probe fit override for patients with cartoon mode PE tubes or middle ear perforations for children...
- Page 11 Bio-logic Quick Guide: ® Bio-logic AuDX PRO FLEX Quick start ® ® Audiometry diagnostics Connect the headphones to the blue connector and select an Audiometry Preset from the start menu. Select the ear on which you want to start the test. The test screen will be displayed. Test screen Patient response Stimulus on indicator...
- Page 12 Bio-logic Quick Guide: ® Bio-logic AuDX PRO FLEX Quick start ® ® Audiometry test results Green background indicates range of normal hearing Print results to a label or to a pdf file Audiometry screening Connect the headphones to the blue connector and select the Audiometry: Screening button from the start menu.
- Page 13 Bio-logic Quick Guide: ® Bio-logic AuDX PRO FLEX Quick start ® ® Audiometry screening: Test screen Select the frequency Select the Select the stimulus levels Select the ear to test Stop test Press to present the stimulus Select the type of stimulus: Additional information about options for...
- Page 14 Bio-logic Quick Guide: ® Bio-logic AuDX PRO FLEX Quick start ® ® When the test is finished, press the Stop button. You can add the patient’s personal data, and save on the device, print to a label (a label printer is required) or print to a pdf file or full page report on PC.
- Page 15 Bio-logic Quick Guide: ® Bio-logic AuDX PRO FLEX Quick start ® ® Quick Guide Information Release date: 2017-01-11 Revision: 02 Valid from: Firmware Rev. 2.1, Mira PC Software Rev. 1.6.4 Applies to: Model: SOD100497, web description SOD06, SOD07, SOD08 and SOD09 All mentioned items, products, brands and trademarks are registered or owned by the mentioned companies.