
Related Manuals for Sony RM-VL610


Summary of Contents for Sony RM-VL610
- Page 1 4-117-851-11 (1) Integrated Remote Commander Operating Instructions RM-VL610 ©2008 Sony Corporation...
- Page 2 For the customers in the U.S.A. WARNING This equipment has been tested and found to comply with the limits for a Class B digital device, pursuant to Part 15 of the FCC Rules. These limits are designed to provide reasonable protection against harmful interference in a residential installation.
-
Page 3: Features
Centralized control of Sony AV components with this one remote commander This Commander is preset at the factory to operate Sony brand components, so you can use it out of the box as a control center for your Sony AV components. -
Page 4: Startup Guide
Startup Guide This guide shows you how to set the Remote Commander to operate your components. First, find the four-digit component code number for your component, referring to the supplied “Component code numbers.” If you have the code number Example: To set up a TV of the code number “8011”... -
Page 5: Learning Function
Learning function If your component does not work as supposed even if the code number is set, make the RM-VL610 “learn” the functions of your component’s remote control. Example: To “teach” the H (play) signal of your video cassette recorder to the VCR H button of the RM-VL610 Place the RM-VL610 head to head with your VCR’s remote control. -
Page 6: Table Of Contents
When to replace the batteries ... 8 Location of Controls ... 9 Basic Operations Setting the Code for non-Sony Preset Audio and Visual Components — Setting component codes ... 10 Setting a component code ... 10 Checking if the code number works ... 12 Setting a Component Code by the Search Function ... - Page 7 Additional Information Precautions ... 36 Maintenance ... 36 Specifications ... 36 Troubleshooting ... 37 Appendixes Table of Preset Functions ... 39 TV ... 39 VCR ... 41 CBL (Cable box) ... 41 SAT ... 42 DVD ... 42 DVR (Digital video recorder) ... 43 CD ...
-
Page 8: Getting Started
Getting Started Installing the Batteries Slide open the battery compartment lid and insert two size AA (R6) batteries (not supplied). Be sure to match up the + and – indications on the batteries with the + and – indications on the battery compartment. -
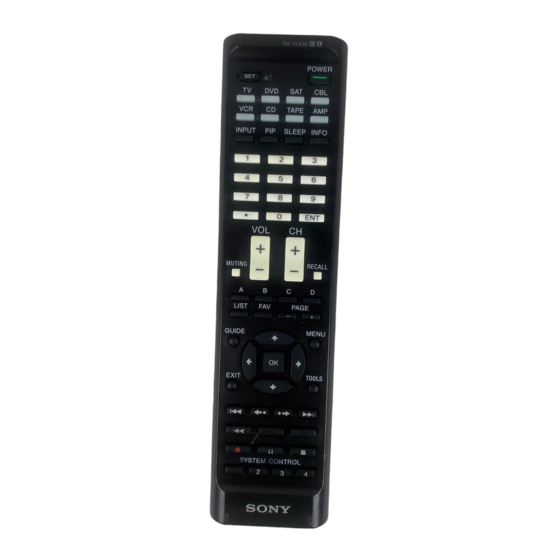
Page 9: Location Of Controls
Location of Controls About tactile dots The number 5 button, the G button and CH + button each have a tactile dot for ease of use. * Note on the VOL +/– and MUTING buttons The Commander controls or mutes the TV’s volume when you select a visual component. -
Page 10: Basic Operations
Audio and Visual Components — Setting component codes The Commander is preset at the factory to operate Sony brand AV components (see the table below). If you are using the Commander with a factory-set Sony components, skip the following procedures. - Page 11 Press the Component Select button for the desired component. The SET indicator and the selected Component Select button lights up. Press the Number buttons to enter the four-digit component code number. Press ENT. The SET indicator and the Component Select button light turns off.
-
Page 12: Checking If The Code Number Works
Setting the Code for non-Sony Preset Audio and Visual Components — Setting component codes (continued) Checking if the code number works Power on the component with its power switch. Press the corresponding Component Select button for the component you have set up. -
Page 13: Setting A Component Code By The Search Function
Setting a Component Code by the Search Function You can find a code number available for a component that doesn’t have one in the supplied “Component code numbers.” Before starting the Search function Set each component to the following status so that the Search function works effectively. -
Page 14: Operating Your Components With The Remote Commander
To cancel setup, press SET. Operating Your Components with the Remote Commander When you operate a non-Sony component, make sure you set the component code first (page 10). Example: To operate a video cassette recorder Press the desired Component Select button. -
Page 15: To Control The Volume
Press any Player Control button. See “Table of Preset Functions” (page 39) for the functions of buttons for each component. Note The remote control signals may be different for some components or functions. In this case, program the remote control signals with the Learning function (page 16). -
Page 16: Programming Signals Of Another Remote Control - Learning Function
Programming Signals of Another Remote Control — Learning Function To operate components or functions which do not work even if you set a component code number, use the following Learning procedure to “teach” any of the programmable buttons of the Commander to operate the functions of another remote control. - Page 17 Press and hold SET for over 3 seconds. The SET indicator flash. Press the Component Select button for the component whose signals are to be “learned.” The SET indicator flashes and the selected Component Select button light up. Press the button on the Commander you want to “teach.”...
- Page 18 Programming Signals of Another Remote Control — Learning Function (continued) Press and hold the button on the other remote control, until both the SET indicator and the Component Select button lights up again. During data transfer, only the SET indicator stays lit, and the Component Select button turns off.
-
Page 19: For Accurate Learning
• When you teach signals of an interactive signal exchange system remote control unit (supplied with some of Sony’s amplifiers) to the Commander, the response signal of the main unit may interfere with the learning of the Commander. -
Page 20: Programming Remote Control Signals To The
Programming signals of another remote control — Learning Function (continued) Programming remote control signals to the Component Select buttons and System Control buttons You can “teach” one operating procedure to a Component Select button and System Control buttons, so that when you press the Component Select button and System Control buttons, the operation is also automatically... - Page 21 If another signal has already been “learned” by that button The SET indicator flashes twice, and the Commander takes no action, returning to its state after SET was pressed and held in Step 2. Either “teach” to another free button, or clear the already “learned”...
-
Page 22: Changing Or Erasing The Function Of A "Learned" Button
Programming signals of another remote control — Learning Function (continued) Changing or erasing the function of a “learned” button To change the “learned” function, clear it first and perform Learning again. To clear the “learned” function of a single button Example: To erase the “learned”... - Page 23 To erase the learned function of the Component Select button and System Control buttons Example: To erase the function “learned” by the TV button While holding SET pressed, press and hold the TV Component Select button for over 3 seconds. When erasing of a “learned”...
-
Page 24: Notes On Programming The Signals For An Air-Conditioner
Programming signals of another remote control — Learning Function (continued) While holding x pressed, press the Component Select button you want to erase. When erasing of a “learned” function has completed, all the other Component Select button lights turn off. during data data erasing erasing... -
Page 25: Advanced Features
Advanced Features Controlling the Volume of Visual Components Connected to an Audio System The Commander is factory preset based on the assumption that you hear the sound of your visual components from your TV speakers, and that you hear sound of your audio components from the loudspeakers connected to your amplifier. - Page 26 Controlling the Volume of Visual Components Connected to an Audio System (continued) While holding MUTING pressed, press VOL + or VOL –. To set all volume controls to Press VOL + while holding MUTING pressed. All Component Select buttons light up when you press these buttons, and then turn off when you release them.
-
Page 27: Adding An Extra Function To The Component Select Buttons
Component Select button (for Sony components only) When a code number of a Sony component is set to a Component Select button, the Power-On signal is automatically programmed to the button. You can select the... - Page 28 Repeat the same procedure, pressing the desired Component Select button. Notes • If the component code of a non-Sony brand has been set on a Component Select button, you cannot program the Power-On function on it. If you change the component code (page 10) after setting the Power-On function, the Power-On function is cleared.
-
Page 29: Executing A Series Of Commands - System Control Functions
Executing a Series of Commands — System Control Functions With the System Control function, you can program a series of operating commands, and execute them by pressing just one button. You can program up to 16 consecutive operation steps to each of the SYSTEM CONTROL buttons (1 –... - Page 30 Example: To program the procedure above to the SYSTEM CONTROL 2 button Press and while holding SET, press the SYSTEM CONTROL 2 button. The SET indicator light turns If a System Control function (System Control Macro) has already been set on the button, the SET indicator flashes twice.
-
Page 31: To Clear Programmed Commands
Executing a Series of Commands — System Control Functions (continued) Tips for programming the System Control functions The following information helps you to program a consecutive operation steps. About the order of operation steps Some of the components may not accept consecutive remote control signals. -
Page 32: Programming A Series Of Commands To On The Component Select Buttons
Programming a Series of Commands on the Component Select Buttons As with the SYSTEM CONTROL buttons, you can also program a series of operating commands for the Component Select buttons (up to 16 steps). To execute the commands programmed on a Component Select button by the System Control function, press the button for more than 2 seconds. -
Page 33: To Clear Programmed Commands
Programming a Series of Commands on the Component Select Buttons (continued) To clear programmed commands Press and while holding SET, press and hold for more than 3 seconds the Component Select button you want to clear. Notes • You can program a Control Program function (Component Macro) for a Component Select button on which the Power-On function (page 27) has... -
Page 34: Using Other Functions
Using Other Functions Locking the Controls — Hold Function To prevent accidental operation, you can lock all the buttons with the Hold function. Press and while holding POWER, press INPUT and CH +. The SET button and the Component Select button currently selected flash once, and the Hold function is set. -
Page 35: Erasing All Settings - To Reset The Commander To Its Factory Settings
Erasing All Settings — To reset the Commander to its factory settings You can erase all remote control signals programmed by the “learned“ function to reset the Commander to its factory settings. While holding POWER pressed, press INPUT and VOL –. When pressing the POWER button and the INPUT button, all the Component Select... -
Page 36: Additional Information
Additional Information Precautions •Do not drop the unit or give a shock to the unit, or it may cause a malfunction. •Do not leave the unit in a location near heat sources, or in a place subject to direct sunlight, excessive dust or sand, moisture, rain or mechanical shock. -
Page 37: Troubleshooting
Search function. • When you teach signals of an interactive signal exchange system remote control unit (supplied with some of Sony’s amplifiers) to the Commander, the response signal of the main unit may interfere with the learning of the Commander. - Page 38 For the customers in the U.S.A Customer Support Information After you have read through this manual, if you still cannot get the Remote Commander to work properly, call the Sony Customer Support Helpline at 1-800-822-2217. Remedy • Learning has not succeeded. See “For accurate Learning”...
-
Page 39: Appendixes
Appendices Table of Preset Functions Note There may be some components or functions that cannot be operated with this Commander. KEY DISPLAY FUNCTION qdPOWER To turn on and off. 3qh4 To change the channel. 1 – 9, 0, ENT, For example, to change to channel 5, press 0 and 5 (or, press 5 and ENT). -
Page 40: Vcr
Table of Preset Functions (continued) KEY DISPLAY FUNCTION qdPOWER To turn on and off. To change the channel. 1 – 9, 0, ENT For example, to change to channel 5, press 0 and 5 (or, press 5 and ENT). qfINFO To expose the on-screen (DISPLAY) display. -
Page 41: Sat
KEY DISPLAY FUNCTION qdPOWER To turn on and off. 34qh To change the channel. 1 – 9, 0, DOT, For example, to change to channel 5, press 0 and 5 ( or, press 5 and ENT) 1INPUT To switch the output of (TV/SAT) the SAT receiver to the TV. -
Page 42: Dvd
Table of Preset Functions (continued) KEY DISPLAY FUNCTION qdPOWER To turn on and off. 31 – 9, 0 Number buttons: To set items selected from the screen. 4DOT To select numbers 10 (+10) and above. qhENT To enter the setting. To set items selected from the screen. -
Page 43: Dvr (Digital Video Recorder)
DVR (Digital video recorder) KEY DISPLAY FUNCTION qdPOWER To turn on and off. To change the channel. 1 – 9, 0, ENT For example, to change to channel 5, press 0 and 5 (or, press 5 and ENT). 1INPUT To switch the output of the SAT receiver to the TV. - Page 44 Table of Preset Functions (continued) KEY DISPLAY FUNCTION qdPOWER To turn on and off. 31 – 9, 0 To select the track number. 0 selects track To select track numbers above 10, see the descriptions on the +10 button below. 4DOT To select numbers 10 (+10)
-
Page 45: Deck
To rewind.* qhENT (n) To reverse. wsF (X) To pause.* * Activated when using a double cassette deck (for deck A of Sony component) KEY DISPLAY FUNCTION qdPOWER To turn on and off. To select the input source: VIDEO 1... -
Page 46: Dav (Dvd/Receiver Combo)
Table of Preset Functions (continued) DAV (DVD/Receiver combo) KEY DISPLAY FUNCTION qdPOWER To turn the power on/ 31 – 9, 0 Number buttons: To set items selected on the screen 4DOT To select numbers 10 (+10) and above qhENTER To enter the setting To rewind To play To fast-forward... -
Page 47: Digital Tv Tuner
Digital TV TUNER KEY DISPLAY FUNCTION qdPOWER To turn on and off. 34qh To change the channel. 1 – 9, 0, ENT, For example, to change to channel 5, press 0 and 5 (or, press 5 and ENT). qfINFO To display the current (DISPLAY) channel. -
Page 48: Index
Index A, B Batteries 8 C, D Changing 22 CH (CHANNEL) button 13 Clearing/Changing learned signal 22, 23 Power-On command 27 Code numbers 10, 13 Component Select buttons assigning other components 33 programming a signal 16 programming a series of commands 32 setting the Power-On function 27 Erasing 35... - Page 52 Printed in China...