Sony STR-DH820 Operating Instructions Manual
Multi channel av receiver
Hide thumbs
Also See for STR-DH820:
- Quick setup manual (2 pages) ,
- Specifications (2 pages) ,
- Service manual (108 pages)

Related Manuals for Sony STR-DH820


Summary of Contents for Sony STR-DH820
- Page 1 Multi Channel AV Receiver Operating Instructions STR-DH820 ©2011 Sony Corporation 4-266-497-11(2)
-
Page 2: Important Safety Instructions
The model and serial numbers are located on the rear of the unit. Record these numbers in the space provided below. Refer to them whenever you call upon your Sony dealer regarding this product. Model No. _______________ _____________________________ _________ Serial No. ________________ _____________________________ _________... - Page 3 12)Use only with the cart, stand, tripod, bracket, or table specified by the manufacturer, or sold with the apparatus. When a cart is used, use caution when moving the cart/apparatus combination to avoid injury from tip-over. 13)Unplug this apparatus during lightning storms or when unused for long periods of time.
-
Page 4: About This Manual
Notice for customers: The following information is only applicable to equipment sold in countries applying EU Directives. The manufacturer of this product is Sony Corporation, 1-7-1 Konan Minato-ku Tokyo, 108-0075 Japan. The Authorized Representative for EMC and product safety is Sony Deutschland GmbH, Hedelfinger Strasse 61, 70327 Stuttgart, Germany. - Page 5 “x.v.Color (x.v.Colour)” and “x.v.Color (x.v.Colour)” logo are trademarks of Sony Corporation. “BRAVIA” is a trademark of Sony Corporation. “PlayStation” is a registered trademark of Sony Computer Entertainment Inc. “WALKMAN” is a registered trademark of Sony Corporation.
-
Page 6: Table Of Contents
Table of Contents About This Manual...4 Supplied accessories...7 Description and location of parts...9 Getting started ...18 Connections 1: Installing the speakers ...19 2: Connecting the speakers ...21 3: Connecting the TV ...23 4a: Connecting the video equipment ...24 4b: Connecting the audio equipment...32 5: Connecting the antennas (aerials)...33 6: Connecting the AC power cord (mains lead) ...33... -
Page 7: Supplied Accessories
Using the Remote Control Programming the remote control ... 80 Resetting the remote control ... 85 Additional Information Precautions ... 85 Troubleshooting ... 86 Specifications ... 93 Index... 96 Supplied accessories • Operating Instructions (this manual) • Quick Setup Guide •... -
Page 8: Remote Control
Inserting batteries into the remote control Insert two R6 (size AA) batteries (supplied) by matching 3 and # on the batteries to the diagram inside the battery compartment of the remote control. Notes • Do not leave the remote control in an extremely hot or humid place. -
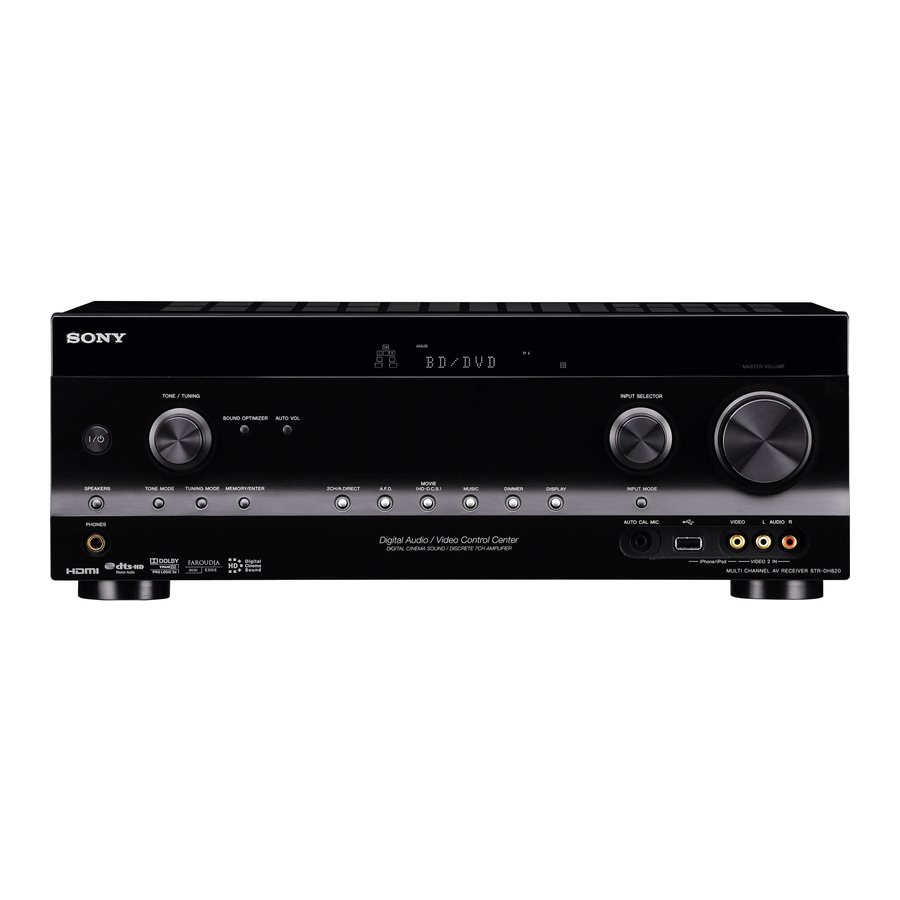
Page 9: Description And Location Of Parts
Description and location of parts Front panel ql qk A ?/1 (on/standby) (page 34, 52, 58) B TONE, TONE MODE Press TONE MODE repeatedly to select BASS or TREBLE, then turn TONE to adjust the level. C SOUND OPTIMIZER (page 58) D AUTO VOL Adjust the volume automatically depending on the input signal or content from the connected... - Page 10 Indicators on the display panel ANALOG SW RH PL II x z D.L.L. A.P.M. D.RANGE SB L SB R qk qj A SW Lights up when the audio signal is output from the SUBWOOFER jack. B USB Lights up when iPhone/iPod or USB device is detected.
- Page 11 N Tuning indicators Lights up when the receiver tunes to a radio station. RDS (Europe, Australia and Taiwan models only) Tuned to a station with RDS services. Memory function, such as Preset Memory (page 52), etc., is activated. Stereo broadcast O EQ Lights up when the equalizer is activated.
-
Page 12: Rear Panel
COAXIAL IN jack (page 27) B ANTENNA section FM ANTENNA jack (page 33) AM ANTENNA terminals (page 33) C Controls jacks for Sony equipment and other external equipment IR REMOTE IN/OUT jacks (page 66) D SPEAKERS section (page 21) E AUDIO INPUT/OUTPUT section... - Page 13 Remote control Use the supplied remote control to operate this receiver and other equipment. The remote control is pre-programmed to operate Sony audio/video equipment. You can also program the remote control to operate non-Sony equipment. For details, see “Programming the remote control”...
-
Page 14: Sound Field
Selects the equipment you want to use. When you press any of the input buttons, the receiver turns on. The buttons are assigned to control Sony equipment. You can program the remote control to control non-Sony equipment following the steps in “Programming the remote control”... - Page 15 Returns to the previous menu or exits the menu while the menu or on-screen guide is displayed on the TV screen. Press TV (W), then press RETURN/EXIT O to return to the previous menu of Sony TV. Press V/v/B/b to select the menu items, then press , MENU...
- Page 16 S GUIDE Press TV (W), then press GUIDE or display the on-screen program guide. T AUTO CAL Press SHIFT (V), then press AUTO CAL to perform Auto Calibration. Note This button is not available when the receiver is in “GUI MODE”. DISPLAY Views information on the display panel.
- Page 17 To control other Sony equipment TV VCR Name AV ?/1 Numeric buttons -/--, >10 ENT/MEM CLEAR (Text) Color buttons TOOLS/ OPTIONS MENU, HOME ./> < < FOLDER +/– REPEAT SHUFFLE m/TUNING –, M/TUNING + N, X, x PRESET +/–, TV CH +/–, PROG +/–...
-
Page 18: Getting Started
Getting started You can enjoy your audio/video equipment connected to the receiver by following the simple steps below. Installing and connecting the speakers (page 19, 21) Checking the connection appropriate for your equipment Connecting the TV and video equipment (page 23, 24) The image quality depends on the connecting jack. -
Page 19: Connections
Connections 1: Installing the speakers This receiver allows you to use a 7.2 channel system (7 speakers and 2 subwoofers). Example of speaker system configuration AFront speaker (Left) BFront speaker (Right) CCenter speaker DSurround speaker (Left) ESurround speaker (Right) FSurround back speaker (Left)* GSurround back speaker (Right)* HFront high speaker (Left)* IFront high speaker (Right)*... - Page 20 Tips • When you connect a 7.1 channel speaker system with two surround back speakers, all the angles A should be the same. • When you connect a 7.1 channel speaker system with two front high speakers, place the front high speakers –...
-
Page 21: 2: Connecting The Speakers
2: Connecting the speakers Center speaker Surround speaker Right Left 10 mm (13/32") Right Left Right Left Subwoofer * Surround back/Front high/ Front A speaker Bi-amplifier/Front B speaker ** A Monaural audio cord (not supplied) B Speaker cord (not supplied) continued... -
Page 22: Bi-Amplifier Connection
* When you connect a subwoofer with an auto standby function, turn off the function when watching movies. If the auto standby function is set to on, it turns to standby mode automatically based on the level of the input signal to the subwoofer, and the sound may not be output. -
Page 23: 3: Connecting The Tv
A Optical digital cord (not supplied) B Audio cord (not supplied) C Component video cord (not supplied) D Video cord (not supplied) E HDMI cable (not supplied) Sony recommends that you use an HDMI- authorized cable or Sony HDMI cable. Video signals Audio/video signals... -
Page 24: 4A: Connecting The Video Equipment
Using HDMI connection High-Definition Multimedia Interface (HDMI) is an interface which transmits video and audio signals in digital format. By connecting Sony “BRAVIA” Sync- compatible equipment using HDMI cables, operations can be simplified. See ““BRAVIA” Sync Features” (page 59). HDMI features •... - Page 25 • The audio and video signals of HDMI input are not output from the HDMI TV OUT jack while the GUI menu is displayed. • When you want to listen to the sound from the TV speaker, set the “Audio Out” to “TV+AMP”...
- Page 26 If you want to connect several digital equipment, but cannot find an unused input See “Using the sound/images from other inputs (Input Assign)” (page 63). Converting video signals This receiver is equipped with a function for converting video signals. For details, see “Function for conversion of video signals”...
- Page 27 Blu-ray Disc player, DVD player Audio/video Video signals signals A HDMI cable (not supplied) Sony recommends that you use an HDMI- authorized cable or Sony HDMI cable. B Component video cord (not supplied) C Video cord (not supplied) D Coaxial digital cord (not supplied)
- Page 28 Connecting a satellite tuner, cable TV tuner Satellite tuner, Cable TV tuner Audio/video signals A HDMI cable (not supplied) Sony recommends that you use an HDMI- authorized cable or Sony HDMI cable. B Component video cord (not supplied) C Video cord (not supplied)
- Page 29 Connecting a PlayStation 3 PlayStation 3 Audio/video signals A HDMI cable (not supplied) Sony recommends that you use an HDMI- authorized cable or Sony HDMI cable. Connecting an iPhone, iPod for video contents A Apple composite AV cable (not supplied)
-
Page 30: Connecting Other Equipment
A Audio cord (not supplied) B Video cord (not supplied) C HDMI cable (not supplied) Sony recommends that you use an HDMI- authorized cable or Sony HDMI cable. D Audio/video cord (not supplied) * If you want to record, you must make this connection (page 50). - Page 31 Function for conversion of video signals The receiver is equipped with a function for converting video signals. Video signals and component video signals can be output as HDMI video signals (HDMI TV OUT jack only). As the default setting, video signals input from the connected equipment are output as shown in the table with solid arrows.
-
Page 32: 4B: Connecting The Audio Equipment
4b: Connecting the audio equipment Connecting a Super Audio CD player, CD player, MD deck, Tape deck Super Audio CD player, CD player MD deck, Tape deck A Audio cord (not supplied) Connecting an iPhone, iPod, USB device iPhone, iPod, USB device A USB cable (not supplied) -
Page 33: 5: Connecting The Antennas (Aerials)
5: Connecting the antennas (aerials) Before connecting the antennas (aerials), be sure to disconnect the AC power cord (mains lead). FM wire antenna (aerial) (supplied) AM loop antenna (aerial) (supplied) Notes • To prevent noise pickup, keep the AM loop antenna (aerial) away from the receiver and other equipment. -
Page 34: Preparing The Receiver
Preparing the Receiver Initializing the receiver Before using the receiver for the first time, initialize the receiver by performing the following procedure. This procedure can also be used to revert back to the factory default settings. Be sure to use the buttons on the receiver to perform this operation. - Page 35 Press V/v repeatedly to select “Speaker”, then press Press V/v repeatedly to select “SP Pattern”, then press Press V/v repeatedly to select the speaker pattern you want, then press Press RETURN/EXIT O. Setting the surround back speakers You can switch the usage of the speaker(s) connected to the SPEAKERS SURROUND BACK/FRONT HIGH/BI-AMP/FRONT B terminals in accordance with the intended use.
-
Page 36: Using Auto Calibration
Selecting the front speaker You can select the front speakers you want to drive. Be sure to use the buttons on the receiver to perform this operation. SPEAKERS Press SPEAKERS repeatedly to select the front speaker system you want to drive. You can confirm the selected speakers terminals by checking the indicator on the display panel. -
Page 37: Setting Up Auto Calibration
• Remove any obstacles in the path between the optimizer microphone and the speakers to avoid measurement errors. • Get accurate measurement by making sure the environment is free from noise and quiet. Notes • The speakers emit very loud sound during the calibration and the volume cannot be adjusted. - Page 38 Performing Auto Calibration MUTING/ Press GUI MODE. After “GUI ON” appears on the display panel for a while, the GUI menu appears on the TV screen. Press MENU if the GUI menu does not appear on the TV screen. Press V/v repeatedly to select “...
-
Page 39: Checking Auto Calibration Results
Press V/v repeatedly to select the item you want, then press • Retry: Performs the Auto Calibration again. • Save: Save the measurement results and exits the setting process. • Warning: Displays warning related to the measurement results. See “Message list after Auto Calibration measurement”... -
Page 40: Customizing The Auto Calibration
• Full Flat: Makes the measurement of frequency from each speaker flat. • Engineer: Sets to “the Sony listening room standard” frequency characteristics. • Front Reference: Adjusts the characteristics of all the speakers to match the characteristics of the front speaker. -
Page 41: Guide To On-Screen Display Operation
Guide to on-screen display operation You can display the menu of the receiver on the TV screen and select the function you want to use on the TV screen by pressing V/v/B/b on the remote control. To display the menu of the receiver on the TV screen, make sure that the receiver is in “GUI MODE”... - Page 42 Overview of the main menus Menu icon Description Input Selects the input source equipment connected to the receiver (page 43). Music Selects the music from iPhone/iPod (page 46) or USB device (page 48). Video Selects the video from iPhone/iPod (page 46). FM/AM Selects the built-in FM/AM radio (page 51).
-
Page 43: Basic Operations
Basic Operations Playing an input source equipment MUTING/ Press GUI MODE. Press MENU if the GUI menu does not appear on the TV screen. Select “ Input”, then press or b. The menu item list appears on the TV screen. Select the equipment you want, then press The menu screen disappears and the... - Page 44 Tips • You can turn INPUT SELECTOR on the receiver or press input buttons on the remote control to select the equipment you want. • You can adjust the volume differently depending on the speed you turn the MASTER VOLUME on the receiver.
-
Page 45: Playing An Iphone/Ipod
4 Notes • Sony cannot accept responsibility in the event that data recorded to iPod/iPhone is lost or damaged when using an iPod/iPhone connected to this receiver. • This product has been designed specifically to work with iPod/iPhone and has been certified to meet Apple performance standards. - Page 46 Selecting the iPhone/iPod control mode You can select the iPhone/iPod control mode using the GUI menu or iPhone CTRL on the remote control. You can use the GUI menu to browse contents on the iPhone/iPod. You can also control all operations by viewing the information on the display panel when “GUI MODE”...
- Page 47 Select the content you want using iPhone/iPod menu. For details on operating the iPhone/iPod, refer to the operating instructions supplied with iPhone/iPod. To operate the iPhone/iPod using the remote control You can operate the iPhone/iPod using the following buttons on the remote control of the receiver.
-
Page 48: Playing A Usb Device
“.wma” * The receiver does not play files encoded with DRM. Compatible USB devices You can use the following Sony USB devices on this receiver. Other USB devices cannot be used on this receiver. Verified Sony USB device Product name Model name ®... - Page 49 Press GUI MODE. Press MENU if the GUI menu does not appear on the TV screen. Select “ Music”, then press or b. When the USB device is connected, “USB” appears on the TV screen. Press to select “USB”. You can operate the USB device using the remote control of the receiver.
-
Page 50: Recording Using The Receiver
• Compatibility with all encoding/writing softwares, recording devices, and recording media cannot be guaranteed. Incompatible USB device may produce noise or interrupted audio or may not play at all. • Some time may be needed to start playback when: – the folder structure is complex. –... -
Page 51: Tuner Operations
Tuner Operations Listening to FM/AM radio You can listen to FM and AM broadcasts through the built-in tuner. Before operation, be sure you have connected the FM and AM antennas (aerials) to the receiver (page 33). The tuning scale for direct tuning is shown below. Area USA, Canada 100 kHz... -
Page 52: Presetting Fm/Am Radio Stations (Preset Tuning)
Adjust the direction of the AM loop antenna (aerial) for optimum reception upon tuning to an AM station. Press If you cannot tune to a station “– – – .– – MHz” appears and then the screen returns to the current frequency. Make sure you have entered the right frequency. -
Page 53: Receiving Rds Broadcasts
Tuning to preset stations Select “ FM” or “ the menu, then press Select the preset station you want. Preset numbers from 1 to 30 are available. Naming preset stations (Name Input) On “ FM” or “ AM” screen, select the preset number which you want to name. -
Page 54: Enjoying Surround Sound
Enjoying Surround Sound Selecting the sound field This receiver can create multi channel surround sound. You can select one of the optimized sound fields from the receiver’s pre-programmed sound fields. Press SOUND FIELD +/– repeatedly to select the sound field you want. You can also use 2CH/A.DIRECT, A.F.D., MOVIE (HD-D.C.S.) or MUSIC on the receiver. -
Page 55: Music Mode
HD-D.C.S. HD Digital Cinema Sound (HD-D.C.S.) is Sony’s new innovative home theater technology using the latest acoustic and digital signal processing technologies. It is based on precise response measurement data of a mastering studio. With HD-D.C.S., you are able to enjoy... - Page 56 When headphones are connected You can only select this sound field if the headphones are connected to the receiver. x HP 2CH (HP (2CH)) This mode is selected automatically if you use headphones (except “A. DIRECT”). Standard 2 channel stereo sources completely bypass the sound field processing and multi channel surround formats are downmixed to 2 channels except LFE signals.
- Page 57 Digital audio formats supported by the receiver Digital audio formats that this receiver can decode depend on digital audio output jacks of the equipment connected. This receiver supports the following audio formats. Audio format Dolby Digital Dolby Digital EX Dolby Digital Plus Dolby TrueHD DTS-ES DTS 96/24...
-
Page 58: Using The Sound Optimizer
Using the SOUND OPTIMIZER The Sound Optimizer lets you enjoy clear and dynamic sound at low volume levels. It automatically calibrates the sound which cannot be heard well when you turn down the volume level. After Auto Calibration is performed, the sound level is optimized to suit your environment. -
Page 59: Bravia" Sync Features
Sony products such as TV, Blu-ray Disc/DVD player, AV amplifier, etc. that supports the Control for HDMI function. By connecting Sony equipment that is compatible with the “BRAVIA” Sync with an HDMI cable (not supplied), operation is simplified as follows: •... -
Page 60: Playing Back Equipment With One-Touch Operation (One-Touch Play)
If your TV is not compatible with the “Control for HDMI-Easy Setting” function Press GUI MODE. Press MENU if the GUI menu does not appear on the TV screen. Select “ Settings” from the menu, then press or b. The Settings menu list appears on the TV screen. -
Page 61: Enjoying The Tv Sound From The Speakers Connected To The Receiver (System Audio Control)
Notes • Be sure that the System Audio Control function is set to on using TV menu. • Depending on the TV, the start of the content may not appear. • Depending on the settings, the receiver may not turns on when “Pass Through” is set to “AUTO” or “ON”. -
Page 62: Enjoying Movies With The Optimum Sound Field (Theater/Theatre Mode Sync)
Enjoying movies with the optimum sound field (Theater/Theatre Mode Sync) Press THEATER or THEATRE on the remote control of the TV or the Blu-ray Disc player, while pointing the remote control towards the TV. The sound field switches to “HD-D.C.S.”. To return to the previous sound field, press THEATER or THEATRE again. -
Page 63: Using The Sound/Images From Other Inputs (Input Assign)
Notes • Some audio input modes may not be set up based on the input. • When the USB input is selected, “------” appears on the display panel, and you cannot change to other modes. Select another input, then set the audio input mode. - Page 64 Input name BD/DVD Assignable COMP.1 video input COMP.2 jacks CVBS NONE Assignable BD COAX audio input SAT OPT jacks ANALOG NONE * Default setting Notes • You cannot assign other optical input to the inputs to which optical input jack is initially assigned. •...
-
Page 65: Using A Bi-Amplifier Connection
CD in zone 2. When using an IR repeater (not supplied), you can operate both equipment in the main zone and Sony receiver in zone 2 from zone 2. To operate the receiver from zone 2 You can operate the receiver without pointing... - Page 66 Outputs sound from speakers in zone 2 using the receiver and another amplifier. Main zone ZONE 2 VIDEO ZONE 2 AUDIO A Audio equipment B Video equipment C IR repeater (not supplied) D Speakers E Sony Amplifier/Receiver STR-DH820 REMOTE Zone 2 RM-AAP061/RM-AAP062...
- Page 67 Operating the receiver from zone 2 The following operations are described for connecting an IR repeater and operating the receiver in zone 2. When an IR repeater is not connected, use this receiver in the main zone. Turn on the main receiver (this receiver).
-
Page 68: Adjusting Settings
Adjusting Settings Using the Settings menu You can adjust various settings for speakers, surround effects, etc. using the Settings menu. To display the menu of the receiver on the TV screen, make sure that the receiver is in “GUI MODE” by following the steps in “To turn “GUI MODE”... -
Page 69: Speaker Settings Menu
Speaker Settings menu You can adjust each speaker manually. You can also adjust the speaker levels after the Auto Calibration is completed. Note The speaker settings are only for the current seating position. x SP Pattern (Speaker Pattern) Select “SP Pattern” according to the speaker system which you are using. -
Page 70: Crossover Frequency
To adjust the size of each speaker You can adjust each speaker’s (front left/right, front left/right high, center, surround left/right, surround back left/right) size. Select the speaker on the screen for which you want to adjust the size, then press Select “Size”. -
Page 71: Surround Settings Menu
When a test tone is not output from the speakers • The speaker cords may not be connected securely. Check to see if they are connected securely and cannot be disconnected by pulling on them slightly. • The speaker cords may have short-circuit problem. -
Page 72: Eq Settings Menu
You can adjust settings for the audio to suit your preference. x D.L.L. (Digital Legato Linear) The D.L.L. function is Sony proprietary technology that allows low quality digital audio signals and analog audio signals to be played back with high quality sound. -
Page 73: Hdmi Settings Menu
• AUTO: When the TV is turned on while the receiver is in the standby mode, the receiver outputs HDMI signals from the receiver’s HDMI TV OUT jack. Sony recommends this setting if you use a “BRAVIA” Sync compatible Sony TV. This setting saves power in the standby mode when compared with the “ON”... -
Page 74: System Settings Menu
• TV+AMP: The sound is output from TV’s speaker and the speakers connected to the receiver. Notes • The sound quality of the playback equipment depends on the TV’s sound quality, such as the number of channels, and the sampling frequency, etc. - Page 75 Using the menu in the display panel Press GUI MODE repeatedly to select “GUI OFF”. The receiver is switched to front panel display mode. Press AMP. Press MENU. Press V/v repeatedly to select the menu you want, then press or b. Press V/v repeatedly to select the parameter you want to adjust, then press...
-
Page 76: Overview Of The Menus
Overview of the menus The following options are available in each menu. For details on navigating through menus, see page 75. Menu Parameters [Display] [Display] Auto Calibration Auto Calibration (Standard) settings [STANDARD] [<AUTO CAL>] Auto Calibration (Custom) [CUSTOM] Level settings Test tone [<LEVEL>] [TEST TONE]... - Page 77 Menu Parameters [Display] [Display] Surround speakers size [SUR SIZE] Front high speakers size [FH SIZE] Surround back speaker assign [SB ASSIGN] Front left speaker distance [FL DIST.] Front right speaker distance [FR DIST.] Center speaker distance [CNT DIST.] Surround left speaker distance [SL DIST.] Surround right speaker distance [SR DIST.]...
- Page 78 Menu Parameters [Display] [Display] Surround speakers crossover frequency [SUR CROSS] Front high speakers crossover frequency [FH CROSS] Surround settings Effect level [<SURROUND>] [EFFECT] EQ settings Front speakers bass level [<EQ>] [BASS] Front speakers treble level [TREBLE] Tuner settings FM station receiving mode [<TUNER>] [FM MODE] Naming preset stations...
- Page 79 You can only select this parameter after you have performed Auto Calibration. Depends on the speaker pattern setting, some parameters or settings may not be available. xxx represent a speaker channel (FL, FR, CNT, SL, SR, SB, SBL, SBR, LH, RH, SW). You can only select this parameter if “SP PATTERN”...
-
Page 80: Using The Remote Control
You can even program the remote control to operate non-Sony equipment and also Sony equipment that the remote control is normally unable to control. Before you begin, note that: – You cannot change the settings of TUNER and USB input buttons. - Page 81 Use the numeric codes in the tables below to program non-Sony equipment and also Sony equipment that the remote control is normally unable to control. Since the signal from the...
- Page 82 To control a tape deck Maker Code(s) SONY 201, 202 DENON 204, 205 KENWOOD 206, 207, 208, 209 NAKAMICHI PANASONIC PHILIPS 211, 212 PIONEER 213, 214 TECHNICS 215, 216 YAMAHA 217, 218 To control an MD deck Maker Code(s) SONY...
- Page 83 To control a TV Maker Code(s) SONY 501, 502 AIWA 501, 536, 539 AKAI CENTURION CORONADO CURTIS-MATHES 503, 551, 566, 567 DAYTRON 517, 566 DAEWOO 504, 505, 506, 507, 515, 544 FISHER 508, 545 FUNAI FUJITSU GOLDSTAR/LG 503, 512, 515, 517,...
- Page 84 717, 720, 746 SHARP 748, 749 TOSHIBA 747, 756 * If an AIWA VCR does not work even though you enter the code for AIWA, enter the code for Sony instead. To control a satellite tuner (box) Maker Code(s) SONY...
-
Page 85: Resetting The Remote Control
Resetting the remote control AV ?/1 MASTER VOL –/ – While holding down MASTER VOL – or –, press and hold ?/1, then press AV ?/1. The RM SET UP indicator flashes 3 times. Release all buttons. All the contents of the remote control memory (i.e., all the programmed data) are cleared. -
Page 86: Troubleshooting
Should any problem persist, consult your nearest Sony dealer. Note that if service personnel changes some parts during repair, these parts may be retained. Power The receiver is turned off automatically. - Page 87 There is no sound, or only a very low- level sound is heard from specific speakers. • Connect a pair of headphones to the PHONES jack to verify that sound is output from the headphones. If only one channel is output from the headphones, the equipment may not be connected to the receiver correctly.
- Page 88 There is no sound, no matter which equipment is selected, or only a very low-level sound is heard. • Check that all connecting cords are inserted to their input/output jacks for the respective jacks of the receiver, speakers and the equipment. •...
- Page 89 • When you connect the receiver to a video equipment (projector, etc.), sound may not be output from the receiver. In this case, select “AMP”. • If you cannot listen to the sound of the equipment connected to the receiver while TV input is selected on the receiver –...
- Page 90 Tuner The FM reception is poor. • Use a 75-ohm coaxial cable (not supplied) to connect the receiver to an outdoor FM antennas (aerial) as shown below. Outdoor FM antenna (aerial) Receiver Radio stations cannot be tuned in. • Check that the antennas (aerials) are connected securely.
-
Page 91: Usb Device
USB device Are you using a supported USB device? • If you connect an unsupported USB device, the following problems may occur. See “Compatible USB devices” (page 48) for the supported device types. – The USB device is not recognized. –... -
Page 92: Error Messages
• Make sure you select the correct input on the remote control. • When you operate a programmed non- Sony equipment, the remote control may not function properly depending on the model and the manufacturer of the equipment. -
Page 93: Specifications
USB FAIL An over current from the (USB) port was detected. The receiver will automatically turn off after a few seconds. Check the iPhone/iPod or USB device, then unplug it and turn on the power again. For other messages, see “Message list after Auto Calibration measurement”... - Page 94 Measured under the following conditions: Area Power requirements USA, Canada, 120 V AC, 60 Hz Taiwan Europe, Australia 230 V AC, 50 Hz Reference power output for front, center, surround, surround back and front high speakers. Depending on the sound field settings and the source, there may be no sound output.
- Page 95 General Power requirements Area Power requirements USA, Canada, 120 V AC, 60 Hz Taiwan Europe, Australia 230 V AC, 50/60 Hz Power consumption 240 W Power consumption (during standby mode) 0.3 W (When “Ctrl for HDMI” is set to “OFF”) Dimensions (width/height/depth) (Approx.) 430 mm ×...
-
Page 96: Index
Index Numerics 2 channel 54 5.1 channel 19 7.1 channel 19 A.F.D. mode 54 A/V Sync 72, 78 AM 51 Audio Out 73, 78 Audio Settings 72, 78 Auto Calibration Settings 76 Auto Standby 74, 78 Auto Tuning 51 Bass 72, 78 BI-AMP 35, 65 Bi-amplifier connection 65 Blu-ray Disc player 27... - Page 97 SB Assign 69 Scene Select 62 Settings menu 68 Sound field 54 SOUND OPTIMIZER 58 Speaker Pattern 69, 76 Speaker Settings 69, 76 SPEAKERS 36 Super Audio CD player 32 Surround Settings 71, 78 System Audio Control 61 System Power-Off 61 System Settings 74, 78 Test Tone 70, 76 Theater/Theatre Mode Sync...
- Page 100 Sony Corporation Printed in Malaysia...