Table of Contents
Advertisement
USING THE REVERSE
Tools and Materials Required . . . . . . . . . . 8
Before Beginning Installation . . . . . . . . . . 9
Plan the Installation. . . . . . . . . . . . . . . . . 10
Feed Water Supply . . . . . . . . . . . . . . . . . 11
Drain Adapter . . . . . . . . . . . . . . . . . . . . . 12
Storage Tank and Faucet . . . . . . . . . . . . 14
Faucet Electronics. . . . . . . . . . . . . . . . . . 15
Connect Tubes . . . . . . . . . . . . . . . . . . . . 16
Sanitize the System . . . . . . . . . . . . . . . . 18
Test and Purge the System. . . . . . . . . . . 19
Cartridge Life and Replacement . . . . . . . 20
Change Faucet Battery . . . . . . . . . . . . . . 21
Drain Flow Control . . . . . . . . . . . . . . . . . 22
Systems tested and certified by NSF
reduction of claims as specified on
Write the model and serial numbers here:
Model # __________________________
Serial # __________________________
You can find them on the bracket.
GE is a trademark of the General Electric Company. Manufactured under trademark license.
. . . . . . . . 3
. . . . . . . . . . . . . . 5
. . . . . . . . . . . . . 6
. . . 23
. . . . . . . . . . . . . . . . . . . 24
. . . . . . . . . . . . . . . . . . . 26
. . . . . . . 28
International against NSF/ANSI
Standards 58 and 42 for the
the Performance Data Sheet
Systems certified by IAPMO R&T
against NSF/ ANSI Standards
42, 53, 58, 401 and P473 for the
reduction of claims as specified
on the Performance Data Sheet.
7375456
OWNER'S MANUAL
& INSTALLATION
INSTRUCTIONS
GXRQ18NBN
GNRQ18NBN
ENGLISH
Advertisement
Table of Contents

Related Manuals for GE GXRQ18NBN


Summary of Contents for GE GXRQ18NBN
-
Page 1: Table Of Contents
Performance Data Sheet. Write the model and serial numbers here: Model # __________________________ Serial # __________________________ You can find them on the bracket. GE is a trademark of the General Electric Company. Manufactured under trademark license. 7375456... - Page 2 THANK YOU FOR MAKING GE APPLIANCES A PART OF YOUR HOME. Whether you grew up with GE Appliances, or this is your first, we’re happy to have you in the family. We take pride in the craftsmanship, innovation and design that goes into every GE Appliances product, and we think you will too.
-
Page 3: Safety Information
Intended use: The GE Appliances Reverse Osmosis system is intended for use in filtering potable water in Residential applications, and has not been evaluated for other uses. The system is typically installed at the point of use, and must be installed as specified in the installation instructions. - Page 4 • However, additional materials will be required. See parts list to obtain additional materials from GE Appliances. • Locating the tank on a basement floor, with the faucet at a first floor sink may result in some loss of flow rate and capacity (approximately 20%).
-
Page 5: Specifications
Reverse Osmosis System Models: GXRQ18NBN and GNRQ18NBN Supply water pressure limits ..........40-100 psi (280-689 kPa) Supply water temperature limits . -
Page 6: Osmosis System
Using the Reverse Osmosis System How the Reverse Osmosis System Works Reverse Osmosis reduces Total Dissolved Solids (TDS) and organic matter from water by diffusing it through a special membrane (see Performance Data Sheet). The membrane separates minerals and impurities from the water and they are flushed to the drain. - Page 7 Using the Reverse Osmosis System PRODUCT WATER FAUCET Air Gap PRODUCT WATER Gravity Drain DRAIN WATER Drain Flow AUTOMATIC Check Control SHUTOFF Valve WATER BLUE GREEN PRODUCT PREFILTER POSTFILTER WATER STORAGE TANK YELLOW MEMBRANE Reverse Osmosis Water Flow Schematic Water Flow Description 1.
-
Page 8: Installation Instructions
Reverse Osmosis Filtration System Instructions Models GXRQ18NBN and GNRQ18NBN Questions? Call 800.626.2005 or visit our Website at: GEAppliances.com/ge/service-and-support/contact.htm Read entire manual. Failure to follow all guides and rules could cause WARNING personal injury or property damage. ■ Check with your state and/or local public works department for plumbing codes. You must follow their guides as you install the Reverse Osmosis system. -
Page 9: Before Beginning Installation
Installation Instructions THINGS TO CHECK BEFORE BEGINNING INSTALLATION FEED WATER RO FAUCET The water supply to the Reverse Osmosis system The RO product water faucet installs on the sink or must have the qualities listed in the specifications. on the countertop next to the sink. It may be Municipal water supplies most often will have installed in an existing sink spray attachment hole, these qualities. -
Page 10: Plan The Installation
Installation Instructions PLAN THE INSTALLATION The Reverse Osmosis System can be installed under a sink or in a remote location. Typical remote sites are a laundry room or utility room. Review the location options below and determine where to install the system. UNDER THE SINK LOCATION Drain Adapter Reverse... -
Page 11: Feed Water Supply
Installation Instructions FEED WATER SUPPLY Check and comply with local plumbing codes as you plan, then install a cold water supply fitting. A. PREFERRED INSTALLATION B. OPTIONAL INSTALLATION A typical connection using the included water A typical connection using a compression type supply fitting is shown in the illustration below. -
Page 12: Drain Adapter
Installation Instructions REVERSE OSMOSIS DRAIN ADAPTER (for under sink installation) INTRODUCTION INSTALL DRAIN ADAPTER (Cont.) A suitable drain point is needed for the drain water from the Reverse Osmosis system. Options are: Faucet • Install the included Drain Adapter As shown below, install the included drain adapter onto the sink’s drain pipe above the P- trap. - Page 13 Installation Instructions ALTERNATIVE DRAIN INSTALLATION (for a remote location) Outside Faucet Outside Faucet (Hard Water) BLUE Tubing (Hard Water) to Reverse Osmosis Faucet Soft, Cold Water Soft Water - Soft, Hot Water GREEN Tubing to Reverse Shutoff Osmosis System Valve Reverse Osmosis System Reverse Osmosis...
-
Page 14: Storage Tank And Faucet
Installation Instructions STORAGE TANK AND FAUCET STORAGE TANK INSTALLATION INSTALL THE FAUCET (Cont.) 1. Apply thread sealing tape (2 wraps clockwise) to 1. If drilling is needed, drill a 1-3/8" diameter hole the threads on the nipple at the top of the tank. in the mounting surface. -
Page 15: Faucet Electronics
Installation Instructions FAUCET ELECTRONICS Inside the faucet handle is a battery operated 6 month timer. On a new Reverse Osmosis system, the product water faucet is shipped with a battery in the holder. After the faucet has been installed, the thin plastic strip must be removed, as described below, to power up the 6 month timer. -
Page 16: Connect Tubes
Installation Instructions HOW TO CONNECT TUBES The Reverse Osmosis system includes push-in 2. If additional tubing is required, see parts list at fittings for quick tubing connection. Review the the end of this manual. following instructions before connecting the tubes Collet O-Ring in the next step. - Page 17 Installation Instructions MAKE TUBING CONNECTIONS (Cont.) RO Product Water Faucet 3/8” Black Tube Drain Water Supply Adapter 1/4” Red Fitting Tube HOT COLD Sink Tank 3/8” Blue P–Trap Connector Tube 3/8” Yellow Tube 1/4” Green Tube Green Collet Red Collet Blue Collet Yellow Collet Storage Tank...
-
Page 18: Sanitize The System
4. Add 3 ml. of bleach into open end of yellow Osmosis system. tube. Handle bleach according to bleach manufacturer’s recommendations. To order, call toll-free GE Appliances Parts and 5. Connect yellow tube to tank connector. Services at 877.959.8688. 6. Sanitizing the system will be completed during the pressure test and purging steps on the following page. -
Page 19: Test And Purge The System
Installation Instructions TEST AND PURGE THE SYSTEM PRESSURE TEST THE SYSTEM PURGE THE SYSTEM NOTE: Complete the sanitizing procedure on the To purge the system, complete the following steps. preceding page before pressure testing. 1. Open the Reverse Osmosis faucet and let water To pressure test the system, complete the flow through the system for a 24 hour period. -
Page 20: Care And Cleaning
7. Purge the Reverse Osmosis system. See previous page for instructions. To obtain replacement filters, call toll-free GE Appliances Parts and Services at 877.959.8688, or visit the store where you purchased your reverse osmosis system. Prefilter / Postfilter Cartridge Replacement FQ18PN... -
Page 21: Change Faucet Battery
Care and Cleaning CARTRIDGE REPLACEMENT (Cont.) Manifold Prefilter Cartridge Cartridge Turn filter cartridges counterclockwise to remove from manifold Turn filter cartridges clockwise to attach to manifold Postfilter Cartridge CHANGE FAUCET BATTERY WARNING Chemical Burn Hazard: ■ Keep batteries away from children. This product contains a lithium button cell battery. If a new or used lithium button cell battery is swallowed or enters the body, it can cause severe internal burns and can lead to death in as little as 2 hours. -
Page 22: Drain Flow Control
Care and Cleaning DRAIN FLOW CONTROL ASSEMBLING COLLET AND O-RING The flow control is required for proper operation of the 1. Remove the collet and o-ring from the fitting with a Reverse Osmosis system. See illustration below. The small screwdriver. Do not scratch the internal walls flow control, located inside the push-in elbow fitting on of the fitting port. -
Page 23: Troubleshooting Tips
Install a pressure regulator in the house water supply system to through the faucet air gap. This reduce the pressure below 80 psi. may be associated with high pressure water supply, generally 80 psi or greater. If you are still having trouble, please visit www.GEAppliances.com/ge/service-and-support/contact.htm or call us at 800.626.2005. -
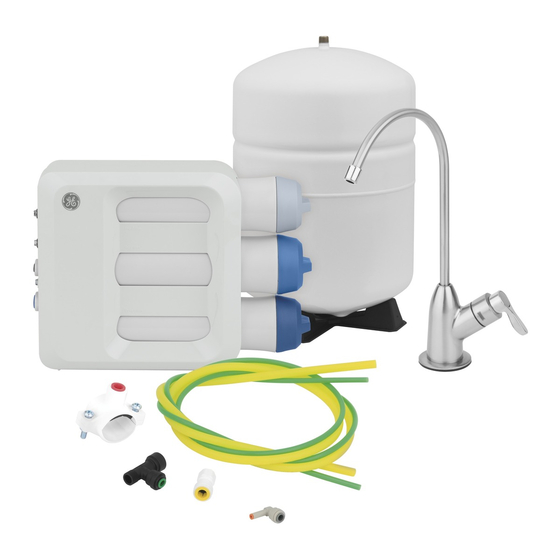
Page 24: Parts List
Parts List GXRQ18NBN and GNRQ18NBN... - Page 25 Parts Catalog QUANTITY REF. APPLIANCES PART NO. PART DESCRIPTION 0001 WS19X21938 CABINET ASSEMBLY, LEFT HALF, RIGHT HALF, AND DRIP TRAY 0002 FQ18PN PRE AND POST FILTER CARTRIDGE SET, INCLUDING BATTERY (NOT SHOWN) 0003 FQ18MN RO CARTRIDGE 0004 WS19X21937 MANIFOLD ASSEMBLY (INCLUDES REF.
-
Page 26: Warranty
USA. If the product is located in an area where service by a GE Appliances Authorized Servicer is not available, you may be responsible for a trip charge or you may be required to bring the product to an Authorized GE Appliances Service location for service. - Page 27 Notes...
-
Page 28: Consumer Support
Have a question or need assistance with your appliance? Try the GE Appliances Website 24 hours a day, any day of the year! You can also shop for more great GE Appliances products and take advantage of all our on-line support services designed for your convenience.