Sony DVP-FX850 Operating Instructions Manual
Sony portable dvd cd player user manual
Hide thumbs
Also See for DVP-FX850:
- Service manual (64 pages) ,
- Service manual (64 pages) ,
- Service manual (64 pages)

Related Manuals for Sony DVP-FX850


Summary of Contents for Sony DVP-FX850
- Page 1 Portable CD/DVD Player Operating Instructions To find out useful hints, tips and information about Sony products and services please visit: www.sony-europe.com/myproduct DVP-FX850 © 2007 Sony Corporation 3-100-247-11(2)
-
Page 2: Warning
Never use the plug without the fuse cover. If you should lose the fuse cover, please contact your nearest Sony service station. Disposal of Old Electrical & Electronic Equipment (Applicable in the European Union and other... -
Page 3: Notes About The Discs
Notes About the Discs • To keep the disc clean, handle the disc by its edge. Do not touch the surface. • Do not expose the disc to direct sunlight or heat sources such as hot air ducts, or leave it in a car parked in direct sunlight as the temperature may rise considerably inside the car. -
Page 4: Important Notice
TV for an extended period of time you risk permanent damage to your television screen. Plasma display panel televisions and projection televisions are susceptible to this. If you have any questions or problems concerning your player, please consult your nearest Sony dealer. -
Page 5: Table Of Contents
Table of Contents WARNING ........... . 2 Notes About the Discs . -
Page 6: About This Manual
About This Manual • Instructions in this manual describe the controls on the remote. You can also use the controls on the player if they have the same or similar names as those on the remote. • “DVD” may be used as a general term for DVD VIDEOs, DVD+RWs/DVD+Rs (+VR mode) and DVD-RWs/DVD-Rs (VR mode, video mode). -
Page 7: This Player Can Play The Following Discs
This Player Can Play the Following Discs Format of discs DVD VIDEO DVD-RW/-R (finalized disc) DVD+RW/+R (finalized disc) VIDEO CD/ Music CD CD-RW/-R “DVD+RW,” “DVD-RW,” “DVD+R,” “DVD-R,” “DVD VIDEO,” and “CD” logos are trademarks. Note about CDs/DVDs The player can play CD-ROMs/CD-Rs/CD- RWs recorded in the following formats: –... -
Page 8: Region Code
• Music discs encoded with copyright protection technologies This product is designed to playback discs that conform to the Compact Disc (CD) standard. Recently, various music discs encoded with copyright protection technologies are marketed by some record companies. Please be aware that among those discs, there are some that do not conform to the CD standard and may not be playable by this product. -
Page 9: Preparations
Preparations Checking the Accessories Check that you have the following items: • Audio/video cord (mini plug × 2 y phono plug × 3) (1) • Mains lead (1) • AC adaptor (1) Using the Remote When operating, point it at the remote sensor To replace the remote control battery Insert a lithium battery CR2025 matching the 3 and # ends of the battery. -
Page 10: Using The Lcd Panel
Using the LCD Panel The LCD panel of the player can rotate a maximum of 180 degrees clockwise and still be used. After rotation of the LCD panel, it can be folded down on the main body of the player and still function. -
Page 11: Connecting The Ac Adapter
Connecting the AC Adapter Connect the AC adaptor (supplied) in the order of 1 to 3 below. To disconnect, follow the steps in reverse order. See also “On AC adaptor” in “Precautions” (page 3). PHONES AUDIO VIDEO LINE SELECT IN OUT OPTICAL DC plug Note... -
Page 12: Using With Battery Pack
Using with Battery Pack When a mains connection is not available, the player can be enjoyed with the battery pack (supplied) installed. Please charge the battery pack before using it. See also “On battery pack” in “Precautions” (page 4). Installing the battery pack Aligning the battery pack with the lines on the player’s bottom, engage the hooks of the battery pack in the holes on the bottom of the player. -
Page 13: Charging The Battery Pack
Charging the battery pack Attach the battery pack to the player (page 12). Connect the AC adaptor to the player, and then connect the mains lead into a mains (page 11). VOLUME PHONES AUDIO VIDEO OPTICAL Player Battery pack When charging begins, the CHARGE indicator turns on. When charging ends, the CHARGE indicator turns off. -
Page 14: Using With The Car Battery Adaptor
Using With the Car Battery Adaptor Use the car battery adaptor (supplied) to supply power from the cigarette lighter socket to the player. The adaptor is for a 12V car battery. Do not use it with a 24V car battery. The adaptor is also for use with negatively grounded cars. -
Page 15: Playing Discs
Playing Discs Playing Discs Depending on the DVD or VIDEO CD, some operations may be different or restricted. Refer to the operating instructions supplied with the disc. Connect the AC adaptor or install the battery pack. DISPLAY OPEN OPEN knob Open the player’s LCD panel. - Page 16 • The disc may be still spinning when the disc lid is opened. Wait until the spinning stops before removing the disc. • During operation, “ ” may appear on the screen. This symbol indicates that a function explained in this operating instruction is not available on the current DVD VIDEO.
-
Page 17: Resume Play
Resuming playback from the point where you stopped the disc (Resume Play) When you stop playback, the player remembers the stop point and displays a message on the screen. You can resume from the same point by pressing H again. Resume Play works even after the player is turned off, as long as the disc lid is kept closed. -
Page 18: Changing The Sound
Changing the sound When playing a DVD VIDEO recorded in multiple audio formats (PCM, Dolby Digital, or DTS), you can change the audio format. If the DVD VIDEO is recorded with multilingual tracks, you can also change the language. With CDs or VIDEO CDs, you can select the sound from either the right or left channel and listen to the sound of the selected channel through both the right and left speakers. -
Page 19: Displaying The Subtitles
Displaying the subtitles If subtitles are recorded on the disc, you can change the subtitles or turn them on and off whenever you want while playing a DVD. Press SUBTITLE repeatedly to select a setting. Depending on the disc, the choice of language varies. - Page 20 Selecting “Original” or “Play List” on a DVD-RW/DVD-R Some DVD-RWs/DVD-Rs in VR (Video Recording) mode have two types of title for playback: originally recorded titles (Original), and titles that can be created on recordable DVD players for editing (Play List). You can select the type of title to be played.
-
Page 21: Using The Playback Settings Display
Using the Playback Settings Display While playing a DVD, you can check the current playback settings on the screen. The Playback Settings Display also allows you to change sound, subtitle, and angle or search for a title or track by inputting numbers. DISPLAY Number buttons... -
Page 22: Repeat Play
• See page 23 for details about using direct search for a CD or VIDEO CD. Notes • The displayed title/chapter number is the same as the number recorded on the disc. • Chapter times are not displayed when a DVD- RW/DVD-R (VR mode) is played. -
Page 23: Searching For A Particular Point On A Disc
Searching for a Particular Point on a Disc (Search, Scan, Slow Play, Repeat Play, Random Play) You can quickly locate a particular point on a disc by monitoring the picture or playing back slowly. DISPLAY Notes • Depending on the disc, you may not be able to perform some of the operations described. -
Page 24: Slow Play
Watching frame by frame (Slow Play) Press m or M when the player is in pause mode. To return to normal speed, press H. Each time you press m or M during Slow Play, the playback speed changes. With each press the indication changes as follows: ◆... -
Page 25: Playing Mp3 Audio Tracks Or Jpeg Image Files
Checking the play information of the disc When playing a DVD Press DISPLAY while playing a DVD, and then use the Playback Settings Display (page 21). When playing a CD Press DISPLAY. The playing track number/the total number of tracks and the elapsed time of the current track appear. - Page 26 Compatible Sony USB devices JPEG and MP3 file playback via USB port is confirmed with Sony’s USB Memory Stick Reader/Writer and USB Flash drive “Pocket Bit.” (Confirmed device: MSAC-US40, USM-EX series, USM-J series, USM-JX series, USM-H series) Notes • Do not disconnect the USB device while its access indicator is flashing.
- Page 27 Playing a JPEG image file Press X/x to select an album on the list, and press ENTER. The list of files in the album appears. Dir:001 HAWAII DSC00001 DSC00002 DSC00003 DSC00004 DSC00005 • To go to the next or previous page, press >...
-
Page 28: Adjusting The Picture Size And Quality
Enjoying JPEG Images as a Slide Show You can play JPEG image files on a DATA CD or DATA DVD successively as a slide show. While displaying the file you want to start a slideshow, press MENU. The list of thumbnails appears. Press C/X/x/c to select “Slide Show”... - Page 29 sides. In “Full,” a 16:9 picture will be adjusted to fill the entire screen. To turn off the Option Menu Press OPTIONS or O RETURN. z Hints • The screen turns off automatically when the LCD panel is closed. • You can see the settings for the display in “General Setup”...
-
Page 30: Enjoying Divx ® Videos
® Enjoying DivX Videos Playing DivX Video Files You can play DivX video files on DATA CDs (CD-ROMs/CD-Rs/CD-RWs) and DATA DVDs (DVD-ROMs/DVD+RWs/DVD+Rs/ DVD-RWs/DVD-Rs). When you insert DATA CDs and DATA DVDs, the list of albums appears. DISPLAY C/X/x/c ENTER Notes •... -
Page 31: About Divx Video Files
To change the subtitles Press SUBTITLE during playback. Press X/x, and ENTER during displaying the subtitle information. To stop playback Press x. z Hint If the number of viewing times is preset, you can play the DivX video files as many times as the preset number. -
Page 32: Video Files
About playback order of DivX video files Note that the playback order may not be applicable, depending on the software used for creating the DivX video file, or if there are more than 299 albums and 648 DivX video files in each album. See “About playback order of albums, tracks, and files”... -
Page 33: Settings And Adjustments
Settings and Adjustments Using the Setup Display By using the Setup Display, you can make various adjustments to items such as picture and sound. You can also set a language for the subtitles and the Setup Display, among other things. For details on each Setup Display item, see pages from 34 to 38. -
Page 34: Settings For The Display (General Setup)
To turn off the Setup Display Press OPTIONS or O RETURN twice. Settings for the Display (General Setup) Choose playback display options and settings according to the TV to be connected. Select “General Setup” in the Setup Display. To use the display, see “Using the Setup Display”... -
Page 35: Settings For The Sound (Audio Setup)
Note Depending on the DVD, “4:3 Letter Box” may be selected automatically instead of “4:3 Pan Scan” or vice versa. ◆ Angle Mark Displays the angle mark when you can change the viewing angles during playback of DVDs recorded with multi-angles. Display the angle mark. -
Page 36: Setting The Display Or Sound Track Language (Language Setup)
Setting the digital output signal Switches the method of outputting audio signals when you connect an audio equipment such as an AV amplifier (receiver) with the OPTICAL OUT jack. For connection details, see page 39. After setting “Digital Output” to “On,” select “Dolby Digital”... -
Page 37: Parental Control Settings (Parental Control)
Parental Control Settings (Parental Control) Playback of some DVD VIDEOs can be limited, by the parental control function. Select “Parental Control” in the Setup Display. To use the display, see “Using the Setup Display” (page 33). Parental Control Password Parental Control Select: ENTER Cancel:... - Page 38 Press X/x to select the limitation level (1-8), and press ENTER. The lower the value, the stricter the limitation. The display for entering the password appears. Parental Control Password Enter password, then press Enter Enter or re-enter your 6-digit password using the number buttons, then press ENTER.
-
Page 39: Hookups
Hookups Connecting to another device To switch LINE SELECT (IN/OUT) switch LINE SELECT IN: Input images or audio from an exterior device. The “Line in” message will be displayed on the LCD screen until the signal from the exterior device is received. - Page 40 Connecting to an AV amplifier (receiver) Example 1 PHONES AUDIO VIDEO OPTICAL To send the playback signal to an AV amplifier (receiver) Set the LINE SELECT switch on the player’s right side to “OUT.” * The yellow plug is used for video signals (page 39). Example 2 PHONES AUDIO...
- Page 41 Connecting to Video Player or Camcorder PHONES AUDIO VIDEO LINE SELECT IN OUT OPTICAL To AUDIO/VIDEO To receive the playback signal from a Video Player or Camcorder Set the LINE SELECT switch on the player’s right side to “IN.” Note Set the LINE SELECT switch to “OUT”...
-
Page 42: Additional Information
Should any problem persist, consult your nearest Sony dealer. Power The power is not turned on. , Check that the mains lead is connected securely. - Page 43 Nothing happens when buttons are pressed. , The player’s \/1/HOLD switch is set on “HOLD” (page 16). The disc does not play. , The disc is turned over. Insert the disc with the playback side facing down. , The disc is not set correctly. , The player cannot play certain discs (page 7).
-
Page 44: About Mp3 Audio Tracks And Jpeg Image Files
The JPEG image file cannot be played (page 44). , The DATA CD is not recorded in a JPEG format that conforms to ISO 9660 Level 1 or Joliet. , The DATA DVD is not recorded in JPEG format that conforms to UDF (Universal Disk Format). - Page 45 Notes • Change the extension to “.JPG,” for files with “.JPE” or “.JPEG” extension. • The player will play any data with the extension “.MP3,” “.JPG,” or “.JPEG,” even if they are not in MP3 or JPEG format. Playing this data may generate a loud noise which could damage your speaker system.
-
Page 46: Specifications
Supplied accessories See page 9. Specifications and design are subject to change without notice. The manufacturer of this product is Sony Corporation, 1-7-1 Konan Minato-ku Tokyo, 108-0075 Japan. The Authorized Representative for EMC and product safety is Sony Deutschland GmbH, Hedelfinger Strasse 61, 70327 Stuttgart, Germany. -
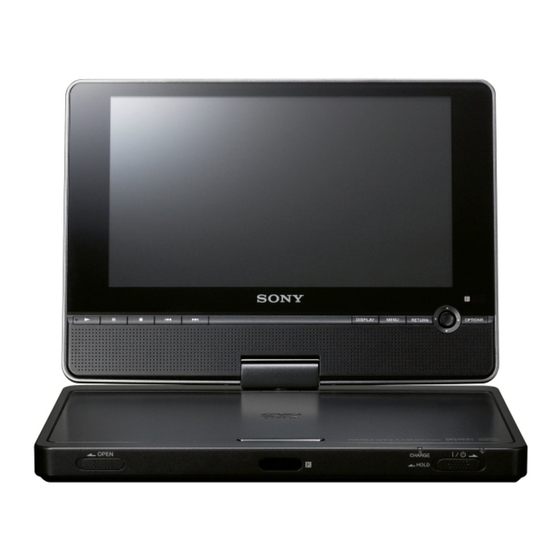
Page 47: Index To Parts And Controls
Index to Parts and Controls For more information, see the pages indicated in parentheses. Upper view A ./> (previous/next) buttons (16) B x (stop) button (16) C X (pause) button (16) D H (play) button (15) E Speaker (16) F LCD panel (10) G DISPLAY button (21) H MENU button (17) I RETURN button (21) -
Page 48: Front View
Front view OPEN A OPEN knob (15) (remote sensor) (9) C CHARGE indicator (13) Left view A CD/DVD USB switch (15) Right view VOLUME A VOLUME –/+ (sound volume) button B PHONES (headphone) jack A, B C AUDIO (input/output) jack/OPTICAL OUT (optical output) jack (39, 40) D \/1 (on/standby)/HOLD switch (15) E Power indicator (15) - Page 49 Remote A DISPLAY button (21) B Number buttons (17) C TOP MENU button (17) D C/X/x/c buttons, ENTER button (17) E O RETURN button (21) F ./> PREV (previous)/NEXT buttons (16) G m/M (scan/slow) buttons (23) ADVANCE button (16) I X PAUSE button (16) J \/1 (on/standby) button (15) K VOL (sound volume) +/–...
-
Page 50: Index
Index Numerics 16:9 34 4:3 Letter Box 34 4:3 Pan Scan 34 Album 45 Angle 19 Audio 18 Audio DRC 35 Audio Setup 35 Batteries 9 CD 7 Connecting 39 DATA CD 6 DATA DVD 6 Digital output 35 Disc Menu 36 Display Playback Settings Display Setup Display 33... - Page 52 3-100-247-11(2) Sony Corporation Printed in China...