Bella Pro Series Instruction Manual
6 burger grill
Hide thumbs
Also See for Pro Series:
- Instruction manual (44 pages) ,
- Instruction manual (32 pages) ,
- Instruction manual (16 pages)
Table of Contents
Advertisement
Advertisement
Table of Contents

Related Manuals for Bella Pro Series


Summary of Contents for Bella Pro Series
- Page 1 6 Burger Grill Instruction Manual...
- Page 2 Thank You for your purchase Register & sign up for special announcements and trendy recipes! Tell us what you think! Rate, review or ask us a question. @bellahousewares.com #getinspired BellaLife BellaLifestyle...
-
Page 3: Table Of Contents
TABLE OF CONTENTS Important Safeguards ..................... 4-5 Additional Important Safeguards ...................6-7 Notes on the Plug ........................6 Notes on the Cord ........................7 Plasticizer Warning ......................7 Electric Power ........................7 Getting to Know Your 6 Burger Grill .................8 Before Using for the First Time ..................8 Operating Instructions ......................9 6 Burger Grill (Closed Position) .................. -
Page 4: Important Safeguards
IMPORTANT SAFEGUARDS When using electrical appliances, basic safety precautions should always be followed, including the following: READ ALL INSTRUCTIONS. 2. The cord to this appliance should be plugged into a 120V AC electrical outlet only. CAUTION: NEVER plug unit in without both upper and lower GRILL PLATES properly installed. - Page 5 adjustment. An incorrect reassembly could present a risk of electric shock when the 6 Burger Grill is used. 10. The use of accessories or attachments not recommended by the manufacturer may cause fire, electrical shock or injury. 11. Do not use outdoors or for commercial purposes. 12.
-
Page 6: Additional Important Safeguards
SAVE THESE INSTRUCTIONS FOR HOUSEHOLD USE ONLY ADDITIONAL IMPORTANT SAFEGUARDS CAUTION HOT SURFACES: This appliance generates heat and escaping steam during use. Proper precautions must be taken to prevent the risk of burns, fires or other damage to persons or property. CAUTION: This appliance is hot during operation and retains heat for some time after unplugging. -
Page 7: Notes On The Cord
NOTES ON THE CORD A short power-supply cord (or detachable power-supply cord) is to be provided to reduce the risk resulting from becoming entangled in or tripping over a longer cord. Longer detachable power-supply cords or extension cords are available and may be used if care is exercised in their use. If a long detachable power-supply cord or extension cord is used : 1. -
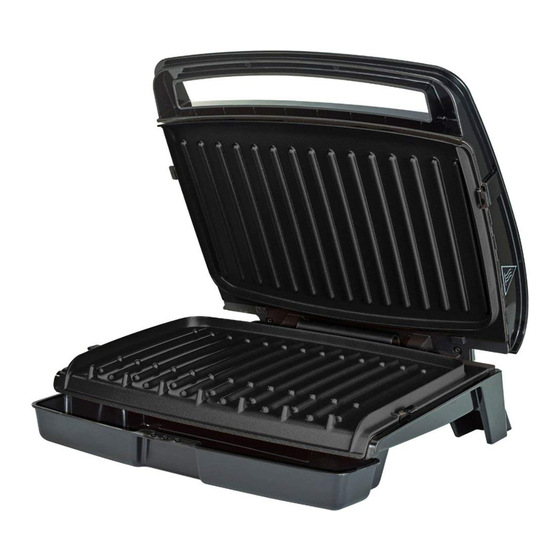
Page 8: Getting To Know Your 6 Burger Grill
GETTING TO KNOW YOUR 6 BURGER GRILL Product may vary slightly from illustrations Figure 1 Polarized Plug (not shown) Upper Side Plate Upper Removable Lock Clips Non-Stick Grill Plate Lower Removable Non- Stick Grill Plate Lower Side Plate Lid Handle Lock Clips Removable Drip Tray BEFORE USING FOR THE FIRST TIME... -
Page 9: Operating Instructions
NOTE: When the grill plates are heated for the first time, they may emit slight smoke or odor. This is normal and should disappear in a few minutes. This will not affect the safety of the appliance. Condition grill plates. Use a brush or paper towel to lightly coat the grill surfaces with solid vegetable shortening or vegetable oil. -
Page 10: Burger Grill (Closed Position)
6 BURGER GRILL (CLOSED POSITION) Use cuts of meat, vegetables, fish, poultry Figure 2 of equal thickness; all food should be thick enough to touch the upper and lower grill plates when the 6 Burger Grill is closed. Floating Hinge Set-Up: Open the lid to 90º. -
Page 11: Grilling Hints For Best Results
GRILLING HINTS FOR BEST RESULTS • Tougher cuts such as flank steak should be tenderized by marinating for few hours or overnight. Wine or vinegar will help to break down connective tissue before grilling. • Drain excess marinade and dry meat well before placing on the grill plate. •... -
Page 12: Panini Press (Closed Position)
PANINI PRESS (CLOSED POSITION) Your 6 Burger Grill doubles as a Panini Press. Traditionally, Panini’s are sandwiches made with a variety of breads, stuffed with meats, cheeses, vegetables…then pressed and grilled until the crust is delightfully crisp. This 6 Burger Grill is calibrated at the optimum temperature for perfect pressed sandwiches. -
Page 13: Panini Press: Hints For Best Results
When sandwiches are finished cooking, remove the plug from the wall outlet. WARNING! ALWAYS UNPLUG UNIT WHEN COOKING IS FINISHED. Otherwise, the 6 Burger Grill will continue to heat until unit is unplugged. Allow the 6 Burger Grill to cool completely before removing the drip tray or grill plates or to clean the unit. -
Page 14: Usda Cooking Guidelines
USDA COOKING GUIDELINES A meat thermometer should always be used to gauge internal temperature. The thermometer should be inserted into the thickest portion of meat, away from bones or fatty areas. The United States Department of Agriculture recommends that meat and poultry be cooked to the following internal temperatures to be sure any harmful bacteria has been killed. - Page 15 Figure 4 Figure 5 Unfasten side clips on the lower plate. Pull the plate up, then out from the slots on the bottom of the lower body. (See Figure 4.) Brush non-stick grill plates with a clean, brush or cloth. If necessary, clean plates in hot, soapy water.
- Page 16 STORING INSTRUCTIONS WARNING: Never store 6 Burger Grill while it is hot or still plugged in. Make sure unit is unplugged and fully cooled. WARNING: TO AVOID POSSIBLE FIRE HAZARD AND DAMAGE TO THE UNIT, THE 6 BURGER GRILL MUST BE STORED WITH BOTH UPPER/LOWER GRILL PLATES INSTALLED. Keep drip tray with unit or store in a convenient place.
-
Page 17: Recipes
RECIPES MILE-HIGH SOUTHWEST CLUB SANDWICH Makes: 4 Panini • 8 slices sourdough • 12 oz cooked chicken • 1 cup loosely packed bread, sliced 1/2-inch breast, sliced spinach thick • 1/2 tsp salt • 1/2 red onion, thinly • 1/2 cup mayonnaise sliced •... -
Page 18: Recipes
RECIPES STUFFED PANCETTA AND BRIE PANINI Makes: 2 Stuffed Panini • 2 Italian sandwich rolls • 4 thin slices Brie cheese • 1 handful fresh baby spinach (optional) • 12 to 16 slices pancetta • 8 sun-dried tomato (to taste) strips Open the Burger Grill. - Page 19 RECIPES GRILLED APPLE CHEDDAR PANINI Makes 2 Panini • 4 slices cinnamon raisin • 2 – 4 slices sharp cheddar • Butter or coconut oil bread cheese • 1 Golden Delicious apple • 2 - 4 teaspoons sugar (cored and sliced into 1/2” •...
- Page 20 RECIPES BLACK BREAD AND GRILLED CHICKEN PANINI WITH OLIVE TAPENADE Makes 2 Panini • 4 slices hearty black • 1/2 sweet onion, finely • 1/2 tomato, thinly sliced bread sliced • 1 ripe avocado, thinly • 2 boneless, skinless • 2 - 4 slices Monterey sliced chicken breasts,...
- Page 21 8. Use the floating hinge to close the Burger Grill, making sure the upper grill plate lies evenly on the panini sandwiches. Cook until golden brown, approximately 3 to 4 minutes. 9. Prepare Olive Tapenade. Pulse all ingredients in a food processor until mixture is coarse and uniform.hinge to close the Burger Grill, making sure the upper grill plate lies evenly on sandwich.
-
Page 22: Warranty
Limited Two-Year Warranty SENSIO Inc. hereby warrants that for The warranty is only valid for the a period of TWO YEARS from the date original retail purchaser from the date of purchase, this product will be free of initial retail purchase and is not from mechanical defects in material transferable. - Page 23 How To Obtain Warranty Service: You must contact Customer Service at Also, include a copy of the original sales our toll-free number: 1-866-832-4843. receipt. Carefully package the tagged A Customer Service Representative product with the sales receipt, and send will attempt to resolve warranty issues it (with shipping and insurance prepaid) over the phone.
- Page 24 For customer service questions or comments 1-866-832-4843 bellahousewares.com BELLA Pro Series is a registered trademark of Sensio Inc., Montreal, Canada H3C 4S9. All rights reserved.