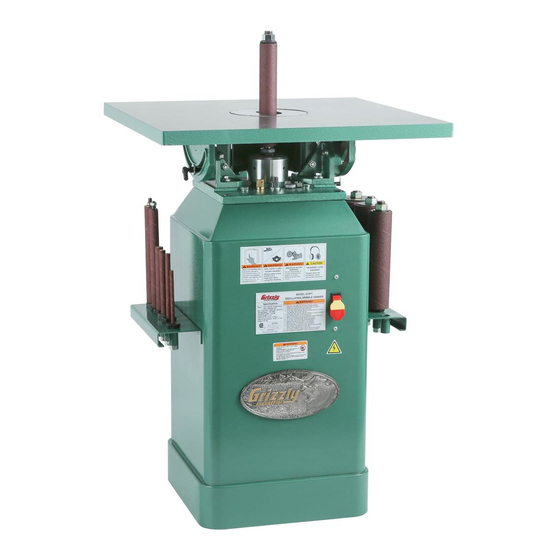
Grizzly G1071 Owner's Manual
1 hp oscillating spindle sander
Hide thumbs
Also See for G1071:
- Owner's manual (40 pages) ,
- Instruction manual (26 pages) ,
- Parts list (5 pages)
Table of Contents
Advertisement
Quick Links
Download this manual
See also:
Instruction Manual
MODEL G1071
1 HP OSCILLATING SPINDLE
SANDER
OWNER'S MANUAL
(For models manufactured since 11/10)
177335
COPYRIGHT © 1995 BY GRIZZLY INDUSTRIAL, INC. REVISED MAY, 2019 (BL)
WARNING: NO PORTION OF THIS MANUAL MAY BE REPRODUCED IN ANY SHAPE
OR FORM WITHOUT THE WRITTEN APPROVAL OF GRIZZLY INDUSTRIAL, INC.
#JB11261 PRINTED IN TAIWAN
V3.05.19
Advertisement
Table of Contents

Related Manuals for Grizzly G1071


Summary of Contents for Grizzly G1071
- Page 1 OWNER'S MANUAL (For models manufactured since 11/10) 177335 COPYRIGHT © 1995 BY GRIZZLY INDUSTRIAL, INC. REVISED MAY, 2019 (BL) WARNING: NO PORTION OF THIS MANUAL MAY BE REPRODUCED IN ANY SHAPE OR FORM WITHOUT THE WRITTEN APPROVAL OF GRIZZLY INDUSTRIAL, INC.
- Page 2 This manual provides critical safety instructions on the proper setup, operation, maintenance, and service of this machine/tool. Save this document, refer to it often, and use it to instruct other operators. Failure to read, understand and follow the instructions in this manual may result in fire or serious personal injury—including amputation, electrocution, or death.
-
Page 3: Table Of Contents
Table of Contents INTRODUCTION ..........2 SECTION 5: ACCESSORIES ......25 Manual Accuracy ........... 2 SECTION 6: MAINTENANCE ......27 Contact Info............ 2 Schedule ............27 Machine Description ........2 Cleaning & Protecting ........27 Identification ........... 3 Lubrication ........... 27 Machine Data Sheet ........ -
Page 4: Introduction
The integrated dust collection port can be fitted to a dust collection system to reduce the amount of dust released by the machine. Sanding sleeves are easily replaceable and avail- able in a variety of sizes and grits. Model G1071 (Mfd. Since 11/10) -
Page 5: Identification
For Your Own Safety Read Instruction Manual Before Operating Spindle Sander a) Wear eye protection. b) Feed workpiece AGAINST rotation of sanding drum. c) Keep fingers away from sanding drum. d) Do not use awkward hand positions. Model G1071 (Mfd. Since 11/10) -
Page 6: Machine Data Sheet
MACHINE DATA SHEET Customer Service #: (570) 546-9663 · To Order Call: (800) 523-4777 · Fax #: (800) 438-5901 MODEL G1071 1 HP OSCILLATING SPINDLE SANDER Product Dimensions: Weight................................287 lbs. Width (side-to-side) x Depth (front-to-back) x Height..............25 x 30 x 44-1/2 in. - Page 7 The information contained herein is deemed accurate as of 5/23/2019 and represents our most recent product specifications. Model G1071 PAGE 2 OF 2 Due to our ongoing improvement efforts, this information may not accurately describe items previously purchased. Model G1071 (Mfd. Since 11/10)
-
Page 8: Section 1: Safety
Never operate under the influence of drugs or injury or blindness from flying particles. Everyday alcohol, when tired, or when distracted. eyeglasses are NOT approved safety glasses. Model G1071 (Mfd. Since 11/10) - Page 9 EXPERIENCING DIFFICULTIES. If at any time debris. Make sure they are properly installed, you experience difficulties performing the intend- undamaged, and working correctly BEFORE ed operation, stop using the machine! Contact our operating machine. Technical Support at (570) 546-9663. Model G1071 (Mfd. Since 11/10)
-
Page 10: Additional Safety For Spindle Sanders
Never operate without maintain support and control when sanding force adequate dust collection system in place and run- is applied. ning. However, dust collection is not a substitute for using a respirator. Model G1071 (Mfd. Since 11/10) -
Page 11: Section 2: Power Supply
Nominal Voltage ..208V, 220V, 230V, 240V meets the specified circuit requirements. Cycle ............60 Hz Phase ........... Single-Phase Power Supply Circuit ......15 Amps Plug/Receptacle ......NEMA 6-15 Model G1071 (Mfd. Since 11/10) -
Page 12: Extension Cords
The plug must only be inserted into a matching receptacle (see following figure) that is properly installed and grounded in accordance with all local codes and ordinances. -10- Model G1071 (Mfd. Since 11/10) -
Page 13: Voltage Conversion To 240V
Wire Cutters/Stripper ........1 instructions are not available, NEMA stan- dard 6-15 plug wiring is provided on Page 32. To convert Model G1071 to 240V: DISCONNECT MACHINE FROM POWER! Cut off existing 5-15 plug. Open motor junction box, remove two wire nuts indicated in Figure 4, then disconnect wires. -
Page 14: Section 3: Setup
IMPORTANT: Save all packaging materials until you are completely satisfied with the machine and have resolved any issues between Grizzly or the shipping agent. You MUST have the original pack- aging to file a freight claim. It is also extremely Like all power tools, there is danger asso- helpful if you need to return your machine later. -
Page 15: Inventory
H. Table Insert 4 ⁄ " ......... 1 Hardware Bag ..........1 —Set Screws ⁄ "-20 x ⁄ " ......12 —Roll Pins 5 x 28 ........3 —Hex Wrench ⁄ " ........1 -13- Model G1071 (Mfd. Since 11/10) -
Page 16: Cleanup
NOTICE Avoid harsh solvents like acetone or brake parts cleaner that may damage painted sur- faces. Always test on a small, inconspicu- ous location first. -14- Model G1071 (Mfd. Since 11/10) -
Page 17: Assembly
Jam Nut Mounting Figure 10. Table stop bolt. Hardware (1 of 4) Sander Base Loosen the table lock handles located on Figure 8. Table mounting. each side of the table trunnion assembly (see Figure 8). -15- Model G1071 (Mfd. Since 11/10) - Page 18 Figure 14. Make sure it does not extend through the surface of the table insert. Roll Pin Table Insert Figure 12. Table stop bolt (table tilted for clarity). Figure 14. Inserting roll pins (bottom view). -16- Model G1071 (Mfd. Since 11/10)
-
Page 19: Check Gearbox Oil
After first two hours of operation, perform an oil change as described in the Gearbox Oil on Page 28. Set Screws Roll Pin Figure 15. Inserting set screws. -17- Model G1071 (Mfd. Since 11/10) -
Page 20: Test Run
Clear all setup tools away from machine. Connect machine to power supply. Turn machine ON, verify motor operation, and then turn machine OFF. The motor should run smoothly and without unusual problems or noises. -18- Model G1071 (Mfd. Since 11/10) -
Page 21: Section 4: Operations
Read books/magazines or get formal training before beginning any proj- ects. Regardless of the content in this sec- tion, Grizzly Industrial will not be held liable for accidents caused by lack of training. -19- Model G1071 (Mfd. Since 11/10) -
Page 22: Disabling Switch
Always turn the sander ON and allow it to reach full speed before engaging the workpiece with the sanding sleeve. • Keep your workpiece moving across the sanding sleeve to prevent burns, grooves or ruts in the workpiece surface. -20- Model G1071 (Mfd. Since 11/10) -
Page 23: Sanding Spindles
Insert the threaded end of the spindle shaft into the spindle mounting hole, and screw it down by hand as shown in Figure 20. The Model G1071 is supplied with ten rubber sanding spindles. Use the larger diameter spin- dles for sanding large sweeping curves and the smaller spindles for sanding more intricate curves. -
Page 24: Sanding Sleeves
" and smaller: DISCONNECT MACHINE FROM POWER! The Model G1071 is supplied with 10 sanding sleeves. Use coarse grits for fast material removal Loosen the set screw located in the retainer and a rough finish. Use fine grits for slower mate- nut (see Figure 23). -
Page 25: Table Inserts
This ensures the table insert will not make con- tact with the spindle even when the table is The Model G1071 is supplied with three different tilted. sized table inserts. The inserts are designed to... -
Page 26: Bevel Sanding
Figure 27. This allows the finish line to be viewed on the top side of the The Model G1071 has a tilting table to allow bevel workpiece. sanding at a variety of angles. -
Page 27: Section 5: Accessories
To reduce this risk, only install accessories ⁄ " x 1 ⁄ " x 8 ⁄ " ........W1306 recommended for this machine by Grizzly. 2" x 2" x 12" ..........W1307 ⁄ " x 1 ⁄ " x 9" with Handle ..... W1308 NOTICE 2"... - Page 28 Figure 31. Half-mask respirator with disposable cartridge filters. Replacement Sanding Sleeves A full range of sanding spindles are available for Figure 33. Dust collection attachments. the Model G1071. Visit www.grizzly.com to see them all! Figure 32. Replacement sanding sleeves. www.grizzly.com 1-800-523-4777...
-
Page 29: Section 6: Maintenance
Always disconnect power to the machine before performing maintenance. Failure to do this may Cleaning the Model G1071 is relatively easy. result in serious person- Vacuum excess wood chips and sawdust, and al injury. wipe off the remaining dust with a dry cloth. If any... -
Page 30: Sanding Sleeves
Glue used to hold the grit to the paper will rub off onto the workpiece, causing burns and interfering with the final finishing. Oil Fill Cap Figure 36. Oil fill cap. -28- Model G1071 (Mfd. Since 11/10) -
Page 31: Section 7: Service
2. Motor fan rubbing on fan cover. 2. Fix/replace fan cover; replace loose/damaged fan. 3. Motor bearings at fault. 3. Test by rotating shaft; rotational grinding/loose shaft requires bearing replacement. 4. Gearbox is damaged. 4. Inspect and repair/replace. -29- Model G1071 (Mfd. Since 11/10) - Page 32 1. Too much pressure against sleeve. 1. Reduce pressure on workpiece while sanding. clog quickly or 2. Sanding softwood. 2. Use different stock. Or, accept the characteristics burn. of the stock and plan on cleaning/replacing belts frequently. -30- Model G1071 (Mfd. Since 11/10)
-
Page 33: Section 8: Wiring
Technical Support at (570) 546-9663. The photos and diagrams included in this section are best viewed in color. You can view these pages in color at www.grizzly.com. -31- Model G1071 (Mfd. Since 11/10) -
Page 34: Wiring Diagram
The motor wiring shown here is current at the time of printing, but it match your machine. Always use the wiring diagram inside the motor junction box. Ground Neutral Ground Rewired to 240V READ ELECTRICAL SAFETY -32- Model G1071 (Mfd. Since 11/10) ON PAGE 31! -
Page 35: Section 9: Parts
84V2 84V2 84V2 73V2 82V2 74V2 82V2 88V2 82V2 82V2 82V2 82V2 82V2 92V2 82V2 87V2 82V2 101V2 101V2 100V2 98V2 BUY PARTS ONLINE AT GRIZZLY.COM! -33- Model G1071 (Mfd. Since 11/10) Scan QR code to visit our Parts Store. -
Page 36: Main Parts List
TOGGLE SAFETY SWITCH We do our best to stock replacement parts when possible, but we cannot guarantee that all parts shown are available for purchase. Call (800) 523-4777 or visit www.grizzly.com/parts to check for availability. BUY PARTS ONLINE AT GRIZZLY.COM! -34- Model G1071 (Mfd. -
Page 37: Base
SET SCREW 10-24 X 1/4 P1071051 SPINDLE 2" P1071111 HEX NUT 3/4-16 P1071052 SPINDLE 3" P1071115 FLAT WASHER 3/8 P1071053 SPINDLE 4" P1071116 SPACER BUY PARTS ONLINE AT GRIZZLY.COM! -35- Model G1071 (Mfd. Since 11/10) Scan QR code to visit our Parts Store. -
Page 38: Labels & Cosmetics
Safety labels help reduce the risk of serious injury caused by machine hazards. If any label comes off or becomes unreadable, the owner of this machine MUST replace it in the original location before resuming operations. For replacements, contact (800) 523-4777 or www.grizzly.com. BUY PARTS ONLINE AT GRIZZLY.COM! -36- Model G1071 (Mfd. -
Page 39: Warranty & Returns
WARRANTY & RETURNS Grizzly Industrial, Inc. warrants every product it sells for a period of 1 year to the original purchaser from the date of purchase. This warranty does not apply to defects due directly or indirectly to misuse, abuse, negligence, accidents, repairs or alterations or lack of maintenance.