Advertisement
Quick Links
INSTRUCTION MANUAL
Orion SkyView
GoTo System
Providing Exceptional Consumer Optical Products Since 1975
All Rights Reserved. No part of this product instruction or any of its contents may be reproduced, copied, modified or adapted,
without the prior written consent of Orion Telescopes & Binoculars.
#7817
Copyright © 2018 Orion Telescopes & Binoculars
Pro
™
Customer Support:
www.OrionTelescopes.com/contactus
Corporate Offices:
89 Hangar Way, Watsonville CA 95076 - USA
IN 296 Rev. D 01/18
Advertisement

Related Manuals for Orion SkyView Pro GoTo System


Summary of Contents for Orion SkyView Pro GoTo System
- Page 1 Copyright © 2018 Orion Telescopes & Binoculars All Rights Reserved. No part of this product instruction or any of its contents may be reproduced, copied, modified or adapted, without the prior written consent of Orion Telescopes & Binoculars. IN 296 Rev. D 01/18...
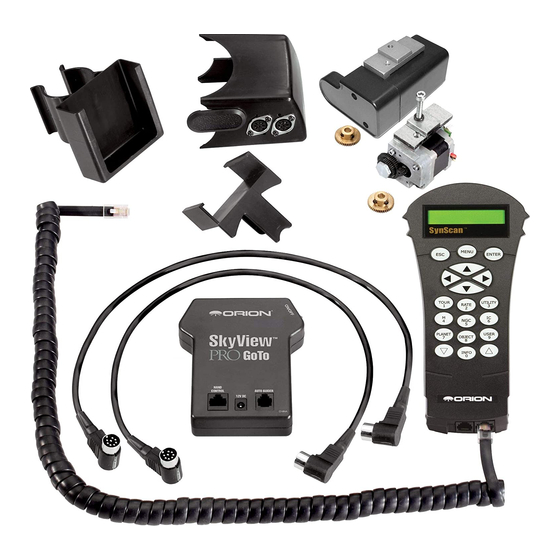
- Page 2 Motor control box bracket R.A. GoTo motor Brass GoTo hand gears controller bracket GoTo hand controller Motor control Motor cables GoTo hand controller cable Figure 1. The SkyView Pro GoTo System (not all parts on parts list are shown)
-
Page 3: Parts List
These instructions will help you install and properly use the SkyView Pro GoTo system. Please read them over thoroughly before getting started. It may take a few observing sessions to become familiar with all the features of the SkyView Pro GoTo system, so keep this manual handy as you master your mount’s operation. - Page 4 4-pin rectangular Smaller gear R.A. connectors GoTo motor Hole Figure 4. Attaching the R.A. GoTo motor Brass gear Attachment hole R.A. GoTo motor attachment screw Figure 3. The R.A. GoTo motor assembly the R.A. GoTo motor. Place one of the 10mm flat wash- ers onto the R.A.
- Page 5 Dec. GoTo motor Note: There is a small packet of grease included with your SkyView Pro GoTo system. Once you have installed the GoTo motor so the gears mesh properly, you can apply a very small amount of the included grease to the meshed gears to ensure optimal gear mating.
- Page 6 Note: There is a small packet of grease included with your SkyView Pro GoTo system. Once you have installed the GoTo Figure 13. Installed GoTo motors motor so the gears mesh properly, you can apply a very so it resembles Figure 8.
- Page 7 6. Connect the other end of the motor cable to the 8-pin cir- cular jack on the Dec. GoTo motor. The SkyView Pro GoTo system should be powered by a 12V (11V-15V) DC power supply (tip positive) capable of produc- Attaching the GoTo Hand Controller ing continuous current of a minimum 2 amps.
-
Page 8: One-Year Limited Warranty
One-Year Limited Warranty This Orion product is warranted against defects in materials or workmanship for a period of one year from the date of purchase. This warranty is for the benefit of the original retail purchaser only. During this war- ranty period Orion Telescopes &...