Table of Contents
Advertisement
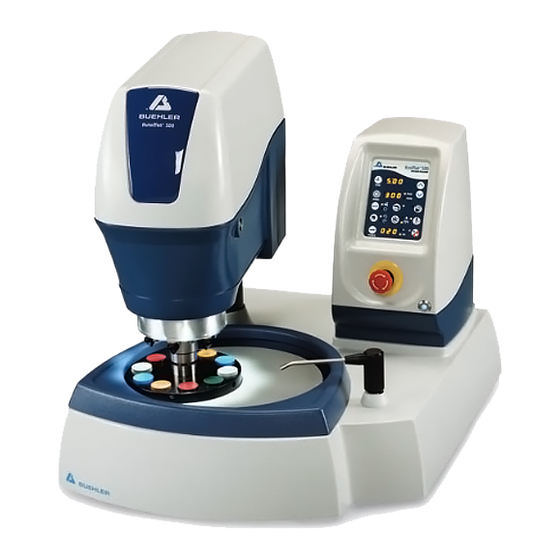
Buehler EcoMet 250 Grinder-Polisher
Revision: 1.0 — Last Updated: Dec 01 2016, Revised by Matt Bilton
Overview
This document will provide a detailed operation procedure of the Buehler EcoMet 250 Grinder-
Polisher. Formal Training is required for all users prior to using this system.
Revision History
#
Revised by:
1
2
3
4
5
Document No.
1
4D LABS, Simon Fraser University 8888 University Drive, Burnaby, B.C. V5A 1S6
E
nanoimaging@4dlabs.ca
Standard Operating Procedure
Date
Modification
T
778.782.8158
F
778.782.3765
W
www.4dlabs.ca
Advertisement
Table of Contents

Related Manuals for Buehler EcoMet 250


Summary of Contents for Buehler EcoMet 250
-
Page 1: Overview
Revision: 1.0 — Last Updated: Dec 01 2016, Revised by Matt Bilton Overview This document will provide a detailed operation procedure of the Buehler EcoMet 250 Grinder- Polisher. Formal Training is required for all users prior to using this system. -
Page 2: Table Of Contents
4D LABS, Simon Fraser University 8888 University Drive, Burnaby, B.C. V5A 1S6 nanoimaging@4dlabs.ca 778.782.8158 778.782.3765 www.4dlabs.ca Table of Contents Overview..............................1 Revision History ............................1 Table of Contents ............................. 2 General Information ..........................4 Main components: ........................... 4 Safety ..............................5 Operation .............................. - Page 3 4D LABS, Simon Fraser University 8888 University Drive, Burnaby, B.C. V5A 1S6 nanoimaging@4dlabs.ca 778.782.8158 778.782.3765 www.4dlabs.ca...
-
Page 4: General Information
778.782.8158 778.782.3765 www.4dlabs.ca General Information Buehler’s EcoMet 250 is a variable speed grinder-polisher with an 8-inch (203 mm) platen. The AutoMet Power Head allows for semiautomatic specimen preparation operation, increasing productivity and specimen consistency. Main components: Power Head Control... -
Page 5: Safety
4D LABS, Simon Fraser University 8888 University Drive, Burnaby, B.C. V5A 1S6 nanoimaging@4dlabs.ca 778.782.8158 778.782.3765 www.4dlabs.ca Safety Only trained users are permitted to operate the Grinder-Polisher. Wear safety glasses and protective gloves at all times. To avoid floods, always check that the water flow hose is securely attached to the outlet at the rear of the machine, and also that the hose is suitably fitted into the waste collection vessel beneath the table. -
Page 6: Operation
4D LABS, Simon Fraser University 8888 University Drive, Burnaby, B.C. V5A 1S6 nanoimaging@4dlabs.ca 778.782.8158 778.782.3765 www.4dlabs.ca Operation Control Panel: Increase / Time decrease Speed Water flow (base & head) (on/off) Water source (tap only) Platen only Burst Head rotation dispenser direction (on/off) (Clockwise /... - Page 7 4D LABS, Simon Fraser University 8888 University Drive, Burnaby, B.C. V5A 1S6 nanoimaging@4dlabs.ca 778.782.8158 778.782.3765 www.4dlabs.ca Time display set for a grinding-polishing cycle (m:ss) Displays the rpm of the platen or Power Head Base Base = 1 – 500 rpms Head = 30 –...
-
Page 8: Preparing Your Grinding Or Polishing Platens
4D LABS, Simon Fraser University 8888 University Drive, Burnaby, B.C. V5A 1S6 nanoimaging@4dlabs.ca 778.782.8158 778.782.3765 www.4dlabs.ca Pause or Stop a cycle Preparing your grinding or polishing platens: 1. Check that the platen is secure and lying flat. 2. Attach the 8” magnetic disc to the platen (it may already be attached), this allows for easy attachment and exchange of grinding discs and polishing cloths. -
Page 9: Preparing Samples In The Power Head
4D LABS, Simon Fraser University 8888 University Drive, Burnaby, B.C. V5A 1S6 nanoimaging@4dlabs.ca 778.782.8158 778.782.3765 www.4dlabs.ca 4. Proceed to begin the polishing procedure. Do not use a water flow during polishing as this will remove the diamond fluid from the cloth. 5. -
Page 10: Loading A Specimen Holder
(see Figure 3) on the left side of the Power Head to enable rotation of the head. Tighten the locking handle once the Power Head is in place. 2. Move the Power Head into the desired position. (Buehler recommends the specimen be approximately 1/3 off the edge of the platen in its outmost position.) 3. -
Page 11: Removing A Specimen Holder
7. Load your samples. For central force, ensure that the sample holder is balanced (using blank balance pucks if necessary). 8. Position the polishing head over the platen. Buehler recommends the specimen be approximately 1/3 off the edge of the platen in its outmost position. -
Page 12: Mounting The Glass Slide Holder
4D LABS, Simon Fraser University 8888 University Drive, Burnaby, B.C. V5A 1S6 nanoimaging@4dlabs.ca 778.782.8158 778.782.3765 www.4dlabs.ca pucks are ok) are needed for a grinding and polishing cycle with the central force specimen holder (the do not have to be in contact with the platen). Ensure that your samples are level for grinding/polishing and secured in place using an Allen key. - Page 13 4D LABS, Simon Fraser University 8888 University Drive, Burnaby, B.C. V5A 1S6 nanoimaging@4dlabs.ca 778.782.8158 778.782.3765 www.4dlabs.ca 2. Place the glass slide holder into the 1” distance rings (sample side down). Lock the holder in place by turning the locking caps of the glass-slide holder over the edges of the distance rings (Figure Figure 8: Positioning the glass-slide holder into the central force holder.
-
Page 14: Begin The Grinding / Polishing Procedure
4D LABS, Simon Fraser University 8888 University Drive, Burnaby, B.C. V5A 1S6 nanoimaging@4dlabs.ca 778.782.8158 778.782.3765 www.4dlabs.ca Begin the Grinding / Polishing Procedure 1. Use the control panel to select your desired force mode, Single or Central (check that this corresponds to your selected sample holder). Press the MODE button to select between CENTRAL or SINGLE mode. - Page 15 4D LABS, Simon Fraser University 8888 University Drive, Burnaby, B.C. V5A 1S6 nanoimaging@4dlabs.ca 778.782.8158 778.782.3765 www.4dlabs.ca 7. To use water, position the Water Dispensing Arm over the platen. Press the WATER button. The WATER LED will light and water will be dispensed from both the Water Dispensing Arm the Platen Bowl Wash.
-
Page 16: Exchanging Grinding And Polishing Discs
4D LABS, Simon Fraser University 8888 University Drive, Burnaby, B.C. V5A 1S6 nanoimaging@4dlabs.ca 778.782.8158 778.782.3765 www.4dlabs.ca To stop the process, press and hold the PAUSE / STOP button for about 3 seconds When the STOP function has been selected all parameters return to their default settings. To resume machine operation, press the SPEED button. -
Page 17: References And Files
10. Fill in the user log book and remember to create your online 4D LABS usage ticket. References and Files Buehler Manual for EcoMet™ 250 / 300 Grinder-Polisher & AutoMet™ 250 / 300 Power Head. Contact Information Questions or comments in regard to this document or Buehler Grinder-Polisher should be directed towards Xin Zhang or Matt Bilton (zhang@4dlabs.ca;... -
Page 18: Supplementary Information
4D LABS, Simon Fraser University 8888 University Drive, Burnaby, B.C. V5A 1S6 nanoimaging@4dlabs.ca 778.782.8158 778.782.3765 www.4dlabs.ca Supplementary Information Silicon Carbide Abrasive Grinding Discs FEPA Grit Grit Size (µm) Code P120 P280 52 ± 2 P400 35.0 ± 1.5 P800 21.8 ± 1.0 P1200 15.3 ±...