
Related Manuals for Niles IntelliPad


Summary of Contents for Niles IntelliPad
- Page 1 IntelliPad ® IntelliPad ® IntelliPad WALL MOUNTED PROGRAMMABLE IR KEYPAD SYSTEM NILES ® I N S T A L L A T I O N & O P E R A T I O N G U I D E...
-
Page 2: Table Of Contents
Wall Mounted Programmable IR Keypad System Introduction TABLE OF CONTENTS Introducing IntelliPad ® , the world’s first wall-mounted, programmable Introduction IR keypad system that provides a unique LED power status display and the convenience of true one-button remote control of complex Features and audio/video systems. -
Page 3: Features And Benefits
Y S T E M Features and Benefits Speaker Relay Power Status Display and Synchronization The IntelliPad incorporates a unique speaker The Status Feedback feature eliminates the muting function with status display. When you guesswork common with other IR control sys- press the Mute key the local speakers turn off and tems. - Page 4 LEDs which provide visual Proudly Made in USA prompts—leading you step-by-step through the programming process. The IntelliPad is made in the USA and comes with a limited two year parts and labor warranty. Program Duplication The memory contents of a programmed keypad can be transferred directly into another keypad via a supplied cable—thereby simplifying the pro-...
-
Page 5: Parts Guide
Style Insert (not supplied) Note: The above figure illustrates how the IntelliPad would be installed by itself. However, because of its modular Decora-style design, the IntelliPad can be combined in a three or four- gang configuration with additional wall-mount control devices. - Page 6 R O G R A M M A B L E E Y P A D Y S T E M Figure 3 IntelliPad parts guide; rear view (a) Mounting Bracket (b) Dust Shield (c) Status Input Connector (d) Speaker Relay Jumper...
-
Page 7: Installation Considerations
P-Rings and Electrical Boxes CAUTION: DO NOT INSTALL THE INTELLIPAD The mounting depth of the IntelliPad is 2 1/2” . INTO ELECTRICAL BOXES WITH 110 VOLT DEVICES When installed, the unit extends 2” behind the Some states or municipalities allow devices such sheetrock wall (assuming 1/2”... - Page 8 IRZ6+). Home run means an individual cable is to connect to the 12v+ and the GND terminals connected between each IntelliPad and the IR on the IR DATA connector of the IntelliPad. See main system unit. Figure 5. Your IR controllable A/V components are con-...
- Page 9 Unswitched AC Outlet Powers the System Power, IR Data, and Status Feedback Signal via 2-conductor shielded wire Loudspeaker Figure 4 Loudspeaker Connecting the IntelliPad to a Niles IR repeater system capa- ble of broadcasting a status feedback signal...
- Page 10 IntelliPad into the Switched Outlet DC Power Supply Plugged into an Unswitched AC Outlet Powers the System Rear Panel of IntelliPad ® Loudspeaker Figure 5 Loudspeaker Connecting an IntelliPad in a “Stand Alone” system using a direct status feedback connection...
- Page 11 Using speaker wire larger than 14 “daisy-chain” a single cable. A cable is run gauge for the IntelliPad connections is not rec- between the keypad and the IR sensor and a sin- ommended—the wire may not fit into the con- gle cable is run from either the IR sensor or the nectors.
-
Page 12: Installation
Y S T E M Installation Overview Installing the Source Labels Included with the IntelliPad is a sheet of precut The IntelliPad is installed by following these and preprinted labels for your convenience. To steps in order: install the labels follow these steps: 1. - Page 13 Status Feedback Jumper Figure 9 Use the ENABLE setting if you are giving the Pushing in the IntelliPad Status Feedback via the Status input on label plugs the IntelliPad or via a Niles IR main system unit.
- Page 14 If the Mute key is pressed when the system Feedback feature is in use, the IntelliPad’s internal speaker relay will mute the speakers in that room only. The Status LED will change from green to red. In a system...
- Page 15 IntelliPad. Note that the oblong shape of the screw holes allow you to position the IntelliPad so NOTE: Certain "old work" or "retro-fit" boxes, such as the Carlon B225R, have a plastic "lip"...
-
Page 16: Programming Considerations
The remaining keys can be used to store the “Key” . The Key is the actual key you would IR commands which are only used in sequences press on the IntelliPad. The Page describes one of (e.g. Stereo/Surround Modes, EQ settings, eight different layers of memory storage. - Page 17 The second function can be accessed by the empty key address which prevents the pressing and holding one of these keys for more IntelliPad from defaulting to the System page. than one second. These special commands or sequences are stored on an eighth page of IR Press and Hold Page command memory, the Press and Hold page.
-
Page 18: Programming
Y S T E M Programming Overview Ground Rules and Guidelines The IntelliPad system is programmed in six Erasing the Entire Memory Before You Start fundamental stages: Before beginning to program the IntelliPad, 1. Teach all of the preamp/receiver IR com- erase any earlier programs by following these mands onto the System page. - Page 19 3 to 6 commands from some manufacturers (e.g. Control Inches Sony) which are taught to the Intellipad as con- IntelliPad tinuous commands will not work in sequences. When teaching the IntelliPad, make sure you only press and hold buttons for functions which...
- Page 20 LED lights confirming that the IR command 4. Press the key on the CD’s remote control that has been successfully learned by the you would like the IntelliPad to learn (in our IntelliPad. example you would press the “Play” key).
- Page 21 3. Select the Page, then the Key that corresponds into a sequence. The IntelliPad’s Auto Power to the address of the IR command that you wish Insert feature is enabled via the jumper labeled to erase.
- Page 22 I R K A L L O U N T E D R O G R A M M A B L E E Y P A D Y S T E M Programming the Sequence prompting you to select the key of the first command.
- Page 23 Source 1 .5 Second mand issued by the IntelliPad. This is to accom- modate those brands which will not accept Source 2 1 Second another IR command right after turn-on.
- Page 24 4. Press the key on the source component’s remote the Press and Hold TUNER control that you want the IntelliPad to learn. In feature. our example you would press the Power key on the VCR’s remote control. The KEY LED...
- Page 25 Disabling or Enabling the Auto Power Insert For One of the Source Select Keys If the local television will be used by itself, it is usu- “enabled” will light. Sources that have the ally desirable to disable the IntelliPad’s automatic feature “disabled” will not light. insertion of the preamp/receiver “power” com- 2.
- Page 26 The IntelliFile System consists of a storage/trans- fer program, PC Interface, power supply, and a 3. Connect the IntelliPad to 12v DC power. Use cable adapter kit. the 12v+ and GND connectors of the IR DATA connector located on the rear of the IntelliPad.
-
Page 27: Operation
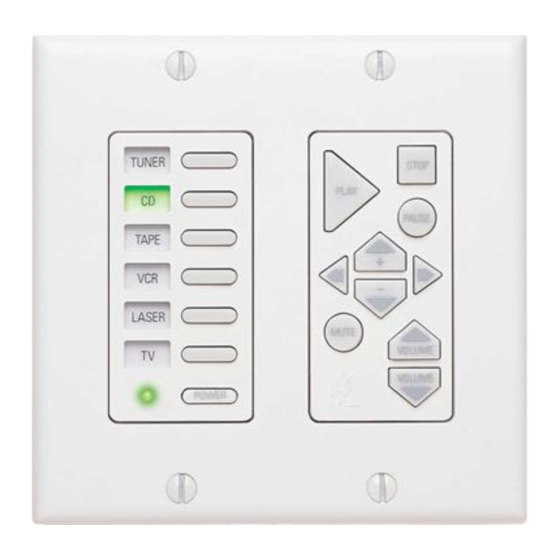
I R K A L L O U N T E D R O G R A M M A B L E E Y P A D Y S T E M Source Select Keys Function Control Keys TUNER TAPE Source Labels LASER... - Page 28 I R K A L L O U N T E D R O G R A M M A B L E E Y P A D Y S T E M Source Labels Mute Key The backlit label indicates which source compo- This key controls the built-in Speaker Mute fea- nent your Function Control keys will operate.
-
Page 29: Troubleshooting
However, some brands have an IR code struc- PROBLEM: The Intellipad Will Not Learn an IR Command ture that the IntelliPad interprets as a single code. As a result, you must repeatedly tap the volume The IntelliPad will operate most IR controlled... -
Page 30: Specifications
I R K A L L O U N T E D R O G R A M M A B L E E Y P A D Y S T E M Specifications FCC Certification IR System Class “B” certified for use in a residential envi- Compatible with virtually all brands of remote ronment controls using carrier frequencies between 23... - Page 31 ©1999 Niles Audio Corporation. All rights reserved. Because Niles constantly strives to improve the qual- ity of its products, Niles reserves the right to change product specifications without notice. Niles, the Niles logo, IntelliPad and IntelliFile are registered trademarks of Niles Audio Corporation. Decora is a reg- 12331 S.W. 130 Street istered trademark of Leviton Manufacturing Company.