Table of Contents
Advertisement
User Manual
Digital Ceramic
Tower Heater
MODEL: WHT2401
1. READ these instructions carefully before installing and operating the
appliance. Keep them for further reference.
2. Record in the space below the "SERIAL/MODEL NUMBER" found on the back
or bottom of your appliance and retain this information for future reference.
SERIAL NUMBER:
MODEL NUMBER:
DATE OF PURCHASE:
Save and staple your sales receipt to your manual for warranty coverage.
Page 1
Advertisement
Table of Contents

Related Manuals for Westinghouse WHT2401


Summary of Contents for Westinghouse WHT2401
- Page 1 User Manual Digital Ceramic Tower Heater MODEL: WHT2401 1. READ these instructions carefully before installing and operating the appliance. Keep them for further reference. 2. Record in the space below the “SERIAL/MODEL NUMBER” found on the back or bottom of your appliance and retain this information for future reference.
-
Page 2: Table Of Contents
CONTENTS SAFETY INFORMATION Important Safety Instructions ............................3-5 Electrical Requirements................................4 SET UP & USE Parts & Features ..................................6 Control Panel ....................................6 Operation Guide ..................................7-8 CLEANING & CARE ...............................9 TROUBLESHOOTING & WARRANTY Limited Warranty ................................10-11 Page 2... -
Page 3: Safety Information
SAFETY INFORMATION DANGER WARNING CAUTION DANGER - Immediate hazards WARNING - Hazards or unsafe CAUTION - Hazards or unsafe which WILL result in severe practices which COULD result in practices which COULD result in personal injury or death severe personal injury or death minor personal injury IMPORTANT SAFETY INSTRUCTIONS WARNING... -
Page 4: Electrical Requirements
Do not attempt to modify the plug in any way. NOTE: Neither Westinghouse nor the dealer can accept any liability for damage to the product or personal injury resulting from failure to observe the electrical connection procedures. - Page 5 SAFETY INFORMATION SAFETY FEATURES TIP-OVER SAFETY FEATURE This heater is equipped with a tip-over safety feature. Once the heater is tipped over, an internal switch will automatically shut the heater off. Once the heater is restored an upright position, the heater will reset. To continue operation, turn on the heater using the supplied remote control or the control panel on the heater.
-
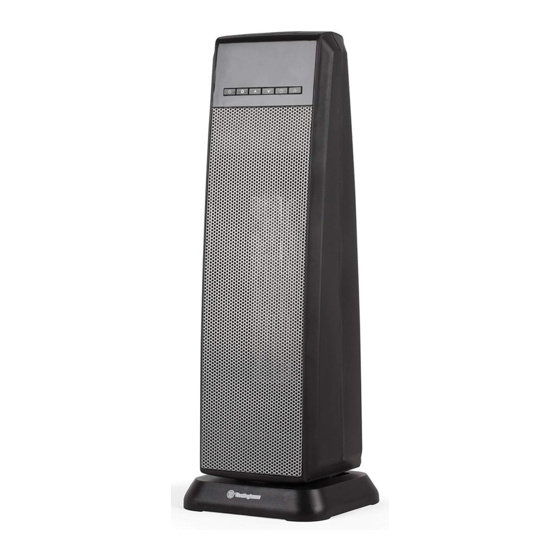
Page 6: Set Up & Use
SET UP & USE PARTS & FEATURES Handle Display Window (In back, not shown) Control Panel Oscillate Power Air Output Grill OSCILLATE POWER OSCILLATE POWER TIMER MODE Timer Mode TEMP + TEMP - TIMER MODE Temp+ Temp- TEMP + TEMP - OSCILLATE POWER TIMER... -
Page 7: Operation Guide
SET UP & USE PREPARATION FOR USE Place the heater on a firm, level surface and plug the unit directly into a 120v AC electrical outlet. Pull out the insulating film from the battery compartment of the remote control as shown below. OPERATING INSTRUCTIONS POWERING AND SELECTING WORK MODE Turn the heater on by pressing the POWER button on the remote control or... - Page 8 SET UP & USE OSCILLATE SETTING THE AUTO SHUTOFF TIMER FUNCTION The Auto Shutoff Function allows for the heater to automatically power off after a certain set time. NOTE: Timer can only be set while heater is on.Turn the heater on and press TIMER the Timer button on the heater’s control panel or the remote control.
-
Page 9: Cleaning & Care
CLEANING & CARE 1. Unplug the unit and let it cool completely. 2. To keep the heater clean, the outer shell may be cleaned with a soft, damp cloth. You may use a mild detergent if necessary. After cleaning, dry the unit with a soft cloth. -
Page 10: Troubleshooting & Warranty
TROUBLESHOOTING & WARRANTY CUSTOMER SERVICE IMPORTANT DO NOT RETURN THIS PRODUCT TO THE STORE If you have a problem with this product, please contact the W Appliance Co. Customer Satisfaction Center at 1-855-855-0294. DATED PROOF OF PURCHASE, MODEL # AND SERIAL # REQUIRED FOR WARRANTY SERVICE BEFORE YOU CALL FOR SERVICE IF THE PRODUCT FAILS TO OPERATE:... -
Page 11: Limited Warranty
TROUBLESHOOTING & WARRANTY LIMITED WARRANTY Westinghouse brand is used under license. 13. Service calls to instruct you how to use your heater. Any repair, replacement, or warranty service, 14. Service calls to repair or replace the and all questions about this product should be... - Page 12 , WESTINGHOUSE, and INNOVATION YOU CAN BE SURE OF are trademarks of Westinghouse Electric Corporation. Used under license by W Appliance Company. All Rights Reserved. 090617 Page 12...