Table of Contents
Advertisement
O P E R A T I N G I N S T R U C T I O N S
MULTI CONTROL
AUDIO/VIDEO SURROUND RECEIVER
R-863
AUDIO/VIDEO SURROUND RECEIVER
BAND
T/P MODE
MULTI ROOM
REMOTE SENSOR
TUNING/PRESET
POWER
AUDIO
STANDBY
ON/STANDBY
ON /
OFF
PHONES
CHANNEL
SPEAKER
SELECTOR
TEST TONE
TONE MODE
VIDEO LABEL
ON/OFF
R-863
SOURCE
DIRECT
LOCK
LOCK
ROOM2 FEED
INPUT SELECTOR
SURROUND MODE
VIDEO
TAPE MON.
7.1CH DIRECT
DECODING
EXTRA SURR.
STEREO
DIGITAL/ANALOG
6.1/7.1
MEMO/ENTER
W R A S
WIDE RANGE AMPLIFIER STAGE
MASTER VOLUME
CINEMA EQ
DYNAMIC
RANGE
L - AUDIO - R
OPTICAL IN
S-VIDEO
VIDEO
Advertisement
Table of Contents

Related Manuals for Sherwood Newcastle R-863


Summary of Contents for Sherwood Newcastle R-863
- Page 1 O P E R A T I N G I N S T R U C T I O N S MULTI CONTROL PHONES SPEAKER ON/OFF AUDIO/VIDEO SURROUND RECEIVER R-863 AUDIO/VIDEO SURROUND RECEIVER BAND T/P MODE MULTI ROOM REMOTE SENSOR...
-
Page 2: Introduction
Introduction UNPACKING AND INSTALLATION Congratulations on Your Purchase! Your new high fidelity receiver is designed to deliver maximum enjoyment and years of trouble free service. Please take a few moments to read this manual thoroughly. It will explain the features and operation of your unit and help ensure a trouble free installation. -
Page 3: Read This Before Operating Your Unit
READ THIS BEFORE OPERATING YOUR UNIT FOR U.S.A AND CANADA ...120 V FOR YOUR SAFETY Units shipped to the U.S.A and Canada are designed for operation on 120 Volts AC only. Observe all safety precautions for use of a polarized AC plug. -
Page 4: Table Of Contents
CONTENTS Introduction UNPACKING AND INSTALLATION ... 2 READ THIS BEFORE OPERATING YOUR UNIT... 3 System Connections ... 5 Front Panel Controls ... 9 Universal Remote Controls DIGI LINK SYSTEM REMOTE CONTROLS ... 10 OPERATING COMPONENTS WITH REMOTE CONTROL... 12 REMOTE CONTROL OPERATION RANGE... 12 LOADING BATTERIES... -
Page 5: System Connections
System Connections Please be certain that the receiver is unplugged from the AC outlet before making any connections. Be sure to connect the white RCA pin cords to the L(left) and the red RCA pin cords to the R(right) jacks when making connections. - Page 6 • Neither on-screen display function nor video recording are available when using the COMPONENT VIDEO connections. • When Sherwood DVD player such as V-756, etc. is connected to the DIGI LINK jack for system control, you should connect the DVD player to the "VIDEO 2" jacks of this unit. Because, if the PLAY button, etc. is pressed on the DVD player, the VIDEO 2 is automatically selected as an input source on this unit.
- Page 7 Surround back speakers Front center speaker • Connect this jack to the DIGI LINK jack of the external Sherwood component that uses the DIGI LINK II or III remote control system. • A digital input should be connected to the components such as LD player, CD player or DVD player, etc.
-
Page 8: Connecting Speakers
I ROOM 2 connections • If another A/V receiver or integrated amplifier, etc. is connected to these jacks, you can play a different program source in another room as well as one source in the main room at the same time.(For details, refer to "ROOM 2 SOURCE PLAYBACK" on page 31). •... -
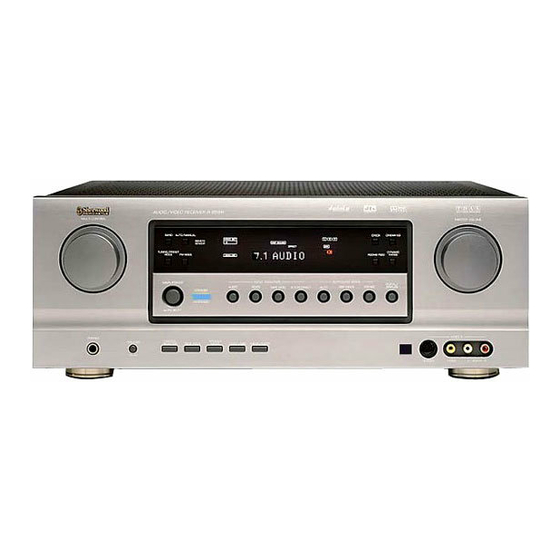
Page 9: Front Panel Controls
INPUT, FREQUENCY, VOLUME LEVEL, OPERATING INFORMATIONs, etc. REMOTE SENSOR SOURCE DIRECT BUTTON CINEMA EQ BUTTON DYNAMIC RANGE BUTTON ROOM 2 BUTTON E X T E N D E D R-863 SOURCE DIRECT CINEMA EQ MULTI ROOM REMOTE SENSOR LOCK LOCK... -
Page 10: Universal Remote Controls
TV. • Sherwood mode: Allows you to operate this unit and other Sherwood components like cassette decks, CD players, etc.(To operate other Sherwood components, you should make the DIGI LINK connections between them.) •... - Page 11 FUNCTION TABLE of the NUMBERED BUTTONS. Component buttons to be controlled (for receiver, (for CD player, (for tape deck, Button "001") "001") symbol POWER <POWER> MUTE <MUTE> CH LEVEL UP( ) <CH LEVEL UP( )> <CH LEVEL UP( )> CH LEVEL DOWN( ) <CH LEVEL DOWN( )>...
-
Page 12: Operating Components With Remote Control
• When a button is pressed, the corresponding DEVICE button flickers. • When operating a Sherwood CD player or tape deck using the system remote control, aim the remote control at the REMOTE SENSOR on this unit. -
Page 13: Additional Information On Remote Command Codes
ADDITIONAL INFORMATION ON REMOTE COMMAND CODES • This receiver recognizes and responds to IR codes that are not transmitted by the supplied remote control unit. These commands and their corresponding functions, shown on the following table, are made available for custom installers and advanced hobbysts who are already familiar with the programming of such devices as the Crestron Touch Screen and the Philps Pronto. -
Page 14: Entering A Setup Code
Sherwood component such as CD player, tape deck and DVD player(V-756, etc.) is “001” respectively.(However, the setup code for some Sherwood DVD player such as VD-4103, etc. is “057”, “074”, “112”, “114”.) Enter each setup code for CD player and tape deck doing steps ③, ④... -
Page 15: Operations
Operations Notes : Before operating this receiver with the supplied remote control, refer to “Universal Remote Controls” on page 10 for details about operation. Before operating this receiver, first set this unit as desired for optimum performance, by using the OSD menu setting procedures. (For details, refer to “OSD Menu Settings”... - Page 16 When CD, TAPE MON or VIDEO 1~ VIDEO 4 is selected Select the digital or the analog input as desired. DIGITAL/ANALOG Each time this button is pressed, the corresponding input is selected as follows: DIGITAL ANALOG To listen to DTS, Dolby Digital or MPEG program sources in the 2-CH downmix mode, in the stereo mode, the digital input must be selected.
- Page 17 To achieve pure sound quality. SOURCE DIRECT Only when playing program sources recorded in analog stereo or digital 2 ch PCM format, the source direct function can be selected. “DIRECT” lights up and stereo mode is automatically selected. Then the sound that bypasses the tone circuitry will be heard.
-
Page 18: Surround Sound
SURROUND SOUND This unit incorporates a sophisticated Digital Signal Processor that allows you to create optimum sound quality and sound atmosphere in your personal Home Theater. Surround modes ■ ■ DTS Digital Surround DTS Digital Surround(also called simply DTS) is a multi-channel digital signal format which can handle higher data rates than Dolby Digital. - Page 19 The following modes apply conventional 2-channel signals such as digital PCM or analog stereo signals to high performance Digital Signal Processor to recreate sound fields artificially. Select one of the twelve provided surround modes according to the program source you want to play. ■...
-
Page 20: Speaker Placement
Speaker placement Ideal speaker placement varies depending on the size of your room and the wall coverings, etc. The typical example of speaker placement and recommendations are as follows : ■ ■ Front left and right speakers and center speaker Place the front speakers with their front surfaces as flush with TV or monitor screen as possible. -
Page 21: Enjoying Surround Sound
ENJOYING SURROUND SOUND Surround sound effect will not work properly if the signal passes through a graphic equalizer. Please refer to your equalizer operating instructions for guidance on switching off (or defeating) the equalizer. ■Note : Before surround playback, first perform the SPEAKER SETUP procedure, etc. on the OSD menu for optimum performance.(For detail, refer to “SETTING THE SPEAKER SETUP”... - Page 22 Continued When playing some multi-channel program sources in the Extra Surround 6.1/7.1 mode. When the digital signals from the following program sources only are input in the available decoding mode, if these buttons are pressed, the corresponding surround mode will be selected. Dolby Digital 5.1-channel sources(including THX Surround EX created using the Dolby Digital Surround EX technology) : EXTRA SURROUND mode, DTS 5.1-channel sources : DTS ES MATRIX mode.
-
Page 23: Adjusting Each Channel Level With Test Tone
Adjusting each channel level If you have performed the CH LEVEL TRIM procedure on the OSD menu, you can skip this procedure. (For details, refer to “SETTING THE CH LEVEL TRIM” on page 43.) Select the desired channel. CHANNEL VOL. CH LEVEL CH SEL SELECTOR... -
Page 24: Downmixing Into 2 Front Channels
Downmixing into 2 front channels Allows the multi - channel signals encoded in DTS, Dolby Digital or MPEG format to be reproduced through only two front speakers or through headphones. When the digital signals from the DTS, Dolby Digital or MPEG program sources are input, press the STEREO button. -
Page 25: Listening To Radio Broadcasts
LISTENING TO RADIO BROADCASTS Auto tuning Select the tuner. AUDIO ENTER TITLE 7.1 SURR DISC P.SCAN TUNER T1/MON TUNER VID1 VID2 VID3 SYS DISP SLEEP HOME THEATER MASTER RNC-220 Select the tuning mode. T/P MODE Each time this button is pressed, the mode changes as follows: Tuning mode : “PRESET”... -
Page 26: Memory Backup Function
Select the desired preset number(1~30) and press the MEMORY/ENTER button. TUNING/PRESET MEMO/ENTER When using the NUMERIC buttons on the remote control. Examples) For “3” : within 2 seconds For “15” : For “30” : The station has now been stored in the memory. When using the NUMERIC buttons, the station is stored automatically without pressing the MEMORY/ ENTER button. -
Page 27: Recording
RECORDING The analog signals from the 7.1 CH DIRECT inputs as well as the digital signals from the coaxial or optical digital input can be heard but cannot be recorded. The volume, tone (bass, treble) settings,etc. have no effect on the recording signals. Recording with TAPE MONITOR Select the desired input as recording source except TAPE MONITOR. -
Page 28: Digital Audio Recording With Md Recorder
Start recording on the component hooked up to VIDEO 1. DIGITAL AUDIO RECORDING WITH MD RECORDER Only when the OPTICAL DIGITAL OUT of this receiver is connected to the OPTICAL DIGITAL IN of the MD recorder or CD recorder, you can enjoy high-quality sound of digital recording without converting the original signals. -
Page 29: Other Functions
Unit : minutes While operating the sleep timer, “SLEEP” lights up. When the sleep time is selected, all display panels of Sherwood components connected by the DIGI LINK III are dimly lit. Each time this button is pressed, the mode changes and disappears in 3 seconds as follows;... -
Page 30: Entering A Video Label
Entering a video label This function can be operated only on video input sources such as VIDEO 1~4. Select the desired video input source to enter its label. VIDEO ENTER TITLE 7.1 SURR DISC P.SCAN TUNER T1/MON VID1 VID2 VID3 VID1 VID2 VID3... -
Page 31: Room 2 Source Playback
ROOM 2 SOURCE PLAYBACK This function allows enjoying one source in the main room and playing another in a different room at the same time. The analog signals from the 7.1 CH DIRECT inputs and TAPE MONITOR INs as well as the digital signals from the coaxial or optical digital input cannot be output from the ROOM 2 OUTs, meaning no playback in a different room. -
Page 32: Using The Osd
Using the OSD This unit incorporates an OSD(On-screen display) function to provide information about basic operation of this unit and to simplify the setup procedures. The OSD function uses a monitor TV connected to this unit as a display and has two kinds of display modes such as current status display and menu screen. - Page 33 Select the desired menu using the CURSOR UP(▲), DOWN(▼) buttons. Confirm your selection. VOL. CH LEVEL CH SEL ENTER ENTER INTRO TITLE 7.1 SURR RETURN AUTO MODE DISC TEST CENTER P.SCAN TONE MODE TUNER T1/MON PHONO VID1 VID2 VID3 VID4 VID5 SYS DISP SLEEP...
-
Page 34: Setting The Speaker Setup
SETTING THE SPEAKER SETUP After you have installed this unit and connected all the components, you first perform the speaker setup settings for the optimum sound acoustics according to your environment and speaker layout. S P E A K E R S E T U P S P E A K E R C O N F I G S P E A K E R D I S T A N C E L F E L E V E L C O N T R O L... -
Page 35: When Selecting The Speaker Distance
Repeat the above steps ② and ③ until the speakers are all set to the desired mode. When selecting the SPEAKER DISTANCE Press the CURSOR UP(▲)/DOWN(▼) buttons to select the SPEAKER DISTANCE, then press the ENTER button. VOL. CH LEVEL CH SEL ENTER INTRO... -
Page 36: When Selecting The Lfe Level Control
When selecting the LFE LEVEL CONTROL Press the CURSOR UP(▲)/DOWN(▼) buttons to select the LFE LEVEL CONTROL, then press the ENTER button. VOL. CH LEVEL CH SEL ENTER INTRO TITLE 7.1 SURR RETURN AUTO MODE DISC TEST CENTER P.SCAN TONE MODE TUNER T1/MON... -
Page 37: Setting The Function Select
SETTING THE FUNCTION SELECT F U N C T I O N S E L E C T I N P U T S E T U P T O N E C O N T R O L O S D M O D E R E T U R N : B a c k E N T E R : S e l e c t Note:... - Page 38 Press the CURSOR LEFT(◀)/RIGHT(▶) buttons to select the desired DIGITAL IN. VOL. CH LEVEL CH SEL ENTER INTRO TITLE 7.1 SURR RETURN AUTO MODE DISC TEST CENTER P.SCAN TONE MODE TUNER T1/MON PHONO VID1 VID2 VID3 VID4 VID5 SYS DISP SLEEP DIRECT IN ROOM2...
-
Page 39: When Selecting The Tone Control
When selecting the TONE CONTROL Press the CURSOR UP(▲)/DOWN(▼) buttons to select the TONE CONTROL, then press the ENTER button. VOL. CH LEVEL CH SEL ENTER INTRO TITLE 7.1 SURR RETURN AUTO MODE DISC TEST CENTER P.SCAN TONE MODE TUNER T1/MON PHONO VID1... -
Page 40: When Selecting The Osd Mode
When selecting the OSD MODE When the OSD MODE is set to On, the current status display overlays the program image on the monitor TV and may interfere with your movie enjoyment. In such a case, set the OSD MODE to Off. Press the CURSOR UP(▲)/DOWN(▼) buttons to select the OSD MODE, then press the ENTER button. -
Page 41: Setting The Surround Setup
SETTING THE SURROUND SETUP S U R R O U N D S E T U P S O U R C E D I R E C T D E C O D I N G M O D E AUTO D O L B Y D I G I T A L C I N E M A E Q :... -
Page 42: When Selecting The Decoding Mode
When selecting the DECODING MODE Depending on the input digital signal format, you can select the desired decoding mode. Auto : Select this for automatic detection of a digital input signal format. The input digital signal format (DTS, Dolby Digital, MPEG or PCM(2 channel stereo), etc.) used by the selected digital input source is detected automatically to perform the necessary decoding process for optimum surround modes. -
Page 43: Setting The Ch Level Trim
SETTING THE CH LEVEL TRIM C H L E V E L T R I M : - - - - - - - - - - - - : : - - - - - - - - - - - - : : - - - - - - - - - - - - : : - - - - - -... -
Page 44: Setting The Room2 Feed Setup
SETTING THE ROOM2 FEED SETUP R O O M 2 F E E D S E T U P To select the desired volume mode. V O L U M E M O D E F U N C T I O N S E L E C T To select the desired ROOM 2 source. - Page 45 When selecting the FUNCTION SELECT for ROOM 2 Press the CURSOR UP(▲)/DOWN(▼) buttons to select the FUNCTION SELECT for ROOM 2 source, then press the ENTER button VOL. CH LEVEL CH SEL ENTER INTRO TITLE 7.1 SURR RETURN AUTO MODE DISC TEST CENTER...
-
Page 46: Troubleshooting Guide
Remote control unit does not • Batteries are not loaded or exhausted. operate. • The remote sensor is obstructed. Other Sherwood components do • DIGI LINK connections are not made properly. not react to remote control commands. A video label cannot be displayed. -
Page 47: Specifications
Specifications AMPLIFIER SECTION Power output, stereo mode, 8 Ω, THD 0.05%, 20 Hz~20 kHz... 2×100 W Total harmonic distortion, 8 Ω, 100 W, 1 kHz... 0.05 % Intermodulation distortion 60 Hz : 7 kHz = 4 : 1 SMPTE, 8 Ω, 100 W... 0.09 % Input sensitivity/impedance Line (CD, TAPE, VIDEO) ... - Page 48 O P E R A T I N G I N S T R U C T I O N S R-863 AUDIO/VIDEO SURROUND RECEIVER 5707-21053-001-0...
Need help?
Do you have a question about the Newcastle R-863 and is the answer not in the manual?
Questions and answers