Sharp ER-A520 Service Manual
Sharp cash register user manual
Hide thumbs
Also See for ER-A520:
- Knowledge book (275 pages) ,
- Instruction manual (229 pages) ,
- Programming manual (22 pages)
Table of Contents
Advertisement
q
ER-A520
CHAPTER 1. SPECIFICATIONS . . . . . . . . . . . . . . . . . . . . . . . . . . . . 1
CHAPTER 2. OPTIONS . . . . . . . . . . . . . . . . . . . . . . . . . . . . . . . . . . . 5
CHAPTER 3. MASTER RESET AND PROGRAM RESET. . . . . . . . . 6
CHAPTER 4. HARDWARE DESCRIPTION . . . . . . . . . . . . . . . . . . . . 7
CHAPTER 5. DIAGNOSTIC PROGRAM . . . . . . . . . . . . . . . . . . . . . 14
CHAPTER 6. IPL FROM EP-ROM . . . . . . . . . . . . . . . . . . . . . . . . . . 19
CHAPTER 7. CIRCUIT DIAGRAM AND PWB LAYOUT . . . . . . . . . 20
PARTS GUIDE
Parts marked with "!" are important for maintaining the safety of the set. Be sure to replace these parts with specified
ones for maintaining the safety and performance of the set.
SERVICE MANUAL
ER-A530
CONTENTS
SHARP CORPORATION
CODE : 00Z
ELECTRONIC
CASH REGISTER
ER-A520
ER-A530
MODEL
(U, A version)
ERA520USME
This document has been published to be used
for after sales service only.
The contents are subject to change without notice.
Advertisement
Table of Contents

Related Manuals for Sharp ER-A520


Summary of Contents for Sharp ER-A520
-
Page 1: Table Of Contents
ER-A520 ER-A530 CHAPTER 1. SPECIFICATIONS ......1 CHAPTER 2. OPTIONS ........5 CHAPTER 3. -
Page 2: Chapter 1. Specifications
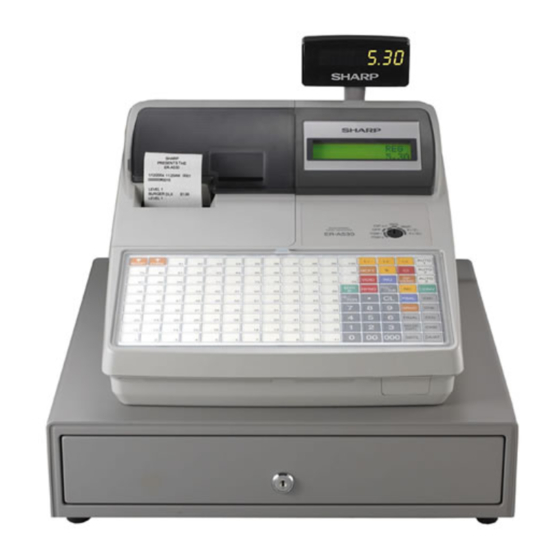
19 (W) x 19 (H) mm ER-A530 Type Flat key 0.8 m 0.2 mm Key stroke Key pitch 18 (W) x 15 (H) mm 3-2. KEY LAYOUT ER-A520 KEYLAYOUT STANDARD KEY LAYOUT Rear view Printer SLIP RCPT PBLU cover lock (left side) - Page 3 Non-add code/Date & time display key Note: The following function keys can optionally be mounted in place of those shown in the figure of the standard keyboard layout. For details, please consult your authorized SHARP dealer. Optional keys DEPT# Dept. number key...
-
Page 4: Mode Switch
Food stamp tender key Note: Department and direct PLU keys can be expanded. If you require expansion of the department or direct PLU keys, please contact your authorized SHARP dealer. 4. MODE SWITCH 4-1. MODE SWITCH AND MODE KEYS X / Z (SRV) •... -
Page 5: Operator Display
5. DISPLAY 5-1. OPERATOR DISPLAY Display device: Number of lines: 2 lines Number of positions: 16 positions Color of display: Yellow / Green Character font: 5 x 7 dot Character size: 4.84 (W) x 8.06 (H) mm Layout: 5-2. CUSTOMER DISPLAY Display device: Number of lines: 1 line... -
Page 6: Chapter 2. Options
To unlock, insert the drawer lock key and turn it 90 degrees clockwise. Key No: SK1-1 For A version Allowed Allowed 5B/6C 5B/6C MODEL NAME ER-03DW ER-04DW ER-11KT7 ER-12KT7 ER-22KT7 ER-11DK7G ER-51DK7G UP-P16DP UP-S02MB ER-A520U/ER-A530U OPTIONS – 5 – REMARK ER-A520 only... -
Page 7: Chapter 3. Master Reset And Program Reset
CHAPTER 3. MASTER RESET AND PROGRAM RESET The SRV key is used for performing entries in the SRV mode. A MASTER RESET clears the entire memory and resumes initial values. A PROGRAM RESET resumes the initial program without clearing the memory. -
Page 8: Chapter 4. Hardware Description
CHAPTER 4. HARDWARE DESCRIPTION 1. BLOCK DIAGRAM ER-A520 and ER-A530 RAM 10KB DRIVER, SENSOR PRINTER 4 to 16 DECODER KEY SCAN KEY SCAN KEY RETURN KEY RETURN RS232C CH1 RS232C CH2 MITSUBISHI M30802GP 12MHz (INTERNAL RAM 10KB) EXTERNAL MEMORY STD RAM... - Page 9 3. CPU PIN TABLE M16C/80 PORT Signal Initial PORT name name value P00 122 P01 121 P02 120 P03 119 P04 113 P05 112 P06 111 P07 110 P10 109 P11 108 P12 107 P13 106 P14 105 P15 104 /INT3# P16 103 /INT4#...
- Page 10 Signal I/O Initial PORT name name value POFF P91/ RxD3 P92/ TxD3 P93/ DRAWER1 RTS3# P94/ DRAWER2 RTS4# P95/ PCLK CLK4 P96/ TxD4 P97 144 P97/ RxD4 P100 141 P100/ P101 139 P101/ VPTEST P102 138 P102/ VREF P103 137 P103/ PHUPS P104 136 P104/ RPES...
-
Page 11: Printer Control
4. PRINTER CONTROL The PR-58HM printer is employed. 4-1. STEPPING MOTOR CONTROL The stepping motor is driven at a constant current by SMA7036M (made by Sanken). 1step: 0.125mm, 1dot: 1step Printing speed: 50mm/s <CPU PORT> CPU PORT <DRIVING STEP> RECEIPT MOTOR Driver IC input (CPU output) STEP RDS /RPFA /RPFB /RPFC /RPFD... - Page 12 5. A/D CONVERSION In the ER-A520/530, the following three kinds of signals are inputted to the A/D conversion port. <CPU PORT> Signal to CPU PORT be used PRINTER HEAD TEMPERATURE MONITOR VPTEST PRINTER HEAD VOLTAGE MONI- VREF REFERENCE VOLTAGE 5-1. PRINTER HEAD TEMPERATURE MONITOR A voltage divided by the temperature detection thermistor of the printer head and the resistor is inputted to AN0 pin.
- Page 13 6-2. KEY/DISPLAY SCAN Key/display scan and key read are performed at the following timing. 1 Key/display scan cycle: 10ms 2 Blanking time: 50us 3 KEY DATA READ timing: Read before 10~100us of strobe signal OFF. Key/Display-related Register Function LED Segment Signal <LED Segment Signal>...
- Page 14 6-3. DISPLAY The ER-A520/530 is provided with the LCD display of 5 x 7 dot, 2 line, 16 digit on the FRONT side, and the LED display of 7 digit on the POP UP side. FRONT: POP UP: • DISPLAY DIGIT SIGNAL The above ST0~ST6 are DIGIT signals.
- Page 15 Oscillation frequency is 2.048kHz (2.0kHz~2.2kHz). <CPU PORT> Signal to CPU PORT be used BUZZER BUZZER SIGNAL 13. UP-P16DP I/F The ER-A520/530 is provided with I/F with CKDC on the option display of UP-P16DP. <CPU PORT> Signal to CPU PORT be used INT1# SHEN#...
-
Page 16: Chapter 5. Diagnostic Program
CHAPTER 5. DIAGNOSTIC PROGRAM 1. TEST ITEMS The test items are as follows: Code Description Display buzzer test Key code Printer test Keyboard test Mode switch test Printer sensor test Clock test Drawer 1 open & sensor test Drawer 2 open & sensor test LCD CG test Standard RAM test OPTION RAM test... - Page 17 3) PRINTER TEST 1 Key operation 102 3 CA/AT 2 Test procedure OP display R / J P R I N T E R 5 lines of 24 digits are printed. At the receipt side, the logo is also printed and the receipt is issued. 3 Check that: The print is free from contamination, blur, and uneven density.
- Page 18 7) CLOCK TEST 1 Key operation 107 3 CA/AT 2 Test procedure OP display T I M C H E C K 1 0 7 Hour Blinks at an interval of 0.5 sec. 3 Check that: “–“ blinks and the clock counts up. 4 End of testing When any key is pressed, the date and time are printed and the test mode will be terminated.
- Page 19 11) STANDARD RAM TEST 1 Key operation 120 3 CA/AT 2 The standard RAM is checked. The contents of memory must be the same before and after this test. RAM (100000H~1FFFFFH area) is tested in the following procedure: a) Store data in the test areas b) Write “00H”...
- Page 20 CPU INTERNAL RAM TEST 1 Key operation 122 3 CA/AT 2 Test procedure The test program tests internal RAM (10 Kbytes) of the CPU. The contents of memory must be stored before and after this test. RAM (00400H ~ 02BFFH area) is tested in the following procedure. a) Store data in the test area.
- Page 21 Data communication check A loopback test of 256-byte data between is performed. DATA: $00 - $FF BAUD RATE:9600 BPS OP display 2 3 2 T E S T 5 0 0 3 Check: The completion print. 4 End of testing Completion print RS TEST Error print...
-
Page 22: Chapter 6. Ipl From Ep-Rom
CHAPTER 6. IPL FROM EP-ROM Before installation, unplug the AC power cord from the AC outlet. 1. Open the top cabinet. 2. Set the IPL switch (S1) to ROM COPY position. 3. Install the IPL ROM in the IC socket of the MAIN PWB. pin-1 4. -
Page 23: Chapter 7. Circuit Diagram And Pwb Layout
ER-A520U/ER-A530U CIRCUIT DIAGRAM AND PWB LAYOUT – 22 –... - Page 24 ER-A520U/ER-A530U CIRCUIT DIAGRAM AND PWB LAYOUT – 23 –...
- Page 25 ER-A520U/ER-A530U CIRCUIT DIAGRAM AND PWB LAYOUT – 24 –...
- Page 26 REFA OUT/A REFB OUTA OUT/B OUTB ER-A520U/ER-A530U CIRCUIT DIAGRAM AND PWB LAYOUT REFA OUT/A REFB OUTA OUT/B OUTB – 25 –...
- Page 27 ER-A520U/ER-A530U CIRCUIT DIAGRAM AND PWB LAYOUT – 26 –...
- Page 28 ER-A520U/ER-A530U CIRCUIT DIAGRAM AND PWB LAYOUT – 27 –...
- Page 29 ER-A520U/ER-A530U CIRCUIT DIAGRAM AND PWB LAYOUT – 28 –...
- Page 30 PWB LAYOUT ER-A520U/ER-A530U CIRCUIT DIAGRAM AND PWB LAYOUT – 29 –...
- Page 31 ER-A520U/ER-A530U CIRCUIT DIAGRAM AND PWB LAYOUT – 30 –...
- Page 32 ER-A520U/ER-A530U CIRCUIT DIAGRAM AND PWB LAYOUT – 31 –...
- Page 33 COPYRIGHT 2004 BY SHARP CORPORATION All rights reserved. Printed in Japan. No part of this publication may be reproduced, stored in a retrieval system, or transmitted. In any form or by any means, electronic, mechanical, photocopying, recording, or otherwise, without prior written permission of the publisher.