Table of Contents
Advertisement
Advertisement
Table of Contents

Related Manuals for Verizon One Talk T42S


Summary of Contents for Verizon One Talk T42S
- Page 1 One Talk T42S IP User guide desk phone user guide vzw.com/support/one-talk/...
-
Page 2: Table Of Contents
User guide Contents Welcome ..........................................4 Initial setup ........................................4 Connecting the phone to power and Ethernet ..........................4 Viewing E911 location information ..............................4 Configuring Wi-Fi via phone user interface..........................5 Getting to know your desk phone ...............................6 Hardware components ..................................6 Navigating the display ..................................7 Indicators and notifications ................................ - Page 3 User guide Conference calling ..................................... 14 Do Not Disturb ...................................... 14 Transferring calls ....................................14 Consultative Transfer ..................................14 Direct Transfer ...................................... 14 Direct Transfer to Voice Mail ................................. 14 Call History ........................................15 View Call History....................................15 Delete an individual call log................................15 Delete all or a subset of all call logs.
-
Page 4: Welcome
Viewing E911 location information Enhanced 911 (E911) is a location technology that enables The Verizon T42S IP desk phone is a Voice over IP (VoIP) emergency responders to know the geographical location of a business phone with nine programmable line keys. The desk caller who dials 911. -
Page 5: Configuring Wi-Fi Via Phone User Interface
User guide Configuring Wi-Fi via phone user interface To access Basic settings: 1. Press the Menu soft key while the phone is idle 2. Use the keys to navigate to Settings and press Enter to select 3. Select the Basic setting and press the Enter soft key 4. -
Page 6: Getting To Know Your Desk Phone
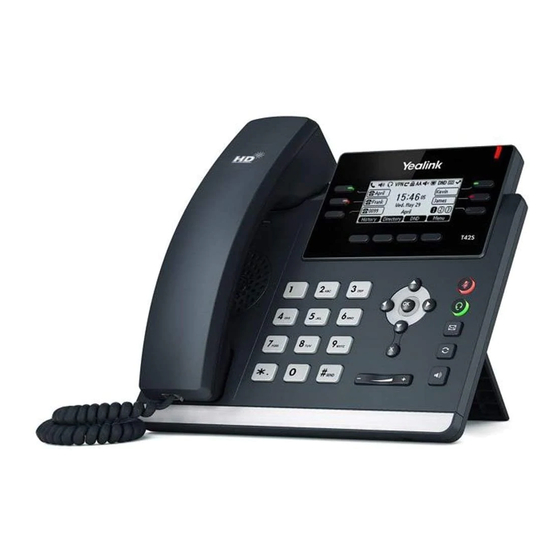
User guide Getting to know your desk phone Hardware components Item Description Item Description Speakerphone key Toggles unit into hands-free speakerphone mode Displays info about calls, messages, soft keys, time, date and other relevant data, such as: • Caller ID Adjusts the volume of the handset, headset, speaker Volume key •... -
Page 7: Navigating The Display
User guide Customizing your desk phone Navigating the display About Basic settings Setup and preference options for the following can be found in the Basic settings menu: • Language preferences • Time and date • Display settings • Ringtone and keypad sound settings To access Basic settings: Indicators and notifications 1. -
Page 8: Time And Date
User guide Time and date Time and date are displayed in the middle of the status bar. You can also set your preferred formats for displaying time and date in the Time & Date settings screen. The phone is defaulted to SNTP so as to synchronize the time zone with the provided 911 address. -
Page 9: Line Keys
User guide Line keys You will get a prompt to enter the extension number if left blank. Your T42S comes with nine configurable line keys. You can use them to create one-button speed dials for frequently dialed numbers. To view all lines, press the 2 3 pages key on the idle screen to toggle to additional line key pages. -
Page 10: Voice Mail Setup
User guide To use a dedicated Intercom line key when extension 2. Press to switch between All, Placed, Received, is defined: Missed and Forwarded call lists 1. From the Home screen, press the soft key next to the 3. Press to select the desired entry Intercom label 4. -
Page 11: Hold A Call
User guide Hold a call. To blacklist a contact: From your directory: Press the Hold soft key during a live call. 1. Press the Directory soft key while the phone is idle Resume a call. 2. Locate the contact you wish to blacklist by selecting If there is only one call on hold, press the Resume soft key. -
Page 12: Bridge Line
My Business 1. Press the Menu soft key while the phone is idle Verizon One Talk Admin Portal. 2. Press the Directory soft key, then press Blacklist Monitoring and answering a bridged line: 3. -
Page 13: Remote Group Pickup
User guide Remote Group Pickup 2. Scroll and select Call Forwarding One Talk helps ensure that calls are answered by associating 3. Scroll to find and select your forwarding preference lines with groups such as company departments. If your (Always Forward, Busy Forward or No Answer Forward) administrator has assigned your line to a specific group, and click Remote Group Pickup enables you to remotely pick up a group... -
Page 14: Caller Line Id Block
User guide To retrieve a call: • Press the Retrieve soft key • The user will receive audio and visual notification of the parked call • The call can be retrieved by dialing **88 + extension Transferring calls You may transfer an active call to any other phone number (it does not have to be a One Talk number). -
Page 15: Call History
User guide Call History Call History maintains a list of all calls that were missed, placed, received and forwarded. You can view your Call History, place a call, add a contact or delete entries from the Call History list. Call History can be accessed from the idle screen or main menu. - Page 16 User guide To search for a contact: To delete a contact: 1. Press the Directory soft key 1. Press the Directory soft key when the phone is idle, and then press All Contacts 2. Select All Contacts 2. Highlight the contact you wish to delete 3.
-
Page 17: Groups
User guide To blacklist a contact from your directory: See “Advanced Calling Features > Block a call > Blacklist a contact from your directory.” Groups Groups are a great way to organize large lists of contacts, such as by function or department. Groups help you more quickly find the individual(s) you need to reach. - Page 18 User guide To move a contact to a different group: 1. Press the Directory soft key, then press All Contacts or the group to which the contact belongs 2. Scroll to highlight the contact you wish to move, then press Options 3.
-
Page 19: Voice Mail
User guide Voice Mail To retrieve Voice Mail messages: Press the message button on the desk phone console. Rebooting or resetting phone These are advanced settings for administrators only and System status, troubleshooting and other settings require an admin password. The default password is “admin.” To check phone status: To navigate to the Advanced Settings page: 1. - Page 20 User guide To reboot the phone: To reset the phone to factory settings: 1. From Advanced Settings, scroll to Reset & Reboot and 1. From Advanced Settings, scroll to Reset & Reboot press to select and press 2. Press the OK soft key to confirm 2.
-
Page 21: Features
Hearing-aid compatible is not fully HAC compatible. If customers require • HD Voice (HAC) handsets HAC-compliant handsets, they can be provided by Verizon. Applications and software An indicator light on the phone indicates that new Visual Message • One Talk compatible messages are waiting. -
Page 22: For Vision-Impaired And Blind Users
Many feature keys are illuminated when activated, Illuminated feature keys providing alerts when a feature is enabled. T42SSHS T42S Replacement Handset For mobility-impaired users Visit the Verizon Wireless website for a list of compatible headsets from popular manufacturers. Feature Description Dedicated headset jack that enables the Headset can be set up to take all calls. -
Page 23: Important Customer Information
To avoid the potential effects on the environment and human Neither Verizon Wireless nor any of its affiliates shall health as a result of the presence of hazardous substances in be liable for any service outage and/or inability to access... -
Page 24: Declaration Of Conformity
User guide Important safety precautions Please read the following important safety notices and instructions before installing or using the product. Declaration of conformity • A DANGER warning refers to situations that could cause Hereby, Yealink Network Technology CO., LTD. declares that bodily injury this phone is in conformity with the essential requirements •... -
Page 25: T42S Desk Phone Navigation Guide (Soft Key Menu A)
User guide T42S desk phone navigation guide (soft key menu A) This navigation guide shows the hierarchy of screens for the Soft Key menu. You can refer to this diagram for a visual representation of the flow of the soft key screens and as a reference guide when you need to locate specific menu items. -
Page 26: T42S Desk Phone Navigation Guide (Soft Key Menu B)
User guide T42S desk phone navigation guide (soft key menu B) This navigation guide shows the hierarchy of screens for the Soft Key menu. You can refer to this diagram for a visual representation of the flow of the soft key screens and as a reference guide when you need to locate specific menu items. -
Page 27: T42S Desk Phone Navigation Guide (Soft Key Menu)
Call Forwarding Busy to Voice Mail ON Call Forwarding Busy to Voice Mail OFF Call Forwarding No Answer to Voice Mail ON Call Forwarding No Answer to Voice Mail OFF Back Network details & coverage maps at vzw.com. © 2018 Verizon. UG2801218...