Advertisement
Table of Contents
- 1 Table of Contents
- 2 Introduction
- 3 Compatability
- 4 M1 Features
- 5 Product Service And Support
- 6 Installation Instructions
- 7 Controls And Connections
- 8 Basic Operation
- 9 Buttons, Status Indicator Led & Buzzer
- 10 Downloading M1 App
- 11 Escort M1 App Settings
- 12 Software Update 1
- 13 Connection To A Computer
- 14 Troubleshooting
- Download this manual
Advertisement
Table of Contents

Related Manuals for Escort M1


Summary of Contents for Escort M1
- Page 1 P a g e...
-
Page 2: Table Of Contents
TABLE OF CONTENTS Introduction ............................ 3 Compatability ............................ 3 M1 Features ............................ 3 Product Service and Support ........................ 6 Installation Instructions .......................... 7 Controls and Connections .......................... 9 Basic Operation ............................ 1 0 Buttons, Status Indicator LED & Buzzer .................... 1 1 Downloading M1 App .......................... 1 2 Connecting to Wi-Fi .......................... 1 2 Escort M1 App Settings .......................... 1 3... -
Page 3: Introduction
INTRODUCTION Congratulations! You’ve made a smart choice by purchasing Escort M1 dash cam. The Escort M1 provides peace of mind by continuously recording the road in crystal clear, 1080P HD video. Working side-by-side with your Escort (and Beltronics) radar/laser detector, the M1 provides cutting edge features, phenomenal video quality, and ease of use – a perfect companion to enjoying your ride. Please read this User Manual to acquaint yourself with the various features of the Escort M1. COMPATIBILITY Please refer to the M1 compatibility chart below to make sure it works with your Escort (and Beltronics) radar/laser detector: P a g e... -
Page 4: M1 Features
M1 FEATURES Wi-Fi Connectivity to the Escort M1 App – Review or edit video files recorded on the micro SD memory card and transfer to your smartphone via the Escort M1 App. Please refer to the “Downloading the M1 App” and “Connecting to Wi-Fi” section of this manual for details. 1080P Full HD – The Escort M1 records the road ahead in 1080P HD, featuring excellent image quality, enhanced night vision, and wide dynamic range (WDR). 160° Viewing Angle - Ultra wide-angle view gives you a full view of the road and your periphery while at the same time minimizing edge distortion. Continuous Loop Recording - Footage is stored in 1, 2, or 3-minute clips. When the memory card fills up, the camera automatically deletes the oldest clips to make room for new ones. Emergency Recording - Automatic or Manual - If you don’t want a clip to be overwritten, simply press the Power/Emergency Recording button and the clip will be protected. Also, clips are automatically protected if an impact is detected. G-Sensor - 3-axis accelerometer senses sudden accelerations, stops, and collisions and automatically protects footage surrounding the incident. Wide Dynamic Range (WDR) - Optimized to automatically maximize video clarity in daylight or night-time conditions. Space-saving, Simple Installation - Mount the M1 dash cam on your Escort (or Beltronics) radar/laser detector and automatically start recording without the need for complex configuration. Please refer to the Installation Guide section of this manual for details. Ready to Use - Includes a 16GB micro SD memory card and power connector to your Escort (or Beltronics) radar/laser detector. P a g e... - Page 5 Built-in Microphone - Records audio along with your video. The microphone can easily be toggled off via the M1 App, if you prefer not to record audio. Auto Record and Auto Power Off - As soon as power is applied the M1 turns on and starts recording. When power is removed, the M1 will safely stop recording and shut down. P a g e...
-
Page 6: Product Service And Support
PRODUCT SERVICE AND SUPPORT To obtain service: 1. Contact ESCORT (1-800-543-1608) to obtain a Return Authorization Number. 2. Properly pack your product and include: your name, complete return address, written description of the problem with your product, daytime telephone number, and a copy of the original proof of purchase or receipt. 3. Label the outside of the package clearly with your Return Authorization Number. 4. Ship the Product prepaid (insured, for your protection) to: ESCORT, Inc., 5440 West Chester Rd., West Chester, OH 45069. Register your product at: www.escortradar.com/productregistration Full manual available at: www.escortradar.com P a g e... -
Page 7: Installation Instructions
INSTALLATION INSTRUCTIONS What’s Included with the Escort M1 A. Star Washers x 4 B. Camera Mount Thumb Screw x 1 C. Camera Mount Arm x 1 D. 45mm Carriage Bolt for Sticky Cup Mount x1 E. Escort M1 x 1 Note: Your M1 is pre-mounted on the (C) Camera Mount Arm, using the (A) Star Washers (x 2), and (B) Camera Mount Thumb Screw. What to reuse from your Detector Sticky Cup Mount F. Sticky Cup Mount Thumb Screw x 1 G. Sticky Cup Mount x 1 Note: The 45mm Carriage Bolt for the Sticky Cup Mount will replace the existing carriage bolt on your detector Sticky Cup Mount. P a g e... - Page 8 Installation of the M1 to your Detector’s Sticky Cup Mount 1) Remove (F) the Sticky Cup Mount Thumb Screw and Flat Washer that came with your detector. 2) Replace the carriage bolt from your detectorSticky Cup Mount with the longer ○ 45mm Carriage Bolt. 3) Sandwich the (C) Camera Mount Arm with the 2 (A) Star Washers as shown in the image above. 4) Mount the Camera Mount Arm and washers onto the (D) 45mm Carriage Bolt and tighten with ○ Sticky Cup Mount Thumb Screw. Note: Be careful not to lose the flat washer that came with your detector. Also, save the carriage bolt that came with your detector. You will need this if you decide to use the detector alone without the M1 camera in the future. III. Mounting the Sticky Suction Cup in your vehicle and adjusting the detector and M1 angles 1) Remove the backing from the Sticky Cup mount, if not already removed. 2) Make sure the M1 is centered on your windshield and not the detector. This will ensure a symmetrical recording view to capture both edges of the windshield. Remember to mount the detector and the M1 away from windshield wipersand heavily tinted areas that might obstruct the radar antenna, laser and camera lenses. 3) Firmly press the Sticky Cup onto windshield and flip the locking clamp to secure. 4) Slide the detector onto the mounting bracket until it’s fully engaged. If you have the magnet type mount, the magnet inside holds the detector in place. 5) Loosen the ○ Sticky Cup Mount Thumb Screw to adjust the detector mounting angle. For optimum detection and performance, mount the detector level and high enough to provide clear view of the road from front and rear. Once the detector is properly adjusted, tighten the ○ Sticky Cup Mount Thumb Screw to secure the detector. 6) Next, loosen the ○ Camera Mount Thumb Screw and adjust the camera to be level with the detector and retighten the screw.
-
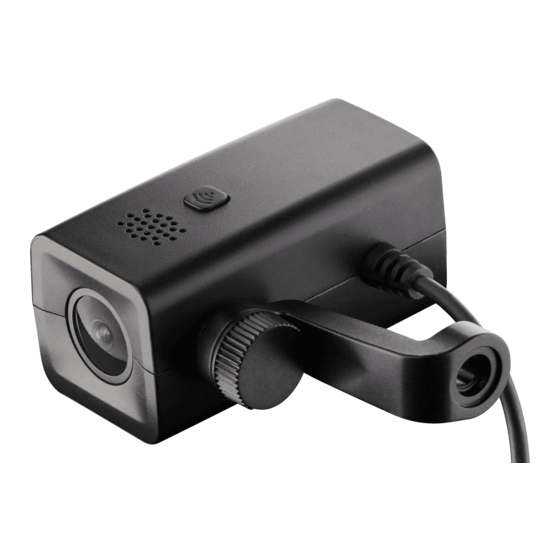
Page 9: Controls And Connections
CONTROLS AND CONNECTIONS P a g e... -
Page 10: Basic Operation
BASIC OPERATION POWERING ON THE DASH CAM When plugged in, the camera will power on and start recording automatically. WARNING! • Do not remove the Micro SD memory card while the M1 is on and recording. This will corrupt the video clip that was recording when the card was removed. • Do not insert the micro SD memory card while the M1 is on. Always insert the Micro SD memory card while the M1 is off. THE MICRO SD MEMORY CARD The device comes with a Micro SD memory card. To remove the card, press firmly on the card to push it further into the slot. There will be a click and the card will pop out on release. Extract the card and replace as necessary by inserting a card into the slot and pressing until it locks in place. This camera is compatible with Micro SD memory cards up to 32GB. IMPORTANT: Please make sure to format the Micro SD memory card within the camera before use. Connect to the M1 App, and select “Format SD Memory Card” under Camera Settings. Class 10 high endurance cards from reputable brands are recommended for constant video recording with a dash cam. CONTINUOUS LOOP RECORDING: Once the memory card is full, the camera will continuously overwrite the oldest video clip recorded. To protect a clip so that it will not be overwritten, press the Power/Emergency Record Button. EMERGENCY RECORDING An Emergency Recording is triggered when the Power/Emergency Record Button at the back of the unit is pressed or when the G-Sensor registers an impact. Emergency Recordings create locked video clips that are not overwritten by Continuous Loop Recording. To ensure that important video clip isn’t lost surrounding an incident, adjacent video clips are locked if the incident happens within 30 seconds of the beginning or end of a file. 10 | P a g e... -
Page 11: Buttons, Status Indicator Led & Buzzer
BUTTONS, STATUS INDICATOR LED, & BUZZER The M1 has a Status Indicator LED and Buzzer to communicate its operational/recording status. Please refer to the details in the table below: 1. CONTROLS & INDICATORS Operation M1 Dash Cam Unit Status Indicator LED Buzzer Using M1 Dash Cam inside your vehicle: Power Button Important: Power Button is When the engine starts and LED stays steady RED for 3 Short, single beep will sound. not used to turn on the M1 power is supplied to the M1 seconds and then changes to Dash Cam. Simply connect the Dash Cam, the camera will blinking GREEN during power cord that came with start recording automatically. recording. your detector to your M1 This will also turn Wi-Fi ON Dash Cam and start your automatically. engine. Single press of the Power Locks the video as an LED blinks GREEN and RED Button while recording Emergency Recording clip. alternately while the file is Short, single beep on press of Emergency recording clip will being saved. Once the the Power Button, followed by not be overwritten by newer Emergency Recording clip is 2-second beep at the end of video clips. -
Page 12: Downloading M1 App
DOWNLOADING THE M1 APP Download the M1 App from the App Store or Google Play and install it on your smartphone. CONNECTING THE M1 TO YOUR SMARTPHONE Once you have installed the M1 App follow the steps below to connect the M1 to your smartphone: 12 | P a g e... -
Page 13: Escort M1 App Settings
ESCORT M1 APP SETTINGS The following settings can be changed via the M1 App. CAMERA SETTINGS Video Resolution: This setting allows you to set one of three available video recording resolutions: 1080P Full HD 1920x1080 30 Frames per Second (default) 720P HD 60fps 1280x720 60 Frames per Second 720P HD 30fps 1280x720 30 Frames per Second Note: Higher resolutions will give you a sharper image but take up more memory on the card. Video Stamp: This setting allows you to turn the video stamp on/off and set one of the 3 available time stamp formats: YYYY/MM/DD (Default) MM/DD/YYYY DD/MM/YYYY Wide Dynamic Range (WDR): This setting allows you to turn WDR on or off. When the WDR is turned on (default), your camera will automatically adjust/balance luminance present in the environment through its camera sensor, to avoid underexposure or overexposure. Loop Recording: This setting allows you to control the duration of each individual video clip on the device. Video clips can be set to durations of 1 minute, 3 minutes, or 5 minutes. In general, shorter clips are preferred because the file size is much more manageable when transferring to a smartphone or a computer for editing. Auto Recording: This recording allows you to turn Auto Recording on or off. When Auto Recording is turned on (default), your dash cam will automatically power up and start recording when power is supplied. If it is turned off, you must press the Power/Emergency Record Button on the dash cam to start recording. Camera Date/Time: This setting allows you to set the dash cam date/time via syncing with your smartphone (default) or manually. 13 | P a g e... - Page 14 G-Sensor Sensitivity: Your dash cam includes a built in G-Sensor which allows it to determine if the car has been in a collision. If the camera detects a collision, it automatically locks the recording at the time of the accident. You can use this setting to set the sensitivity of the G-Sensor from 1-3 or turn it off. Level 1 is the easiest to activate the G- sensor and over time the G-Sensor may lock files due to smaller bumps and the SD card may fill up with protected files. Level 3 is the hardest to activate the G-sensor. Record Audio: This allows you to record audio together with your video clip when turned on (default). You can also choose to turn it off or to record audio only for emergency video clips. When set to record only for emergency video clips normal videos will not contain audio but emergency clips (automatic or G-sensor activated) will have audio included from the start of the event until the end of the emergency clip. Exposure Value: This setting allows you to adjust the exposure value of the dash cam (default is set at 0.0). Positive number exposure values make the picture brighter while negative numbers make the picture darker. Restore Camera Default Settings: Resets the dash cam settings to factory defaults. Note that restoring defaults will NOT erase data on your memory card. Format SD Memory Card: This allows you to format the inserted micro SD Card. NOTE: This action will permanently delete all data on the card. It is recommended to format any new card and periodically format existing cards. Wi-Fi Mode: This allows you to choose between Access Point (AP) Mode (default) or Station Mode. In AP Mode, you can access video clips saved on your dash cam’s memory card as well as change settings via your smartphone (Android or iOS). For Android users only, switching this to Station Mode will allow you to access both the dash cam and the internet simultaneously. APP SETTINGS Auto Connect on Startup: When turned on (default), the smartphone will automatically connect to the dash cam whenever the App is launched. File Sorting: This setting allows you to sort your recorded video clips from Latest to Oldest (default) or Oldest to Latest. 14 | P a g e...
-
Page 15: Connection To A Computer
CONNECTING TO A COMPUTER The M1 can connect to a computer via the micro USB port located on the back of the unit. A micro USB to USB Type A cable is included for your convenience. Alternatively, you can remove the Micro SD Card and plug it directly into a computer (may require an adapter - not included). Most video players available on your computer will allow you to playback, edit, and save video files. For example, Microsoft® Windows Media Player™ and Apple® Quick Time™. DASH CAM SOFTWARE UPDATE INSTRUCTIONS For optimal performance, check www.escortradar.com/M1update periodically for software updates. • Connect the dash cam to your computer using the included USB to micro-USB cable. • Power on the dash cam and select Connect to Computer using the record/select button. • The camera will be listed as ESCORT M1 in Windows Explorer. • Download the update file from www.escortradar.com/M1update and save it somewhere you will remember it. It will be called FW96658A.bin. Note: You do not need to open this file. • Copy/paste or drag the update file (FW96658A.bin) into the root directory of the ESCORT M1 folder. Note: the file name must be FW96658A.bin in order to update the firmware. • Disconnect the dash cam from the computer. The dash cam will turn off. • Reconnect the dash cam with the USB cable. The dash cam will turn on and automatically update the firmware. • You will hear several beeps and see the LED flashing red. Once the beeps and flashing stop, the firmware update is complete. The firmware update file will be deleted automatically. 15 | P a g e... -
Page 16: Troubleshooting
TROUBLESHOOTING If your unit is not operating properly, please follow these troubleshooting steps: • Make sure the power cord to the M1 as well as the pigtail cord from the M1 to the detector are both properly connected. • Make sure the socket of your vehicle’s cigarette lighter is clean and free of corrosion. • Make sure the power cord’s cigarette lighter adapter is firmly seated in your cigarette lighter, and the power LED is on. • Make sure the micro SD memory card is properly inserted into the memory card slot. For a detailed and up-to-date FAQ’s, please visit www.escortradar.com/support/faqs. 16 | P a g e... - Page 17 TRADEMARK ACKNOWDLEGEMENT, WARNINGS, and REGULATORY INFORMATION ©2017 ESCORT Inc. ESCORT®, M1®, and Sticky Cup Mount™ are trademarks of ESCORT, Inc. FCC NOTE: Modifications not expressly approved by the manufacturer could void the user’s FCC granted authority to operate the equipment. This device complies with part 15 of the FCC rules. Operation is subject to the following two conditions: (1) This device may not cause harmful interference, and (2) This device must accept any interference received including interference that may cause undesired operation. Driver is responsible for the safe operation and control of the vehicle. Do not substitute your driving judgment with the information provided by this feature. Escort disclaims liability for injuries, damages, or death arising from use of this feature. DISPOSAL OF ELECTRONICS EQUIPMENT: This product may contain hazardous substances that could impact health and the environment if not disposed of properly. The crossed out wheeled bin symbol indicates that the product should not be disposed of along with household waste. It should be handed over to an applicable collection point for the recycling of electrical equipment. By ensuring that this product is disposed of correctly you will help/prevent potential negative impact on the environment. If you need more information on the collection, reuse and recycling systems, please contact your local civic office or the shop where it was originally purchased. 17 | P a g e...