Samsung YP-T10 User Manual
Hide thumbs
Also See for YP-T10:
- Service manual (57 pages) ,
- Manual (12 pages) ,
- User manual (121 pages)

Related Manuals for Samsung YP-T10


Summary of Contents for Samsung YP-T10
-
Page 1: Mp3 Player
YP-T10 MP3 Player user manual imagine the possibilities Thank you for purchasing this Samsung product. To receive more complete service, please register your product at www.samsung.com/global/register... - Page 2 You can tap on the touch pad to navigate Your new MP3 player has built-in DNSe™ through the menus. (Digital Natural Sound engine), Samsung’s unique sound technology created to deliver WHERE FORM MEETS FUNCTION richer, deeper sound for an unbelievable Sure, it’s sleek and good-looking.
-
Page 3: Safety Information
safety information What the icons and signs in this user manual mean : Means that death or serious personal injury is a risk. WARNING Means that there is a potential risk for personal injury or material damage. CAUTION To reduce the risk of fi re, explosion, electric shock, or personal injury when using your MP3 Player, follow these basic safety precautions: CAUTION... - Page 4 Do not get the product wet or drop it in water. If the product gets wet, do not switch it on because you could get an electric shock. Instead, CAUTION contact a Samsung Customer Service Center. Do not use the earphones while you are driving a bicycle, automobile or motorcycle.
- Page 5 Prevent any foreign particles or dust from entering into the product. Do not place the product near magnetic objects. Be sure to backup important data. Samsung is not responsible for data loss. Use only accessories provided by or approved by Samsung.
-
Page 6: Table Of Contents
Library Update Settings Language settings Date&time settings System settings Resetting the system SAMSUNG MEDIA STUDIO PC requirements Installing Samsung Media Studio Transferring fi les to the player with Samsung Media Studio Using as a Removable Disk Disconnecting from your PC... - Page 7 Playing from the beginning of the current track Playing the previous track Playing the next track Creating a Playlist using Samsung Media Studio Creating a Playlist Adding music fi les to a Playlist you’ve created Transferring a Playlist to your player...
- Page 8 contents VIEWING PICTURES Viewing pictures Using the picture Menu LISTENING TO FM RADIO To use the mute function To search for fm stations Using the FM radio menu USING THE DATACAST Registering a channel Creating a new channel group Transferring a datacast from <Media Studio>...
- Page 9 contents TROUBLESHOOTING Troubleshooting APPENDIX Menu Tree Product Specifi cations License...
-
Page 10: The Basics
WHAT’S INCLUDED Your new mp3 player comes with these accessories. If you’re missing any of these items, contact Samsung Customer Service Center. Player Earphones USB Cable Installation CD The accessories in your box may look slightly different than these. -
Page 11: Your Mp3 Player
YOUR MP3 PLAYER Screen display Power & Hold switch Slide and hold in the opposite direction of the arrow for power on/off. Slide in the direction of the arrow to lock the button functions. Reset Hole If a player malfunction occurs, press the reset hole with a pointed object to re-initialize the system. - Page 12 YOUR MP3 PLAYER (Continued) These buttons are ‘Touch’ buttons. Menu button Tap to display the menu screen. Up volume button Tap to increase the volume or move to an upper item/menu. Back button Tap to move to the previous screen. Press and briefl...
- Page 13 YOUR MP3 PLAYER (Continued) Earphone connection jack Neck string hole Earphones USB connection port Labeled “L” for the left earpiece and “R” for the right earpiece. Microphone Also serves as an antenna for FM Radio in the MP3 player. the basics _ 13...
-
Page 14: Screen Displays
SCREEN DISPLAYS Music Bluetooth/Lock Indicator Parent Menu Indicator Battery Status Current track playing / Total Songs number of tracks Indicator Play Speed Indicator Current Time Total Play Time Play/Pause, Search Indicator Music Mode Indicator Play Mode Indicator DNSe Mode Indicator Music Play Screen Play Status Bar Current Play Time... - Page 15 SCREEN DISPLAYS (Continued) Video Video Track 1 Bluetooth/Lock Indicator Video Mode Indicator Battery Status File Name Current Time Play Status Bar Total Play Time Current Play Time Play/Pause, Search Indicator the basics _ 15...
- Page 16 SCREEN DISPLAYS (Continued) Picture Bluetooth/Lock Indicator Battery Status Current fi le /Total number of Pictures fi les Indicator Picture Image1.jpg Current Time Music Play Status Picture Mode Indicator Parent Menu Indicator File Name [Preview Screen] FM Radio Bluetooth/Lock Indicator Battery Status Current Time MANUAL Radio Mode Indicator...
-
Page 17: Using The Touch Button
USING THE TOUCH BUTTON Tap on touch screen with your fi ngertip. To avoid damage to the touch screen, do not use any object other than your fi ngers to operate it. NOTE Do not tap on the touch screen if your fi ngers are not clean. Do not tap on the touch screen with gloves on. -
Page 18: Charging The Battery
CHARGING THE BATTERY Charge it before using the player for the fi rst time and when you haven’t used it for a long time. The battery for your mp3 player will fully charge in about 3 hours, although total charging time varies depending on your PC environment. Before you start - Remove the earphones before connecting the USB cable. -
Page 19: Caring For The Battery
CARING FOR THE BATTERY Your battery will last longer if you follow these simple guidelines for caring and storing it. • Recharge and store the battery within the temperature range of 40°F~95°F (5°C~35°C ). • Do not overcharge (longer than 12 hours). Excessive charging or discharging may shorten the battery’s life. -
Page 20: Playing Music
PLAYING MUSIC Load music fi les onto your new mp3 player using Samsung Media Studio. Learn more about Media Studio on page 34. 1. Press and briefl y hold [ ] to move to the main menu Music screen. 2. Tap [ ] to select <Music>... -
Page 21: Disabling The Buttons
DISABLING THE BUTTONS The hold function disables all the other buttons on the mp3 player, so that if you accidentally bump one-while working out, for example-your music won’t be interrupted. 1. Slide the switch in the direction of the arrow. Music 2. -
Page 22: Changing The Settings And Preferences
CHANGING THE SETTINGS AND PREFERENCES Your mp3 player comes with settings and preferences that were set up at the factory, but you can change these pre-set values to truly customize your player. Tap [ ] to move to the previous screen. Press and briefl... -
Page 23: Sound Settings
CHANGING THE SETTINGS AND PREFERENCES (Continued) Sound Settings You can set Master EQ, Beep Sound and Volume Limit. 1. Press and briefl y hold [ ] to move to the main menu screen. Settings Menu Style 2. Tap [ ] to select <Settings> and tap [ Sound Display The <Settings>... -
Page 24: Display Settings
CHANGING THE SETTINGS AND PREFERENCES (Continued) Display Settings Change the display off time and brightness of your screen. 1. Press and briefl y hold [ ] to move to the main Settings menu screen. Menu Style 2. Tap [ ] to select <Settings> and tap [ Sound Display The <Settings>... -
Page 25: Library Update Settings
CHANGING THE SETTINGS AND PREFERENCES (Continued) Library Update Settings Be sure to update your library once you transferred the fi le to the removable disk. 1. Press and briefl y hold [ ] to move to the main Settings menu screen. Menu Style 2. -
Page 26: Language Settings
CHANGING THE SETTINGS AND PREFERENCES (Continued) Language Settings The menus on your new mp3 player can be set to appear in any one of multiple languages. You can change your preference language easily. 1. Press and briefl y hold [ ] to move to the main menu screen. - Page 27 CHANGING THE SETTINGS AND PREFERENCES (Continued) Language Setting Options Menu : Set the menu language. Select from <English>, < >, <Français>, <Deutsch>, <Italiano>, < >, < >, < >, <Español>, < >, <Magyar>, <Nederlands>, <Polski>, <Português>, <Svenska>, < >, < eština>, < >, <Türkçe>, <Norsk>, <Dansk>, <Suomi>, <Español (Sudamérica)>, <Português (Brasil)>, <Indonesia>, <Ti ng Vi t>, <Bulgarian>, <Român >, <...
-
Page 28: Date&Time Settings
CHANGING THE SETTINGS AND PREFERENCES (Continued) Date&Time Settings You can set the current time and date. 1. Press and briefl y hold [ ] to move to the main menu screen. Settings Menu Style 2. Tap [ ] to select <Settings> and tap [ Sound Display The <Settings>... -
Page 29: System Settings
CHANGING THE SETTINGS AND PREFERENCES (Continued) System Settings Choose the sleep timer, start mode, auto power off, default setting that’s right for you. 1. Press and briefl y hold [ ] to move to the main menu screen. Settings Menu Style 2. - Page 30 CHANGING THE SETTINGS AND PREFERENCES (Continued) System Setting Options Sleep : Turns off power automatically after the preset time. Select either <Off>, <15min>, <30min>, <60min>, <90min>, or <120min>. Start Mode : You can set the start screen displayed when you turn on the player.
-
Page 31: Resetting The System
RESETTING THE SYSTEM If your mp3 player won’t turn on, won’t play music, or isn’t recognized by your computer when you connect it, you may have to reset the system. Press the Reset hole at the rear of the player with a pointed object such as a safety clip. -
Page 32: Samsung Media Studio
Samsung Media Studio is the easy-to-use software application that helps you organize your fi les on your PC. With your fi les already sorted and organized in Media Studio, you can quickly transfer them to your mp3 without searching your entire hard drive for the right fi le. -
Page 33: Installing Samsung Media Studio
1. Insert the Installation CD provided with the player into the CD-ROM drive. 2. Click <Install Now>. 3. Click <Next>. <Media Studio> installation starts and then creates an icon on your desktop when installation is complete. Next > samsung media studio _ 33... -
Page 34: Transferring Files To The Player With Samsung Media Studio
CDDB is a registered trademark of Gracenote. The Gracenote logo and logotype, the Gracenote CDDB logo and logotype, and the “Powered by Gracenote CDDB” logo are trademarks of Gracenote. Music Recognition Service and MRS are service marks of Gracenote. 34 _ samsung media studio... - Page 35 <Media Studio> Screen. 6. Select the fi le to transfer from the list on the left side. 7. Click the icon. The fi le you selected is transferred to the player. [YP-T10 ] Portable [YP-T10] samsung media studio _ 35...
- Page 36 If you connect the USB cable to the PC in the Low Battery condition, the player will be charged for several minutes before connecting to the PC. Samsung Media Studio has a thorough Help function. If you can’t fi nd the answer to your question about Media Studio, click <MENU>...
-
Page 37: Using As A Removable Disk
Digital Rights Management (DRM) is a technology and service to prevent the illegal use of digital contents and protect the profi t and rights of copyright holders. DRM fi les are charged music fi les applied with the illegal copy protection technology of legally purchased MP3 music. samsung media studio _ 37... -
Page 38: Disconnecting From Your Pc
PC. Please retry after fi le playback is fi nished. When you have disconnected the PC from your player and want to re-connect them, make sure you turn off the player before doing so. 38 _ samsung media studio... -
Page 39: Listening To Music
listening to music Before you start - Connect the earphones, then turn on the player, and check the battery. Tap [ ] to move to the previous screen. Press and briefl y hold [ ] to move to the main menu screen. NOTE LISTENING BY CATEGORY 1. -
Page 40: Pausing
PAUSING 1. Tap [ ] while the music is playing. The music playback will be paused. 2. Tap [ ] again. The music will play from the point where it stopped. SEARCHING WITHIN A TRACK 1. Press and briefl y hold [ ] while the selected track is playing. -
Page 41: Creating A Playlist Using Samsung Media Studio
CREATING A PLAYLIST USING SAMSUNG MEDIA STUDIO With <Media Studio>, you can create your own collection, or playlist, of audio fi les. Before you start - Connect the player to your PC. Media Studio must be installed on your PC. -
Page 42: Adding Music Fi Les To A Playlist You've Created
CREATING A PLAYLIST USING SAMSUNG MEDIA STUDIO (Continued) Adding music fi les to a Playlist you’ve created [YP-T10] 1. Click <My PC> on the top of <Media Studio>. The <My PC> window appears. 2. Click <Playlists> in the right corner of the window. -
Page 43: Transferring A Playlist To Your Player Using Media Studio
CREATING A PLAYLIST USING SAMSUNG MEDIA STUDIO (Continued) Transferring a Playlist to your player using Media Studio [YP-T10] Portable [YP-P2] 1. Click <Playlists> on the top of <Media Studio>. The <Playlists> window appears. 2. Select a playlist in the <Playlists> section. -
Page 44: Creating A Playlist On Your Mp3 Player
CREATING A PLAYLIST ON YOUR MP3 PLAYER If you’ve already downloaded fi les to your mp3 player, you can create a “Favorites” playlist without Media Studio or your PC. 1. Press and briefl y hold [ ] to move to the main menu Add to Playlist screen. -
Page 45: Playing A Playlist
PLAYING A PLAYLIST 1. Press and briefl y hold [ ] to move to the main menu screen. Music Now Playing 2. Tap [ ] to select <Music> and tap [ Artists The music list appears. Albums Songs 3. Tap [ ] to select <Playlists>... -
Page 46: Deleting A Fi Le From The Playlist
DELETING A FILE FROM THE PLAYLIST 1. Press and briefl y hold [ ] to move to the main menu screen. Delete from Playli.. Delete All from Pl... 2. Tap [ ] to select <Music> and tap [ The music list appears. 3. -
Page 47: Using The Music Menu
USING THE MUSIC MENU The Music menu allows you manage all facets of listening - from repeating tracks and albums to choosing the background on the screen as you listen. To set the sound effect You can enjoy clearer sound. 1. - Page 48 You can set <EQ> and <3D&Bass> when you have selected <User>. What is DNSe? Digital Natural Sound Engine (DNSe) is a sound effect function for MP3 NOTE players developed by Samsung. It provides various sound settings to enhance the type of music you’re listening to. 48 _ listening to music...
- Page 49 USING THE MUSIC MENU (Continued) To set the Digital Natural Sound engine (DNSe) (Continued) <EQ> You can adjust individual sound frequencies to your preference. 1 Tap [ ] in the DNSe menu to select <User> and tap [ ]. > 3D &...
-
Page 50: To Set The Play Mode
USING THE MUSIC MENU (Continued) To set the play mode Select playback mode such as repeat settings. 1. Tap [ ] while listening to music. Sound Effect The music menu appears. DNSe 2. Tap [ ] to select <Play Mode> and tap [ Play Mode Music Play Screen The <Play Mode>... -
Page 51: To Select The Music Play Screen
USING THE MUSIC MENU (Continued) To select the music play screen Choose a background image from those provided, or choose an image of your own to be displayed as you listen to music. 1. Tap [ ] while listening to music. Sound Effect The music menu appears. -
Page 52: To Set The Play Speed
USING THE MUSIC MENU (Continued) To set the play speed Speed up or slow down your favorite music by adjusting the play speed. 1. Tap [ ] while listening to music. Sound Effect The music menu appears. DNSe 2. Tap [ ] to select <Play Speed>... - Page 53 USING THE MUSIC MENU (Continued) Before you start - Use only the Bluetooth-certifi ed stereo headset. Check if the stereo headset has been registered. <Connect to Headset> appears when there is a registered headset. For more information, refer to <Using a Bluetooth Stereo Headset>.
-
Page 54: Watching A Video
watching a video Before you start - Connect the earphones, then turn on the player, and check the battery. Transfer a video fi le to the player. See pages 34~36 Tap [ ] to move to the previous screen. Press and briefl y hold [ ] to move to the main menu screen. -
Page 55: To Move To A Specific Frame
TO MOVE TO A SPECIFIC FRAME 1. In horizontal view, press and briefl y hold [ Video Track 1 This enables you to move backwards or forwards in the current video fi le. 2. Release the button when you have moved to the position you want. -
Page 56: Using The Video Menu
<Action>. What is DNSe? Digital Natural Sound Engine (DNSe) is a sound effect function for MP3 NOTE players developed by Samsung. It provides various sound settings to enhance the type of music you’re listening to. 56 _ watching a video... - Page 57 USING THE VIDEO MENU (Continued) Before you start - Use only the Bluetooth-certifi ed stereo headset. Check if to make sure your Bluetooth stereo headset has been registered. <Connect to Headset> appears when there is a registered headset. For more information, refer to <Using a Bluetooth Stereo Headset>. See page 83 To connect a Bluetooth stereo headset You can directly connect to a registered Bluetooth headset during video playback.
-
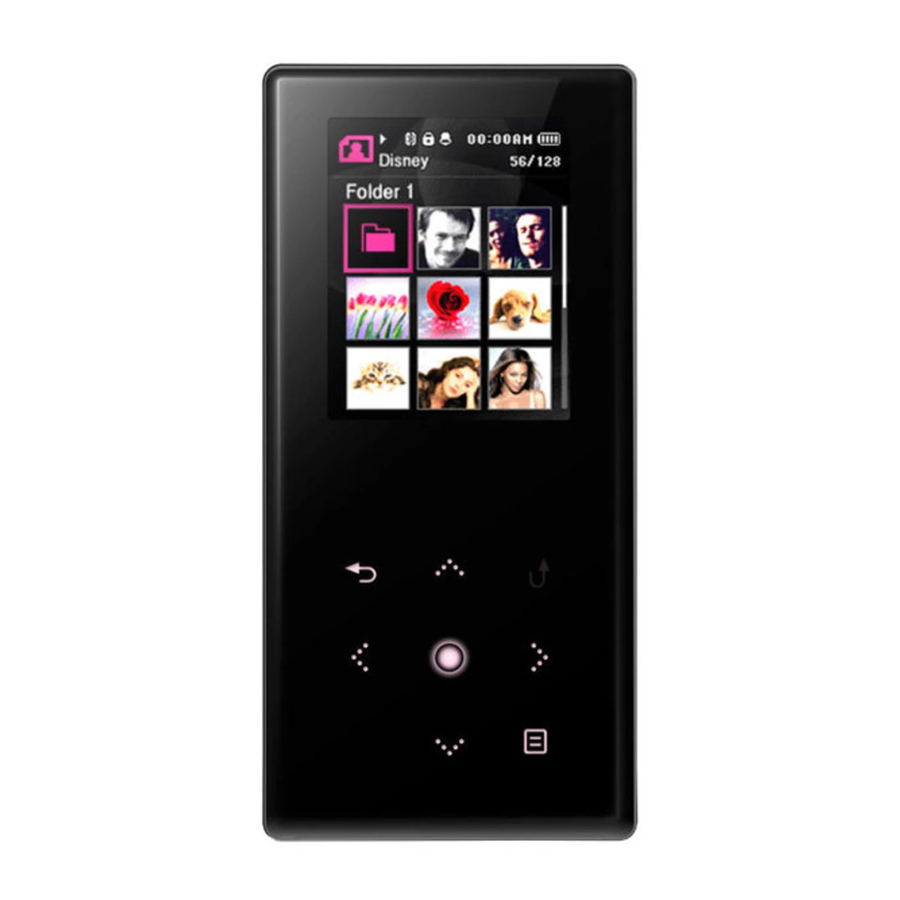
Page 58: Viewing Pictures
viewing pictures Before you start - Connect the earphones, then turn on the player, and check the battery. Tap [ ] to move to the previous screen. Press and briefl y hold [ ] to move to the main menu screen. NOTE 1. -
Page 59: Using The Picture Menu
USING THE PICTURE MENU To exit the menu, tap [ NOTE To listen to music while viewing your picture You can listen to the song that you last played while viewing your picture. 1. Tap [ ] while viewing a picture. The Picture menu appears. -
Page 60: To Set The Slideshow Speed
USING THE PICTURE MENU (Continued) To stop the slideshow How To 1 Music 1. In the slideshow mode, tap [ Stop Slideshow Slideshow Speed The slideshow stops. Zoom Rotate How To 2 Select as My Skin 1. In the slideshow mode, tap [ ]. The Picture menu appears. -
Page 61: To Enlarge A Picture
USING THE PICTURE MENU (Continued) To enlarge a picture You can zoom in a picture. 1. Tap [ ] while viewing a picture. Music The Picture menu appears. Start Slideshow Slideshow Speed 2. Tap [ ] to select <Zoom> and tap [ Zoom The <Zoom>... -
Page 62: To Rotate A Picture
USING THE PICTURE MENU (Continued) To rotate a picture You can rotate a picture for your convenience. 1. Tap [ ] while viewing a picture. The Picture menu appears. Music Start Slideshow 2. Tap [ ] to select <Rotate> and tap [ Slideshow Speed The <Rotate>... -
Page 63: To Use The Mute Function
listening to FM radio Before you start - Connect the earphones, then turn on the player, and check the battery. Tap [ ] to move to the previous screen. Press and briefl y hold [ ] to move to the main menu screen. NOTE 1. -
Page 64: To Search For Fm Stations
TO SEARCH FOR FM STATIONS 1. Press and briefl y hold [ ] and then release in Manual mode. MANUAL <Auto Searching..> appears on the display. The search will stop at the frequency nearest from the point the button is released. Auto Seaching... -
Page 65: Using The Fm Radio Menu
USING THE FM RADIO MENU To switch to Preset Mode Select this mode if you want to search through your saved FM presets one preset at a time. 1. Tap [ ] in Manual mode. The FM Radio menu appears. PRESET 2. -
Page 66: To Store Stations In The Preset Memory
USING THE FM RADIO MENU (Continued) To store stations in the Preset memory You can store up to 30 stations in your MP3 player’s memory and return to them with the press of just one number. Have the MP3 player choose only the stations you want using the manual process, or fi... -
Page 67: To Cancel Auto Preset
USING THE FM RADIO MENU (Continued) To store stations in the Preset memory (continued) Automatic - automatically store all the stations the player receives 1. Tap [ ] in FM Radio mode. The FM Radio menu appears. Go to Preset Mode Add to Preset 2. -
Page 68: To Listen To Preset Stations
USING THE FM RADIO MENU (Continued) To listen to preset stations While in Preset mode, tap [ ] to scroll through preset stations. PRESET You can listen to the stored radio frequency. To delete a preset Follow the steps below to delete frequencies while listening to FM Radio. -
Page 69: To Record Fm Radio Broadcasting
USING THE FM RADIO MENU (Continued) To record FM Radio broadcasting You can record FM radio broadcasting at any time while listening to the radio. 1. Tap [ ] to select a frequency to record in FM Radio mode and tap [ ]. Go to Manual Mode Delete from Preset The <FM Radio>... -
Page 70: To Set The Fm Sensitivity
USING THE FM RADIO MENU (Continued) To set the FM sensitivity To receive more or fewer FM radio frequencies, adjust the FM sensitivity. 1. Tap [ ] in the FM Radio Mode. Go to Manual Mode The <FM Radio> menu appears. Delete from Preset 2. -
Page 71: To Set The Fm Region
USING THE FM RADIO MENU (Continued) To set the FM region You can change an FM region setting in preparation for overseas travel. 1. Tap [ ] in FM Radio mode. Go to Manual Mode The FM Radio menu appears. Delete fromPreset 2. -
Page 72: Registering A Channel
using the datacast Using <Media Studio>, you can transfer blog information and fi les registered on RSS to the player for your entertainment. What is RSS? RSS stands for Rich Site Summary or Really Simple Syndication. It is a xml-based data NOTE transmission system used to deliver information on frequently updated web sites such as news and blogs to users in a more convenient and easier way. -
Page 73: Creating A New Channel Group
If the program does not start automatically, double click the <Media Studio> icon on [YP-T10] the desktop. Portable [YP-T10] 2. Click <Datacasts> on the top of <Media Studio>. Datacasts group channel list appears. 3. Click a desired group channel. 4. Click a desired channel. -
Page 74: Viewing Datacasts
VIEWING DATACASTS You can view channel posts added to <Datacasts>. Before you start - Transfer the post of a desired channel to the player using <Media Studio>. See page 73 Tap [ ] to move to the previous screen. Press and briefl y hold [ ] to move to the main menu screen. -
Page 75: Enjoying The Prime Pack
enjoying the prime pack Prime Pack enables you to enjoy various functions such as reading text and a voice recording. READING TEXT Whether it’s a novel, the manuscript of a new story, or your research paper, your mp3 player allows you to read it… all while listening to music! Before you start - Turn on the player and check the battery capacity. -
Page 76: Using The Text Menu
USING THE TEXT MENU To exit the menu, tap [ NOTE To listen to music while viewing your text You can listen to the music that you last played while viewing your text. 1. Tap [ ] while viewing a text. Music The Text menu appears. - Page 77 USING THE TEXT MENU (Continued) To exit the menu, tap [ NOTE To set a bookmark Set a bookmark to return to that point in the text at any time. 1. Tap [ ] while viewing a text. The Text menu appears. Music Go to 1st Page 2.
-
Page 78: To Change The Font Size
USING THE TEXT MENU (Continued) To set the text viewer color Choose what color you’d like the text to appear. 1. Tap [ ] while viewing a text. The Text menu appears. Music Go to 1st Page 2. Tap [ ] to select <Text Viewer Color>... - Page 79 USING THE TEXT MENU (Continued) To set a text language You can select a language for text to view. Music 1. Tap [ ] while viewing a text. Go to 1st Page The Text menu appears. Add Bookmark Go to Bookmark 2.
-
Page 80: Voice Recording
VOICE RECORDING You can make a voice recording. To make a voice recording 1. Press and briefl y hold [ ] to move to the main Prime Pack menu screen. Text 2. Tap [ ] to select <Prime Pack> and tap [ Voice REC The <Prime Pack>... -
Page 81: To Stop Voice Recording
VOICE RECORDING (Continued) To stop voice recording 1. Tap [ ] during the recording. A message appears asking you if you want to listen to the fi le you just recorded. 2. Tap [ ] to select <Yes> or <No> and tap [ Selecting <Yes>... -
Page 82: What Is Bluetooth
using Bluetooth Tap [ ] to move to the previous screen. Press and briefl y hold [ ] to move to the main menu screen. NOTE WHAT IS BLUETOOTH? Bluetooth is an industry specifi cation that describes how Bluetooth-compliant stereo headsets, mobile phones, and external devices can easily interconnect with each other using a short wireless connection. -
Page 83: Using A Bluetooth Stereo Headset
USING A BLUETOOTH STEREO HEADSET You can use a Bluetooth stereo headset to let you enjoy music with high quality stereo sound, all without wires! Before you start - Ensure that the Bluetooth device to connect is ready for pairing. (refer to the device’s user manual) To register the Bluetooth Stereo Headset (you only need to register it once) - Page 84 <Bluetooth> <Bluetooth Mode> <Off>. Bluetooth-compliant Headsets Company Model Company Model i.TECH Blueband SAMSUNG SBH100 Plantronics PULSAR 590A Jabra BT620s MOTOROLA HT820 Use only a Bluetooth-certifi ed stereo headset. Mono hands-free headsets are not supported. When not in use, set the <Bluetooth Mode> to <Off>. If you stay in <On>...
-
Page 85: To Connect The Registered Bluetooth Stereo Headset
USING A BLUETOOTH STEREO HEADSET (Continued) To connect the registered Bluetooth stereo headset 1. Tap [ ] in the Bluetooth screen to select <Stereo Headset> and tap [ Bluetooth Stereo Headset 2. Tap [ ] to select a stereo headset to connect Bluetooth Mode Bluetooth Settings and tap [... -
Page 86: Using The Bluetooth Menu
USING THE BLUETOOTH MENU To disconnect the Bluetooth device 1. Tap [ ] in the Bluetooth screen. Disconnect 2. Tap [ ] to select <Disconnect> and tap [ Connected Device The Disconnect confi rmation window appears. 3. Tap [ ] to select <Yes> and tap [ The currently connected device will be disconnected. -
Page 87: Bluetooth Settings
BLUETOOTH SETTINGS Before you start - Set <Bluetooth Mode> to <On>. 1. Press and briefl y hold [ ] to move to the main menu Bluetooth screen. Stereo Headset 2. Tap [ ] to select <Bluetooth> and tap [ Bluetooth Mode Bluetooth Settings 3. -
Page 88: To Delete A Bluetooth Device
BLUETOOTH SETTINGS (Continued) To delete a Bluetooth device 1. Tap [ ] to select <Delete Device> and tap [ Bluetooth Settings You will see the list of the registered devices. Search Timeout Delete Device 2. Tap [ ] to select a device to delete and tap [ My Device Info. -
Page 89: Troubleshooting
If you have a problem with your new mp3 player, check for a solution in this list. If the problem persists, contact Samsung Customer Service Center near you. PROBLEM SOLUTION • Power will not turn on if the battery is completely drained. - Page 90 PROBLEM SOLUTION • Check the battery status. • The power is automatically turned off when the battery is completely drained. Recharge the battery. Power is turning off. • If <Auto Power Off> is selected from <Settings> <System>, the Power will be turned off when the player is in Pause mode.
- Page 91 fi les/data but also to the product. You missing. have to be extra cautious as Samsung is not responsible for data loss. • Check if the fi le is in Variable Bit Rate (VBR) Abnormal play time format.
-
Page 92: Appendix
appendix MENU TREE Here’s a quick look at how the menus and functions are organized on your new mp3 player. Menu Select Screen Prime File Music Videos Pictures Datacasts Bluetooth Settings Radio Pack Browser Stereo Text Menu Style Headset Bluetooth Voice REC Sound Mode... -
Page 93: Product Specifications
PRODUCT SPECIFICATIONS YP-T10 Model Name DC 5.0V / 500mA Rating 550 mAh / DC 3.7V Built-in Battery Power AUDIO : MPEG1/2/2.5 Layer3 (8kbps~320kbps, 22kHz~48kHz) WMA(8kbps~320kbps, 8kHz~48kHz), Ogg(Q0~Q10) VIDEO : SVI (Video : MPEG4, Audio : MP3(44.1kHz, 128Kbps), WMV(Video : WMV9 Simple Profi le,... - Page 94 FM Frequency 87.5~108.0MHz FM T.H.D RADIO FM Signal to FM Useable 50dB 30dB Noise Ratio Sensitiivity Wireless System Emission Type RF Power 1.8mW Transmit Frequency 2402MHz ~ 2480MHz Receive Frequency 2402MHz ~ 2480MHz No. of channels Temperature -10 °C~ +50°C(14 ~ 122°F) Modulation System GFSK Communication Mode...
- Page 95 LICENSE The product player accompanying this user manual is licensed under certain intellectual property rights of certain third parties. This license is limited to private non-commercial use by end-user consumers for licensed contents. No rights are granted for commercial use. The license does not cover any product player other than this product player and the license does not extend to any unlicensed product player or process conforming to ISO/IEC 11172-3 or ISO/IEC 13818-3 used or sold in combination...
-
Page 96: Contact Samsung World Wide
CONTACT SAMSUNG WORLD WIDE If you have any questions or comments relating to Samsung products, please contact the SAMSUNG customer care center. Country Customer Care Center Web Site CANADA 1-800-SAMSUNG(726-7864) www.samsung.com/ca MEXICO 01-800-SAMSUNG(726-7864) www.samsung.com/mx U.S.A 1-800-SAMSUNG(726-7864) www.samsung.com/us ARGENTINE 0800-333-3733 www.samsung.com/ar... - Page 97 0120-327-527 www.samsung.com/jp MALAYSIA 1800-88-9999 www.samsung.com/my PHILIPPINES 1800-10-SAMSUNG(726-7864) www.samsung.com/ph SINGAPORE 1800-SAMSUNG(726-7864) www.samsung.com/sg THAILAND 1800-29-3232 , 02-689-3232 www.samsung.com/th TAIWAN 0800-329-999 www.samsung.com/tw VIETNAM 1 800 588 889 www.samsung.com/vn Turkey 444 77 11 www.samsung.com.tr SOUTH AFRICA 0860-SAMSUNG(726-7864 ) www.samsung.com/za U.A.E 800-SAMSUNG (726-7864), 8000-4726 www.samsung.com/mea...
- Page 98 REV.0.0...