Table of Contents
Advertisement
Quick Links
Dukane DV P506
Digital V isualizer
Quick Start Guide
Information in this Guide may change due to product improvements. To obtain the latest manuals,
www.dukcorp.com/av
literature and software please visit the Dukane web site at
and
look at the specific model SUPPORT or DOWNLOADS section.
6-22-09
Dukane AV
1
Advertisement
Table of Contents

Related Manuals for Dukane DVP506

Summary of Contents for Dukane DVP506
- Page 1 Quick Start Guide Information in this Guide may change due to product improvements. To obtain the latest manuals, www.dukcorp.com/av literature and software please visit the Dukane web site at look at the specific model SUPPORT or DOWNLOADS section. 6-22-09...
-
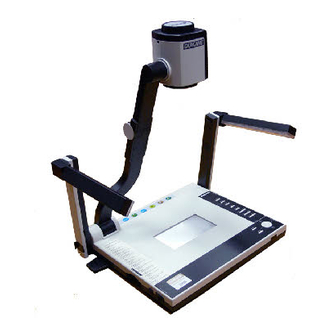
Page 2: Product Overview
2. Product Overview 1. Camera Head 2. Camera arm 3. Lamp 4. Backlight 5. Remote controller slot 6. CF card slot 7. Lamp lock 8. Control Panel 9. Button Function Guide 10. IR sensor (for controller) 11. In-Out connectors Dukane AV... -
Page 3: Installation Process
2. There is no VGA output once S-Video or C-Video output is turned on. 3. NTSC is used in the Taiwan, Panama, Philippine, Canada, Chile, Japan, Korea, Mexico. USA, . PAL is used in other countries than the NTSC listed above 3.1.4 Connecting “VGA in” to a Computer Notebook Dukane AV... - Page 4 3.1.5 Connecting USB to a Computer Connect to USB port then install the Dukane web site support “queue” program. Please refer to “queue” installation Instruction for more information. The “queue” will have a driver and the “queue” software program. Notebook Notice;...
-
Page 5: Initial Setup
(the 『POWER』 button) for about 1 second to power on the Digital Presenter. The red LED (flashing until the presenter is started) turns to green. Press the 『LAMP』button on the remote control to switch the side lamps or backlight. Note: you can often rotate the camera head for better subject lighting. Dukane AV... - Page 6 The default-input source is set as "Camera", press SOURCE to switch. Remote Keypad Monitor Notebook Projector 4.2 Zoom in/ out Zoom in / out by pressing continuously Remote Keypad 4.3 Auto Focus Auto Focus by pressing once Remote Keypad Dukane AV...
- Page 7 The default shooting area is A4 size, press “A5” to change. Keypad 4.6 Capture & playing the Images: To capture a Live Image, press CAPTURE, to play the captured image, press PLAY. To delete a highlighted image press DELETE. Remote Keypad Dukane AV...
-
Page 8: Osd (On-Screen Display) Menu
For more detailed functions of OSD menu, please refer to the user manual. • Update information will be released on Dukane’s web site. Please visit the web site at • www.dukcorp.com/av and look at the “support” tab for a specific product to obtain the latest updates and software.