Samsung SGH-I600 User Manual
Hide thumbs
Also See for SGH-I600:
- User manual (188 pages) ,
- Service manual (104 pages) ,
- User manual (194 pages)
Table of Contents
Advertisement
Quick Links
Advertisement
Table of Contents

Related Manuals for Samsung SGH-I600


Summary of Contents for Samsung SGH-I600
- Page 1 Smartphone SGH-i600 User’s Guide...
-
Page 2: Table Of Contents
Getting started HAPTER What’s in the box? ......7 Getting to know your device ..... . 8 Installing the SIM card . -
Page 3: Hapter 1 Getting Started
Call functions HAPTER Turning the phone functions on and off ... . . 54 Using the Dialling screen ..... . . 54 Making a call . - Page 4 Extra programs HAPTER Games ........133 Calculator .
-
Page 5: Important Safety Precautions
Important safety precautions Read these guidelines before using your wireless device. Failure to comply with them may be dangerous or illegal. Drive safely at all times Do not use a hand-held device while driving. Park the vehicle first. Switch off the device when refuelling Do not use the device at a refuelling point (service station) or near fuels or chemicals. -
Page 6: Sensible Use
Keep the device and all its parts, including accessories, out of the reach of small children. Accessories and batteries Use only Samsung-approved batteries and accessories, such as headsets and PC data cables. Use of any unauthorised accessories could damage you and your device and may be dangerous. -
Page 7: What's In The Box
• Bluetooth mono & stereo headset Note: The items supplied with your device and the accessories available at your Samsung dealer may vary, depending on your country or service provider. 1. It contains Microsoft ActiveSync software, Add-on software and programs. -
Page 8: Getting To Know Your Device
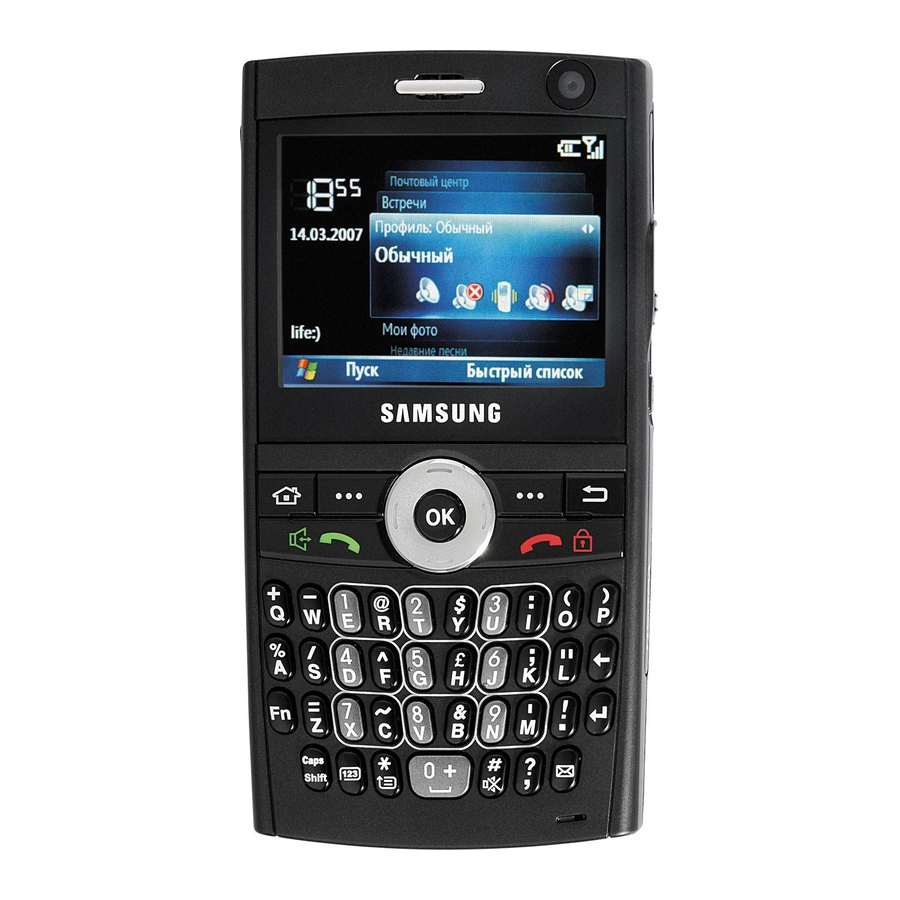
Getting to know your device Front view The following illustrations show the main elements of your phone: Power ON/OFF button (long press)/Quick List key (short press) Volume keys Headset/Power adapter/ USB or data cable jack OK key Left soft key (LSK) Home key (short press)/Task Manager key (long press) -
Page 9: Rear View
Rear view microSD™ card slot Thumbwheel/Quick launcher (long press) Back/Clear key (short press) /Camera key (long press) Keys of your device Description • Press and hold to turn the device on or off. • Press to open the Quick List screen. •... - Page 10 Description • Press to scroll through a list. • Press to move the cursor in a text input field. Press to confirm your selection or input. • Press to open the Dialling screen. • Press to make or answer a call. •...
-
Page 11: Installing The Sim Card
Description Press and hold to activate or deactivate the Vibrate profile from the Home screen. Press to open the Messaging program. • Press to adjust the audio volume. • Press to mute the call ringer as a call comes in. Press and hold to reject a call. •... -
Page 12: Inserting The Sim Card
Inserting the SIM card 1. Remove the battery cover. 2. Insert and slide the SIM card, as shown, ensuring that the gold-coloured contacts of the card are face down. Continue to install the battery. See the next page. Removing the SIM card To remove the SIM card, slide the card out of the holder, as shown. -
Page 13: Installing The Battery
Getting started Installing the battery Your device is powered by a rechargeable Li-Ion battery. Installing the battery 1. Remove the battery cover, if necessary. 2. Insert the battery into the battery compartment, as shown. 3. Reattach the battery cover. -
Page 14: Charging Your Device
Charging your device Your phone is powered by a rechargeable Li-ion battery. Use the travel adapter to charge the battery, and use only Samsung approved batteries and chargers. Use of the wrong adaptor could damage your phone and void your warranty. - Page 15 Note: The following illustration shows the correct and incorrect method for connecting the adapter. Verify the arrow on the adapter is showing and pointing to the device for a correct connection. If it is not, damage to the accessory port will occur therefore voiding the device’s warranty.
-
Page 16: Turning Your Device On Or Off
Low battery warning When the battery is weak and only a few minutes of talk time remain, a warning tone sounds and the “Main Battery very low” message repeats at regular intervals on the display and the battery icon ( turns off to conserve the remaining battery power. -
Page 17: The Basics
The basics This chapter explains basic information about using your device, such as customising your device and using online help. Using the Home screen When you turn on your device, the Home screen, the device’s idle screen, appears. You can also access this screen by pressing Status bar On the top line of the screen, the status bar displays icons... - Page 18 Icon Description Appears when you are roaming out of your home service area and logged onto a different GPRS network. Appears when a 3G (UMTS) connection is available in the network. Appears when Wi-Fi is activated. It also indicates the Wi-Fi connection status: •...
- Page 19 Icon Description Appears when Bluetooth is activated. For details, see page 146. Appears when a Bluetooth headset is connected to the device. Appears when an error occurs during synchronisation. Appears when a text (SMS) or multimedia (MMS) message has been received. Appears when an e-mail has been received.
-
Page 20: Customising The Home Screen
Accessing information from the Home screen From the Home screen, you can: • check the service status and the current time and date • view upcoming appointments • view unread messages • access your contact List • access the most recently accessed programs •... -
Page 21: Start Menu Screen
3. Press the Up or Down Navigation key to scroll to an option, and press the Left or Right Navigation key to change the setting. The following options are available: • Home screen layout: Select the layout to be used for the Home screen. -
Page 22: Closing Programs
Switching between programs Your device is a multi-tasking device. You can run multiple programs at the same time and switch from one program to another. From any program, press to the Home screen. Then access another program from the Start menu or quick launcher. Note: Your phone supports multiple PDP so that you can activate multiple data connections at the same time. -
Page 23: Entering Text
Entering text Your device is equipped with a Full keyboard to support easy and quick text input. You can enter text as you would when using a computer’s keyboard. The keys are labelled with alphabet on the lower half and numbers and symbols on the upper half. -
Page 24: Customising Your Device
The basics Customising your device You can customise the phone settings to suit the way you work. Operator Settings Use this menu to set a service provider according to the USIM/SIM card you are using. When you select a service provider, the phone will automatically turn itself off and then back on. -
Page 25: Time And Date Settings
5. If you changed the Language or Locale option, press the OK soft key. Then you need to turn the device off and then back on to make your changes take effect. Time and date settings The Date and Time setting enables you to set the date, time, and time zone. -
Page 26: Accessibility Settings
• Backlight time out on battery: You can select the length of time the display backlight stays on when you do not use the device. • Backlight time out on AC: You can select the length of time the display backlight stays on while charging. •... -
Page 27: Sound Settings
The basics Sound settings You can customise sound settings for various events on the device. Setting sounds and notifications Your device reminds you in various ways when you have something to do, receive a message, or press the keys on the device. - Page 28 Notes: • You can connect to the Internet and then download ringtones that are in a .wav or .mid format. • To use an .mp3 or .wma file as your call ringtone, it must be saved in a My Rintones or Sounds folder. Changing the sound profile Using Profiles, you can adjust and customise the device tones for different events or environments and then apply...
-
Page 29: Owner Information
3. Change the settings in each field. Available options may differ depending on the selected profile. 4. When you have finished, press the Done soft key. Note: To change all profile settings to their factory default, press the Menu soft key from the profile list and select Reset to default. -
Page 30: Security Settings
Security settings With options in Security, you can protect your device and SIM card from unauthorised use. Locking the device You can protect your device using the Device Lock feature. Once the feature is enabled, your device is automatically locked after the specified period of inactivity. Note: Even if the device is locked, you will be able to receive calls. -
Page 31: Activating The Sim Pin
The basics 7. Press the Done soft key. 8. Press the Yes soft key. Note: Press and select Lock from the Quick List to manually lock the device. To unlock your device: 1. On the Home screen, press the Unlock soft key. 2. -
Page 32: Changing Pin2
Locking the SIM card When SIM Lock is enabled, your device works only with the current SIM card. To use another SIM card, you must enter the SIM lock password. 1. On the Home screen, press the Start soft key. 2. -
Page 33: Changing The Call Barring Password
Changing the call barring password You can change the default call barring password supplied by your service provider. 1. On the Home screen, press the Start soft key. 2. Select Settings → More... → Security → Change Barring Password. 3. Enter the old password, then a new password, and re-enter the new one for confirmation. - Page 34 3. Select the program you want. 4. Press the Done soft key. Menu shortcut settings If you have set the Start menu style to List, then number keys can be used as shortcut keys to directly access specific programs that exist in the Start menu. Note: You can also assign phone numbers, e-mail addresses, or web pages in Contacts to the number keys as speed dial entries.
- Page 35 Customer feedback setting You can join the Customer Experience Improvement program by sending some feedback about how you are using Windows Mobile products. This helps identify trends and usage patterns to improve future versions of products. 1. On the Home screen, press the Start soft key. 2.
-
Page 36: Using The Quick Launcher
5. If you select Automatic, set whether you use your data plan to check for updates. 6. Press the Done soft key. Using the quick launcher Your device provides you with the quick launcher, which allows you to set up shortcuts to your favourite programs, website, files, or folders, and quickly access them. - Page 37 Changing the order of the quick launcher window 1. From the quick launcher window, select the Edit icon 2. Scroll to the item you want. 3. Press the Menu soft key and select Move. 4. Press the Up or Down Navigation key to move the selected item to the position you want.
-
Page 38: Searching For Items
Searching for items Your device provides a search program, Smart Search, to allow you to easily search for data or media files in your device and quickly access them. Searching for an item 1. On the Home screen, press the Start soft key and then the More soft key. -
Page 39: Locking The Keys
• Appointment: Select whether to include notes, or set a date for the device to search for appointments. • Task: Select whether to include notes in your search. • SMS: Select the types of message information you want to include in your search, or set a date for the device to search for text messages. -
Page 40: Using An Optional Memory Card
Using an optional memory card Your device has an expansion slot compatible with microSD memory cards, which are primarily used to back up or transfer files and data. Note: Use only compatible memory cards with your device. Using incompatible memory cards, such as Secure Digital (SD) cards, may damage the card, as well as the device, and data stored on the card. -
Page 41: Adding And Removing Programs
Adding and removing programs You can install any program created for your device, as long as the device has enough memory. The most popular place to find software for your device is on the Microsoft web site (http://www.microsoft.com/windowsmobile/ catalog/cataloghome.aspx). Adding programs using ActiveSync You can install programs downloaded from the Internet or included on the supplied software CD-ROM by performing synchronisation between your device and your computer. - Page 42 5. Double-click the *.exe file on the computer. If the file is an installer, the installation wizard will begin. Follow the instructions on the screen. Once the software has been installed, the installer will automatically transfer the software to your device. If the file is not an installer, you will see an error message.
-
Page 43: Managing Certificates
5. Follow the directions on the screen. Once installation is completed, you can view and open the program by accessing the Start menu. Removing programs 1. On the Home screen, press the Start soft key. 2. Select Settings → More... → Remove Programs. 3. -
Page 44: Resetting Your Device
Viewing certificates 1. On the Home screen, press the Start soft key. 2. Select Settings → More... → Security → Certificates → a certificate type. 3. Select the certificate to view more details. Deleting a certificate 1. Scroll to the certificate you want on the list. 2. -
Page 45: Using Online Help
Changing the reset password You can change the reset password to prevent the device from being reset by unauthorised people. 1. On the Home screen, press the Start soft key. 2. Select Settings → More... → Security → More... → Change Reset Password. -
Page 46: Synchronisation
Synchronisation ® Using Microsoft ActiveSync your desktop computer with the data on your device. Synchronisation compares the data on your device with your desktop computer and updates both your device and computer with the latest data. With ActiveSync, you can: •... -
Page 47: Installing Activesync
Installing ActiveSync Before beginning synchronisation, you must install ActiveSync on your desktop computer using the supplied CD-ROM. You can also download the latest version of ActiveSync from the Microsoft web site (http://www.microsoft.com). 1. Insert the CD-ROM into the CD-ROM drive of your desktop computer. -
Page 48: Customising Connection Settings
Customising connection settings To establish a connection between your computer and the device, you must enable the connections you want to use in the ActiveSync program. By default, all connections are enabled. 1. From the ActiveSync window on your computer, select File →... -
Page 49: Connecting Via Bluetooth
The connection is established and the Microsoft ActiveSync window appears. The synchronisation automatically begins. Notes: • When an error occurs with a USB connection, activate the DHCP Client service, or deactivate the firewall or VPN environment. • USB hubs and laptop docking stations have not exhibited consistent stability with Windows Mobile-powered devices and ActiveSync. -
Page 50: Synchronising Information
When you enter the same passcode on your computer, paring is finished. 8. Enter a display name for the computer and press the Next soft key. 9. Check the services you want to use and press the Done soft key. Note: ActiveSync must be checked on the service list. -
Page 51: Customising Synchronisation Settings
Note: To synchronise Bluetooth devices with a compatible computer, the computer must have the Bluetooth stack for Windows XP Service Pack 2. Customising synchronisation settings You can customise various setting options for synchronisation with a computer and a server, and set the synchronisation schedule. -
Page 52: Configuring An Exchange Server Connection
Note: For more information on the conditions that must be met on the computer and how to change synchronisation options, see ActiveSync Help. Setting server synchronisation You can synchronise information automatically as items arrive only if your company runs Microsoft Exchange Server with Exchange ActiveSync. -
Page 53: Changing The Synchronisation Schedule
• Advanced: You can set how to handle a data conflict between your device and computer, and set an event logging type. • Back: You can return to the previous step. 8. When you have finished, press the Finish soft key. Changing the synchronisation schedule You can schedule synchronisation with the Microsoft Exchange Server on two separate times. -
Page 54: Call Functions
Call functions This chapter explains all of the call functions provided by your device. Turning the phone functions on and You can choose to turn off the phone functions and just use the PDA functions at any time and then turn it back on when you want. -
Page 55: Making A Call
Making a call You can make a phone call using the number keypad. As well as normal voice calls, you can make video calls in a 3G (UMTS) network. Note: In some networks, you may be unable to use call functions when HSDPA connections are enabled. -
Page 56: Advanced Calling Features
Advanced calling features You can make a call from Contacts, Speed Dial, and Call History. Making a call from Contacts 1. On the Home screen, press the Contacts soft key. You can also press the Start soft key and select Contacts. 2. -
Page 57: Making A Call From Call History
3. Scroll to the number you want. 4. Press for a voice call, or press the Menu soft key and select Video Call for a video call. Making a call from Call History 1. On the Home screen, press the Start soft key. 2. -
Page 58: Answering Or Ignoring A Call
Making an emergency call Your device provides the emergency number 112. This number can normally be used to make an emergency call in any country, with or without a SIM card inserted, if you are within a mobile phone network’s service area. Enter the emergency number 112 and press Notes: •... -
Page 59: Options During A Call
Options during a call Your device provides a number of control functions that you can use while a call is in progress. Answering a second call If a person is trying to call you when you are talking on the device, a notification window will pop out. - Page 60 • Conference: makes a conference call when you have an active call and a call on hold. You can have a conversation with up to 5 people at the same time. • Private: allows you to have a private conversation with the selected conference call participant.
-
Page 61: Call-Related Features
• Advanced: allows you to send the DTMF tones of numbers or a file to the person with whom you are speaking. • Switch to voice call: turns off the camera and switches the call to a voice call. • Options: allows you to change the options for video calls. - Page 62 Adding a contact to the Speed Dial list 1. On the Home screen, press the Contacts soft key. You can also press the Start soft key and select Contacts. 2. Select a contact from the list. 3. Scroll to a number, e-mail address, or web page address.
-
Page 63: Viewing Details Of Calls
To open Call History: On the Home screen, press the Start soft key and select Call History. A list of all calls appears. If necessary, select the category of the call history to be displayed by pressing the Menu soft key and selecting Filter. -
Page 64: Customising Your Phone Functions
2. Press the Done soft key. To erase the call time records, except for Lifetime calls, press the Menu soft key, select Reset Timers, and press the Yes soft key. Customising your phone functions You can personalise the settings of the phone functions, the services you have, and the network to which you have connected. - Page 65 Phone number: Check your phone number. Voice mail number: When you insert your SIM card into your device, the device automatically detects and sets your voicemail access number by default. If not, you can manually enter the number obtained from your service provider.
- Page 66 • Fixed Dialling: When this option is activated, your device allows outgoing calls only to the limited set of phone numbers. You can call only those numbers that are included in the Fixed Dialling Number list or which begin with the same digit(s) as a phone number on the list. •...
-
Page 67: Voice Calls
Reset Call Cost: allows you to reset the cost counter. Edit Cost Limit: allows you to enter the maximum cost that you authorise for your calls. Calls can be made as long as the preset max cost is not exceeded. Price/Unit: allows you to set the cost of one unit. - Page 68 • Call Barring: This network service allows you to restrict your incoming or outgoing calls. To set up this service, you need to enter the call barring password obtained from your service provider. For incoming call barring, the following options are available: All calls: No calls can be received.
-
Page 69: Video Calls
Video Calls • Outgoing Image: You can set whether the device shows the camera view to the person with whom you are speaking, or select an image to be shown instead of the camera view. • Call Fail Option: Select how to retry a video call when it fails. -
Page 70: Messaging And The Internet
Messaging and the Internet Messaging In Messaging, you can create, send, receive, view, edit, and organise: • Text messages (SMS) • Multimedia message (MMS) • E-mail messages To open Messaging: On the Home screen, press the Start soft key and select Messaging. -
Page 71: Creating And Sending An Mms Message
Creating and sending an SMS message Note: You can select your preferred network type for sending SMS messages and validity period. Press the Start soft key and select Settings → More... → Connections → More... → Send SMS Options. Then select the option you want. - Page 72 3. In the To, Cc, or Bcc field, enter the recipients’ numbers or addresses, separating them with a semicolon. Note: The Cc and Bcc fields are above the To field. You can also retrieve numbers or addresses from the contact list or the messages you have sent by pressing the Menu soft key and selecting Add Recipients.
- Page 73 Viewing SMS or MMS messages When you receive a new SMS or MMS message, the New Message icon ( ) displays on the top line of the screen. You can also view messages you received, sent, composed but not sent by accessing the message folders. To open the message folders: On the SMS/MMS screen, press the Menu soft key and select Folders.
- Page 74 2. Select the message you want to view. If you open a push message from a WAP server, press the Proceed soft key to access the URL specified in the message. 3. Press the Left or Right Navigation key to view other messages.
-
Page 75: Configuring Mms Settings
• Copy to SIM/Copy to Phone: copies the message to the SIM card or the device’s memory. • Send/Receive: sends or receives messages. • MMS Options: allows you to change the options for MMS messages. See page 75. Configuring MMS settings You can change the default MMS settings. - Page 76 Request read report: When this option is activated, your device sends a request for a read reply along with your message to the recipient. • Receiving Options: allows you to change the settings for receiving MMS messages. Home Network: Set how to retrieve new messages from the server while in your home network.
- Page 77 Login ID: Enter the login name. Password: Enter the login password. DNS1/DNS2: Enter the primary or secondary DNS address. • About: shows version and copyright information. Working with e-mail messages You can send and receive e-mail messages in one of these ways: •...
- Page 78 Connecting directly to an e-mail server You can send and receive e-mail messages by connecting to an e-mail server. You’ll need to set up a remote connection to a network or an ISP, and a connection to your e-mail server. When you connect to the e-mail server, new messages are downloaded to the device’s Inbox folder.
- Page 79 Creating an e-mail account You need to create a new account to be used for retrieving and sending e-mail messages. To make a new account: 1. From the Messaging screen, select New Email Account. 2. Enter your display e-mail address and press the Next soft key.
- Page 80 To edit an account: 1. From the Messaging screen, scroll to the account you want. 2. Press the Menu soft key and select Settings. 3. Change the account settings as you would when creating it. Creating and sending an e-mail message 1.
- Page 81 6. When you have finished composing the message, press the Send soft key. 7. Press the Menu soft key and select Send/Receive to connect to the network and send the message. Viewing e-mail messages You can also view messages you received, sent, composed but not sent by accessing the message folders.
- Page 82 To access message options: From any message folder, you can access the following options by pressing the Menu soft key: • New: allows you to create a new message. • Reply: sends a reply to the sender and/or all other recipients, or forwards the message to other people.
-
Page 83: Inserting Signatures Into Messages
Setting downloading options You can specify your downloading preferences when you set up the account or select your synchronisation options. • Change options for Email synchronisation using ActiveSync on your computer. For more information, see “ActiveSync Help.” • Change options for direct e-mail server connections in Inbox on your device. -
Page 84: Internet Explorer
4. To insert a signature in every messages, including when you reply or forward the message, select Include when replying and forwarding. 5. Enter a signature to be inserted and press the Done soft key. Internet Explorer ® Use Microsoft Pocket Internet Explorer to view Web and WAP pages. -
Page 85: Using The Favorites List
Navigating the Internet Explorer From web pages, you can use the following options: scroll through browser items the Navigation keys. select a browser item return to the previous page refresh the connection To change the display options view information on the web page Using the Favorites list You can store your favourite links while using the Internet... - Page 86 3. Select a category under which you want to save the favourite link from the Folder field. You can also create a new category. See “Managing Favorites categories.” 4. Press the Add soft key. Opening a link through the Favorites list 1.
- Page 87 Changing Explorer options You can customise web browsing options, change the connection settings, and clear memory. On the Internet Explorer screen, press the Menu soft key and select Tools → Options. The following options are available: • General: You can select whether or not to play sounds on web pages, view the warnings when you move from a secure web page to a non-secure one, or enable or disable the receiving and sending of cookies.
-
Page 88: Windows Live
Windows Live Windows Live™ is a new set of Internet software and services designed to work together seamlessly to put you in control of the information, personal connections, and interests you care about. Windows Live makes it easier for you to stay in touch with your friends and to find the information you need quickly and more safely. - Page 89 To access Messenger: On the Home screen, press the Start soft key and then the More soft key twice, and select Messenger. Signing In To use the Windows Live Messenger service, you must have a Microsoft Passport account or Hotmail account, or a Microsoft Exchange e-mail account.
- Page 90 6. Select the items to be synchronised with the messenger server and press the Next soft key. 7. When the setup is complete, press the Done soft key. The Messenger screen appears. Working with Messenger Your upgraded Messenger allows you to: •...
- Page 91 • To block a contact from chatting with you, scroll to the contact and press the Menu soft key and select Contact options → Block contact. To cancel the blocking, select Contact options → Unblock contact. • To sign out, press the Menu soft key and select Sign out.
-
Page 92: Rss Reader
Changing Messenger settings On the Messenger screen, press the Menu soft key and select Options to access the following options: • Automatically play voice clips: Set the phone to play video clips automatically when it is arrived. • Notification type: Change the notification type to be used for alerting you to a new instant message. - Page 93 4. Select a headline which interests you. The Internet Explorer launches and you can access the corresponding news website. Searching for news reports You can search for news reports by entering a keyword for the subjects in which you have a interest. 1.
- Page 94 To import a feed: 1. Scroll to the folder to which you want to import a feed. 2. Press the Menu soft key and select OPML → Import. 3. Choose Select OPML file to import a feed from an OPML file, or Enter OPML URL to import a feed from a web site.
-
Page 95: Organiser
Organiser This chapter explains how to use Personal Information Management (PIM) programs to keep track of contacts and appointments and make a list of tasks you need to do. Contacts Contacts maintains a list of your friends and colleagues so that you can easily find the information you are looking for, whether you are at home or on the road. - Page 96 Select the Picture field to add an image for the caller ID image. To remove the added image, press the Menu soft key and select Remove Picture. To assign the contact card to a category, scroll to the Categories field and select a category. 4.
- Page 97 Viewing and editing a contact card When you access Contacts, the contact list displays the names of your contacts alphabetically, along with an abbreviation for the primary contact number or e-mail address, such as the person’s work phone number (w) or mobile phone number (m).
- Page 98 2. On the summary screen: • To edit the contact information, press the Menu soft key and select Edit. • To send an SMS message or MMS message, press the Menu soft key and then select Send Text Message or Send MMS. •...
- Page 99 Adding a number or address to the Speed Dial list You can assign a short cut number to a phone number for speed dialling or to an e-mail or URL address for quick access. 1. On the contact list, select the contact card you want. 2.
-
Page 100: Sending A Contact Card
Copying from the SIM card to Contacts 1. On the contact list, select the contact card stored on the SIM card. 2. Press the Menu soft key and select Save to Contacts. 3. If necessary, change the contact name. 4. Fill in the other fields and press the Done soft key to save the changes. -
Page 101: Calendar
Deleting a contact card 1. On the contact list, select a contact card. 2. Press the Menu soft key and select Delete Contact. 3. Press the Yes soft key to permanently delete the contact card. Calendar Use Calendar to schedule appointments, including meetings and other events. -
Page 102: Editing An Appointment
Viewing and editing an appointment On the Calendar screen, you can view and edit your appointments using the different views: Agenda, Week, or Month. By default, the calendar first appears in the agenda view, which provides the most detailed information about your appointment. -
Page 103: Sending An Appointment
To go to today’s date, press the Menu soft key and select Go to Today. To go to a certain date, press the Menu soft key and select Go to Date. Enter the date and press the Done soft key. 3. - Page 104 3. If you are deleting a repeating or continuous appointment, decide whether to delete all appointments in the series or only the current appointment by pressing the No or Yes soft key. Or, press the Yes soft key to permanently delete the appointment.
-
Page 105: D-Day
D-Day In D-Day, you can calculate how many days are left before or have passed since a specific event. To open D-Day: On the Home screen, press the Start soft key and select Organizer → D-Day. Note: Depending on the language setting, your device may not display some texts. -
Page 106: Tasks
5. Press the Left or Right Navigation key to change the category icon. 6. Press the Done soft key to save changes. Deleting a D-Day counter 1. Scroll to the counter you want. 2. Press the Menu soft key and select Delete. 3. -
Page 107: Deleting A Task
Organiser Completing a task When a task is complete, mark it to indicate that the task is done. To mark, scroll to the completed task and press the Complete soft key. To unmark, press the Activate soft key. Beaming a task note You can send a task note to another device via an active Bluetooth connection. -
Page 108: Notepad
Notepad Using Notepad, you can create memos for important things and manage them. To access Notepad: On the Home screen, press the Start soft key and select Organizer → Notepad. Creating a memo 1. Press the New soft key. 2. Enter the memo text and press the Done soft key. Viewing a memo To view memo details, select the memo you want from the list. -
Page 109: Voice Notes
Organiser Deleting a memo 1. Scroll to the memo you want. 2. Press the Menu soft key and select Delete. 3. Press the Yes soft key to confirm the deletion. Voice Notes In any program where you can write on the screen, you can also quickly capture thoughts, reminders, and phone numbers by recording a message. -
Page 110: Alarms
Setting a voice note as the ringtone 1. On the voice note list, scroll to a voice note. 2. Press the Menu soft key and select Set As Ringtone. 3. Press the OK soft key. Deleting a voice note 1. On the voice note list, scroll to a voice note. 2. -
Page 111: Setting An Alarm
3. Select a melody for the alarm in the Tone field. 4. Select a time interval to resume the alarm in the Snooze field. 5. Press the Done soft key. Setting an alarm 1. On the Alarm screen, select one of Alarm 1 to Alarm 9. 2. -
Page 112: World Clock
World Clock You can set up the world clock with the time zones you want, and then check the current time of the city you need at any time. 1. On the Home screen, press the Start soft key. 2. Select Organizer → World Clock. 3. -
Page 113: Multimedia
Multimedia Camera With the built-in camera of your device, you can take photos or record videos of people or events while on the move. Your device produces JPEG photos and 3GP videos. To open Camera: From the Home screen, press the Start soft key and select Camera, or press and hold Taking photos When you access Camera mode, the main display is... -
Page 114: Setting Camera Options
Setting camera options You can customise the camera settings. Once you change the camera settings, the corresponding icons display at the top of the photo preview screen. On the preview screen, press the Menu soft key. • Camcorder: switches to Camcorder mode. •... -
Page 115: Viewing Photos
Using the keypad shortcuts You can use the keypad to customise your camera settings when you are in the photo preview screen. • : switches to Camcorder mode. • : changes the shooting mode by changing the number of photos or the layout. •... -
Page 116: Setting Camcorder Options
• Press the Left or Right Navigation key to adjust the brightness of the image. • Press the Menu soft key to access the camcorder options. See page 116. • Use the number keypad to adjust the image quickly. See page 117. 3. - Page 117 • Size: allows you to select a video frame size. • Quality: allows you to select an image quality setting. • White Balance: allows you to select a white balance mode to adjust the colour balance of videos. • Timer: selects the length of time for the device to delay before recording a video.
-
Page 118: Playing Video Clips
Playing video clips To view the video clips you have recorded, press the My Video soft key in Camcorder mode. The list of the video clips in the currently selected memory appears. For further details, see page 128. Changing the default camera settings To customise the default camera settings, press the Menu soft key and select Options. -
Page 119: Windows Media Player
• Camcorder: You can customise the settings for Camcorder mode. Default Prefix: allows you to change the default prefix of video names. Sound: allows you to turn on or off the sound effect when recording begins or ends. • Shortcuts: You can check view the functions assigned to the keys in Camera mode or Camcorder mode. - Page 120 About DRM, licences, and protected files Some digital media files, such as songs downloaded from online stores, are encrypted to prevent the files from being unlawfully distributed or shared. Content providers use a technology called Digital Rights Management (DRM), to encrypt the files.
- Page 121 Copying media files using the Windows Media Player program on your computer You can use the desktop Windows Media Player to copy media files. Using the desktop Windows Media Player ensures that licences are copied with protected files. Make sure that you have Windows Media Player 10 or later versions on your desktop computer.
-
Page 122: Using Libraries
Using libraries A library is a file list provided by Windows Media Player to retrieve media files in the device’s memory. To access libraries, press the Menu soft key from the player screen and select Library. The library screen contains categories, such as My Playlists, My Music, and My Videos. - Page 123 Playing music and video files If you have copied media files to your device’s memory or memory card, you can play them from Windows Media Player. Playing media files from a library 1. On the library screen, if necessary, press the Menu soft key, select Library, and select the memory from which you want to retrieve files.
-
Page 124: Setting Up A Play List
• To access the previous file, press the Left Navigation key before playback starts. • To pause or resume playback, press thumbwheel. • To play the files on the play list randomly or repeatedly, press the Menu soft key and select Shuffle/Repeat → an option. -
Page 125: Creating A Play List
Creating a play list 1. On the library screen, select the category you want and scroll to the file you want to play. If the file does not appear on the list, press the Menu soft key and select Update Library. 2. - Page 126 Changing the Window Media Player settings You can customise the appearance and functionality of Windows Media Player. On the player screen, press the Menu soft key and select Options. You can use the following options: • Playback: Select the options for playback. You can select the way time is displayed on the player screen, or whether or not to pause playback when you launch another program, and resume playback after a phone...
-
Page 127: Podcast
Multimedia Podcast In Podcast, you can access and enjoy online audio and video services and create your own play lists. To open Podcast: On the Home screen, press the Start soft key and the More soft key twice, and select Podcast. Subscribing to the Podcast service From the Podcast screen, scroll to Podcasts, press the Menu soft key and select Subscribe to Podcast. -
Page 128: Contents Manager
2. Enter a title for the play list. For a play list wizard, press the Menu soft key and add rules or limit to filter audio or video files. 3. Press the Ok or Done soft key. 4. Add files, if necessary. Changing Podcast settings To change the properties of Podcast, press the Menu soft key and select Options or Properties. -
Page 129: Viewing Pictures As A Slide Show
While viewing a picture, you can use the following options: • To zoom in or out, press the Zoom soft key to switch to Zoom mode, and then press the + or - soft key. • To edit the picture, press the Menu soft key and select Edit image. -
Page 130: Searching For A File
2. Select the thumbnail image of the sound or video clips you want. The file plays in Windows Media. Searching for a file You can quickly search for a file by entering its name. 1. From the file folder list, select a folder. 2. -
Page 131: Copying Or Moving A File
Copying or moving a file 1. From the file folder list, open the folder you want and scroll to the file you want. 2. Press the Menu soft key and select Edit → Copy or Move. 3. Select the folder to which you want to copy or move the file. - Page 132 Customising Contents Manager settings From the file folder list, press the Menu soft key and select Options to access the following options: • View by: allows you to select a view mode of folders. • Slide show: allows you to set up properties of a slide show.
-
Page 133: Extra Programs
Extra programs Games Your device includes fun games, such as Bubble Breaker and Solitaire, in Games. To open Games: On the Home screen, press the Start soft key and then the More soft key, and select Games Bubble Breaker The object of Bubble Breaker is to clear out all the balls. The rule is that you may only clear out adjacent same-coloured balls. -
Page 134: Calculator
Solitaire The object of Solitaire is to use all the cards in the deck to build up the four suit stacks in ascending order, beginning with aces. Playing a game 1. On the Game screen, select Solitaire. 2. Move any aces on the seven stacks to the four card spaces on the left of the screen and then make any other available plays. -
Page 135: Smart Converter
3. Enter the numbers and operations (+, -, /, or x). To use advanced operations, such as percentage (%), square (Xn), and square root (√), press the Menu soft key and select an option. 4. Press to execute the calculation. You can use the calculation result for subsequent calculations by pressing the Menu soft key and selecting Copy result. -
Page 136: Stopwatch
4. Select an original unit and enter the value to be converted in the upper unit field. Press to add a decimal point. Your device only can display up to 6 digits after the decimal point. In the temperature converter, press the temperature to below zero. -
Page 137: Voice Assist
Voice Assist Voice Assist is a speech recognition program that enables you to launch programs or dial contacts by speaking an associated command into the microphone. Note: This menu may not be shown depending on your service provider. To open Voice Assist: On the Home screen, press the Start soft key and then the More soft key twice, and select Voice Assist. -
Page 138: Searching For Contacts
4. Say “Next” until you hear the number you want or scroll to the one you want, and press the Ok soft key. The device dials the currently selected number. Searching for contacts You can retrieve contact information for any name in the device’s memory or the SIM card by saying that name. -
Page 139: Picsel Viewer
Customising the Voice Assist settings You can customise the various settings for using Voice Assist by pressing the Settings soft key on the Voice Assist screen. • Timeout: Adjust the maximum time limit for the device to wait for your commands. •... -
Page 140: Viewing A Document
To open Picsel Viewer: On the Home screen, press the Start soft key and then the More soft key, and select Picsel Viewer. Viewing a document When you open Picsel Viewer, the file directory of the device displays. 1. Select the folder containing the document you want. If you have inserted a memory card, Storage Card appears to allow you to access files on the memory card. -
Page 141: Viewing History
• Panning: To pan to a different part of the document, press the Navigation keys to move to the direction you want in Panning mode. You can also press , respectively. • Zooming: To zoom in or out, press the Menu soft key and select Page →... -
Page 142: File Explorer
To add the current page to the Favourites list: 1. Press the Menu soft key and select Favourites to access the Favourites list. 2. Press the Add/Delete soft key and select Add. 3. Enter the name you want and press the OK soft key. To open a favourite page: Access the Favourites list and select the thumbnail of the page you want. -
Page 143: Accessing Files
Accessing files 1. On the Home screen, press the Start soft key and then the More soft key. 2. Select File Explorer. The list of the folders in the device’s memory displays. 3. Scroll to the folder that you want to view. Press the Up soft key to return to the previous directory level. -
Page 144: Task Manager
Task Manager Your device is a multi-tasking device. It can run more than one program at the same time. However, multi-tasking may cause hang-ups, freezing, memory problems, and additional power consumption. To avoid these problems, end unnecessary programs using Task Manager. To open Task Manager: On the Home screen, press and hold press the Start soft key and then the More soft key, and... -
Page 145: Getting Connected
Getting connected You can use your device to exchange information with other mobile devices as well as your desktop computer, a network, or the Internet. You have the following connection options: • Exchange information between devices with Bluetooth capabilities without a physical connection. •... - Page 146 Activating Bluetooth mode 1. On the Home screen, press the Start soft key. 2. Select Settings → More... → Connections → Bluetooth. 3. Press the Menu soft key and select Turn On Bluetooth or Turn On Visibility. 4. Press the Done soft key. Setting Bluetooth profiles You can change the settings for each Bluetooth profile available on your device.
- Page 147 Searching for and pairing with a Bluetooth device 1. To search for a new device, select Add new device... 2. Wait for the device to search for Bluetooth devices. 3. Select a device to connect to the device. 4. Enter a Bluetooth passcode and press the Next soft key. This passcode is used just once and you do not need to memorise it.
-
Page 148: Receiving Data With Bluetooth
• Set as Hands-free: allows you to connect your headset to your device as a hands-free device. • Set as Wireless Stereo: allows you to connect your headset to your device as a stereo headset. • Turn On Bluetooth/Turn Off Bluetooth: allows you to turn Bluetooth on or off. -
Page 149: Connecting To An Ftp Server
3. Press the Menu soft key and a Bluetooth sending option, depending on the program you accessed. 4. Search for and pair with the device beginning with step 2 on page 146. The device searches for devices within range and displays a list of available devices. -
Page 150: Connecting To A Computer Via Usb
Connecting to a computer via USB You can select how the device functions when connected to a computer via the USB port. 1. On the Home screen, press the Start soft key. 2. Select Settings → More... → Connections → More... → USB. -
Page 151: Connecting To The Internet Or Your Network
1. For a USB connection, plug the PC data cable into the device and the USB port on your computer. 2. On the Home screen, press the Start soft key and then the More soft key. 3. Select Internet Sharing. 4. -
Page 152: Creating A Gprs Connection
Creating a GPRS connection If you subscribe to General Packet Radio Services (GPRS), you can set up a GPRS connection to gain access to your corporate network or the Internet. You can also use your device as a GPRS modem for a desktop computer. - Page 153 Getting connected 5. When you have finished, press the Done soft key.
-
Page 154: Creating A Proxy Connection
Creating a proxy connection You can use a proxy connection to gain access to the Internet over an existing connection to your corporate network. 1. On the Home screen, press the Start soft key. 2. Select Settings → More... → Connections → More... → Proxy. -
Page 155: Creating A Vpn Connection
Creating a VPN connection If your company has set up a virtual private network (VPN), you can create a VPN connection to gain access to your corporate network over an Internet connection. 1. On the Home screen, press the Start soft key. 2. -
Page 156: Adding A Url Exception
Setting up data connections After creating connection profiles, you can assign a profile to each network type. 1. On the Connections screen, press the Menu soft key and select Advanced. 2. Select a connection profile in each network. 3. Press the Done soft key. Adding a URL exception Some URL addresses for web pages on your company intranet may use periods, for example:... -
Page 157: Using High Speed Connections Via Wi-Fi
Changing the data connection options On the Advanced screen, press the Menu soft key and select Options to access the following options: • Redial attempts: Select the redial attempt to connect the Internet or your network after an unsuccessful connection. •... - Page 158 → More... → Wi-Fi. Then press the Menu soft key and select Turn On Wi-Fi. 2. If the Networks Detected message appears, press the Yes soft key to access the available network list. You can also press the Start soft key on the Home screen and select Settings →...
- Page 159 1. On the Home screen, press the Start soft key and select Settings → More... → Connections → More... → Wi-Fi → New... 2. Enter a network name and select a network type. 3. If you are creating an Ad Hoc network, check This is a device to device (ad-hoc) connection and press the Next soft key.
- Page 160 Changing the Wi-Fi settings You can configure the Wi-Fi connection settings. From the Wi-Fi screen, press the Menu soft key and select Wi-Fi Settings to access the following options: • Networks to access: Set the kind of network connection type that is displayed on the Wi-Fi network list.
-
Page 161: Troubleshooting
Troubleshooting General problems Problem “Invalid or missing SIM card. You can still make emergency calls if your service provider supports it” displays “No network coverage,” “Error unable to connect. No network coverage.” or “Message sending failed” displays The bars next to disappear Description &... - Page 162 Problem Description & Solution The display is not In direct sunlight, you may not be clear able to see the display clearly. Moving to a place with different lighting should solve this problem. White lines This may happen if you turn on the appear on the device after a long period of disuse, display...
-
Page 163: Call Problems
Problem Description & Solution I forgot the If you forget or lose the device password, PIN, password, contact your device dealer. reset password, If you forget or lose a PIN or PUK or PUK codes code, or if you have not received such a code, contact your network provider. - Page 164 Problem Description & Solution • Be sure that you have switched on correspondent cannot hear me • Make sure that the device is close speaking The audio quality • Adjust the voice volume by pressing of the call is poor •...
-
Page 165: Power And Charging Problems
The device Remove the battery and then replace malfunctions or it. Turn on the device. If the problem does not function persists, contact a Samsung service representative. The battery’s • Batteries are subject to wear and standby time is shorter than expected •... -
Page 166: Program Problems
Problem Description & Solution The battery level • Remove the battery from the device seems sufficient, but the device does not turn on • Clean the metal contacts both on the The device turns Dust on the contacts may cause off when the unexpected power-off or charging adapter is... - Page 167 Problem Description & Solution I cannot stop a The reminder or alert sound will stop reminder or alert after playing the entire song or sound melody set for the reminder or alert. Internet Explorer “Your Internet Insert proper browser settings. connection is not Contact your service provider for configured...
- Page 168 Problem Description & Solution Camera Images seem Check if the camera lens protection smudged window is clean. Contacts No number is • Check if a number has been stored dialled when you recall a contact • Re-store the number, if necessary. card Bluetooth I cannot end a...
- Page 169 Problem Description & Solution I cannot discover • Be sure that the Bluetooth the remote Bluetooth stereo headset • Be sure that the remote Bluetooth • Be sure that the remote Bluetooth I cannot connect Ensure that the correct passkey was to the remote entered on the device during the Bluetooth stereo...
- Page 170 Problem Description & Solution There are breaks You may observe breaks if there are in the music walls that separate the device and the being played on Bluetooth stereo headset. the remote Bluetooth stereo headset OBEX FTP I entered a The other device may display an error correct message due to short pairing timeout,...
- Page 171 If the above guidelines do not help you to solve the problem, take note of: • the model and serial numbers of your device • your warranty details • a clear description of the problem Then contact your local dealer or Samsung after-sales service.
-
Page 172: Regulatory Notices
Regulatory notices SAR certification information This phone meets European Union (EU) requirements concerning exposure to radio waves. Your mobile phone is a radio transmitter and receiver. It is designed and manufactured so as not to exceed the limits for exposure to radio-frequency (RF) energy, as recommended by the EU Council. -
Page 173: Important Safety Information
SAR tests are conducted using standard operating positions with the phone transmitting at its highest certified power level in all tested frequency bands. Although the SAR is determined at the highest certified power level, the actual SAR level of the phone while operating can be well below the maximum value. - Page 174 • GSM11.10 • ANSI/IEEE C.95.1-1992- specific absorption rate in mobile phone emission condition for body health • FCC part 15 and part 24 • prENV50166-2, 1995 for SAR • SAR: 0.776 W/kg Important safety information Retain and follow all product safety and operating instructions.
- Page 175 Regulatory notices • There are noticeable signs of overheating. • The product does not operate normally when you follow the operating instructions. Avoid hot areas: The product should be placed away from heat sources such as radiators, heat registers, stoves, or other products (including amplifiers) that produce heat.
-
Page 176: Safety Precautions For Power Supply Unit
Safety precautions for power supply unit Use the correct external power source: A product should be operated only from the type of power source indicated on the electrical ratings label. If you are not sure of the type of power source required, consult your authorised service provider or local power company. - Page 177 inadvertently damage these things or choke on small parts. • Keep the phone dry. Precipitation, humidity and liquids contain minerals that corrode electronic circuits. • Do not use the phone with a wet hand. Doing so may cause an electric shock to you or damage to the phone. •...
-
Page 178: Microsoft Software License Terms For Windows Mobile 6 Software
TERMS FOR WINDOWS MOBILE 6 SOFTWARE These license terms are an agreement between you and Samsung Electronics Co., Ltd. Please read them. They apply to the software included on this device. The software also includes any separate media on which you received the software. - Page 179 As described below, using some features also operates as your consent to the transmission of certain standard computer information for Internet- based services. By using the software, including use on this device, you accept these terms. If you do not accept them, do not use the device or software.
- Page 180 b. Included Microsoft Programs and Additional Required Licenses. Except as provided below, these license terms apply to all Microsoft programs included with the software. If the license terms with any of those programs give you other rights that do not expressly conflict with these license terms, you also have those rights.
- Page 181 • reverse engineer, decompile or disassemble the software; • make more copies of the software than specified in this agreement; • publish the software for others to copy; • rent, lease or lend the software; or • use the software for commercial software hosting services.
- Page 182 By using these features, you consent to the transmission of this information. Microsoft does not use the information to identify or contact you. Device Information. The following features use Internet protocols, which send to the appropriate systems device information, such as your Internet protocol address, the type of operating system, browser and name and version of the software you are using, and the language code of the device where you installed the software.
- Page 183 b. Misuse of Internet-based Services. You may not use these services in any way that could harm them or impair anyone else's use of them. You may not use the services to try to gain unauthorized access to any service, data, account or network by any means. 5.
- Page 184 8. NETWORK ACCESS. If you are using a network, such as an employer network, the network administrator may limit features or functionality on your device. 9. PRODUCT SUPPORT. Contact Company for support options. Refer to the support number provided with the device.
- Page 185 14.NOT FAULT TOLERANT. The software is not fault tolerant. Company installed the software on the device and is responsible for how it operates on the device. 15.RESTRICTED USE. The Microsoft software was designed for systems that do not require fail-safe performance.
- Page 186 Regulatory notices It also applies even if Microsoft should have been aware of the possibility of the damages. The above limitation may not apply to you because your country may not allow the exclusion or limitation of incidental, consequential or other damages. 18.EXPORT RESTRICTIONS.
- Page 187 2006.10.27 (place and date of issue) It is not the address of Samsung Service Centre. For the address or the phone number of Samsung Service Centre, see the warranty card or contact the retailer where you purchased your phone. Yong-Sang Park / S. Manager...
- Page 188 * Depending on the software installed or your service provider or country, some of the descriptions in this guide may not match your phone exactly. * Depending on your country, your phone and accessories may appear different from the illustrations in this guide. English.