D-Link DWA-160 User Manual
Hide thumbs
Also See for DWA-160:
- User manual (60 pages) ,
- Quick installation manual (57 pages) ,
- Quick installation manual (33 pages)
Table of Contents
Advertisement
Advertisement
Table of Contents

Related Manuals for D-Link DWA-160


Summary of Contents for D-Link DWA-160
-
Page 2: Table Of Contents
Product Overview ...........3 ™ ™ Configure WPA /WPA2 -Personal ........32 Package Contents .............. 3 Using the D-Link Wireless Connection Manager ..32 System Requirements ............3 ® Using Windows Vista ..........34 Introduction ............... 4 Using the Windows ®... -
Page 3: Product Overview
Section 1 - Product Overview Product Overview Package Contents ™ Dual Band USB Adapter System Requirements Vista ® or XP (Service Pack 2) D-Link DWA-160 User Manual... -
Page 4: Introduction
The D-Link Wireless Manager is included with this product to keep track of all your most frequently accessed networks. -
Page 5: Features
Section 1 - Product Overview Features ™ /WPA2 ™ (Wi-Fi ® Protected Access) providing you a much for wireless authentication. Supports Infrastructure networks via an access point * Using a USB 1.1 port will adversely affect throughput. D-Link DWA-160 User Manual... -
Page 6: Hardware Overview
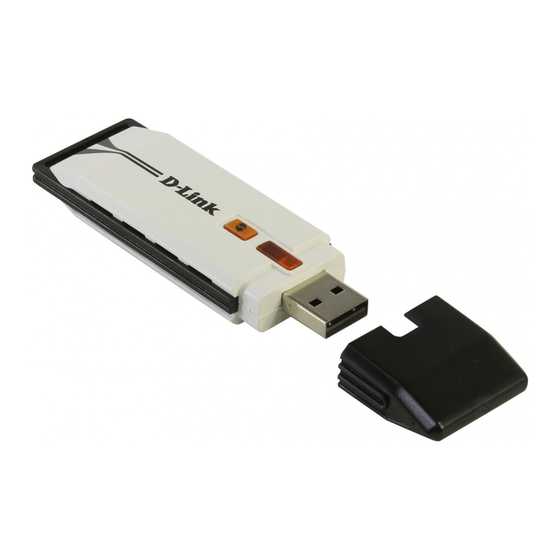
Hardware Overview WPS Button Press the WPS button to automatically connect to a WPS-enabled wireless router or access point and establish connectivity. Refer to pg 19. USB Port Used to connect the DWA-160 to your computer. D-Link DWA-160 User Manual... -
Page 7: Installation
This section will walk you through the installation process. If you have a built-in wireless adapter, please disable it in device manager before installing your D-Link adapter. Also, if you have previously installed another wireless adapter, please make sure any software is uninstalled. -
Page 8: Disable Other Wireless Adapters
Section 2 - Installation Disable Other Wireless Adapters Most newer laptops may include a built-in wireless adapter. To prevent any conflicts with the D-Link wireless adapter, it is recommended to disable the wireless adapter (as well as any unused Ethernet adapters). - Page 9 Click Yes to disable the adapter. The adapter is now disabled. When disabled, a red X will be displayed. Disabling the adapter will not remove the drivers. If you would like to use the adapter, simply right-click it and select Enable. D-Link DWA-160 User Manual...
-
Page 10: Wireless Installation Considerations
Typical ranges vary depending on the types of materials and background 1. Keep the number of walls and ceilings between the D-Link adapter and other network devices to a minimum - each 2. -
Page 11: Adapter Installation
D-Link CD. Turn on the computer and Insert the D-Link DWA-160 Driver CD in the CD-ROM drive. If the CD Autorun function does not automatically start on your computer, go to Start > Run. In the run box type “D:\DWA160. - Page 12 The InstallShield Wizard window will appear. Click Next By default setup will install to the default location: C:\Program Files\D-Link\DWA-160, where C: represents the drive letter of your hard drive. To install to a different location click Browse and specify the location.
- Page 13 If the Found New Hardware Wizard appears, click Cancel. Click Next If you want to manually connect to a wireless network, refer to page 15. The following instructions will connect you to a wireless network using Wi-Fi ® Protected Setup (WPS). Click Next D-Link DWA-160 User Manual...
- Page 14 Press the WPS button on your access point or wireless router within 2 minutes to establish connectivity. When this screen appears, you have successfully connected to your wireless network. Click Next to complete your setup. Click Next D-Link DWA-160 User Manual...
- Page 15 Click Scan to display the site survey page. Click Next Click the Scan button to display a list of wireless networks (site survey). Click on the network name (SSID) and click Next. Click Next D-Link DWA-160 User Manual...
- Page 16 When this screen appears, you are successfully connected to your wireless network. Click Next to complete your setup. Click Next Click Finish to continue. If you are prompted to reboot your computer, select Yes, I want to restart my computer now. Click Finish D-Link DWA-160 User Manual...
-
Page 17: Configuration
Section 3 - Configuration Configuration This section will show you how to configure your new D-Link wireless adapter using the D-Link Utility as well as Windows ® XP Zero Configuration and Vista ™ WLAN Auto Configuration. D-Link Wireless Connection Manager The D-Link DWA-160 uses the Wireless Connection Manager as the management software. -
Page 18: Wireless Networks
Enter the security information to connect (refer to the Wireless Security section for more information). Select a wireless network profile from the Activate Button: drop-down menu and click Activate to connect. Allow up to 30 seconds to connect. D-Link DWA-160 User Manual... -
Page 19: Wi-Fi ® Protected Setup (Wps)
120 seconds. Refer to page 20. “Personal Identification Number” (PIN) is a unique number generated utility of the WPS-enabled wireless router or access point connects you with the intended wireless network. Refer to page 21 for more information. D-Link DWA-160 User Manual... - Page 20 1. To connect to your network, press the WPS button on screen appears. 2. Press the WPS button located on your access point or router to continue. This screen will appear once you have successfully established connection with your network. D-Link DWA-160 User Manual...
- Page 21 Make sure your access point or wireless router is close by. Write down the number on the screen. Enter this number in your access point or wireless Once you click Next, you will have 2 minutes to enter this number in your access point or wireless router. Click Next D-Link DWA-160 User Manual...
- Page 22 Section 3 - Configuration The adapter will try to establish connectivity to your access point or wireless router. When this screen appears, you have successfully established connectivity. Click Finish to complete your setup. Click Finish D-Link DWA-160 User Manual...
-
Page 23: My Wireless Networks
Click Activate to use a profile. Allow up to 30 seconds to connect to the wireless network. Profile Details: The Profile Details section will display information about the wireless network such as the network name (SSID), network type (Infrastructure), and if the network is secured. D-Link DWA-160 User Manual... -
Page 24: Add Profile
Infrastructure. (Ad-hoc mode is not supported) Security Type: Select the type of security used. Please refer to the Wireless Security section for more information. Click OK to save your settings. OK Button: D-Link DWA-160 User Manual... -
Page 25: Modify Profile
Displays the SSID of the network. Network Type: Displays the network type. Security Type: Select the type of security used. Please refer to the Wireless Security section for more information. Click OK to save your settings. OK Button: D-Link DWA-160 User Manual... -
Page 26: Support
Section 3 - Configuration Support If you need help, click the Support button. A panel will appear to the right of the utility which will display information about the utility. D-Link DWA-160 User Manual... -
Page 27: About
Section 3 - Configuration About The About screen gives you information about the Firmware and Utility Versions of the DWA-160. D-Link DWA-160 User Manual... -
Page 28: Connect To A Wireless Network
Click on a network (displayed using the SSID) and click the Connect button. If you get a good signal but cannot access the Internet, check the TCP/ IP settings for your wireless adapter. Refer to the Networking Basics section in this manual for more information. D-Link DWA-160 User Manual... - Page 29 It may take 20-30 seconds to connect to the wireless network. If the connection fails, please verify that the security settings are correct. The key or passphrase must be exactly the same as on the wireless router. D-Link DWA-160 User Manual...
-
Page 30: Using Windows
Click on a network (displayed using the SSID) and click the Connect button. If you get a good signal but cannot access the Internet, check the TCP/ IP settings for your wireless adapter. Refer to the Networking Basics section in this manual for more information. D-Link DWA-160 User Manual... -
Page 31: Wireless Security
Section 4 - Wireless Security Wireless Security This section will show you the different levels of security you can use to protect your data from intruders. The DWA-160 offers the following types of security: ™ What is WPA ® WPA, or Wi-Fi Protected Access, is a Wi-Fi standard that was designed to improve the security features of WEP (Wired Equivalent Privacy). -
Page 32: Configure Wpa /Wpa2 -Personal
It is recommended to enable WPA/WPA2-Personal on your wireless router or access point before configuring your wireless adapter. If you are joining an existing network, you will need to know the WPA/WPA2-Personal passphrase being used. 1. Open the Wireless Connection Manager by double-clicking on the D-Link icon on your desktop. - Page 33 Make sure you enter the passphrase exactly the same on all wireless devices. 1. Open the Wireless Connection Manager by double-clicking on the D-Link icon on your desktop. Click on New to create a new profile or highlight an existing profile and click Modify.
-
Page 34: Using Windows Vista
Wireless Utility by right-clicking on the wireless computer icon in your system tray (lower right corner of screen). Select Connect to a network. 2. Highlight the wireless network (SSID) you would like to connect to and click Connect. D-Link DWA-160 User Manual... - Page 35 It may take 20-30 seconds to connect to the wireless network. If the connection fails, please verify that the security settings are correct. The key or passphrase must be exactly the same as on the wireless router. D-Link DWA-160 User Manual...
-
Page 36: Using The Windows ® Xp Utility
XP Wireless Utility by right-clicking on the wireless computer icon in your system tray (lower-right corner of screen). Select View Available Wireless Networks. 2. Highlight the wireless network (SSID) you would like to connect to and click Connect. D-Link DWA-160 User Manual... - Page 37 It may take 20-30 seconds to connect to the wireless network. If the connection fails, please verify that the WPA/WPA2-Personal settings are correct. The WPA/ WPA2-Personal passphrase must be exactly the same as on the wireless router or access point. D-Link DWA-160 User Manual...
-
Page 38: Configure Wpa /Wpa2 -Enterprise
WPA/WPA2-Enterprise is for advanced users who are familiar with using a RADIUS server and setting up certificates. 1. Open the Wireless Connection Manager by double-clicking on the D-Link icon on your desktop. Click on New to create a new profile or highlight an existing profile and click Modify. -
Page 39: Configure 802.1X (Radius)
802.1x is for advanced users who are familiar with using a RADIUS server and setting up certificates. 1. Open the Wireless Utility by double-clicking on the D-Link icon in your system tray (lower-right corner of screen). Click on New to create a new profile or highlight an existing profile and click Modify. -
Page 40: Troubleshooting
Section 5 - Troubleshooting Troubleshooting This chapter provides solutions to problems that can occur during the installation and operation of the DWA-160. Read the following descriptions if you are having problems. (The examples below are illustrated in Windows ® XP. If you have a different operating system, the screenshots on your computer will look similar to the following examples.) - Page 41 Section 5 - Troubleshooting Click the + sign next to Network Adapters. Right-click on D-Link DWA-160 Xteme N Dual Band USB Adapter. Select Properties to check that the drivers are installed properly. Look under Device Status to check that the device is working properly.
- Page 42 3. The computer with the DWA-160 installed is unable to connect to the wireless network and/or the Internet. with the broadband connection.
- Page 43 If Security is enabled, make sure that the correct encryption keys are entered on both the DWA-160 and the access point. Double- click on the WLAN icon in the taskbar > click Encryption. Check to see that the key selected is set to the same key as other devices on the network.
-
Page 44: Wireless Basics
Wireless Basics D-Link wireless products are based on industry standards to provide easy-to-use and compatible high-speed wireless connectivity within your home, business or public access wireless networks. Strictly adhering to the IEEE standard, the D-Link wireless family that wireless networking delivers. - Page 45 Why D-Link Wireless? D-Link is the worldwide leader and award winning designer, developer, and manufacturer of networking products. D-Link delivers the performance you need at a price you can afford. D-Link has all the products you need to build your network.
- Page 46 PDAs, headphones, laptops, speakers, and other devices that operate on batteries. Who uses wireless? office, or business, D-Link has a wireless solution for it. Home Small Office and Home Office...
- Page 47 “hotspots”. Using a D-Link USB Adapter with your laptop, you can access the hotspot to connect to the Internet from remote locations like: Airports, Hotels, Coffee Shops, Libraries, Restaurants, and Convention Centers.
-
Page 48: Wireless Modes
Ad-Hoc – Directly connecting to another computer, for peer-to-peer communication, using wireless network adapters on each computer. Unfortunately 802.11a/g/n products such as the DWA-160 do not support ad-hoc mode. An Infrastructure network contains an Access Point or wireless router. All the wireless devices, or clients, will connect to the wireless router or access point. -
Page 49: Networking Basics
Check your IP address After you install your new D-Link wireless adapter and have established a wireless connection, by default, the TCP/IP settings should be set to obtain an IP address from a DHCP server (i.e. router) automatically. To verify your IP address, please follow the steps below. -
Page 50: Statically Assign An Ip Address
® Windows 2000 – From the desktop, right-click My Network Places > Properties. Local Area Connection which represents your D-Link wireless network adapter (or other adapter) which will be connected to your router. Internet Protocol (TCP/IP) and click Properties. Use the following IP address and enter an IP address that is on the same subnet as your network or LAN IP address on your router. -
Page 51: Windows Vista
Start > Control Panel. Make sure you are in Classic View. Double-click on the Network and Sharing Center icon. Along the left panel in the window, click on Manage network connections. Local Area Connection which represents your D-Link wireless network adapter which will be connected to your network. Internet Protocol Version 4 (TCP /IPv4) and click Properties. -
Page 52: Technical Specifications
* Maximum wireless signal rate derived from IEEE Standard 802.11n-draft and 802.11g specifications. Actual data throughput will vary. Network conditions and environmental factors, including volume of network traffic, building materials and construction, and network overhead, lower actual data throughput rate. Environmental factors will adversely affect wireless signal range. D-Link DWA-160 User Manual... -
Page 53: Contacting Technical Support
Before you contact technical support, please have the following ready: technical issues. For customers within the United States: For customers within Canada: Phone Support: Phone Support: (877) 453-5465 (800) 361-5265 Internet Support: Internet Support: http://support.dlink.com http://support.dlink.com D-Link DWA-160 User Manual... -
Page 54: Warranty
Warranty Period or ninety (90) days, whichever is longer, and is subject to the same limitations and exclusions. If a material defect is incapable of correction, or if D-Link determines that it is not practical to repair or replace the defective Hardware, the actual price paid by the original purchaser for the defective Hardware will be refunded by D-Link upon return to D-Link of the defective Hardware. - Page 55 Software. Except as otherwise agreed by DLink in writing, the replacement Software is provided only to the original licensee, and is subject to the terms and conditions of the license granted by D-Link for the Software. Replacement Software will be warranted for the remainder of the original Warranty Period and is subject to the same limitations and exclusions.
- Page 56 D-Link or become the property of D-Link. Products shall be fully insured by the customer and shipped to D-Link Systems, Inc., 17595 Mt. Herrmann, Fountain Valley, CA 92708. D-Link will not be held responsible for any packages that are lost in transit to D-Link.
- Page 57 Trademarks: D-Link is a registered trademark of D-Link Corporation/D-Link Systems, Inc. Other trademarks or registered trademarks are the property of their respective owners. Copyright Statement: No part of this publication or documentation accompanying this product may be reproduced in any form or by any means or used to make any derivative such as translation, transformation, or adaptation without permission from D-Link Corporation/D-Link Systems, Inc., as stipulated by the United States...
- Page 58 SAR compliance has been established in typical laptop computer(s) with USB slot, and product could be used in typical laptop computer with USB slot. Other application like handheld PC or similar device has not been verified and may not compliance with related RF exposure rule an such use shall be prohibited. D-Link DWA-160 User Manual...
- Page 59 RF exposure compliance. To maintain compliance with IC RF exposure compliance requirements, please follow operation instruction as documented in this manual. This Class B digital apparatus complies with Canadian ICES-003. Cet appareil numérique de la classe B est conforme à la norme NMB-003 du Canada. D-Link DWA-160 User Manual...
-
Page 60: Registration
Appendix F - Registration Registration Product registration is entirely voluntary and failure to complete or return this form will not diminish your warranty rights. Version 1.2 March 13, 2009 D-Link DWA-160 User Manual...