Roland HPi-7 Owner's Manual
Roland digital piano owner's manual hpi-7, hpi-7le
Hide thumbs
Also See for HPi-7:
- Brochure & specs (5 pages) ,
- Brochure & specs (5 pages) ,
- Owner's manual (114 pages)
Table of Contents
Advertisement
Quick Links
See also:
Owner's Manual
Congratulations on your choice of the Roland Digital Piano HPi-7/HPi-7LE.
201b
Before using this unit, carefully read the sections entitled: "IMPORTANT SAFETY INSTRUCTIONS" (p. 2), "USING
THE UNIT SAFELY" (p. 3), and "IMPORTANT NOTES" (p. 5). These sections provide important information
concerning the proper operation of the unit. Additionally, in order to feel assured that you have gained a good
grasp of every feature provided by your new unit, owner's manual should be read in its entirety. The manual
should be saved and kept on hand as a convenient reference.
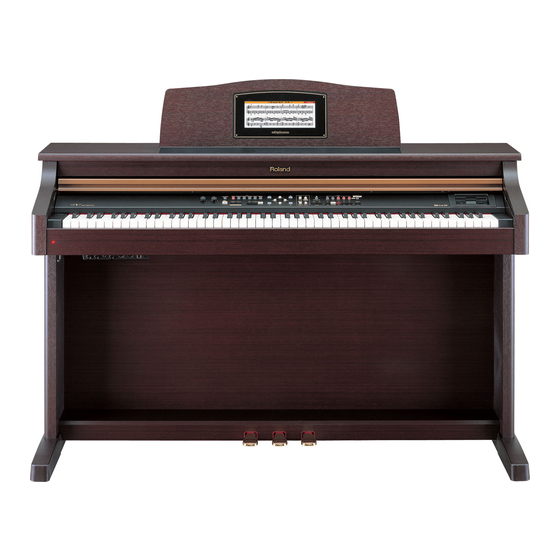
Musical Notation Shown In
A Large LCD Screen
The musical notation can be displayed
not only for the internal songs, but also
for commercially available song files.
You can split the screen and change the
settings as you view the Notation screen.
Lyrics and fingering numbers can also
be displayed.
* The fingering numbers are displayed only for some
of the internal songs.
A "Visual Lesson" Convenient
Functions For Practicing
Enjoy practicing along with song data.
You can also check the results of what you
play right in the screen.
202
All rights reserved. No part of this publication may be reproduced in any form without the written permission of
Owner's Manual
Authentic Piano
Performance
High-quality grand piano tones and
true piano feel from the keyboard
and pedals let you enjoy authentic
-piano performance.
Easy Game-like Operation
After pressing the button for the desired function, operation consists basically
of pressing the cursor buttons, [ ] [ ] buttons and [+] [-] located in the center of
the panel. You can enjoy versatile performance with easy operation.
Copyright © 2004 ROLAND CORPORATION
ROLAND CORPORATION.
A "Wonderland" Sure
To Please Children
"Wonderland" is a world of sound
which children can enjoy, with a
"Piano," a "SFX" of sounds, and more.
A note-guessing game is also included.
A Wealth Of Onboard
Songs
The instrument comes with 170
songs, all carefully
selected so almost
every genre is
represented—
whether it be piano
etudes, or popular
tunes.
Advertisement
Table of Contents

Related Manuals for Roland HPi-7


Summary of Contents for Roland HPi-7
- Page 1 Owner’s Manual Congratulations on your choice of the Roland Digital Piano HPi-7/HPi-7LE. 201b Before using this unit, carefully read the sections entitled: “IMPORTANT SAFETY INSTRUCTIONS” (p. 2), “USING THE UNIT SAFELY” (p. 3), and “IMPORTANT NOTES” (p. 5). These sections provide important information concerning the proper operation of the unit.
-
Page 2: Important Safety Instructions
WARNING: To reduce the risk of fire or electric shock, do not expose this apparatus to rain or moisture. CAUTION RISK OF ELECTRIC SHOCK DO NOT OPEN ATTENTION : RISQUE DE CHOC ELECTRIQUE NE PAS OUVRIR CAUTION: TO REDUCE THE RISK OF ELECTRIC SHOCK, DO NOT REMOVE COVER (OR BACK). -
Page 3: Using The Unit Safely
• Do not attempt to repair the unit, or replace parts within it (except when this manual provides specific instructions directing you to do so). Refer all servicing to your retailer, the nearest Roland Service Center, or an authorized Roland distributor, as listed on the “Information” page. - Page 4 • Before using the unit in a foreign country, consult with your retailer, the nearest Roland Service Center, or an authorized Roland distributor, as listed on the “Information” page.
-
Page 5: Important Notes
However, in certain cases (such as when circuitry related to memory itself is out of order), we regret that it may not be possible to restore the data, and Roland assumes no liability concerning such loss of data. -
Page 6: Handling Floppy Disks
• Do not apply undue force to the music rest while it is in use. • Use a cable from Roland to make the connection. If using some other make of connection cable, please note the following precau- tions. • Some connection cables contain resistors. Do not use cables that incorporate resistors for connecting to this unit. -
Page 7: Table Of Contents
Contents USING THE UNIT SAFELY...3 IMPORTANT NOTES ...5 Before You Begin Playing ...9 Making the Connections...9 Connecting the pedal cable...9 Connecting the Speaker Cable (HPi-7LE only)...9 Attach the music rest ...9 Connect the power cord...9 Connect headphones ...9 Using the Headphone Hook...10 Opening and Closing the Lid...10 Turning the Power On/Off ...10 Adjusting the Volume or Brightness of... - Page 8 SFX Set ...69 Drum Set List...70 Chord List ...74 Internal Song List...75 Songs for Visual Lesson ...76 Pianist Style List...76 Music Files That the HPi-7 Can Use ...77 MIDI Implementation Chart ...78 Main Specifications...79 Index ...80 Connecting an External Display (HPi-7LE only)...82...
-
Page 9: Before You Begin Playing
Speakers Attach the music rest The music rest of the HPi-7 contains a liquid crystal display screen. Use the following procedure, and handle the music rest with care. Insert the music rest as shown in the diagram. -
Page 10: Using The Headphone Hook
To turn the power off, turn the [Volume] knob all the way to the left, and press the [Power On] switch. The Power indicator at the left front of the HPi-7 will go dark, and the power will be turned off. -
Page 11: About The Pedals
Refer to “Notation Screen” (p. 15) and “Changing the function of the pedals (Pedal)” (p. 56). About the adjuster When you move the HPi-7 or if you feel that the pedals are unstable, adjust the adjuster located below the pedals as follows. •... -
Page 12: Panel Descriptions
Panel Descriptions Front Panel fig.panelfront-e 9 10 11 [Power On] switch Pressed to switch the power on and off (p. 10). [Volume] knob Adjusts the overall volume (p. 10). [Brilliance] knob Adjusts the brightness of the sound (p. 10). [Transpose] button Transposes the pitch of the keyboard or the song being played (p. -
Page 13: Rear Panel
An external MIDI device can be connected here to receive performance data (p. 61). USB connector Used for connecting a computer to the HPi-7 using a USB cable (p. 62). Disk Drive You can insert a floppy disk for playing back or saving songs (p. -
Page 14: Basic Operation And The Main Screen
Basic Operation and the Main Screen Basic operation The HPi-7 is operated mainly by using the cursor buttons and [ ] [+] [-] buttons while viewing the screen. The every screen shows the functions of the cursor buttons and the ] [+] [-] buttons. -
Page 15: Playing Along With A Song
Playing Along With A Song Notation Screen When the power of the HPi-7 is turned on, a notation screen like the following will appear in the display. This can display not only the onboard songs, but also the notation for SMF music files or a performance that you’ve recorded on the HPi-7. -
Page 16: Button Operations
Adjusts the volume (p. 10). Playing a Song The HPi-7 comes with 170 piano songs onboard. All of these can be viewed in the notation screen. They also have orchestral accompaniments, so you can play along with the accompaniment, or adjust the tempo to the desired speed for easier practice. -
Page 17: Select A Song
To cancel muting, press the same track button once again to make the indicator light. When playing back SMF music files for Roland Piano Digital series instruments, and the [3/Left hand] button and [4/Right hand] button do not correctly control the left/right-hand performances, please change the “Track Assign”... -
Page 18: Playing Songs Consecutively (All Song Play)
Playing Along With A Song If a screen like the following is displayed fig.d-delete-e If a song has already been selected in the current area (internal memory), it will not be possible to choose another song or record a new performance. If you want to erase the song, use the [ button. -
Page 19: Playing Back At A Fixed Tempo
Playing back at a fixed tempo In the case of a song with difficult tempo changes, it is effective to practice initially with a fixed tempo. Playing back at a fixed tempo without allowing tempo changes is called “Tempo Mute.” Hold down the [ [Fast] button. -
Page 20: Using The Metronome
Playing Along With A Song Using the Metronome The HPi-7 contains a versatile metronome function. While a song or accompaniment (Pianist function, p. 32) is playing, the metronome will sound at the corresponding tempo and time signature (Beat). fig.panelmetro Press the [Metronome] button. -
Page 21: Adding A Count To Assist Your Timing
Adding a Count to Assist Your Timing “Count-in” means to sound a count before song playback begins. “Countdown” means to sound a count after the end of the song introduction (before you begin playing the keyboard). If you will be playing along with a song, sounding a count will make it easier to match the timing of your performance to the song. -
Page 22: Assigning Markers To A Song For Repeated Practice
Playing Along With A Song Assigning Markers to a Song for Repeated Practice You can add markers within a song so that you can move to a marked measure, or play back repeatedly between two markers. fig.panelmark Before you begin, select the song in which you want to assign markers (p. 17). Access the Marker screen Press the [Marker/Count] button. -
Page 23: Assigning A Marker In The Middle Of A Measure (Resolution)
Moving an assigned marker After assigning a marker in the song, you can hold down the [ or [ (Fwd)] button to adjust the location at which marker A was assigned. To adjust the location of marker B, hold down the [ Moving to the location of an assigned marker After assigning a marker in the song, press either the [ location of the marker. -
Page 24: Changing The Key Of The Keyboard Or Song Playback (Transpose)
Playing Along With A Song Changing the Key of the Keyboard or Song Playback (Transpose) By using the “Transpose” function, you can transpose your performance without changing the notes you play. For example, if a song is in a difficult key with numerous sharps ( ) or flats ( ), you can use this function to play it in an easier key. -
Page 25: Adjusting The Keyboard Touch (Key Touch)
Adjusting the Keyboard Touch (Key Touch) You can adjust the touch (playing feel) of the keyboard. fig.panelktch Press the [Key Touch] button. fig.keytouche Key Touch Press to switch the setting. Item Indicator No Light Red Light Key Touch Green Light Orange Light Setting... -
Page 26: Adding Variety To Your Performances
Adding Variety to Your Performances Selecting the Sound to Play The HPi-7 contains 600 and more different tones. The tones are organized into six tone groups, which are assigned to the [Tone] buttons. fig.paneltone Press one of the [Tone] buttons, and select the desired tone in the screen. -
Page 27: Applying Effects To The Sound
Applying Effects to the Sound fig.paneleffect Adding reverberation to the sound (Reverb) By applying the reverb effect you can produce a pleasant reverberation, making it sound as though you were performing in a concert hall. Press the [Reverb] button. The button’s indicator will light, and a reverb effect will be applied to the sound. To cancel the reverb effect, press the [Reverb] button, getting its indicator to go dark. -
Page 28: Playing Different Sounds In The Right And Left Hand (Split)
Adding Variety to Your Performances fig.duale Tone 1 Displays the tone name for the left Tone button that is selected. When the tone names of “Tone 1” or “Tone 2” are highlighted, you can press the [+] or [-] button to select tones within the same tone group (p. -
Page 29: Changing From Dual Performance To Split Performance
fig.splite Left-hand Tone Displays the name of the tone selected for the left-hand keyboard area. When the “Right-hand Tone” or “Left-hand Tone” are highlighted, you can use the [Tone] buttons and the [+] or [-] button to select tones. When the “Split Point” is selected, you can press the [+] or [-] button to change the split point. The split point can also be set by holding down the [Split] button and pressing the key for the desired split point. -
Page 30: Using The Lesson Function (Visual Lesson)
Using the Lesson Function (Visual Lesson) You can enjoy your practices with the HPi-7’s Lesson function. Play along with the accompaniment, and a notation indicating how well you have performed appears in the display. You can select the level and practice songs to match your current abilities. You can also supplement your stock of practice songs with additional music data. -
Page 31: Practicing With Internal Songs And Songs On Floppy Disks
A screen like the one below appears when you select the “Repertoire” course. fig.wonder-e Part This selects the part to be practiced. setting: Both Hands, Left Hands, Right Hands Tempo This sets the tempo for your practice. setting: Original Tempo, A Little Slower, Slower, Much Slower... -
Page 32: Adding An Accompaniment To Your Performance (Pianist Function)
Adding an Accompaniment to Your Performance (Pianist Function) The Pianist function automatically adds a suitable accompaniment to your piano performance. You can choose one of 35 different accompaniment styles as suitable for the song that you want to play. You can specify the accompaniment chord in the left-hand keyboard area, or press a single button to play an intro or ending. -
Page 33: Playing In A Wonderland Of Sound
Playing in a Wonderland of Sound “Wonderland” allows children to experience a variety of sounds and onboard songs with easy operation and enjoyable animation. fig.panelwonder Press the [Wonderland] button, and select the desired item in the screen. After the opening screen is displayed, a screen like the following will appear. fig.wonder-e Explanation of each selection Item... -
Page 34: Recording Your Performance
• Multitrack recording on five tracks (p. 40) Songs you record are discarded as soon as you select another song, or turn off the power of the HPi-7. Be sure to save important performances on a floppy disk. Refer to “Saving Songs” (p. 42). -
Page 35: Start Recording
Press the track button for the track that you want to record (i.e., the track that you want to play yourself). The indicator of the button you pressed will blink, and the HPi-7 enters recording-standby mode. Since in this example we will record the right-hand performance, press the [4/Right] button to make the button’s indicator blink. -
Page 36: Recording A New Song
The notation will appear when you press the [Notation] button. Press the [ (Rec)] button. The indicators of all Track buttons will blink, and the HPi-7 enters recording-standby mode. If the display indicates “Close/ New Song/ Add On,” select “New Song.” In this case, steps 1-2 will be omitted. - Page 37 Start recording Press the [ (Play/Stop)] button. After a two-measure count, recording will begin. Note that recording will also begin as soon as you play anything on the keyboard, even if you do not press the [ (Play/Stop)] button. In this case, no count will be heard. Once recording begins, the [ Go ahead and perform on the keyboard.
-
Page 38: Re-Recording
Recording Your Performance Re-recording When you want to re-record, specify the track button whose performance you want to re-record, and then record again. When you select a previously recorded track button and re-record, the performance from the location at which you begin recording up to the location at which you stop recording will be replaced by the newly re-recorded performance. -
Page 39: Erasing A Recorded Song
As described in steps 1 and 2 of “Recording a New Song” (p. 36), select “New Song.” Press the [ (Rec)] button. The indicators of all Track buttons will blink, and the HPi-7 enters recording-standby mode. Press the [Pianist] button and select the desired accompaniment style. Adjust the tempo as necessary. -
Page 40: Multitrack Recording On Five Tracks
Multitrack recording is a method by which you can record additional tracks while listening to the previously recorded tracks. The HPi-7 provides five tracks, so you can record different sounds on each track to create an ensemble song. → You can also record on 16 tracks (p. 58). -
Page 41: Saving Your Performance
Saving Your Performance The performance data you record on the HPi-7 will be lost when you select another song or turn off the power of the HPi-7. If you want to keep important performance data, you must save it to floppy disks or Favorites. -
Page 42: Saving Songs
Saving Your Performance First make sure that the protect tab of the floppy disk is in the “Write (write enable)” position. fig.DiskProtecte Rear side of the disk Write Protect Tab Insert the floppy disk into the disk drive. Press the [Function] button, and select “File” in the screen, and press the [ (Enter)] button. -
Page 43: Deleting Saved Songs
Explanation The song will be saved in i-format. A song saved in i-format can be listened to on Roland digital pianos (such as those from the HP-G/R/i and KR series), and on units from the MT series. The song will be saved in SMF (Standard MIDI File) format. A song saved in SMF format can be played on the many devices that are able to play back SMF music files (p. -
Page 44: Copying Songs
Saving Your Performance (write enable)” position (p. 42), then insert the floppy disk in the disk drive. Press the [Function] button, and select “File” in the screen, and press the )] button. Enter Use [ ] to select “Delete,” and press the [ (Enter)] button. fig.diskdele Select the save destination and the file, then press the [ (Execute)] button. - Page 45 fig.songcopye Select the copy type, and press the [ (Enter)] button. The following “Copy Song screen” appears. fig.songcopye Copy source Specifying the copy source and the copy destination. If a song name is displayed with a number, a song is already saved to that number. If you select a number with previously saved song data and proceed to copy to that location, the previously saved song will be erased.
-
Page 46: Playing Back Music Files Or A Song That Was Saved On Floppy Disk
Playing Back Music Files or a Song that was Saved on Floppy Disk Here’s how you can play back commercially available music files, or a song that was saved on a floppy disk. You can also play the keyboard along with the song playback. →... -
Page 47: Convenient Functions
Convenient Functions Changing the Notation Screen Settings You can change the parts shown in the notation screen, and how the notation is displayed. Press the [Notation] button, and press the [ Press the [ (Menu)] button to display the “Score Menu.” Select “Score Option”... -
Page 48: Editing Songs
Convenient Functions Editing Songs There are many ways you can edit performances recorded using the HPi-7 Track button (p. 40) or 16-track sequencer (p. 58). Basic Operation of the Editing Functions Press the [Notation] button, and press the [ Press the [ (Menu)] button to display the “Score Menu.”... -
Page 49: Undoing Edits (Undo)
Undoing Edits (Undo) You can cancel an editing operation that you’ve just carried out. This is handy when you want to undo an edit and restore data to the way it was before. There are some edits that can’t be restored. Editing functions that can be undone appear on screen. -
Page 50: Deleting Measures (Delete)
Convenient Functions Item Content Measure number of the first measure of the segment From to be quantized Number of measures to be quantized Track button or part number to be quantized Tr/Pt Choosing “All” quantizes the same passage in all Parts. -
Page 51: Transposing Individual Parts (Transpose)
Transposing Individual Parts (Transpose) You can transpose specified parts and tracks individually. fig.d-e-trans Item Content Measure number of the first measure of the segment From to be transposed Number of measures to be transposed Track button or part number to be transposed Tr/Pt When “All”... -
Page 52: Correcting Notes One By One (Note Edit)
(Delete)] button. Saving the Notation Data in BMP Format You can take notations that are displayed on the HPi-7 and save them to floppy disks. You can also use saved image data to your computer. You cannot save copyrighted song data. - Page 53 Select the song you want to save (p. 17). Press the [Notation] button, and press the [ Press the [ (Menu)] button to display the “Score Menu”. Select the “BMP output”, and press the [ A screen like the one shown below appears. fig.bmpe The following screen appears when you select a copyrighted song.
-
Page 54: Functions That Can Be Selected Using The [Function] Button
Convenient Functions Functions that Can be Selected Using the [Function] Button Here’s how you can easily make changes such as tuning the HPi-7 or changing the function of the pedals. fig.panelfunc Press the [Function] button. fig.functione Use the cursor buttons to select the item that you want to set, and then press the [ button. -
Page 55: Adjusting The Volume Balance Between Accompaniment And Keyboard (Balance)
Decreases the volume of the keyboard sound Adjusting the Piano Sounds (Piano Setting) The HPi-7 is capable of reproducing a variety of the acoustic piano’s distinctive characteristics. You can also adjust these to suit your own taste and style. This setting is valid when some piano sounds are selected. -
Page 56: Mic Echo
Convenient Functions Temperament You can play classical styles such as Baroque using historic temperaments (tuning methods). Today, compositions are generally created with equal temperament in mind and are played using equal temperament. However in past ages of classical music, a variety of temperaments were used. -
Page 57: Selecting Images To Be Shown On The Displays (User Image Display)
Take a floppy disk to which the image data stored in the HPi-7 has been saved, and insert the disk in the disk drive. At Step 2 in p. 54, select “User Image Display” and press the [ (Enter)] button. -
Page 58: Recording And Playing Back Performances Of Specific Instruments (16 Track)
(mute). Playback with only a single part muted is called “Minus One.” You can even set solo and muting during playback. → Part 11 of Roland SMF music data that is available for purchase is included with the track button [2/Bass and Accompaniment], but the correspondence of other parts to the track buttons is the same. -
Page 59: Formatting The User Memory (Initialize User Memory)
Convenient Functions Formatting the User Memory (Initialize User Memory) The HPi-7 features an internal storage area where you can save recorded performances and User Styles. This space is called the “User Memory.” The following content is stored to the user memory. -
Page 60: Restoring The Factory Settings (Factory Reset)
HPi-7. After changing this setting, try selecting the song once again. Playing the Demos You can play demo songs that give you an idea of the HPi-7’s various functions. Hold down the Track [4/Left] button and press the [Wonderland] button. -
Page 61: Connecting External Devices
The HPi-7 provides MIDI connectors, which allow performance data to be exchanged with an external device. When these connectors are used to connect the HPi-7 to external devices, an even wider range of possibilities becomes available. A separate publication titled “MIDI Implementation” is also available. -
Page 62: Connections To A Computer
Local Off setting. The MT transmits a Local Off message when the power is turned on. If you turn on the power in the order of the HPi-7 → MT series, Local Off will be set automatically. -
Page 63: Making The Settings For The Usb Driver
Composer Out setting If you want a performance recorded on the HPi-7 to be transmitted to an external MIDI device or computer, turn the “Composer Out” setting “On.” Item Explanation Specify whether a recorded performance will be Composer Out transmitted to a MIDI device. -
Page 64: Appendics
(p. 10). the edges of the screen Is the volume level of the HPi-7 (p. 10) or connected device turned all the way down? Are headphones plugged in? Has a plug remained connected to the Phones No sound is jack? (p. - Page 65 The recorded Any performance that has been recorded is performance deleted when the power to the HPi-7 is turned off or a song is selected. A performance cannot disappeared. be restored once it’s been deleted. With some music files, the lyrics cannot be Lyrics are not displayed correctly.
-
Page 66: If This Message Appears On Screen
Meaning Be sure you’re using Roland SMF Music Files or other music files compatible with Roland digital pianos (p. 77). The HPi-7 cannot read the floppy disk quickly enough. Press the (Play/Stop)] button, then press the [ (Reset)] button and (Play/Stop)] button to play the song. -
Page 67: Tone List
Tone List Piano Balafon Hard E.Piano NaturalGrand ** Mild E.Grand NaturalMello ** Hard Clav. Natural Hps. ** Soft Clav. Grand Piano1 Reso Clav. MellowPiano1 Phase Clav. Harpsichord2 Analog Clav. Natural Gnd2 ** Pop Vibe. MellowPiano2 Pop Celesta NaturalC.Hps ** Tubular-bell Grand Piano2 Santur DetunedPiano... - Page 68 Piano 1w Feedback Gt. Piano 1d Gt.Harmonics Piano 2 Gt. Feedback Piano 2w GS Ac.Bass Piano 3 GS Fing.Bass Piano 3w GS Picked Bs GS Honkytonk Fretless Bs. Honky-tonk 2 Slap Bass GS E.Piano1 Slap Bass 2 GS E.Piano2 SynthBass101 60's E.Piano Synth Bass 1 E.Piano 1v...
-
Page 69: Sfx Set
Polysynth* Space Voice* Bowed Glass* Metal Pad* Halo Pad* Sweep Pad* Ice Rain* Soundtrack* Crystal* Syn Mallet* Atmosphere* Brightness* Goblin* Echo Drops* Star Theme* Sitar* Banjo* Shamisen* Koto* Kalimba* Bagpipe* Fiddle* Shanai* Tinkle Bell* Agogo* Steel Drums* Woodblock* Taiko* Melo.Tom 1* Synth Drum* ReverseCym.* Fret Noise*... -
Page 70: Drum Set List
Drum Set List -----: No sound. [EXC]: will not sound simultaneously with other percussion instruments of the same number. DR POP R&B Snare Rock Snare Rock Snare Pop Snare m Pop Snare Ghost Pop Snare m Finger Snap 707 Claps Hand Clap [EXC7] Hand Clap2... - Page 71 -----: No sound. [EXC]: will not sound simultaneously with other percussion instruments of the same number. DR STANDARD ----- ----- ----- Bar Chime Snare Roll Finger Snap High Q Slap Scratch Push [EXC7] Scratch Pull [EXC7] Sticks Square Click Metronome Click Metronome Bell Std Kick 2’...
- Page 72 Drum Set List -----: No sound. [EXC]: will not sound simultaneously with other percussion instruments of the same number. DR TR-808 ----- ----- ----- Bar Chime Snare Roll Finger Snap High Q Slap Scratch Push [EXC7] Scratch Pull [EXC7] Sticks Square Click Metronome Click Metronome Bell...
- Page 73 -----: No sound. [EXC]: will not sound simultaneously with other percussion instruments of the same number. DR ORCHESTRA ----- ----- ----- Bar Chime Snare Roll Finger Snap Close Hi-hat [EXC1] Pedal Hi-hat [EXC1] Open Hi-hat [EXC1] Ride Cymbal Sticks Square Click Metronome Click Metronome Bell Concert BD 2...
-
Page 74: Chord List
Chord List ● symbol: Indicates the constituent note of chords. ★ symbol: Chord shown with an “★”can be played by pressing just the key marked with the “★.” Cmaj7 C#maj7 C#m7 Cdim C#dim F#maj7 Gmaj7 F#m7 F#dim Gdim Dmaj7 E maj7 Emaj7 E m7 Ddim... -
Page 75: Internal Song List
Internal Song List 981a • All rights reserved. Unauthorized use of this material for purposes other than private, personal enjoyment is a violation of applicable laws. Practice Openness Arabesque Pastoral A Small Gathering Innocence Progress The Clear Stream Gracefulness The Hunt Tender Flower The Young Shepherdess Farewell... -
Page 76: Songs For Visual Lesson
Pianist Style List Songs for Visual Lesson Beginner’s Course Mary Had A Little Lamb Come Birds The Cuckoo Old MacDonald Had A Farm London Bridge Oh! Susanna Sonata (Mozart) Aura Lee Pathetique Amazing Grace Pianist Style List Piano Pop Jazz Club EnglishWaltz Kids Shuffle ’70s Dance... -
Page 77: Music Files That The Hpi-7 Can Use
■ The HPi-7 allows you to use the following music files ● Floppy disks saved on a Roland MT Series, or Roland Piano Digital HP-G/R/i and KR Series instrument ● Roland Digital Piano Compatible Music Files Roland’s original music file is made specifically for practicing the... -
Page 78: Midi Implementation Chart
MIDI Implementation Chart DIGITAL PIANO Model HPi-7 Function... Basic Default Channel Changed Default Mode Messages Altered Note True Voice Number : Note ON Velocity Note OFF After Key’s Touch Ch’s Pitch Bend 0, 32 6, 38 Control Change 98, 99... -
Page 79: Main Specifications
AC 117 V, AC 230 V or AC 240V (50/60 Hz), Power Supply AC 220 V (60 Hz) Power Consump- HPi-7: 105 W (117 V/230 V/240 V) tion HPi-7LE: 120 W (117 V/230 V/240 V) (including piano stand) 1,421 (W) x 526 (D) x 894 (H) mm... -
Page 80: Index
Index Adjuster ... 11 All Song Play ... 18 Alphabet ... 33 Audio Device ... 61 Auto Demo ... 11 Balance ... 55 BMP Format ... 52 Bouncing Ball ... 47 Chord List ... 74 Chorus ... 27 Clef L ... 47 Clef R ... - Page 81 Piano Setting ... 55 Pitches ... 47 Play Mode ... 60 Power cord ... 9 Power On/Off ... 10 Quantize ... 49 Recording ... 34, 36 Resolution Marker ... 23 Notation ... 47 Reverb ... 27 Saving Songs ... 42 SFX ...
- Page 82 Information When you need repair service, call your nearest Roland Service Center or authorized Roland distributor in your country as shown below. PHILIPPINES AFRICA G.A. Yupangco & Co. Inc. 339 Gil J. Puyat Avenue EGYPT Makati, Metro Manila 1200, Al Fanny Trading Office...
- Page 83 This product complies with the requirements of European Directives EMC 89/336/EEC and LVD 73/23/EEC. FEDERAL COMMUNICATIONS COMMISSION RADIO FREQUENCY INTERFERENCE STATEMENT This equipment has been tested and found to comply with the limits for a Class B digital device, pursuant to Part 15 of the FCC Rules.
-
Page 84: Connecting An External Display (Hpi-7Le Only)
Connecting an External Display (HPi-7LE only) You can connect a computer display or other such external display to the instrument, and display scores and lyrics on the larger screen. Displays That Can Be Connected to This Instrument In general, a great many of the VGA displays and multiscan displays that are available on the market are compatible with this instrument.