Table of Contents
Advertisement
Quick Links
Advertisement
Table of Contents

Related Manuals for Fujitsu KVM1116Q


Summary of Contents for Fujitsu KVM1116Q
- Page 1 CA92344-1928 User's Guide - English Digital KVM Switch User's Guide November 2017...
-
Page 3: For Your Safety
Further information can be found at: Details regarding the return and recycling of devices and consumables within Europe can also be found in the "Returning used devices" manual, via your local Fujitsu branch, or at: http://ts.fujitsu.com/recycling... -
Page 4: Radio Interference
Customers should not use this product for high safety use unless measures are in place for ensuring the level of safety demanded of such use. Please consult the sales staff of Fujitsu if intending to use this product for high safety use. -
Page 5: Table Of Contents
KVM1116Q Two Level Installation ........12... - Page 6 Logging to OSD....................17 Overview ............. .17 Local Console Login .
- Page 7 Access ............. . . 44 Device Level Browser GUI Interface .
- Page 8 KVM1116Q ........
- Page 9 Virtual Media Support........... 87 WinClient ActiveX Viewer / WinClient AP .
- Page 10 Material declaration of BSMI 設備名稱:數位KVM切換器 16埠,型號(型式):KVM1116Q 限用物質及其化學符號 六價鉻 多溴聯苯 多溴二苯醚 鎘 單元 Unit 鉛 汞 Lead Mercury Hexavalent Polybrominate Polybrominate Cadmium (Pb) (Hg) chromium d biphenyls d diphenyl (Cd) (PBB) (PBDE) ethers 電纜線 Cable ○ ○ ○ ○ ○ ○...
-
Page 11: General Information
• Up to 16 (KVM1116Q)users can share the switch's buses. A Message Board feature allows them to communicate with each other to facilitate port sharing. -
Page 12: Safety
Safety Read all of these instructions. Save them for future reference. Follow all warnings and instructions marked on the device. DANGER DANGER HAZARD OF ELECTRIC SHOCK, EXPLOSION, OR ARC RISQUE DE CHOC ÉLECTRIQUE, D'EXPLOSION OU FLASH D'ÉCLAIR D'ARC ÉLECTRIQUE • Avoid circuit overload. Before energizing, review the •... - Page 13 NOTICE • Do not use the device near water, Never spill liquid of any kind on the device. • Unplug the device from the wall outlet before cleaning. Do not use liquid or aerosol cleaners. Use a damp cloth for cleaning.
-
Page 14: System Requirements
System Requirements Remote User Computers Remote user computers (also referred to as client computers) are computers logged into the switch from remote locations over the internet. These computers must have the following equipment installed: • At least a PIII 1 GHz processor, with the screen resolution set to 1024 x 768. •... -
Page 15: Video
Video Only the following non-interlaced video signals are supported: Resolution Refresh Rates 640 x 480 60, 70, 72, 75, 85 720 x 400 70, 75 800 x 600 56, 60, 70, 72, 75, 85 1024 x 768 60, 70, 75, 85 1152 x 864 60, 70, 75, 85 1152 x 900... -
Page 16: Max Server Connections
Servers in a Single Maximum KVM Model Tiered KVM Level Tier Levels KVM1116Q KVM0116A * 16 x 16 = 256 KVM1116Q KVM0108A * 16 x 8 =128 * Not covered in this manual. See the User Guides for these models for more information. -
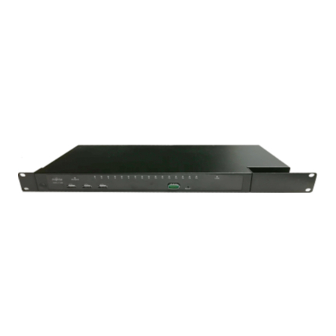
Page 17: Components
Components Front Power KVM1116Q Reset KVM1116Q Item Name Description Power LED Illuminated when the unit is powered up and ready to operate. Port LEDs Provides status information about corresponding KVM Ports. • GREEN: The computer attached to the port is On Line. - Page 18 Rear KVM1116Q Item Name Description Power Socket 1 Plug power cable for Power Source 1 in here LAN Port(s) Connect the unit to the network interface (10/100/1000 Mbps) here remotely over the net). Local Console Port(s) Local console devices (keyboard, monitor and mouse), plug in here. Any combination of USB and keyboards and mice can be used.
-
Page 19: Installation
Installation Overview KVM Adapter Cables connect the KVM switch to the connected devices. A separate KVM Adapter Cable is required for each server or device connection. See the list of KVM Adapter Cables on page 5. NOTE: 1. Refer to the Safety section of this manual before installing the KVM switch. 2. -
Page 20: Rack Mounting - Rear
Rack Mounting - Rear 1. Remove the brackets from the front of the KVM switch. Remove the plug from the alignment hole. 2. Install the smaller bracket from the front of the KVM switch to the back. Install the rack mounting bracket from the inventory to the rear of the KVM switch. -
Page 21: Kvm1116Q Single Level Installation Diagram
KVM1116Q Single Level Installation Diagram... -
Page 22: Tiering Multiple Kvm Switches
256 servers can be controlled in a complete two level installation. In a tiered installation, the (KVM1116Q) switch is considered the First Level or Parent KVM switch, the tiered switches are considered Second Level or Child KVM switch (KVM0116A / KVM0108A). Turn off power to all the devices, including all pre-existing devices on the installation. -
Page 23: Supported Kvm Switches
Supported KVM Switches KVM switches that can be used in a tiered installation: • KVM1116Q – KVM0108A / KVM0116A NOTE: Some of the KVM switch's features may not be supported, depending on the functionality of the tiered KVM switch. (For example, KVM0108A / KVM0116A switches do not support virtual media.) -
Page 24: The Adapter Id Function
The Adapter ID Function Server module information (the Adapter ID, port name, OS, keyboard language, and access mode) is stored on the server module. The switch's Adapter ID function stores this information along with the server module's configuration information (access rights, etc.), so that when a server is moved with its server module from one port to another, its settings do not have to be reconfigured. -
Page 25: Replacement Procedure For Digital Kvm Switch
Replacement procedure for Digital KVM switch (working time: 30 minutes) Tools required (not provided) Phillips screw driver After replacement work of KVM switch, System administrator will need to reconfigure. Recommended to back up the configuration file. (Operate by System administrator) If not find the configuration file, need to reconfigure. -
Page 26: Super Administrator Setup
Super Administrator Setup Overview First Time Setup The Super Administrator sets up the KVM switch for user operation (set the network parameters, change the default Super Administrator login) for the first time from the local console if possible. See “IP Address Determination” on page 88 to set up remotely. Since this is the first time you are logging in, use the default Username “admin”... -
Page 27: Logging To Osd
Logging to OSD Overview KVM Switches can be accessed from a local console, an internet browser, a Windows application (AP) program, and a Java application (AP) program. KVM switches authentication procedure requires a valid username and password. Invalid login information will open an Invalid Username or Password, or Login Failed message. NOTE: If the login fails, log in again with a correct username and password. -
Page 28: Windows Client Ap Login
Windows Client AP Login The Windows AP Client allows direct remote access to Windows systems users, without going through a browser although initially the Windows AP Client program must be downloaded from the browser page. Double-click the WinClient.exe icon to open the Windows Client Connection Screen: The Windows Client AP Connection Screen Item Description... -
Page 29: Java Client Ap Login
Java Client AP Login The Java AP Client provides direct remote access to non-Windows systems users although the Java AP Client program is initially downloaded from the browser page. Double-click the JavaClient.jar icon to open the Java Client Connection Screen. Item Description Server List... -
Page 30: The User Interface
The User Interface Overview The look of the user interface Main Page varies depending on the method used to log in. The Web Browser Main Page Access the KVM switches with most standard web browsers. Once users log in and are authenticated, the Web Browser Main Page opens with the Port Access page displayed. -
Page 31: The Tab Bar
The Tab Bar The number and type of icons that appear on the Tab Bar at the top of the page are determined by user type (Super Administrator, Administrator, User) and permissions. Icon Description Port Access: The Port Access page is used to access and control the server on the KVM switch installation. -
Page 32: The Ap Gui Main Page
The AP GUI Main Page The GUI Main Page is similar to that of the Web Browser. The differences are: 1. The AP GUI version does not have a menu bar below the tab bar. It has tabs like a notebook. Like the Web Browser interface, the makeup of the tabs changes depending on the items selected on the main Tab Bar and in the Sidebar. - Page 33 The Control Panel is hidden at the upper (the default position) or lower center of the screen, and becomes visible when the mouse moves over it. The panel consists of three rows: an icon row at the top, and two text rows below. NOTE: The icons that appear can be user selected.
-
Page 34: Winclient Control Panel Functions
WinClient Control Panel Functions Icon Function Toggle icon. Click to make the Control Panel always display on top of other screen elements. Click again to have it display normally. Macro icon.Click to open the Macros dialog box (see page 25 for details). Hammer icon. -
Page 35: Macros
Under an accessed port, click to begin Auto Scan Mode. The KVM switch automatically switches among the ports selected for Auto Scanning with the Filter function (see Filter, page 37). Monitor the activity of the ports without switching through them manually. Under an accessed port, click to invoke Panel Array Mode (see “Panel Array Mode”... - Page 36 Hotkey actions: Action Explanation Exit remote location Breaks the connection to the KVM switch and returns you to local client computer operation. This is equivalent to clicking the Exit icon on the Control Panel. The default keys are F2, F3, F4. Adjust Video Opens the Video Settings dialog box.
- Page 37 Three ways to run macros: 1. Use the assigned hotkey. 2. Click on the macro from the Macro List on the Control Panel. 3. Open the Macros dialog box and click Play. Run the macro from the Macros dialog box to have the option of specifying how the macro runs. –...
-
Page 38: Video Settings
Video Settings Clicking the Hammer icon on the Control Panel brings up the Video Settings dialog box. Adjust the placement and picture quality of the remote screen on your monitor with these options. Options Usage Screen Position Adjust the horizontal and vertical position of the remote server window by clicking the Arrow buttons. -
Page 39: The Message Board
The Message Board A message board has been provided for users to communicate and to alleviate access conflicts. The buttons on the Button Bar are toggles. Their actions are described in the table below: Button Action Enable/Disable Chat. When disabled, messages posted to the board are not displayed. The button is shadowed when Chat is disabled. -
Page 40: Zoom
Mounting Virtual Media. To mount a virtual media device: 1. Click the Virtual Media icon to open the Virtual Media dialog box. NOTE: The T button at the top right opens a slider bar to adjust the transparency of the dialog box. -
Page 41: The On-Screen Keyboard
The On-Screen Keyboard The KVM switch supports an on-screen keyboard, available in multiple languages, with all the standard keys for each supported language. Click the icon to open the on-screen keyboard. If the keyboard languages of the remote and local systems are not the same, the configuration settings for either system do not have to be changed. - Page 42 The icon on the Control Panel indicates the synchronization mode status. • The icon displays in gray to indicate that Mouse DynaSync is not available - you must use manual synching procedures. This is the default setting. • The green check mark on this icon indicates that Mouse DynaSync is available and is enabled. This is the default setting when Mouse DynaSync is available.
-
Page 43: Control Panel Configuration
Control Panel Configuration Click the Control Panel icon to open a dialog box. Configure the items and graphical settings on the Control Panel. Item Function Customize Select which icons display in the Control Panel. Check the icons to be visible. Unchecked icons Control Panel will not be displayed Control Panel... -
Page 44: Port Access
Port Access Overview The Port Access page opens with the KVM switch's KVM Connections page displayed. The Connections page is organized into several main areas. All the devices, ports, and outlets that a user is permitted to access are listed in the Sidebar at the left of the page. After selecting a device, port, or outlet in the Sidebar, clicking entries on the menu bar (Browser GUI) or tab bar (AP GUI) opens information and configuration pages related to the item. -
Page 45: The Sidebar
The Sidebar All KVM switches and Blade Servers including, their ports and outlets, are listed in a tree structure in the Sidebar at the left of the screen. The Sidebar Tree Structure • Users only see the devices, ports, and outlets for which they have access permission. •... -
Page 46: Port And Outlet Naming
Port Properties. Select Properties from the popup menu to open a dialog box to enter configuration settings for the selected port. NOTE: This is a quick setting method that performs similar port configuration functions to the ones performed in “Port Configuration” on page 46. Field Explanation Port OS... -
Page 47: Scan
Scan Scan is located at the bottom of the AP GUI Sidebar and automatically switches among all the ports visible in the Sidebar at regular intervals, to monitor activity. See“Auto Scanning” on page 71 for details. NOTE: Scan does not appear at the bottom of the Sidebar in the Browser version. Open it from the port's Toolbar. -
Page 48: Port Level
Port Level When a port is selected in the Sidebar, the Connections page displays the port connection and configuration options: The screen is divided into three panels. Status. The current status information is displayed, including whether the port is online or offline, and if the port is mountable. -
Page 49: History
History The History page provides a record of each time that a port was accessed. It provides quick access to the most recently used ports. You can access a port shown in the main panel by double clicking it. • If there are more entries than room on the screen, a scroll bar opens to allow the entire record to be viewed. -
Page 50: Favorites
Favorites The Favorites page is similar to a bookmarks feature. Frequently accessed ports can be saved in a list. Favorites is a useful feature on large installations. Adding a Favorite. 1. With the port selected in the Port Access sidebar. Right click in the main panel of the Favorites page to see the Add Favorite box. -
Page 51: User Preferences
Modifying a Favorite. • To modify a Favorite, or one of the items contained in it, right click on it, then select a choice from the popup menu. • To edit a Favorite's name: – Click on it once, wait a second, then click again. Edit the name after the display opens a text input box (Port naming uses the same procedure), –... - Page 52 Setting Function Language Select the language in which the interface displays. OSD Hotkey Select which Hotkey controls the GUI function: [Scroll Lock] [Scroll Lock] is the default. To select a different combination, click the arrow at the right of the box to open a list of choices. ID Display Select how the Port ID is displayed: the Port Number alone (PORT NUMBER), the Port Name alone (PORT NAME), or the Port Number plus the Port Name (PORT NUMBER + PORT NAME).
-
Page 53: Sessions
Sessions The administrator and users with User Management permissions can see which users are currently logged into the KVM switch, and their session information. NOTE: 1. Only users with User Management permissions can see sessions of ordinary users. 2. User type, SA (Super Administrator), Admin (Administrator), or Normal user (User), is listed under Category. -
Page 54: Access
Access Set user and group access and configuration rights for KVM switches and ports. Only those with User Management permissions can view the Access page. Normal users do not have access. Device Level Browser GUI Interface The main panel consists of two columns: Name, and Config: •... -
Page 55: Port Level Browser Gui Interface
Port Level Browser GUI Interface Port access settings: Setting Function Name Each port accessible to the user is listed under the Names column. Access Device access rights are set from the Access column. To see the choices, click the icon in the row that corresponds to the user you want to configure. -
Page 56: Port Level Ap Gui Interface
Port Level AP GUI Interface The page is the same as for the Browser GUI except that there are filters at the top of the columns to expand or limit the scope of the users and groups displayed. Setting Function Name To filter the User or Group name, enter the name, partial name, or partial name and wild card ( * ) then press Enter. -
Page 57: Associated Links
Associated Links Associate other ports on the same KVM switch to the selected port. This function is used when connecting both KVM and serial ports (using Server Module KVM-SERIAL) from a single server to the switch. • To associate a port with the currently selected port, click Add. Enter the port's number in the dialog box, then click OK. -
Page 58: User Management
User Management Overview Click the User Management tab to open the User Management page. The page is organized into two main areas, the Sidebar at the left, and the large main panel at the right. • Users and groups appear in the panel at the left of the page. The large panel at the right provides more detailed information for each. -
Page 59: Adding Users
Adding Users 1. Select Users on the menu bar (Browser GUI) or Select Users in the Sidebar (AP GUI). 2. Click Add at the bottom of the main panel. The User notebook opens, with the User tab selected: 3. Enter the required information in the fields. Field Description Username... -
Page 60: Modifying User Accounts
6. When the Operation Succeeded message appears, click OK. 7. Click Users in the Sidebar to return to the main screen. The new user appears in the Sidebar list and in the main panel. The Sidebar Users list can expand and collapse. Click the minus symbol ( - ) next to the Users icon to collapse it. -
Page 61: Groups
Groups Server access rights apply to any member of the group. Administrators set them once for the group instead of each user individually. Multiple groups allow some users access to specific servers while restricting other users. Creating Groups 1. Select Groups on the menu bar (Browser GUI) or Select Groups in the Sidebar (AP GUI). 2. -
Page 62: Users And Groups
Users and Groups Manage users and groups from the Users notebook and from the Group notebook. NOTE: Before you can assign users to groups, you must first create them. See “Adding Users” on page 49 for details. Assigning Users to a Group From the User's Notebook 1. -
Page 63: Removing Users From A Group In The User's Notebook
Removing Users From a Group in the User's Notebook 1. In the Sidebar User list, click the user's name or select the user's name in the main panel. 2. Click Modify. 3. Select the Groups tab when the User notebook opens. 4. -
Page 64: Assigning Device Permissions From The User's Notebook
Assigning Device Permissions From the User's Notebook 1. In the Sidebar User list, click the user's name or select the user's name in the main panel. 2. Click Modify to open the User notebook. 3. Select the Devices tab to open the page. ... - Page 65 4. Make your permission settings for each port from the columns on the page. – Name: Each port accessible to the user is listed under the Names column. – Access: Set server access. Click the icon in the row of the port to be configured to view the choices.
-
Page 66: Assigning Device Permissions From The Groups' Notebook
Filters. Expand or limit the scope of the ports that are displayed in the Name column using the five filters at the top of the columns. Filter Description Name To filter the port name, enter the name then press [E ]. -
Page 67: Device Management
Device Management Device Information The Device Management page opens with the top level (parent) KVM switch selected in the Sidebar and Device Information selected on the menu bar. General The General section of the Device Information page displays the name of the selected device, its firmware version, and information about its network configuration. -
Page 68: Operating Mode
Operating Mode Use the Operating Mode page to set working parameters. • Force all to grayscale: Enable to change the remote displays of all devices connected to the KVM switch to grayscale. This can speed up I/O transfer in low bandwidth situations. •... -
Page 69: Ipv4 Settings
IPv4 Settings IP Address: IPv4 is the traditional method of specifying IP addresses. The KVM switch can either have its IP address assigned dynamically (DHCP), or it can be given a fixed IP address. • For dynamic IP address assignment, select the Obtain IP address automatically radio button. (This is the default setting.) •... -
Page 70: Ipv6 Settings
IPv6 Settings IP Address: IPv6 is the new (128-bit) format for specifying IP addresses. (See “IPv6” on page 89 for further information.) The KVM switch can either have its IPv6 address assigned dynamically (DHCP), or it can be given a fixed IP address. •... -
Page 71: Authentication
Log Server. Important transactions that occur on the KVM switch, such as logins and internal status messages, are kept in an automatically generated log file. See “Log” on page 76, for details on setting up the log server. • Specify the MAC address of the computer that the Log Server runs on in the MAC address field. •... - Page 72 AD / LDAP Settings. To allow authentication and authorization for the KVM switch via LDAP / LDAPS: Item Action Enable Put a check in the Enable checkbox to allow LDAP / LDAPS authentication and authorization. Type Select Preferred LDAP or Altenate LDAP from the list. LDAP Server IP and Fill in the IP address and port number for the LDAP or LDAPS server.
- Page 73 Enable Dial Out. For the dial out function, establish an account with an Internet Service Provider, and use a modem to dial up to your ISP account. Item Action ISP Settings Specify the telephone number, account name (username), and password that you use to connect to your ISP.
-
Page 74: Security
Security Login Failures For increased security, administrators can set policies governing user log in failures. Check the Enable checkbox (the default is disable). Entry Explanation Allowed Sets the number of consecutive failed login attempts permitted from a remote computer. The default is disable. Timeout Sets the amount of time a remote computer must wait before attempting to login again after exceeding the allowed failures. -
Page 75: Account Policy
IP Filter / MAC Filter Conflict. If there is a conflict between an IP filter and a MAC filter (a computer's address is allowed by one filter but blocked by the other) then the blocking filter takes precedence (the computer's access is blocked). Modifying Filters. -
Page 76: Working Mode
Working Mode Item Explanation Enable ICMP If ICMP is enabled, the KVM switch can be pinged. If it is not enabled, the device cannot be pinged. The default is Enabled. Enable Multiuser Enabling Multiuser Operation permits up to 32 users to log in at the same time to share the Operation remote bus. -
Page 77: Certificate Signing Request
There are methods for establishing your private certificate: • Obtaining a CA Signed SSL Server Certificate For the greatest security, a third party certificate authority (CA) signed certificate is recommended. To obtain a third party signed certificate, go to a CA (Certificate Authority) website to apply for an SSL certificate. -
Page 78: Date/Time
Date/Time The Date/Time dialog page sets the KVM switch time parameters according to the information below. Time Zone. • Choose from the Time Zone list the city that corresponds to the location of the KVM switch. • If your country or region employs Daylight Saving Time (Summer Time), check the corresponding checkbox. -
Page 79: Port Operation
Port Operation After logging in, the KVM switch opens to the Port Access tab's Connections page, with the first KVM switch selected in the sidebar. NOTE: The WinClient and Java Client AP programs have a hidden Control Panel at the upper center of the screen that becomes visible when you move the mouse over it. -
Page 80: Toolbar Icons
Click to close the toolbar. Click to invoke Panel Array Mode. Not available on KVM1116Q at local console Click to cycle through the Adapter cable choices (Short, Medium, Long) used to connect the device to the switch. Choice depends on the length of Cat 5e cable used for the connection. The line length on the icon changes to indicate the selection. -
Page 81: Auto Scanning
Auto Scanning The Scan function switches at regular intervals among all ports accessible to the currently logged on user to automatically monitor activity. Users can also limit the number of ports scanned with the Filter function of the Sidebar. See “Scan” on page 37, and “Filter” on page 37, for more details. •... -
Page 82: Keyboard Emulation
Keyboard Emulation Mac Keyboard The PC compatible (101/104 key) keyboard can emulate the functions of the Mac keyboard. The emulation mappings are listed in the table below. PC Keyboard Mac Keyboard Shift HIFT Ctrl ] [1] ] [2] ] [3] ] [4] RINT CREEN... -
Page 83: Sun Keyboard
Sun Keyboard The PC compatible (101/104 key) keyboard can emulate the functions of the Sun keyboard when the Control key [Ctrl] is used in conjunction with other keys. The corresponding functions are shown below. PC Keyboard Sun Keyboard Stop ] [T] Again ] [F2] Props... -
Page 84: Panel Array Mode
Panel Array Mode Click the Panel icon on the toolbar to start Panel Array Mode. The screen is divided into up to 42 panels: • Each panel represents one of the switch's ports beginning with Port 1 at the upper left, and going from left to right;... -
Page 85: Panel Array Toolbar
Panel Array Toolbar The panel array toolbar provides shortcut navigation and control of the panel array. The toolbar can be dragged anywhere on the screen. Move the mouse over an icon to show a "tooltip" (a short description of the icon's function). Icon Purpose Click and drag to move the toolbar.... -
Page 86: Log
Log Information The Log Information page displays events and provides the time, severity, user, and description of each event. The sort order can be changed by clicking on the column headings. The log file tracks a maximum of 512 events. When the limit is reached, the oldest events are discarded as new events arrive. Button Explanation Pause... -
Page 87: Log Notification Settings
Log Notification Settings Select which events trigger a notification and how the notification are sent out. Notifications can be sent via SNMP trap, SMTP email, written to the SysLog file, or any combination of the three. A check mark indicates that notification of the event is enabled for the method specified in the column heading, an X indicates that notification is not enabled. -
Page 88: Maintenance
Maintenance Upgrade firmware, backup and restore configuration and account information, ping network devices, and restore default values. Main Firmware Upgrade This procedure needs to be connected from Browser or Client AP. Upgrade the KVM switch's main firmware and upgrade Blade Servers deployed on the installation. New versions of the firmware can be downloaded from the website as they become available. -
Page 89: Firmware Upgrade Recovery
Firmware Upgrade Recovery If the switch's main firmware upgrade procedure fails, and the switch becomes unusable: 1. Power off the switch. 2. Press and hold the Reset Switch in (see page 7). 3. While holding the Reset Switch in, power the switch back on. The switch reverts to the original factory installed main firmware version. -
Page 90: Terminal
Terminal Terminal provides a command line to execute options using a terminal interface. Type a command in the window and hit [Enter] to execute it. Available commands include: Command Function BLADEDEBUG => Debug blade server CLS => Clears the screen ENABLERC4 =>... -
Page 91: System Operation
System Operation Restore configuration changes made to the KVM switch to their original factory default values. Clear Port Names. Removes names that have been assigned to the ports Restore Default Values. Removes all changes made to the KVM switch (except for the Port Names), including the Network Transfer Rate (on the Network page). -
Page 92: The Log Server
The Log Server The Windows-based Log Server is an administrative utility that records all the events that take place on selected KVM switches and writes them to a searchable database. Installation 1. Log into the KVM switch (see page 17). 2. - Page 93 Events. The Events Menu has two items: Search and Maintenance. Search: Search for events containing specific words or strings. Item Description New search One of three radio buttons that define the scope of the search. Select to search all events in the database for the selected Server.
-
Page 94: The Log Server Main Screen
The Log Server Main Screen Overview. The Log Server Main Screen is divided into two main panels. • The upper (List) panel lists all of the KVM switches that have been selected for the Log Server to track (see “Log” on page 76). •... - Page 95 OpenLDAP OpenLDAP is an Open source LDAP server designed for Unix platforms. OpenLDAP Server Installation. Download and install the program. The default directory is: c:\Program Files\OpenLDAP. Select install BDB-tools and install OpenLDAP-slapd as NT service. OpenLDAP Server Configuration. Customize the main OpenLDAP configuration file, slapd.conf, (in the /OpenLdap directory) before launching the server.
-
Page 96: Factory Default Settings
Factory Default Settings Settings Values Port Access - Port Configuration - Edit Ports Properties Occupy Timeout 3 sec Access Mode share Port OS OS Language English US Cable Length Short Device Managemet - Network IP Installer View Only Network Transfer Rate 99999 KBps Operating Mode Force All to Grayscale... -
Page 97: Serial Adapter Pin Assignments
Serial Adapter Pin Assignments KVM1116Q RJ45-F to DB9-M (Black Connector) DTE to DCE (RJ45) Pins (8) <--------> Modem/Device (DB9) <--------> <--------> <--------> <--------> <--------> <--------> <--------> <--------> 9 NC not used Virtual Media Support (This function is available in EMEIA regions only) WinClient ActiveX Viewer / WinClient AP •... -
Page 98: Ip Address Determination
IP Address Determination Log in to the KVM switch as administrator the first time and give it an IP address for connection by users. Your client computer must be on the same network segment as the KVM switch. Connect and log in to give the KVM switch its fixed network address. -
Page 99: Ipv6
IPv6 The KVM switch supports three IPv6 address protocols: Link Local IPv6 Address, IPv6 Stateless Autoconfiguration, and Stateful Autoconfiguration (DHCPv6). Link Local IPv6 Address. The KVM switch is automatically configured with a Link Local IPv6 Address (for example, fe80::210:74ff:fe61:1ef). To find out what the Link Local IPv6 Address is, log in with the KVM switch's IPv4 address and open the Device Management >... -
Page 100: Connection Setup Example (Windows 7)
Basic Setup. The KVM switch can be accessed through its RS-232 port using a PPP dial-in connection: 1. Set up your the KVM switch configuration to match the diagram: LAN 2 PDU 2 LAN 1 PDU 1 Adapter Modem Remote User Phone Line Modem... -
Page 101: Additional Mouse Synchronization Procedures
Additional Mouse Synchronization Procedures To use Manual Mouse Synchronization, perform the following operations on the servers that connect to the switch. NOTE: 1. These procedures are performed on the servers attached to the switch's ports, not on the client computer you are using to access the KVM switch. 2. -
Page 102: Kvm-Serial Server Module Configuration And Operation
KVM-SERIAL Server Module Configuration and Operation (This function is available in EMEIA regions only) The KVM-SERIAL cable connects a serial device to the KVM switch. Configuration To configure the KVM-SERIAL Server Module to interact with the connected device, set its serial parameters to match the parameters of the device: 1. -
Page 103: Internal Serial Interface Configuration
Internal Serial Interface Configuration To configure an attached server's serial interface parameters from within any accessed server. 1. From the accessed server, open a command line (terminal) session or third party serial application such as HypterTerminal or PuTTY. 2. Telnet or SSH to the KVM switch's IP address. 3. -
Page 104: Port Level Configuration
Port Level Configuration The configuration settings that can be made when a serial interface device is selected: Setting Description Port To configure the serial parameters: Configuration 1. Use the Up and Down Arrow keys to highlight the target item. 2. Press [E ] to open the list of choices.... -
Page 105: Troubleshooting
Troubleshooting General Operation Problem Resolution Erratic Operation Start the KVM switch before any tiered switches. 1. Power it on before powering on tiered switches. 2. If the tiered the KVM switch was started before the KVM switch, reset or restart the tiered the KVM switch. Press and release the Reset switch (see “Reset Switch”... -
Page 106: Mouse Problems
Mouse Problems Problem Resolution Mouse and/or Keyboard not responding Check that your KVM Adapter Cable's firmware version is the same as the version stored in the switch's Main firmware. See “Adapter Firmware Upgrade” on page 78 for details. Unplug the cable(s) from the console port(s), then plug it/ them back in. Mouse movement extremely slow There is too much data being transferred for your connection to keep up with. -
Page 107: Virtual Media
Virtual Media (This function is available in EMEIA regions only) Problem Resolution Virtual Media doesn't work. The remote server's mainboard does not support USB. If there is a newer firmware and BIOS version for the remote server's mainboard - one that supports USB - get it from the manufacturer and upgrade the server's mainboard firmware and BIOS. -
Page 108: The Winclient Activex Viewer And The Winclient Ap
The WinClient ActiveX Viewer and the WinClient AP Problem Resolution My KVM switches don't show up in the Server Only units whose Access Port settings for Program match the number List window when I start the WinClient AP specified for Port in the Server area of this dialog box appear in the Server program. -
Page 109: The Java Applet And Java Client Ap
The Java Applet and Java Client AP Problem Resolution I can't connect to the KVM switch. 1. The latest Java version must be installed on your client computer. 2. Check if you need to specify the Program port along with the IP address. -
Page 110: Redhat Systems
Redhat Systems Problem Resolution With Redhat 9.0 (2.4.20-8) installed as server, Choose the AS3.0 setting for your mouse synchronization mode. See Mac the keyboard and mouse aren't working and Linux Considerations, page 34 for details. normally with the console modules. With Redhat 9.0 (2.4.20-8) installed a desktop First, plug your keyboard and mouse into a USB 2.0 hub, then plug the system, the keyboard and mouse aren't... -
Page 111: Radio Frequency Interference
Radio Frequency Interference Changes or modifications to this unit not expressly approved by the party responsible for compliance could void the user’s authority to operate this equipment. USA — FCC This equipment has been tested and found to comply with the limits for a Class A digital device, pursuant to part 15 of the FCC Rules. - Page 112 European Union This product is in conformity with the protection requirements of EU Council Directive 2014/ 30/EU on the approximation of the laws of the Member States relating to electromagnetic compatibility. This product has been tested and found to comply with the limits for Class A Information Technology Equipment according to CISPR 32/European Standard EN 55032.