Table of Contents
Advertisement
Quick Links
Advertisement
Table of Contents

Related Manuals for RCA M5001


Summary of Contents for RCA M5001
- Page 1 M5001/M5002 User’s Manual REV 1.1...
-
Page 2: Fcc Information
FCC Information This device complies with part 15 of the FCC rules. Operation is subject to the following two conditions: (1) This device may not cause harmful interference, and (2) This device must accept any interference received including interference which may cause undesired operation. -
Page 3: Safety Information
Guide. Technical Specification Product: Digital Audio Player Brand: RCA Model: M5001/M5002 This unit may temporarily cease to function if subjected to electrostatic disturbance. To resume normal operation, it may be necessary to cycle the power off and back on M5001... -
Page 4: End User License Agreement
End User License Agreement IMPORTANT-READ CAREFULLY: This End User License Agreement("Agreement") is a legal agreement between you and Thomson Inc.("Thomson") for the RCA Audio Device application/driver software program and associated documentation, if any ("Program"). ACKNOWLEDGMENT BY INSTALLING THE SOFTWARE ORCLICKING ON THE ACCEPTANCE... - Page 5 In this case, the Program may not operate properly. Updated versions of the Program can be down loaded from www.rca.com. d) Thomson is not obligated to provide support services for the Program.
- Page 6 End User License Agreement WARRANTY DISCLAIMER THE PROGRAM IS PROVIDED "AS IS" WITHOUT WARRANTY OF ANY KIND, EITHER EXPRESSED OR IMPLIED, INCLUDING, BUT NOT LIMITED TO THE IMPLIED WARRANTIES OF MERCHANTABILITY, FITNESS FOR A PARTICULAR PURPOSE, TITLE OR NON-INFRINGEMENT. THE ENTIRE RISK AS TO THE QUALITY AND PERFORMANCE OF THE PROGRAM IS WITH YOU.
- Page 7 Microsoft that enables you to play Windows Media Audio (WMA) files ("WMA Software").The WMA Software is licensed to you for use with the RCA/THOMSON Portable Audio Device digital music player under the following conditions. By installing and using this version of the Player, you are agreeing to these conditions.
- Page 8 End User License Agreement The WMA Software is protected by copyright and other intellectual property laws. This protection also extends to documentation for the WMA Software, whether in written or electronic form. GRANT OF LICENSE. The WMA Software is only licensed to you as follows: You may use this version of the Player containing the WMA Software only with the Portable Audio Device player.
- Page 9 End User License Agreement THIRD PARTY SOFTWARE ANY THIRD PARTY SOFTWARE THAT MAYBE PROVIDED WITH THE PROGRAM IS INCLUDED FOR USE AT YOUR OPTION. IF YOU CHOOSE TO USE SUCH THIRD PARTY SOFTWARE, THEN SUCH USE SHALL BEGOVERNED BY SUCH THIRD PARTY'S LICENSE AGREEMENT, AN ELECTRONIC COPY OF WHICH WILL BE INSTALLED IN THE APPROPRIATE FOLDER ON YOUR...
-
Page 10: Table Of Contents
FCC Information ...i Safety Information ... ii End User License Agreement... iii How to Use This Manual ...1 Safety Instructions ...2 Chapter 1. Introduction...3 Unpack ...4 Chapter 2. Getting Started ...5 Overview ...5 LCD Display ...6 Main Menu...6 Normal Playback Mode ...7 Battery Recharge ...8 Battery Status ...8 Lock Switch ...9... -
Page 11: How To Use This Manual
Windows ME / 2000 / XP, and you are capable to follow the step-by-step instructions to install the utility of M5001/M5002. For users who are not able to manage the OS properly, it is suggested to learn more about Microsoft Windows by referring to your Microsoft Windows manual before installing the provided utility. -
Page 12: Safety Instructions
• The equipment has not worked well or you can not get it work according to User’s Manual. • The equipment has been dropped and damaged. Do not change the default folders in the M5001/M5002, or the device might function abnormally. -
Page 13: Chapter 1. Introduction
M5001/M5002. The new M5001/M5002 will improve the convenience of listening music, viewing photos/ videos, and sharing data. We are proud to tell our users that M5001/M5002 is thoroughly tested and certified by our reputation for unsurpassed dependability and customer satisfaction. -
Page 14: Unpack
– Hold Switch M5001/M5002 has a Hold Switch, which locates on the side for preventing any accidental operation while recording or playing. Once the Hold Switch is switched to lock position, all function keys on are disabled instantly. -
Page 15: Chapter 2. Getting Started
Chapter 2. Getting Started Overview 1. Display Screen 2. MIC 3. Exit/ Submenu 4. Play/Pause Power 5. Record Repeat A->B 6. Lock Read status and information at this window. Internal Microphone. Press it to exit to higher level menu. Hold it for two seconds to display available options. Options will vary depending on what menu is displayed. -
Page 16: Lcd Display
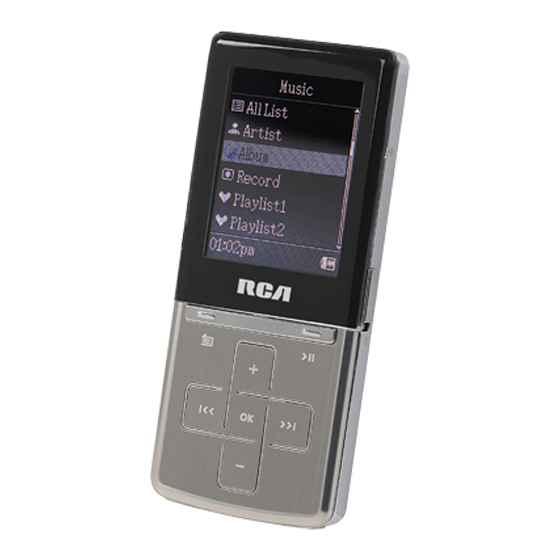
7. Up Volume Up 8. Down Volume Down 9. Left Previous/Rewind 10. Right Next/Forward 11. OK/ Enter 12. USB Connecter 13. Strap Hole 14. Earphone Jack Line-In Jack LCD Display Main Menu 1. Function Icon 2. Function Name 3. Scroll 4. -
Page 17: Normal Playback Mode
5. Clock 6. Battery Status Normal Playback Mode A. Function B. Play/Pause C. Track Name D. Album Name E. Artist Name F. Equalizer G. Playback Time Bar Shows the playback progress. H. Track Timer Track Number Clock K. Repeat/ L. EQ/SRS M. -
Page 18: Battery Recharge
M5001/M5002 comes with a Lithium ion polymer rechargeable battery. To charge the Li-ion battery, follow the instructions below: 1. On the bottom side of M5001/M5002, you could see a USB (B type, female) port. 2. Do not turn on M5001/M5002. Plug mini USB (B type, male) end of supplied USB cable to M5001/M5002, and USB (A type, male) end to your computer. -
Page 19: Lock Switch
M5001/M5002 has a Lock Switch to avoid accidental operation. Slide it to lock position while power is on, and all function keys are disabled. Slide it to unlock to continue. If the switch is at lock position, M5001/M5002 can not be turned on. Unlock it to continue. -
Page 20: Chapter 3. Connect And Disconnect
Make sure the lock key is in Unlock position. 1. On the bottom side of M5001/M5002, you could see a USB (B type, female) port. 2. Plug mini USB (B type, male) end of supplied USB cable to M5001/M5002, and plug USB (A type, male) end to your computer. -
Page 21: Chapter 4. Basic Usage
Chapter 4. Basic Usage This chapter introduces the basic usages of M5001/M5002. Please read carefully to know how to operate your device. Note that the figures below are for reference only. Power On Before operation, you have to turn on the device first. Follow the steps below to turn on M5001/M5002. -
Page 22: Music
Music Music Playback M5001/M5002 supports MP3 Follow the steps below to enjoy music. 1. To play music/ voice, select and enter the Music option on Main Menu. 2. Then press the music files. - Select All List to play all music files stored. -
Page 23: Add Songs To Playlist
Add Songs to Playlist In M5001/M5002, you can edit personal playlist to include your favorite songs. Follow the steps below. 1. In playback mode or on Music file list, press for 2 seconds to call submenu. 2. Select the Add to PL item and press OK key to activate. -
Page 24: Remove A Song From Playlist
Remove a Song from Playlist 1. Select and enter the Music item in Main Menu. 2. Select the Playlist you want edit. 3. Use button to select a song to delete, and press button for 2 seconds to call submenu. 4. -
Page 25: Lyric Function On/ Off
Lyric Function On/ Off M5001/M5002 supports lyric display. If you stored songs with lyric files, you can turn on the lyric to read by the steps below. 1. In playback mode, call submenu. 2. Select the Lyric On item and press OK key to confirm, you can read the lyric as the track is playing. -
Page 26: Set Eq
Set EQ M5001/M5002 provides various EQ modes, such as POP, Rock, Jazz, and Classical. You can choose as following steps to increase the enjoyment of listening to music and to meet your personal needs. 1. In playback mode, call submenu. -
Page 27: Photo
Photo M5001/M5002 supports JPEG graphics (up to 8 mega pixels) and provides slideshow function. View Photo 1. To view photos stored on M5001/M5002, select Photo option on Main Menu and press OK key to enter the photo function. 2. Select and press OK key on a file to view, then thumbnails of stored first 12 photos will show on display. -
Page 28: Slideshow
Slideshow You can have the JPEG files slideshow on M5001/M5002. 1. While viewing one photo, press slideshow. There will be a corner of the display. 2. To stop slideshow, press be a icon at the bottom right corner of the display. -
Page 29: Puzzle
Puzzle You can play puzzle with the stored photo. 1. While viewing one photo, call submenu. Select Puzzle option and press OK key. The photo will be cut in pieces, one piece will be cut down as a black box, and the others will be moved and placed in wrong order. -
Page 30: Video
Video Play Video M5001/M5002 supports .MOV video files encoded with M-JPEG up to a resolution of 128x160 and 12 frames per second (fps). 1. To play video files stored on M5001/M5002, select Video option on Main Menu and press OK key to enter the video function. -
Page 31: Notes
Notes Read *.txt File M5001/M5002 supports reading .txt and .lrc Unicode files. 1. To read text files stored on M5001/M5002, select Notes option on Main Menu and press OK key to enter the Notes function. 2. Select a text file on the file list and press OK key to read it. -
Page 32: Fm Radio
FM Radio Listen to FM Ratio M5001/M5002 supports FM radio function.Follow steps below to enjoy FM radio. 1. To listen to the FM radio broadcast by M5001/M5002, select the Radio option on Main Menu and press OK key to enter. (Also, the earphones have to be plugged, they are the antenna of M5001/M5002) 2. -
Page 33: Customize Channels/ Auto-Scan
Customize Channels/ Auto-Scan You can also set channels at your preference. And if you go to different region, you can perform Auto Preset to scan available stations. 1. Adjust the frequency to the station you need, call submenu, and select Save CH option. 2. -
Page 34: Browser
Browser M5001/M5002 provides an easy access to file management. The file browser can open and arrange files stored on the device. Browse Contents In Browser, you can open video, music, photo, note files which are readable by each function page. -
Page 35: Setting
Setting Enter Setting Menu, you can adjust all the options and allow M5001/M5002 to meet your needs. 1. Select Setting option on Main Menu and press OK key to enter. Lyric On/ Off M5001/M5002 supports lyric display. If you store songs with lyric files, you can turn on the lyric to read lyric by the steps below. -
Page 36: Srs
M5001/M5002 supports SRS effect. WOW is a special combination of SRS audio technologies that creates a thrilling experience with deep rich bass from sound source. Note that when SRS is enabled, the EQ settings will be disabled at the same time. -
Page 37: Set Eq
Set EQ M5001/M5002 provides POP, Rock, Jazz, and Classical EQ modes. Note: Once EQ is enabled, SRS settings will be disabled at the same time. 1. Select Setting option on Main Menu and press OK key to enter. 2. Select and enter EQ item. -
Page 38: Record Settings
Record Settings 1. Select Setting option on Main Menu and press OK key to enter. 2. Select and enter Record option. 3. Select and enter the Quality item. 4. Select one of the options by your needs. 5. You can set the record file type to be MP3 or WAV by selecting the options in File Type, then press OK key to confirm. -
Page 39: Slide Settings
Slide Settings You can set how long each image is displayed. 1. Select and enter Setting item in Main Menu. 2. Select and enter Slide Interval item. 3. Select one from the options to meet your needs. 4. Press button once to go back to upper level. Select and enter Slide Repeat item. -
Page 40: Radio Region
OK key to confirm. Power Off You can set the timer under Power Off setting to turn off M5001/M5002 auto- matically. After the selected period, M5001/M5002 will stop playing and be off. 1. Select the Setting item in Main Menu. -
Page 41: Backlight Off
Backlight Off Backlight timer program can save the power. After having been idle for selected period, the device will cease backlight. Press any button to have backlight on. 1. Select the Setting item in Main Menu. 2. Select the Backlight Off item. 3. -
Page 42: Language
Language 1. Select the Setting item in Main Menu. 2. Select the Language item. 3. Select a language you want to use, then press OK key to confirm. -
Page 43: Date And Time
Date and Time 1. Select the Setting item in Main Menu. 2. Select the Date/Time item. 3. To adjust how you want the time to be displayed, select the Time Format item, and then select 12 hour or 24 hour format. -
Page 44: Master Reset
Master Reset 1. Select the Setting item in Main Menu. 2. Select the Master Reset item. 3. Select the Yes item, then press OK key to confirm. Info 1. Select the Setting item in Main Menu. 2. Select the Info item. 3. -
Page 45: Record
Record Line-In Recording M5001/M5002 has a build-in encoder. With this encoder, you can record external audio via Line-In Jack. First of all, plug one end of Line-In cable to the Audio-out jack of a Walkman, Computer, Radio, TV, or other Audio Equipments, and plug the other end to the Line-In jack of M5001/M5002. -
Page 46: Microphone Recording
Microphone Recording M5001/M5002 has a built in Microphone, which can also works as a synchronizing recorder. In other words, you can use it to record your voice in either an interview or a speech. To proceed Microphone Recording, follow the steps below. -
Page 47: Language Learning Function
Language Learning Function M5001/M5002 enables users to listen to a particular section repeatedly during music or voice playback. With this function, users will be able to pay attention to the repeated section and to achieve the result of language learning. -
Page 48: Synchronize Songs
Synchronize Songs Once the Windows Media Player Plug-in of M5001/M5002 has been installed (from the supplied CD), refer to steps below to synchronize: Note: If the version of Windows Media Player on your computer is below 10, upgrade it via Internet beforehand. - Page 49 5. Click the Start Sync button in the List pane, and you can see the process.
-
Page 50: More Information
Troubleshooting Tips The player does not turn on when the PLAY button is pressed? Try to reset the device by press and hold Power button for 10 seconds. Battery may be empty. Skipping tracks or bad sound quality? Repeat, random or program function may be activated. -
Page 51: U.s. Warranty
What your warranty covers: Defects in materials or workmanship. For how long after your purchase: One year from date of purchase. The warranty period for rental units begins with the first rental or 45 days from date of shipment to the rental firm, whichever comes first. - Page 52 U.S. Warranty Product Registration: • Please complete and mail the Product registration Card packed with your unit. It will make it easierto contact you should it ever be necessary. The return of the card is not required for warranty coverage. Limitation of Warranty: •...