
Related Manuals for RCA H115/H125


Summary of Contents for RCA H115/H125
-
Page 1: Digital Audio
H115/H125 Digital Audio Player User’s Guide Changing Entertainment. Again. www.rca.com It is important to read this instruction book prior to using your new product for the first time. -
Page 2: Table Of Contents
Table of Contents Table of Contents ... 2 Important Information ... 4 End User License Agreement ... 6 Before You Begin ... 8 Unpacking Your Unit ... 8 Things to consider before you get started..9 Computer System Requirements ... 9 Secure Music Download Requirements ... - Page 3 My Selections ... 26 Adding Items to My Selections ... 26 Saving MySelections as a Playlist ... 26 Viewing Playlists ... 27 Deleting Playlists ... 27 Player’s Menus ... 28 Accessing the Player’s Menus ... 28 Navigation and Selections ... 28 Shuffle ...
-
Page 4: Important Information
AC charger to rain or moisture. Technical Specification Product: Digital audio player Brand: RCA Model: H115/H125 Electrical Rating DC : 3.7 V Li-polymer battery (built -in) Importer Comercializadora Thomson de México, S.A. de C.V. Álvaro Obregón No. 151. Piso 13. - Page 5 FCC Regulations state that unauthorized changes or modifications to this equipment may void the user’s authority to operate it. FEDERAL COMMUNICATIONS COMMISSION INFORMATION This equipment has been tested and found to comply with the limits for a Class B digital device, pursuant to Part 15 of FCC Rules.
-
Page 6: End User License Agreement
End User License Agreement End User License Agreement IMPORTANT-READ CAREFULLY: This End User License Agreement (“Agreement”) is a legal agreement between you and Thomson Inc. (“Thomson”) for the RCA Player, Device application/driver software program and associated documentation, if any (“Program”). ACKNOWLEDGMENT... - Page 7 RESULTS, AND FOR THE INSTALLATION, USE, AND RESULTS OBTAINED. WINDOWS MEDIA This version of the RCA Player (the Player) contains software licensed from Microsoft that enables you to play Windows Media Audio (WMA) files (“WMA Software”).The WMA Software is licensed to you for use with the RCA/THOMSON Portable Audio Device digital music player under the following conditions.
-
Page 8: Before You Begin
USB port. Go to page 13 for connection details. Headphones Explore a world of accessories! Jump on the Internet and go to www.rca.com to discover the additional accessories that are available for your player. Illustrations contained within this publication are for representation only and subject to change. -
Page 9: Things To Consider Before You Get Started
Things to consider before you get started... Computer System Requirements • Pentium III 500MHz or higher recommended, running Windows ® XP SP1 (SP= Service Pack). • Internet Explorer 4.0 or higher • Internet access (broadband recommended) • 100MB free hard disk space for the software •... -
Page 10: Caution
Back up your data As with any portable device that has a hard drive, you must back up the drive regularly. RCA and Thomson are not responsible for lost data. Product Registration Please fill out the product registration card and return it immediately. Returning this card... -
Page 11: Software Setup
The Music Management CD that comes with your player contains all of the necessary software components you need to make your player work properly. These components do the following: • enable you to transfer files from your computer to your player •... -
Page 12: Connecting To The Computer
Connecting to the Computer Connecting the Player to the Computer Connect the digital audio player to your computer with the mini USB cable provided. The unit will turn on automatically. The player will appear as a Windows portable device (Windows XP) using the Media Transfer Protocol (MTP). Note: It might take several seconds for the device to be detected. -
Page 13: Charging The Battery
Charging the Battery Your RCA digital audio player is charged through the USB connection when it is connected to your computer. To fully charge the player, make sure your computer is on and the device is connected for at least 3 hours. -
Page 14: Transferring Files To The Player
Transferring Files to the Player Transferring Files to the Player You may select one of the methods to transfer music contents to your player: 1) Yahoo! Music Engine, 2) drag-and-drop via Windows Explorer. For method 1 and 2, you first need to have successfully installed the software packages included in the Music Management CD (refer to “Inserting the Included CD-ROM into CD-ROM Drive). -
Page 15: Transferring Files Via Yahoo! Music Engine (Windows Xp Only)
Transferring Files via Yahoo! Music Engine (Windows XP only) Yahoo! Music Engine lets you manage your music easily and organize like a pro. Create your own playlists: music for work, the gym, or even dinner. You can also buy download music and transfer to your player in seconds. - Page 16 Transferring Files to the Player In the Yahoo! Music Engine, click My Music or click on a playlist on the left navigation pane. From a playlist: at the bottom of the Yahoo! Music Engine window, click the Transfer to Device button. OR From My Music: drag and drop files from My Music to the player.
-
Page 17: Transferring Files Via Windows Explorer (Drag-And-Drop)
Transferring Files via Windows Explorer (Drag and Drop) (Windows XP only) In the Windows Explorer, when the device is opened, the “Data” and “Media” views will be displayed for the device. The Data View is used to manage data content on the device, such as text files. The Media View is used to manage media content supported by the device for playback, such as mp3 and wma. -
Page 18: Disconnecting Your Player From The Computer
Transferring Files to the Player Disconnecting Your Player from the Computer Note: Before disconnecting the USB cable from the computer or the player, be sure the “Safe to Remove Hardware” message is displayed. Tip: You can also stop your player by left clicking on the tray and selecting the drive corresponding to your player. -
Page 19: General Controls
Before You Begin The following example illustrates what you should do before operating your player. These instructions presume you’ve already done the followings: • Installed all necessary applications. • Transferred music from your computer to the player. • Allowed your device to charge for at least 3 hours while connected to the computer. -
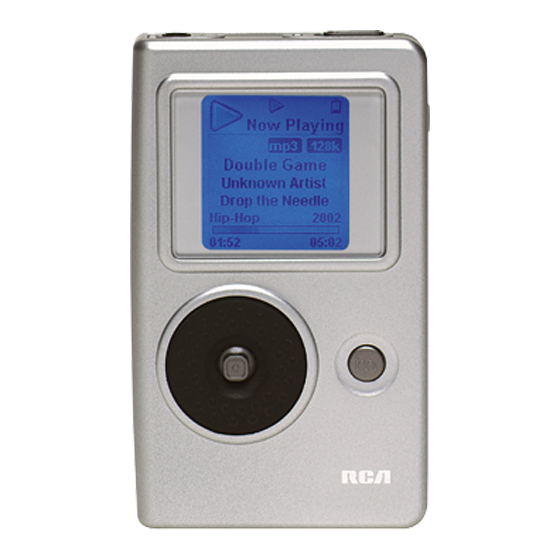
Page 20: Overview Of The General Controls
General Controls Overview of General Controls Front view Front View LCD (Liquid Crystal Display) - This is where the user interface appears. Navigation Controls CONTROL - For navigation control and various functions in different modes. Audio navigation mode Control joystick - Press once to play the highlighted item; or press and hold to select the item into My Selections. -
Page 21: Top View
Audio playback mode Control joystick - Press once to pause the selected item; or press and hold to select the item into My Selections. RIGHT - Press to skip to the next song, press and hold to search forward. LEFT - Press to skip to the previous song, press and hold to search backward. UP - Go to previous set of songs* (when the shuffle mode is not selected). -
Page 22: Navigation Display
General Controls Navigation Display This icon will change to show whether the device is playing or paused. This icon will change to indicate the shuffle mode. This icon will change to indicate the repeat mode. The lock icon is displayed when the key lock function is activated. This can be activated by sliding HOLD to the left. -
Page 23: Music Playback Display
Music Playback Display Current file number / total number of file Song name Singer name Album name Genre type Elapsed playback time Indicates whether the device is playing or paused. Indicates the shuffle function is activated. Indicates the repeat function is activated. -
Page 24: The Navigation Menus
General Controls The Navigation Menus Music files are sorted according to several parameters for quick search of your favourite music. Once your player is turned on, you will see the file menus as below: Music Folders* * Folders mode - Your player is also a USB mass storage device that can be used to store any files. - Page 25 Artist 2 All Songs Album 1 Album 2 Album 3 Album 4 Album 5 Album 2 All Songs Song 1 Song 2 Song 3 Song 4 Song 5 Tips: the item that you can select for playback does not limit to a single file, you may select an artist, an album, a playlist or a folder and then press the Control joystick to start playback of all files within your selected item.
-
Page 26: My Selections
My Selections Adding Items to My Selections You can select your favorite songs, albums, artists as MySelections. Album 1 Song1 Song 2 Added to My Sel Song 3 Song 4 Song 5 Saving MySelections as a Playlist Albums Titles Genres Years Playlists Playlists... -
Page 27: Viewing Playlists
Viewing Playlists Albums Titles Genres Years Playlists Playlists MySelections Playlist1 Playlist2 Playlist3 Playlist4 Deleting Playlists Albums Titles Genres Years Playlists Playlists MySelections Playlist1 Playlist2 Playlist3 Playlist4 Menu Delete Playlist Save as Playlist Shuffle Repeat Flat Settings System Info My Selections In navigation mode, push the Control joystick to move the cursor to Playlists. -
Page 28: Player's Menus
Player’s Menus Accessing the Player’s Menus Press M in any mode to access the player’s menu. Note: during playback M has to be pressed twice to display the player’s menu. Player’s menus Navigation and Selection Player’s Menu items To scroll up or down and highlight items on the screen, rotate the Control ring. To enter and view the submenu, push the Control joystick to the right. -
Page 29: Shuffle
Shuffle Press the Control joystick repeatedly to select shuffle on or off. Files will be played randomly when shuffle is activated. Repeat Press the Control joystick repeatedly to select a repeat mode. Repeat One - Repeat the current item Repeat All - Repeat all items. Repeat Off - Repeat is Off. -
Page 30: Settings
Player’s Menus Settings Press the Control joystick to enter the Settings menu and rotate the Control ring to select an item. Refer to the player for options available within each item. Press the Control joystick repeatedly to select settings. Customize Menu: to customize the music menu to show and hide certain menu items. -
Page 31: Additional Information
Format your unit by right-clicking on the drive letter or icon of your device and select FORMAT. • Please go to http://www.rca.com/digitalaudiodownloads for more details. Problem: Player does not respond to key presses. • If your player stops responding to key presses, you can reset it by pressing ON/OFF for more than 10 seconds. -
Page 32: Check For Updates
• For more information on the Microsoft PlaysForSure program, visit www.PlaysForSure.com. • For more information on RCA PlaysForSure devices, visit www.rca.com. Check for Updates Visit http://www.rca.com/digitalaudiodownloads for the latest news and firmware upgrades for our digital media player. -
Page 33: Specifications
This includes word processing files, presentations, spreadsheets and any other computer files. • Capacity: H115/H125 - 5 GB • Rotational Speed: 3600 RPM •... -
Page 34: Limited Warranty (U.s.)
Your serial number is located on the back of the unit. How you get service: • Contact us on the Internet at www.rca.com and have your unit’s date of purchase and model/serial number ready. The model/serial number information is on your unit. - Page 35 • Write the SR number on the outside of the carton used to return the unit. Make sure you insure your shipment in case of damage or loss. • Carefully pack the unit using the original box and packing material if possible. Please retain all non-defective accessories that were included with your unit such as the headphones.
- Page 36 Additional Information Limitation of Warranty: • THE WARRANTY STATED ABOVE IS THE ONLY WARRANTY APPLICABLE TO THIS PRODUCT. ALL OTHER WARRANTIES, EXPRESS OR IMPLIED (INCLUDING ALL IMPLIED WARRANTIES OF MERCHANTABILITY OR FITNESS FOR A PARTICULAR PURPOSE) ARE HEREBY DISCLAIMED. NO VERBAL OR WRITTEN INFORMATION GIVEN BY THOMSON INC., ITS AGENTS OR EMPLOYEES SHALL CREATE A GUARANTY OR IN ANY WAY INCREASE THE SCOPE OF THIS WARRANTY.
-
Page 37: Limited Warranty (Canada)
Limited Warranty (Canada) Thomson multimedia Ltd. warrants to the purchaser or gift recipient that if any manufacturing defect becomes apparent in this product within 1 year from the original date of purchase, it will be replaced free of charge, including return transportation. This warranty does not include damage to the product resulting from accidents, misuse or leaking batteries. - Page 38 Additional Information visit us at www.rca.com Please do not send any products to the Indianapolis address listed in this manual or on the carton. This will only add delays in service for your product. EXPORTER Thomson Inc. Importador P.O. Box 1976 Comercializadora Thomson de México, S.A.