
Related Manuals for Mitsubishi EasyPhoto MT1 series


Summary of Contents for Mitsubishi EasyPhoto MT1 series
- Page 1 OPERATOR USER´S MANUAL DPS TERMINAL Model MT1 series Software version 2.1.0 ENGLISH Rev 1.8 For more information please visit www.mitsubishiphoto.com www.easyphotosystem.com...
-
Page 2: Table Of Contents
Operator user‟s manual TABLE OF CONTENTS INTRODUCTION ..................5 1.1 The best choice ..................... 5 1.2 Description ....................5 1.2.1 Services ...................... 5 1.2.2 Functions ....................6 1.3 Working Modes ..................... 6 1.3.1 Kiosk Mode ....................6 1.3.2 Operator Mode ................... 6 1.3.3 Order Terminal Mode (Optional) .............. - Page 3 Operator user‟s manual 3.5 Burning DVD/CD ..................23 3.5.1 Selecting photos ..................24 3.6 Compositions....................25 3.7 Photo ID (Optional) ..................26 3.7.1 Taking the pictures ................... 26 3.7.2 Selecting the service ................26 3.7.3 Selecting the picture source ..............27 3.7.4 Selecting the layout ..................
- Page 4 Operator user‟s manual 6.4 Restore Partial Backup ................72 6.5 Restore Total Backup .................. 72 6.6 Restore system from DVD / Factory Settings..........73 6.7 Shutdown ....................73 ACTIVATING ADDITIONAL LICENSES ..........74 7.1 Register and Getting the Activation KEY ............. 74 7.2 Activating licenses in the easyphoto application.
-
Page 5: Introduction
The main advantage of this system is the possibility of seeing all the pictures, and printing only the desired. The system is compatible with 2 different MITSUBISHI ELECTRIC dyesub printers: CP9550DWS and CPD70DWS. NOTE The easyID70 system is an easyphoto system with reduced functionalities. The complete information about this system can be found at chapter „EasyID70‟... -
Page 6: Functions
Operator user‟s manual ONLINE Kioskgifts: the end customer can print orders prepared at home using the online application found at www.kioskgifts.com. 1.2.2 Functions Zoom and Crop: Allows the picture to be trimmed in a portrait and landscape format. Rotation: Allows the picture to be rotated. Red eyes effect: Allows removing the red eyes effect. -
Page 7: System Functions
Operator user‟s manual SYSTEM FUNCTIONS 2.1 Input of images It is necessary to input images in Easyphoto to perform any service. There are many ways of transferring images which are listed below: 2.1.1 Input images from a memory card Easyphoto accepts images from all normal memory cards, like SD, MMC, Compact Flash, xD, MemoryStick…... -
Page 8: Photography Services
Operator user‟s manual 2.2 Photography services 2.2.1 Instant Prints The pictures which have previously been inserted in Easyphoto can be printed in different formats according to the client‟s choice. The possible paper formats offered by Easyphoto are as follows: Media Size Formats 10x15 cm (4x6”) The most frequently used format for standard prints. -
Page 9: Calendars (Optional)
Operator user‟s manual refresh button for continuous shooting and printing, the better accessibility to different tools to adjust zooming, cropping and pan of the picture, and the automatic biometrics detection. The automatic biometrics detection processes the picture of the customer and helps the operator to fit the face inside the biometrics mask that follows each country regulations. -
Page 10: Online Kioskgifts (Optional)
Operator user‟s manual 2.2.9 ONLINE Kioskgifts (Optional) NOTE ONLINE Kioskgifts is an additional licence. Contact with your dealer to acquire this licence. See also „ACTIVATING ADDITIONAL LICENSES‟ chapter. The end customer can print orders prepared at home using the online application found at www.kioskgifts.com. -
Page 11: Screen Flow
Operator user‟s manual SCREEN FLOW For accessing to the services of Easyphoto: NOTE Before switching on the equipment, make sure that there is no additional USB storage devices connected. It may cause problems when detecting the different devices later. 1. Touch the red button to switch on the Easyphoto terminal. Access to services by touching the screen with your finger. -
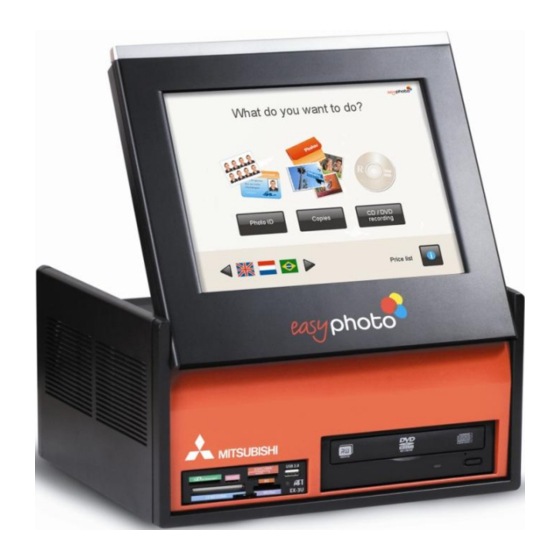
Page 12: Services: What Do You Want To Do
Operator user‟s manual 3.1 Services: What do you want to do? Once the Easyphoto has been switched on, you can see the first screen: On this screen you can: Use the arrows to select the desired language. Press the “Price list” button to display the price list. Access to the services of Easyphoto. -
Page 13: Input Of Images: Where Do You Have Your Pictures
Operator user‟s manual 3.2 Input of images: Where do you have your pictures? Once any service has been selected, the following screen is displayed: Choose the option in which your images are saved. The system can open only these kinds of picture files: JPG, BMP, TIF, PNG and GIF. 3.2.1 Memory Card If your images are saved in a memory card: 1. -
Page 14: Usb Pendrive
Operator user‟s manual 3.2.2 USB pendrive If your images are saved in a USB pendrive: 1. Press the “USB pendrive” button. The following screen appears, indicating how and where to introduce the USB pendrive. Introduce the USB pendrive as indicated on the screen. Press “Next”. -
Page 15: Bluetooth
Operator user‟s manual 3.2.4 Bluetooth If your images are saved in a Bluetooth device: 1. Press the “Bluetooth” button. The following screen appears, indicating how to transfer the images. Transfer the images as indicated on the screen. Press “Next”. 3.3 Selection of images: Picture loading options Once the pictures from the source have been correctly detected, a new screen is displayed: You can choose: “Choose folders”... -
Page 16: Instant Prints And Retouch: What Do You Prefer
Operator user‟s manual 1. Use the arrows to navigate through all the folders. Every folder shows a sample of pictures contained in the folder. 2. Press the desired folder or folders to select them. For deselecting folders: Press the selected folders for deselecting. Press “Continue”. -
Page 17: Instant Prints: 1 Copy Of All And 2 Copies Of All
Operator user‟s manual 3.4.1 Instant prints: 1 copy of all and 2 copies of all Once the “1 copy of all” or “2 copies of all” buttons have been selected, a new screen is displayed: 1. Press the button/ buttons which indicates the desired sizes to select them. Also these buttons shows the prices. -
Page 18: Additional Services: Would You Like To Add An Indexprint
Operator user‟s manual NOTE If “save all files” is selected: All the files (movies, mp3, etc…) included in the device will be burned on the CD/DVD. The original images will be burned on the CD/DVD and not the edited ones. Select “Yes, only selected pictures”... -
Page 19: Order Summary
Operator user‟s manual 3.4.4 Order summary After answering “Would you like to add an indexprint?” the following screen is showed: This screen lists all the services requested up to this moment and their cost. Press “Next” to confirm the order summary. In Kiosk mode an screen keypad is shown: it‟s necessary to validate the order by entering the operator password. -
Page 20: Retouch: View And Adjust My Pictures
Operator user‟s manual 3.4.5 Retouch: View and adjust my pictures Once the “View and adjust my pictures” button has been selected, a new screen is showed: Choose this option to retouch the selected image before printing. 1. Use the arrows which are on the top of the screen to select the image. Choose the size and quantity. -
Page 21: Red Eyes Removal
Operator user‟s manual Press “Finish order” to print. In this moment the screens explained from point 3.4.2 (Additional services: Would you like to burn a dvd or cd?) will be displayed. Red eyes removal Once the “Red eyes removal“ button is pressed, the following screen is showed: For removing the red eyes effect: 1. -
Page 22: Sepia And Black/White
Operator user‟s manual Sepia and black/white Once the “Sepia, black and white” button is pressed, the following screen is showed: For changing the image to black and white: 1. Press the “Black and white” button. Press the “Keep press to compare” button to display the original image without changes. Press the green tic to save the changes. -
Page 23: Zoom And Crop
Operator user‟s manual Zoom and crop. Once the “Zoom and crop” button is pressed, the following screen is showed: For increasing or decreasing the image: 1. Use the arrows to select the part of the image you are interested in. Press “-/+ zoom controls”... -
Page 24: Selecting Photos
Operator user‟s manual 3.5.1 Selecting photos Once the “Select photos” button is pressed, the following screen is showed: For selecting the images: 1. Use the arrows to display all the images. 2. Press the desired image to select it. Press “Yes” to copy it and “No” to deselect it. Press “Back”... -
Page 25: Compositions
Operator user‟s manual 3.6 Compositions Once the “Compositions” button is pressed, the Compositions service is started. The customer is asked to insert the picture source and after following the usual workflow, the pictures can be seen at the Ordering screen. In the right panel of the screen a maximum of 4 different layouts can be shown. -
Page 26: Photo Id (Optional)
Operator user‟s manual 3.7 Photo ID (Optional) It‟s highly recommended to follow the next steps to make an ID service. 3.7.1 Taking the pictures Before selecting the PhotoID service at the main screen, the operator should take the pictures to the customer. When using a digital camera with an USB cable connected to easyphoto: If an USB switch is being used between the camera and the easyphoto, this must be switched to the position where the connection between both devices is disabled, in... -
Page 27: Selecting The Picture Source
Operator user‟s manual 3.7.3 Selecting the picture source After this, depending on the system setup, it‟s necessary to follow the source selection workflow or it can be avoided if the operator is using always the same digital picture files source (see the Administration and Settings chapter for more information). -
Page 28: Selecting The Layout
Operator user‟s manual When using a PTP or Mass Storage mode compatible Digital Camera, the operator is requested to connect it as it‟s shown in the next picture. If an USB switch is being used between the camera and the easyphoto, now it must be switched to the position where the connection between both devices is active. -
Page 29: Selecting And Working With The Pictures
Operator user‟s manual 3.7.5 Selecting and working with the pictures In the top area, the pictures read from the source are shown. When selecting any of them, the picture will be loaded to be shown in the central area. In this screen, it‟s also possible to change the layout by clicking on the preview placed on the top-right corner. -
Page 30: Printing
Operator user‟s manual Once in the Photo ID screen again, it‟s possible to select another picture. 3.7.6 Printing After pressing the “Print” button, a pop-up will appear in order to determine the amount of copies desired. When pressing the refresh button, the latest images from the picture source are reloaded. When using a camera with PTP connection, only the latest 8 images from the device are loaded. -
Page 31: Automatic Biometrics Detection
Operator user‟s manual 3.7.7 Automatic biometrics detection When automatic biometrics detection is active in the settings (see Administration chapter), it will take some more time and the picture could appear centred and zoomed. The easyphoto system is applying innovative imaging processing tools to detect the face of the customer and helping the operator of the system to center the picture in the biometrics mask shown in the centre of the screen. -
Page 32: Calendars (Optional)
Operator user‟s manual 3.8 Calendars (Optional) Once the “Calendar” button is pressed, the Calendar service is started. First, is required to select the year to make the calendar. In the same screen, also the type of calendar (“Full year” or “Monthly”) can be chosen. 3.8.1 Monthly calendars This option makes it possible to create a 12-month calendar using a sheet for each month and including more than one year. - Page 33 Operator user‟s manual Pressing „Start calendar creation‟ and the Monthly calendar workflow is started. There is a help guide shown in the right part of the screen. It‟s required to select a picture in the top section of the screen in order to combine it with the calendar shown in the central area.
-
Page 34: Full Year Calendars
Operator user‟s manual 3.8.2 Full year calendars This option makes it possible to create a calendar of a specific year and using only one sheet. To do so, both the “Full year” option and the desired year will be selected. Pressing „Next‟, the thematic and design of the calendar can be chosen among several types. -
Page 35: Collage (Optional)
Operator user‟s manual „Full year calendar‟ option uses only one picture for the whole year (only 1 sheet of paper). After selecting the picture and adjusting the position in the calendar, „Next‟ button must be pressed to go on. Before confirming the order, the user is asked to choose the print size and the number of copies per each print size. - Page 36 Operator user‟s manual After that, is required to select size and number of prints to follow the standard workflow. 36/78...
-
Page 37: Frames & Greetings (Optional)
Operator user‟s manual 3.10 Frames & Greetings (Optional) Once the “Frames & greetings” button is pressed, the Frames & greetings service is started. The theme and design selection screen appears. Once the design is selected, the photo must be chosen and the resultant greeting will be displayed. Some designs can show an specific text like „Happy christmas‟, „Happy holidays‟... -
Page 38: Mosaic Poster (Optional)
Operator user‟s manual 3.11 Mosaic poster (Optional) NOTE The pictures used for this service must be carefully selected in order to avoid undesirable results. The subtle separation between the pieces of the mosaic can hide important parts of the picture, as instance in people portrait photos, hiding part of the face. -
Page 39: Online Kioskgifts (Optional)
Operator user‟s manual 3.12 ONLINE Kioskgifts (Optional) This service offers the possibility of printing the orders created at www.kioskgifts.com. The Kiosk doesn‟t require an internet connection for this service: the web site allows the end user to create a product everywhere (just using a PC or MAC and an Internet connection) and take the order stored in a digital media to the shop. - Page 40 Operator user‟s manual When the customer selects the pricing information, the list of all available products is shown. Even when these products can be similar or equal to local products offered by other services of easyphoto, like greetings or calendars, the price must be set again for these new products. Current supported products coming from www.kioskgifts.com from are:...
- Page 41 Operator user‟s manual Every order shows: The name of the product The name of the .tar file The date when the order was created The number of required sheets of paper The price The amount of copies of the same order. The customer can change this amount. When an order can not be processed by the system, an error code is shown inside the order area.
-
Page 42: Administration
Operator user‟s manual ADMINISTRATION In this section, the operator and supervisor can check the system status, while the supervisor can configure all the system parameters. Touch twice at the top right of the principal screen to enter “Administration”. Once you have entered to administration, the following screen is showed: The date and the System ID are shown. -
Page 43: System Status
This information is useful for service or remote support purposes. The information is divided into 3 different areas: Printers: the information about the MITSUBISHI photo printer and ticket printer is shown in this area. Device proper connection or available media information is available. -
Page 44: Settings
Operator user‟s manual 4.2 Settings Once the “Settings” button is pressed, the supervisor password is requested and the following screen is showed: 44/78... - Page 45 Operator user‟s manual Supervisor can enter to the following options: Main. User‟s administration. Devices. Services. Statistics. Import/ export settings. Screenshots. Orders In some parts of “Settings” it is necessary to enter a text. The on-screen keyboard can then be used. It‟s composed by two layers: The first one shows the alphanumeric keyboard and the second one appears when pressing “Others”...
-
Page 46: Main
Operator user‟s manual 4.2.1 Main Once the “Main” button is pressed, the following screen is showed: On this section you can choose: Workflow mode: Kiosk mode / Operator mode / Order Terminal mode Available languages for the end customer in mode Kiosk („Kiosk language‟) Current country Date and time setting (for ticket printer) Enable/disable ticket printer (if available) - Page 47 Operator user‟s manual In both Kiosk Mode and Order Terminal Mode the main screen should be shown like this when default values are not changed: 47/78...
-
Page 48: Installing The System As An Order Terminal
Operator user‟s manual 4.2.1.1 Installing the system as an Order Terminal In order to use the easyphoto as an Order Terminal, it‟s necessary, after activating the license, changing the working mode and setting the network parameters. This can be done in 2 different ways: Basic and Advanced Mode. - Page 49 Operator user‟s manual Once “Network” button is pressed, please choose the „Basic mode‟ option. Set the „O.T number‟ using the „+‟ and „-„ buttons as „1‟ if there is only one Order Terminal connected to Click5000. (Change this number only if you are installing multiple easyphoto systems working as O.T.
- Page 50 Operator user‟s manual Once the system has completely been configured, it‟s recommended to export the settings. When working as an O.T., the settings are not exported to an external device: Click5000 will keep the easyphoto settings. See the „Import/ Export settings‟ chapter of this manual.
- Page 51 Operator user‟s manual By pressing check connectivity button, a connection test is performed to ensure that the parameters are valid. The Machine Name parameter (visible in the Advanced Mode section) is also used to set the Bluetooth Name (ID). Even using the Basic mode, if the Bluetooth ID needs to be changed, it‟s possible to select Advanced Mode and change this parameter.
-
Page 52: Select Kiosk Languages
Operator user‟s manual 4.2.1.2 Select Kiosk Languages 1. Use the arrows to display all the languages. 2. Press the languages to select them. 4.2.1.3 Select Country 1. Use the arrows to display all the countries. 2. Press the country to select it (only one can be selected at the same time). NOTE When changing the country, the application is automatically restarted with the new country parameters already set. -
Page 53: Date / Time
Operator user‟s manual 4.2.1.4 Date / Time Date and time configuration. In order to advance or take the date back, „hour‟ setting must be changed. Only 1 day shifting can be applied. 4.2.2 User’s administration Once the “User‟s administration” button is pressed, the following screen is showed: On this screen: Press the “Change name”... -
Page 54: Devices
4.2.3 Devices Once the “Devices” button is pressed, the following screen is showed: Press the “PhotoPrinter” button to modify the MITSUBISHI photo printer default printing quality settings. Press the “DVD/ CD Burner” button to increase or decrease the recording speed. - Page 55 Operator user‟s manual “ICC Profiles”. This menu is for advanced users or technical staff. It allows to manage the ICC profiles for every printing size and speed. Once the “DVD/CD Burner” button is pressed, the following screen is showed: Press “-/+” button to increase or decrease the burning speed. Once the “Ticket Printer”...
- Page 56 Operator user‟s manual In this one, it‟s possible to edit the contents shown in the ticket. The barcodes shown are formatted in EAN13 standard. A screen keyboard is available to fill this data: Shop name Address (2 lines) Phone number 56/78...
-
Page 57: Product Barcode Settings
Operator user‟s manual Product barcode settings This is the barcode that identifies the product among the different available products in the easyphoto machine. Print product barcode: When it‟s enabled, a barcode will be printed for each product. Print product reference: When it‟s enabled, a different number will be printed per each product reference, instead of using a barcode. -
Page 58: Order Barcode Settings
Operator user‟s manual Order barcode settings This is a unique barcode being printed for the whole order, including the total price and global reference to the easyphoto service for the shop accounting. Print order barcode: When it‟s enabled, a barcode will be printed for every order generated in the machine. -
Page 59: Services
Operator user‟s manual 4.2.4 Services In “Services” it is possible to enable or disable services and set their prices and options when available. By pressing the button „Sizes‟ it‟s possible to set the different printsizes for the selected service. When the system is set up as an Order Terminal, the list will be larger than when the system is using a printer. -
Page 60: Prints
Operator user‟s manual 4.2.4.1 Prints. By pressing the „sizes‟ button, it is possible to set the available printing formats. 1. Use the arrows to display all the sizes. 2. Press the desired sizes to select them. NOTE You can select a maximum of 4 sizes (when the system is not working as O.T.) When working as an O.T., it‟s necessary to previously check that the selected printsizes are available at Flexilab size, otherwise the orders will never be printed out. -
Page 61: Index Print
Operator user‟s manual 8. Activate/deactivate price ranges by pressing the green circles. 9. Enter the amount of copies of the range when activating a new one. After pressing the button “back”, the next screen will appear in order to apply the changes or not. -
Page 62: Photo Id
Operator user‟s manual 4.2.4.3 Photo ID. When configuring this service, it is possible to set a default picture source. This helps to increase the workflow speed and avoids asking the operator where the system will find the pictures every time. The professional photographer is used to take ID pictures with the same camera and digital media. -
Page 63: Calendars
Operator user‟s manual 4.2.4.4 Calendars. The purpose of these settings is to maintain the library of available calendar designs per every year. Every item of the list shown in the screen belongs to a different language, showing the first and the last of the available years. -
Page 64: Collage
Operator user‟s manual NOTE In order to import new designs, as shown on the following screen, it is needed to select the calendars languages that will be installed on the system from the distribution CD. Please do not install more than 4 different calendar collections in the system. Consider the available storage space before installing new calendar collections. -
Page 65: Frames & Greetings
Operator user‟s manual 4.2.4.6 Frames & Greetings. By configuring this service, depicted on the image below, it is possible to change the following settings: 1. Delete All. This option allows deleting every frame&greeting design available in the system. 2. Delete by theme. This option allows deleting the frames&greetings selecting by theme. 3. -
Page 66: Mosaic Poster
Operator user‟s manual 4.2.4.7 Mosaic Poster. It‟s possible to select which mosaic poster formats will be available at Mosaic Poster service. NOTE The available formats may differ from picture above, according to the available print sizes in the system. 4.2.4.8 ONLINE Kioskgifts. Once in the settings section, the list of all the available products is shown. -
Page 67: Statistics
Operator user‟s manual 4.2.5 Statistics When this option is enabled in Statistics menu you can see all the orders done in the easyphoto.. It‟s also possible to export statistics in xml format in order to keep them saved and study them. . Today: You can see all the orders done in the current day. -
Page 68: Import / Export Settings
Operator user‟s manual 4.2.6 Import / export settings Use this option for importing settings from another system or export settings to another one. When exporting data to an external USB storage device, please do the following: 1- Insert the storage device. Wait for a few seconds to allow the system recognize the device. -
Page 69: Screenshots
Operator user‟s manual 4.2.7 Screenshots It‟s possible to take screenshots of the application and save them into a USB memory device or digital media card. A keyboard attached to the system is needed. Once the “Screenshots” button is pressed, the following screen is showed: For enabling this option: NOTE For saving the screenshots correctly the USB devices and memory cards should be inserted... -
Page 70: Easyid70
Operator user‟s manual EasyID70 The easyID70 is a limited edition of the standard easyphoto with reduced functionalities. The main use of the system is for PhotoID purposes. 5.1 Available services The EasyID70 offers the following services. • Prints service • CD/DVD burn service •... -
Page 71: Recovery Dvd And Easyphoto Backups
Operator user‟s manual Recovery DVD and easyphoto backups It‟s strongly recommended to make a safe copy of the system after a first setup and also periodically. In case of system malfunction, it could be very helpful for an easy recover of normal operation. -
Page 72: Create Total Backup
Operator user‟s manual 6.3 Create Total Backup This option allows creating a Total Backup of the software in the memory device. It‟s needed a high capacity USB storage device, with a minimum of 1GB free memory. NOTE After installing and setting up the system or after any Software Update operation, it is highly recommended to create a Total Backup. -
Page 73: Restore System From Dvd / Factory Settings
Operator user‟s manual 6.6 Restore system from DVD / Factory Settings This option allows the reinstallation of the Easyphoto software using an image file included in the DVD. If the system was updated at anytime, this option is not so helpful like restoring a Total Backup from an USB device, because the system and software version included in the Recovery DVD could be quite previous to any other upgrade version installed later in the system. -
Page 74: Activating Additional Licenses
Operator user‟s manual ACTIVATING ADDITIONAL LICENSES It‟s required to activate additional licenses (like PhotoID) in order to access the whole functionalities of the system. While the license is not active, the service will be visible in the main screen but not accessible, with the button disabled. 7.1 Register and Getting the Activation KEY You need to be a registered user to activate your licenses. -
Page 75: Activating Licenses In The Easyphoto Application
Operator user‟s manual Once you have your Activation KEY, you can proceed to activate your additional license. 7.2 Activating licenses in the easyphoto application. It‟s necessary to go to Services screen in settings of easyphoto in order to enter the Activation KEY. - Page 76 Operator user‟s manual Once the Activation KEY is correctly entered, the service is Activated. 76/78...
-
Page 77: Ticket Printer Installation (Optional)
Operator user‟s manual TICKET PRINTER INSTALLATION (OPTIONAL) NOTE Please follow only these steps if you have connected correctly the Star TSP100 ticket printer and it‟s not printing any ticket when the system should do. Before connecting the USB cable of the ticket printer to the Easyphoto terminal, please follow these steps: 1. -
Page 78: Contact
Operator user‟s manual CONTACT French Branch Spanish Branch (Barcelona) Mitsubishi Electric Europe B.V. Mitsubishi Electric Europe B.V. 25 Boulevard des Bouvets, 92741 Carretera de Rubi 76-80, Apartado de correos 420, Nanterre Cedex, 08190 Sant Cugat del Valles France (Barcelona) Spain...