
Related Manuals for Naviter Oudie 4

Summary of Contents for Naviter Oudie 4
- Page 1 Manual for Oudie 4 version 7.2 Last modified 24.7.2016 © 2003 - 2016 ... Naviter d.o.o.
-
Page 2: Table Of Contents
........................... 5 2 Turning Oudie 4 on and off ........................... 6 3 Updating your Oudie 4 ........................... 6 4 Running Oudie 4 software for the first time ........................... 9 5 Using vario ........................... 12 6 Copying files to Oudie 4 ........................... - Page 3 ........................... 87 Flight statistic and replay ................................87 22 Transfer ........................... 89 Part VIII Settings 1 Map ........................... 92 Schem e properties ................................94 2 Airspace ........................... 95 3 Waypoints (Wpts) ........................... 96 © 2003 - 2016 ... Naviter d.o.o.
- Page 4 ................................133 Autorun ................................134 Calibration ................................135 ................................136 Part X Oudie 4 tips and tricks Part XI Technical specification Part XII Troubleshooting Part XIII Notice of non-liability Part XIV Limited Warranty © 2003 - 2016 ... Naviter d.o.o.
- Page 5 Contents Index © 2003 - 2016 ... Naviter d.o.o.
- Page 6 Part...
-
Page 7: Part I Introduction
Introduction Oudie 4 version 7.2 Company Naviter is dedicated to solving glider pilot's problems and Oudie 4 is one of the answers in this challenge. It´s intended use is helping para-glider, hang glider and other pilots navigate during leisure, cross country and competition flights. -
Page 8: Charging The Battery
Oudie 4 Fast charge with the universal wall Quick charger take about 6 hours to fully charge the . Slow charge will take about 10 hours to fully charge the battery. © 2003 - 2016 ... Naviter d.o.o. -
Page 9: Oudie
Part... -
Page 10: Part Ii Getting Started
Getting started This topic wants to cover some of the basic things you need to know about how to use your Oudie 4. If this is the first time you are using Oudie 4 please take a few moments to read about the basics about... -
Page 11: Turning Oudie 4 On And Off
To turn the Oudie 4 OFF go to Menu > Next > Exit > Yes . Once Oudie 4 software is turned off , press the power button for 1 second while the device is running then choose the desired action: Power Off: will stop the navigation and turn off the device. - Page 12 1. To update Software, Airspace or Maps press buttons by side and wait until copying of all files is completed. 2. Disconnect Oudie 4 from PC. 3. Reboot Oudie 4 with restart button on the back side. 4. Wait until it boots into an Update dialog box. © 2003 - 2016 ... Naviter d.o.o.
- Page 13 Getting started 5. Press "Update" and wait until the process is finished. © 2003 - 2016 ... Naviter d.o.o.
-
Page 14: Running Oudie 4 Software For The First Time
Oudie 4 has pre-installed two templates for profiles: RACE. Choose one of them to add new profile to Oudie 4. One application for several profiles is when you fly different paragliders and need different setups for them (Competiton flying - RACE template, XC flying - XC template, etc...). - Page 15 Select template dialog: Language Select language which you would like to use on Oudie 4 and confirm this by tapping on the Select button: Region Select region in which you are going to fly and confirm this with Select button:...
- Page 16 Be at waiting for Start gate, Final glide, Navigation, Optimization or another issue, use Menu > Navboxes to select which items you want displayed. © 2003 - 2016 ... Naviter d.o.o.
-
Page 17: Using Vario
Getting Started Using vario Oudie 4 is now assisted by inertial sensors (gyros, accelerometers and magnetometers). Contrary to our initial expectations the inertial vario – when done right – is a real benefit and does provide additional information to pilot through its instantaneous response without being nervous or too sensitive. -
Page 18: Copying Files To Oudie 4
2. Once connected, tap "Connect to PC" or the USB Stick icon on Oudie 4, 3. You should now see Oudie 4 as an external Mass Storage drive on your PC (named TFAT), 4. Copy Files to the root or folder on your Oudie 4 device, 5. -
Page 19: Learning To Use Oudie 4
This is by far the most efficient way to learn Oudie 4 software. What it does is it replays an already flown flight and enables you to see the data you would have been looking at if you had Oudie 4 with you on the particular flight. - Page 20 Part...
-
Page 21: Part Iii How To
You can have separate setups for each of your gliders or type of flying. Here's how it works. 1. When you first ran Oudie 4, a Default profile was created. Anything you have changed in the application was stored to this profile. Now comes a day when you fly the another glider with a significantly different polar than the one you have used previously. - Page 22 . Create a new profile (which creates a copy of the default settings). You may give the new profile a name according to what you are going to use it for. Be it "RACE", "XC" or "Hike and fly glider". © 2003 - 2016 ... Naviter d.o.o.
-
Page 23: Set Takeoff Altitude
The altitude in the Oudie 4 is recorded at the standard pressure of 1013.25 hPa. In order to know you current altitude above mean sea level and your current flight level altitude the altitudes need to be corrected to correspond with the real world. - Page 24 GPS altitude (but the latter is only a fallback and should not normally happen since there is a worldwide terrain database already installed on each Oudie 4). Auto QNH setting will give you a very good idea about the current pressure level and it works automatically without your input.
-
Page 25: Manage Airspace Warnings
Avoiding forbidden airspace is often just as important as navigating in general. It can however be much trickier than finding the right valley since the airspace structure is very abstract and often complicated. Oudie 4 will be your best friend if you use the whole potential of what it's got to offer. 1. Airspace Warning The first stage - let's name it the Airspace Warning - is often merely informative. - Page 26 "Highlight nearest airspace" and it is assigned to the "Nearest airspace - Horizontally" by default. If you touch a Navbox which has this action assigned to it, Oudie 4 will highlight the airspace in question. It will link the glider with the airspace and display the distance from the glider to the airspace.
-
Page 27: Using Thermal Assistant
. Loading (multiple) airspace files Using Thermal Assistant Thermal assistant is a feature of Oudie 4 which should help you get centered in a lift more quickly if you decide to follow its instructions. Thermal assistant analyses the lift in your thermal. It calculates the average and follows how strongly the vario values change in each circle. - Page 28 We will be happy if you continue to enjoy soaring and if you never find the need to use the Thermal Assistant at all :-) See also: Getting Started Settings - Thermal © 2003 - 2016 ... Naviter d.o.o.
-
Page 29: Entering And Flying The Tasks
Entering the tasks by list This is a tutorial about entering the task in Oudie 4. We have had the privilege to look over the shoulder many impressively experienced pilots who have found a very difficult way to enter a task into Oudie3. - Page 30 Oudie 4 Start typing and you will notice that the waypoint name auto-completes while you are typing (note that the keyboard characters which do not make sense are disabled while you type): © 2003 - 2016 ... Naviter d.o.o.
- Page 31 ">>" buttons on the full screen keyboard to advance the waypoint names alphabetically. Once you have found the waypoint you were looking for, press OK. Edit point dialog will open automatically after choosing each waypoint. Setup these values to fly competitions or FAI records. © 2003 - 2016 ... Naviter d.o.o.
- Page 32 Oudie 4 Press the "OK" button again and start entering the Start Gate turnpoint's name, L01058 in this example: © 2003 - 2016 ... Naviter d.o.o.
- Page 33 Note that you can choose your default Sector type settings in Menu > Settings > Task > Observation Zone > Type > Cylinder are what you wanted to use on most flights! © 2003 - 2016 ... Naviter d.o.o.
- Page 34 This tool is most useful for Task comity, to easy set and plan the task on competitions. You can also quickly create a task without waypoints for your upcoming cross country flight. As before: Always start from the scratch. Menu > Task > Tools > Clear task: © 2003 - 2016 ... Naviter d.o.o.
- Page 35 Make sure the first line in the empty list is selected (if you didn't touch the screen after clearing the task, then it is already selected). Then press the "Tools" and choose Map. Set the right Zoom to see codes of waypoints. © 2003 - 2016 ... Naviter d.o.o.
- Page 36 Oudie 4 © 2003 - 2016 ... Naviter d.o.o.
- Page 37 Now you can start adding waypoints to list. Simply tap first waypoint (B01) for a second and Oudie will automatically ask you if you want to Append point to list. Confirm this with Yes. © 2003 - 2016 ... Naviter d.o.o.
- Page 38 Oudie 4 With tap on OK button continue with adding waypoints trough all the task. Use Pan mode to find waypoints on Map for which you´re looking for. © 2003 - 2016 ... Naviter d.o.o.
- Page 39 To make a re-start. Change the target waypoint back to start point. The quickest way to do it is to open the Task dialog, select start point and press Goto. Statistics will be reset, when you cross the start line again. © 2003 - 2016 ... Naviter d.o.o.
- Page 40 Oudie 4 Note that once cylinder is reached you will not see it on the map any more. How to set Conical end Speed Section - CESS © 2003 - 2016 ... Naviter d.o.o.
- Page 41 3. Set Cone: ?None? - there is no cone, ?1:2.5? or ?1:4?... When cone is set as End speed section this observation zone is as marked with crossed lines on map page (visible also in wayponit Edit dialog - picture above). 4. OK. Flying Conical End Speed Section - CESS © 2003 - 2016 ... Naviter d.o.o.
- Page 42 Current L/D (grey line) and Required L/D or arrival altitude (purple line). You can turn it ON/OFF with Action on any Navbox. You´ll find Action name as ? Toggle side view? in Menu > Settings > Next > Navboxes > Select one Navbox > Action > Toggle side view © 2003 - 2016 ... Naviter d.o.o.
- Page 43 How to Flying the task To navigate during the task use all of the features that are made available to you through Oudie 4 software: Map pages to see where you are, Navboxes to see the flight parameters you are interested in,...
-
Page 44: Flying With The Fai Triangle Assistant
Here's how it works. Turning the FAI Assistant on or off follows the same phylosophy as toggling the Map, Waypoints, Airspace, Navboxes etc. It is controlled through the Display Options dialog. © 2003 - 2016 ... Naviter d.o.o. - Page 45 The above example focused on an FAI Triangle which has been started from one of its corners. Flying a triangle with the start on the leg is no different. The only difference is that the second point you turn © 2003 - 2016 ... Naviter d.o.o.
- Page 46 > Settings > OLC & FAI Area dialog. Example shows kilometer lines for Triangles between 80 - 120 km. If you fly into the violet area, the triangle will be an FAI triangle. © 2003 - 2016 ... Naviter d.o.o.
-
Page 47: Finish Flight
Oudie 4 will finish the flight automatically without needing any input from the user. Once the flight is finished and signed it will copy the flight to the micro SD card if such card is present in the Oudie 4. -
Page 48: Connect To The Internet
Bluetooth while the phone then connects to the internet by the any means available to the phone - typically Wifi or Data plan. In order to connect your Oudie 4 to the Android smartphone you need to install a free app "Oudie Live" from the Google Play store. - Page 49 How to © 2003 - 2016 ... Naviter d.o.o.
- Page 50 Oudie 4 © 2003 - 2016 ... Naviter d.o.o.
-
Page 51: Share Your Profile
Share your profile Oudie 4's Transfer menu option enables you by far the fastest way to copy all of the existing data from on to another Oudie 4. No cables, no wireless communication is needed, just a microSD card! This... - Page 52 Oudie 4 Additionally you can transfer to microSD card all flights that are saved on Oudie 4, this way you can save all of your flight elsewhere without any cables etc. See also: Transfer © 2003 - 2016 ... Naviter d.o.o.
- Page 53 Part...
- Page 54 Oudie 4 Map page Map view is the main Oudie 4 window. It contains the following elements: Glider position Arrow towards the North Wind vector Vector map Flight trace Terrain collision Airspace warning Navboxes Animation speed Command bar A function is assigned to each one of these elements. It is described in the chapters you will access by following the above links.
-
Page 55: Part Iv Map Page
You can also get a list of Waypoints, sorted on direction. Tap the screen and hold it down, then move the finger in one direction. You will get a list of points sorted on distance. © 2003 - 2016 ... Naviter d.o.o. -
Page 56: Airspace
By default this page shows all airspace within a certain margin around the area of your tap. You can quickly change the status of any of these airspaces by using the buttons for disabling an airspace for Always, Today, 5 minutes or turning them back on with the Activate button. © 2003 - 2016 ... Naviter d.o.o. -
Page 57: Glider Position
Tap and hold aircraft symbol to move its current position. You will want to do that if you wish to have a different view of the map. You can choose several sizes glider symbol through Menu > Settings > Symbols © 2003 - 2016 ... Naviter d.o.o. -
Page 58: Arrow Towards The North
(and clever use of the Kalman filters if you like) allowed us to improve wind prediction considerably. In the best case scenario Oudie 4 will give a useful wind estimate already after a single 180 degree turn on the ridge. It also works at wind speeds higher than your airspeed. Additional turns make the prediction better of course. -
Page 59: Airspace Warning
Map page Airspace warning Oudie 4 tries to estimate your position in the future and give you comprehensive warnings before you enter airspace. Please read How Airspace warning works from the Getting Started chapter. Navboxes Oudie 4 supports several Navigation boxes. You have full control over which Navboxes you wish to display, how large they should be and where they should be located. -
Page 60: Animation Speed
Rate box controls the speed of the animation. The higher the number, the faster animation, the slower refresh rate for the Map page. Pocket PC reaches its limits here. Slider allows you to quickly jump to a point within the flight. © 2003 - 2016 ... Naviter d.o.o. -
Page 61: Command Bar
Map page Command bar The bottom line of Oudie 4 window is the Menu. It is optional (it can be disabled through Settings > Miscellaneous What it does is it adds 5 more shortcut buttons available in addition to all the hardware buttons on the Oudie 4 device. - Page 62 Part...
-
Page 63: Part V Information Page
Position panel shows present position (also in UTM coordinates format), local date and time. Altitude panel shows Altitude QNH, Flight Level altitude and Height over ground. Sunrise and Sunset panel shows local sunrise and sunset (UTC Offset must be set correctly). © 2003 - 2016 ... Naviter d.o.o. - Page 64 Part...
-
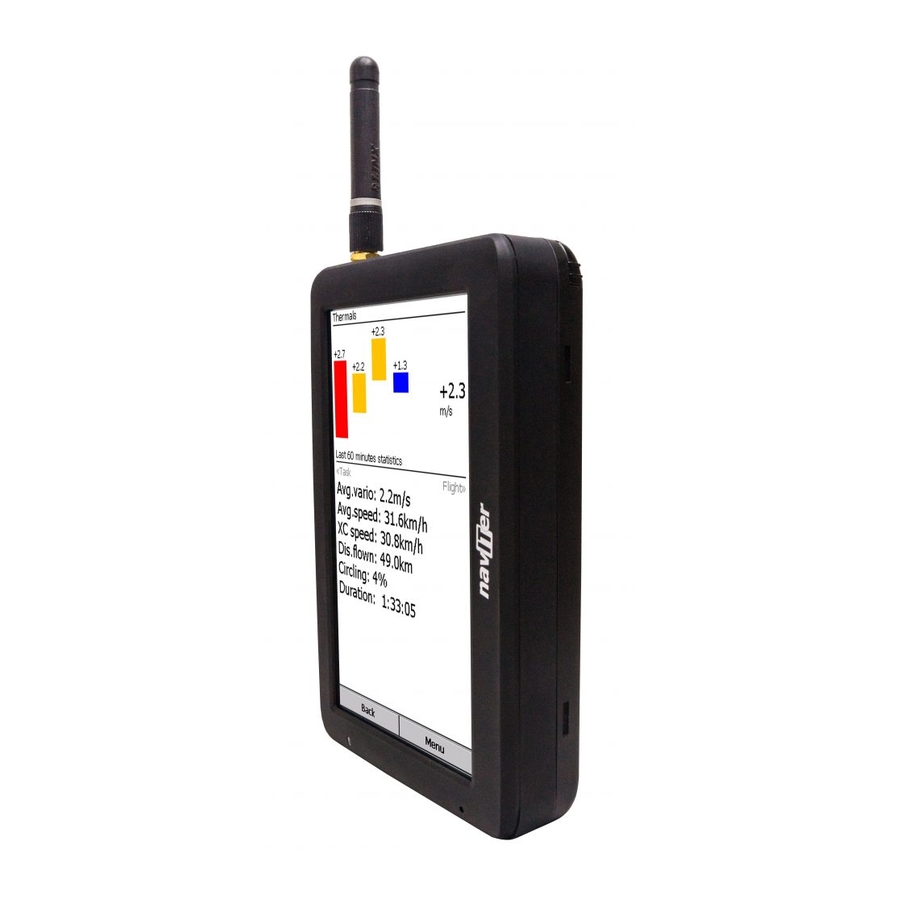
Page 65: Part Vi Statistics Page
Last 60 minutes statistics gives averages achieved on the Race to goal task or the Optimized task in the last hour. You can press the "Back" button to get back to the last map page you have used before Statistics. © 2003 - 2016 ... Naviter d.o.o. - Page 66 Part...
-
Page 67: Part Vii Menu
Page 2: About Save Settings Thermal Assistant Switch Profile Add Waypoint Wind Logbook Transfer Note that this is the default order of the Menu. It can be changed through the Settings > Menu dialog. © 2003 - 2016 ... Naviter d.o.o. -
Page 68: Esc
These buttons show the next and previous page in the Menu Settings The Settings button in the Menu opens the Settings dialog where all of the preferences of Oudie 4 can be setup. © 2003 - 2016 ... Naviter d.o.o. -
Page 69: Display Options
Units, Commands etc. are unique through the whole application. Display options You can control what is visible on the Map page . All items which can be made visible or invisible on Oudie 4 are listed in this dialog: © 2003 - 2016 ... Naviter d.o.o. -
Page 70: Screen Lock
Navboxes like: Zoom in - Zoom out, Previous- Next turnpoint on task will still works. Tu unlock the screen press the Menu button and confirm this by clickin on the upper side of screen. See screenshot below: © 2003 - 2016 ... Naviter d.o.o. -
Page 71: Map Orientation
Pan mode for 10 seconds the Map orientation will change back to what it was before you started to pan. There is a shortcut for this dialog if you tap with your finger on the North Arrow indicator. © 2003 - 2016 ... Naviter d.o.o. -
Page 72: Exit
. save the current profile changes . save changes to the waypoints and tasks . save changed or added Flarm aliases . Finish the flight by signing the IGC file with SeeYou G-record © 2003 - 2016 ... Naviter d.o.o. -
Page 73: Zoom
The Zoom dialog lets you choose from several predefined values (depending on the units). The value represents the width of the Oudie 4 window. 0.1km, ... 2km, 5km ... 35km, 50km ... are fixed zoom settings. Setting represents the width of the Map window. -
Page 74: Volume & Altitude
Auto QNH will take the best possible guess at what your altitude is and use that as your QNH setting. In © 2003 - 2016 ... Naviter d.o.o. - Page 75 Menu order for this feature to work reliably please remember to turn the Oudie 4 on at least 3 minutes before takeoff. By changing the QNH value you can change the pressure at start or change the QNH in flight to correct the change in pressure.
-
Page 76: Goto
Pressing the Details button will open a new window where you can read waypoint details and edit waypoint properties. It will close automatically after 10 seconds or when you press the OK/Goto button. © 2003 - 2016 ... Naviter d.o.o. -
Page 77: Details Overview
It displays the general information about a waypoint. It also allows you to edit and delete waypoint properties on pages Edit Waypoint Edit Description . You can access these pages with the ">>" and "<<" buttons in the command bar. © 2003 - 2016 ... Naviter d.o.o. -
Page 78: Edit Waypoint
Since SeeYou Mobile may use multiple files as the input for waypoints there is need for a simple way to filter the waypoints so that only those waypoints are presented which are of the most interest for the user. © 2003 - 2016 ... Naviter d.o.o. - Page 79 Filter by file allows you to show or hide waypoints that are stored in separate files. In the example below only two out of four waypoint files that were selected through Settings > Files will be displayed in the Goto dialog See also: Goto dialog Details overview Edit Waypoint © 2003 - 2016 ... Naviter d.o.o.
-
Page 80: Task
Map view 7.11.1 List edit Entering the task is best done in list view. Open the keyboard to start entering waypoint name. Oudie 4 will automatically suggest the first waypoint in alphabetical order. Use the right/left button to change waypoint name in alphabetical vicinity of what you had entered. Please read the Gettings Started chapter Entering and flying the task ©... -
Page 81: Map Edit
A warning dialog will be issued if finish altitude is set to zero. This is to protect you from making final glides to the wrong altitude. 7.11.2 Map edit The same simple philosophy from graphical task editing in SeeYou has been implemented in the Oudie 4 software. Tap & Move anywhere except on a waypoint to move the map. -
Page 82: Edit Point
Choose the waypoint name. Note that the easiest way to do this is by typing its name in List view Elev = Elevation This is the reference altitude for the point in question. This is the altitude that is taken into account when calculating the final glide. © 2003 - 2016 ... Naviter d.o.o. -
Page 83: Load Task
Gate time, Gate interval and Start Type (Entry, Exit).* Buttons at the bottom will help you enter the correct values quickly with your fingers. *not featured in Oudie 4 Basic. 7.11.4 Load task Load task dialog is accessed through Menu > Task > Tools > Load task... You can access it through both List view of the Task. -
Page 84: Task Options
Task deadline time You can put task deadline here. Oudie 4 will give you a warning 15 minutes before Task deadline time. Asigned area task time is essential for flying the Assigned Area tasks. It is used to calculate required speed to finish as well as time difference on task. -
Page 85: Next Map
Use the + and - buttons to quickly change values. Note: Task settings are not featured in Oudie 4 Basic. 7.12 Next map If you are currently viewing Map 1 it changes the view to Map 2 and vice versa. -
Page 86: Info Page
7.13 Info page Information page 7.14 Statistics Statistics page 7.15 About Through the About dialog you can see serial number and the version of Oudie 4 software. Upgrades are free and available through http://www.oudie3.com © 2003 - 2016 ... Naviter d.o.o. -
Page 87: Save Settings
Menu See also: Updating your Oudie 4 7.16 Save Settings Once you have setup Oudie 4 for your flight you may want to save the settings without exiting Oudie 4. © 2003 - 2016 ... Naviter d.o.o. -
Page 88: Thermal Assistant
Oudie 4 7.17 Thermal assistant Using Thermal Assistant 7.18 Switch Profile The switch profile icon shuts down Oudie 4 and runs it again so you can choose another profile. © 2003 - 2016 ... Naviter d.o.o. -
Page 89: Add Waypoint
Menu Note: Switch Profile is featured in Oudie 4 Basic. See also Using Profiles 7.19 Add Waypoint You may edit and delete waypoints on this screen. This window opens when you tap Menu > Add Waypoint or use the shorcut on a hardware or software button. - Page 90 Click GOTO if you would immediately like to navigate to the newly created waypoint. UTM Calculator This tool converts usual coordinate format to UTM format or vice versa. © 2003 - 2016 ... Naviter d.o.o.
-
Page 91: Wind
4. If needed, adjust Direction and Speed with the buttons in the lower part of the display, 5. tap Apply, then OK. Wind is calculated using three methods in Oudie 4: . Position drift when Lat/Lon are the only available data, . -
Page 92: Logbook
7.21 Logbook The logbook displays a list of flights written by your Oudie 4. It also displays information about the glider and the pilot if it is stored in the IGC file. - Page 93 Menu If you wish you can replay your flight as well directly from Logbook: Menu > Next > Logbook > select flight >Tools > Replay flight © 2003 - 2016 ... Naviter d.o.o.
-
Page 94: Transfer
Oudie 4 7.22 Transfer Transfer menu option enables to copy all of the existing data from on to another Oudie 4 with a microSD card. Settings to SD card packages and transfer all of the existing user data to the inserted microSD card. - Page 95 Menu . or everything Flights to SD card transfers to all flights that are saved on Oudie 4 on the microSD card. See also: Share your profile © 2003 - 2016 ... Naviter d.o.o.
- Page 96 Part VIII...
-
Page 97: Part Viii Settings
Settings The Settings dialog has an array of Pages where all of the Oudie 4 preferences can be setup. Note that some settings like Map and Navboxes are separate for Map 1 and Map 2 views while others like Units, Commands etc. - Page 98 For each cheme you can select background color. Shade map This function will shade map. Draw surface objects will enable drawing woods and grass, glaciers, fields if newer Open Street Maps are used. © 2003 - 2016 ... Naviter d.o.o.
-
Page 99: Scheme Properties
Settings Note: Map settings are not featured in Oudie 4 Basic. 8.1.1 Scheme properties Scheme Properties dialog lets you change the color scheme for the topographic features of the map. Object properties allows you to change the zoom level, transparency and color for each of the topographic features in the combo box. -
Page 100: Airspace
Combo box Hide airspace above enables you to exclude airspace with lower limit higher than the height you select to show on the map screen. This helps declutter the screen in complex airspace. © 2003 - 2016 ... Naviter d.o.o. -
Page 101: Waypoints (Wpts)
Settings Note: Airspace settings are not featured in Oudie 4 Basic. Waypoints (Wpts) The Waypoints dialog allows you to control how waypoints are displayed. Each waypoint consists of: . Waypoint symbol, . Label one, . Label two. Type panel allows you to select the type of waypoint. Several types are available. Each type has its own waypoint symbol. -
Page 102: Track & Target
Goto dialog. off. Defaults button will return factory settings if pressed. Note: Waypoints settings are not featured in Oudie 4 Basic. Track & target Setup the appearance of the flight on Map page. -
Page 103: Olc & Fai Area
Optimization panel lets you select the Color and Width of the optimized track. Nr. of points (5 is for XC Contest, XC Globe, Leonardo...) and whether or not the Optimized track is shown. © 2003 - 2016 ... Naviter d.o.o. - Page 104 Example shows kilometer lines for Triangles between 80 - 140 km. If you fly into the violet area, the triangle will be an FAI triangle. See also: FAI Triangle Assistant Note: FAI area settings are not featured in Oudie 4 Basic. © 2003 - 2016 ... Naviter d.o.o.
-
Page 105: Task
Show task will show or hide the task from the Map page. Navboxes Navigational boxes are one of the most important parts of Oudie 4. They show all parameters of flight. You have full control over which Navboxes you wish to display, how large and how transparent they should be and where they should be located. - Page 106 MC, wind, glider polar, bugs and ballast into account. It is corrected for reserve altitude. "Arrival altitude" will be positive when the glider is above the calculated glide slope, and negative when it © 2003 - 2016 ... Naviter d.o.o.
- Page 107 "Inside" if your altitude is in between the lower and the upper limit of the airspace in question. . Nearest airspace - Horizontally (Near AS.H) = Distance to horizontally nearest airspace where you © 2003 - 2016 ... Naviter d.o.o.
- Page 108 . Engine running will reset optimization when "engine" is stopped. Tap on the navbox changes the state of the "engine" . Zoom in . Zoom out . Sideview will turn ON or turn OFF Side view © 2003 - 2016 ... Naviter d.o.o.
- Page 109 Settings *not featured in Oudie 4 Basic. Note that these actions will work even when the screen is locked: - Zoom in and Zoom out actions on navboxes, - Increase and decrease volume as an action on the navbox, - turn OFF Thermal assistant (with press on screen anywhere), - turn ON, Turn OFF side view.
- Page 110 Oudie 4 © 2003 - 2016 ... Naviter d.o.o.
-
Page 111: Edit
Settings 8.7.1 Edit While you editing selected or group of selected NavBoxes properties dialog will show you sample support. © 2003 - 2016 ... Naviter d.o.o. - Page 112 Colors panel accounts controls the looks of the Navboxes. You can change the colors for: . Background, . Frame, . Title line, . Data line, . Units line. Note that you can change the Navbox colors separately for each Navbox. Select a group of navboxes in © 2003 - 2016 ... Naviter d.o.o.
-
Page 113: Symbols
The Size slider selects the size of each symbol. Type combo box lets you choose from several options for a particular symbol. Legend option is available only for Vario symbol. All Symbols could be outlined with white color. © 2003 - 2016 ... Naviter d.o.o. -
Page 114: Warnings
Oudie 4 See also: Using vario Warnings There is three types of warnings in Oudie 4: 1. Airspace warnings 2. Altitude warnings Airspace Warning is activated by two triggers. First warning is when the projected point of the flight is inside a sector. -
Page 115: Thermal Assistant
Ring is default setting. If Hide map option is choosen you will not see map while Thermal Assistant is turned ON. Thermal Assistant is automatically activated after 120 degrees turn. When you are flying out from © 2003 - 2016 ... Naviter d.o.o. - Page 116 Oudie 4 thermal for more than 200 m Thermal Assistant is deactivated. Thermal Assistant could be completely disabled with Use thermal assistant checkbox. © 2003 - 2016 ... Naviter d.o.o.
-
Page 117: Polar
(with a shortcut to show the Thermal Assistant regardless of the variables) 8.11 Polar The Polar dialog lets you enter your glider polar data into Oudie 4. These data is essential for performing the final glide calculations. You can access a list of pre-generated polars by clicking on the "List..." button. -
Page 118: Units
If you tap on Calculate button new dialog will show up. Here you make complete polar curve calculations for A,B and C coefficients. Note: Polar settings are not featured in Oudie 4 Basic. 8.12 Units Setup the units you are used to in the Units dialog. You can choose the units for:... -
Page 119: Fonts
Set to British sets up km, kts, km/h, lb/ft2, inHg, °F, ft, lbs, DDMMSS 8.13 Fonts The fonts dialog allows you to change preferences of the fonts in Oudie 4. Choose one Item, then change Font, Size, Color, Bold, Underline, Outline and Italic preferences. -
Page 120: Input
The input dialog lets you choose from three different input methods for displaying a flight in Oudie 4. GPS/Vario is what you will want to use in the air. In normal circumstances all you need to do is turned on Oudie 4 and the communication will run automatically. - Page 121 Flarm data and its warnings. To replay a saved NMEA log you need to create a "TMP" folder in the root of your Oudie memory, save the NMEA log as "nmeain.log" and select "File" as your input in Menu > Settings > input. © 2003 - 2016 ... Naviter d.o.o.
-
Page 122: Commands
8.15 Commands You can customize the 2 software buttons in the Command bar here. Note: Commands settings are not featured in Oudie 4 Basic. 8.16 Menu You can fully control the content and order of the buttons in the menu. Use the Up/Down and Edit/ Insert/Delete buttons to change the main menu. -
Page 123: Files
Note: Menu settings are not featured in Oudie 4 Basic. 8.17 Files Setup the default file locations for Oudie 4 through this dialog. To read about how to transfer your waypoint and airspace files to Oudie 4, please read the chapter... - Page 124 Selecting multiple waypoint and airspace files. It is possible to select more than one waypoint and more than one airspace file in Oudie 4. Maps are preloaded for the whole world. You don't have to change those at any time.
-
Page 125: Igc Logging
CIT files from your PDA will be listed etc. 8.18 IGC Logging Oudie 4 does also log a flight and produces an IGC file. It can however be analyzed in SeeYou or similar software after the flight. This dialog lets you enter the Header information for the flights recorded with Oudie 4. Information on Pilot, Copilot, Competition ID, Glider and Class is collected here. -
Page 126: User Interface (Ui)
Drag limit is an area of pixels within which the control will not move even if you move the stylus or your finger. This is required for using the display with fingers because it is difficult to keep still in a shaky environment of the glider. © 2003 - 2016 ... Naviter d.o.o. -
Page 127: Miscellaneous (Misc)
Map direction Flight properties Oudie 4 speaks several Languages. You may select your language through the Language combo box. Managing installed language files is possible through the Language combo box. Note that you need to have installed the Multilingual version of SeeYou to have other languages than English available. -
Page 128: Hardware
8.21 Hardware GPS data dialog If you will confirm Popup ?Flight properties dialog? Oudie 4 will open this dialog before you will start your flight. © 2003 - 2016 ... Naviter d.o.o. -
Page 129: Terminal
NMEA input can be monitored. 8.21.1 Terminal This dialog allows you to see what data Oudie 4 is receiving through the COM port. It may be very useful for debugging any problems related to GPS input. -
Page 130: Vario
You can simply mute vario sound with checkmark in Mute checkbox. Silence threshold In first field you can set value where Oudie 4 will start to draw attention on sinking which is more that set value. With checkmark you can Enable or Disable this function. - Page 131 Settings © 2003 - 2016 ... Naviter d.o.o.
-
Page 132: Oudie Live
Oudie 4 See also: Using vario Volume & altitude 8.23 Oudie Live This is where you can setup for the Oudie 4 to connect to the internet through the free Oudie Live Android app. © 2003 - 2016 ... Naviter d.o.o. - Page 133 Settings Please make sure to read the "How to connect Oudie to Internet" chapter first. Once you have paired your Oudie 4 with your smartphone you can setup the available services such as SeeYou Cloud, LiveTrack24 and more to come.
- Page 134 Part...
-
Page 135: Part Ix Oudie Firmware
Oudie firmware By default Oudie 4 software will run automatically when you turn on the Oudie 4. If you exit Oudie 4 software (through Menu > Next > Exit) then you will end up in an environment where you can setup some basic things on the Oudie 4. -
Page 136: Volume
Oudie 4 Screen calibration USB port By tapping on the ">>" button you can proceed to the Oudie 4's Main screen 9.2.1 Volume The slider allows you to select the volume setting on the device. The checkbox allows you to select whether or not you would like the Oudie to make a sound each time you tap the screen. -
Page 137: Backlight
Auto OFF allows you to save battery life by selecting after which time the screen Backlight is automatically switched off. Default setting is "Always ON". Auto backlight checkbox allows Oudie 4 to adapt it´s Backlight according to the light conditions as seen by the sensor on the back of the device. -
Page 138: Language
Oudie 4 9.2.3 Language By pressing the left and right icons you can choose the language of the Oudie 4. © 2003 - 2016 ... Naviter d.o.o. -
Page 139: Autorun
The checkbox allows you to select whether or not the software will run automatically after the Oudie 4 has been switched on or reset. You can use the "..." button to determine which software will be run when pressing the Oudie 4 icon on the main menu (or started if automatic start is enabled). -
Page 140: Calibration
Oudie 4 9.2.5 Calibration Allows you to re-calibrate the screen if the touch screen has become inaccurate. © 2003 - 2016 ... Naviter d.o.o. -
Page 141: Usb
This option allows you to select how Oudie 4 behaves when connected to PC with that USB cable. In Mass Storage mode Oudie 4 will become a logical drive when connected to PC. After you plug in the USB cable you will be asked whether or not you wish to "Connect to PC" or "Charge Battery". If you choose to "Connect to PC"... - Page 142 Oudie 4 © 2003 - 2016 ... Naviter d.o.o.
- Page 143 Part...
-
Page 144: Part X Oudie 4 Tips And Tricks
Usually in office conditions, you will be using your Oudie 4 with the included stylus. However in flight this is a pain. Stylus is small, Oudie 4 is shaking, so taping the screen is pretty inaccurate. The stylus could get lost really quickly. Oudie 4 is therefore designed to be used with fingers (gloves) rather than the stylus. - Page 145 Part...
-
Page 146: Part Xi Technical Specification
Mass Storage Active Sync External Flash microSDHC Headphones Yes, 3.5 mm jack Wired Serial port Bluetooth port Software Languages Moving map Preinstalled maps World-wide Airspaces World-wide Airspace updates Automatic & Free Software updates Free © 2003 - 2016 ... Naviter d.o.o. - Page 147 Getting started manual SeeYou Trial CD Universal Wall Charger (110-220V) Car Charger (12V) USB Cable USB charger cable Velcro tape for easy installation PDF Manual on Oudie and CD 2 pcs Naviter stickers © 2003 - 2016 ... Naviter d.o.o.
- Page 148 Part...
-
Page 149: Part Xii Troubleshooting
Menu > Settings > Input options. Sy mpt om: Navigation softw are displays NODA T A in the GPS Fix navbox. Solution: Check the Menu > Settings > Input options. For other problems contact support@naviter.com See also: Input © 2003 - 2016 ... Naviter d.o.o. - Page 150 Part XIII...
-
Page 151: Part Xiii Notice Of Non-Liability
Using the system improperly could cause failure and lead to possible property damage and/or personal injury. Naviter assumes no responsibility for property damage, accidents, injury or death that may result from the misuse of this device/equipment. This includes any use of this device/equipment outside the scope of common sense, the User Manual, inserts and other related documentation. - Page 152 Part...
-
Page 153: Part Xiv Limited Warranty
Naviter company warrants your Oudie 4 against defects in materials and workmanship for one (1) year from date of purchase invoice. The warranty is non-transferable. Should any part of the Oudie 4 become defective within the warranty period return the Oudie 4with a description of what/why it is not functioning and we will repair or replace it, at our discretion, free of charge (you pay only shipping to Naviter). - Page 154 9, 49, 121 Altitude QNH Commands Altitude reserve connection error Always Copy Angle1 77, 100 Copying Angle12 77, 100 Cur.L/D Angle2 77, 100 Current wind Animation Current wind component Animation speed Cursor sort area cWind © 2003 - 2016 ... Naviter d.o.o.
- Page 155 Heading Up FAI Area Height above ground level FAI Triangle Hide FAI Triangle Assistant FAI Triangle distance - I - File 14, 115 File replay Files IGC file Fill 95, 97, 98 imperial © 2003 - 2016 ... Naviter d.o.o.
- Page 156 Map view 75, 92 Pocket PC MAWT Polar Max number Port settings 115, 124 position 52, 58 menu 9, 56, 62, 117 Prev metric profile 16, 122 Misc Profiles Miscellaneous proximity Mobile Wizard © 2003 - 2016 ... Naviter d.o.o.
- Page 157 SeeYou Mobile Simulator Task statistics Send Task time send files tasks Serial tDelta settings 13, 63, 92, 122 tDis several files Team Show 92, 95, 96, 100 Team position code Show all Terminal 123, 124 © 2003 - 2016 ... Naviter d.o.o.
- Page 158 - Z - tRemain tReq.Sp Zoom 9, 68, 76 True airspeed Tsk.Sp. - U - units Upgrades - V - VarA Vario Variometer VarT Vector Vector map Visible 64, 108 visible symbols Volume © 2003 - 2016 ... Naviter d.o.o.