
Related Manuals for Taylor 2752N


Summary of Contents for Taylor 2752N
- Page 1 2752N Digital Wireless Weather Station Dual Mount Wind Sensor with Leading the Way in Accuracy® Instruction Manual...
- Page 2 Thank you for purchasing the Taylor® Digital Wireless Weather Station with Dual Mount Wind Sensor. This state-of-the art measurement instrument is engineered and designed to meet the highest quality standards…to assure you uncompromising accuracy and consistently dependable, convenient performance. This instrument will provide measurements of wind speed &...
-
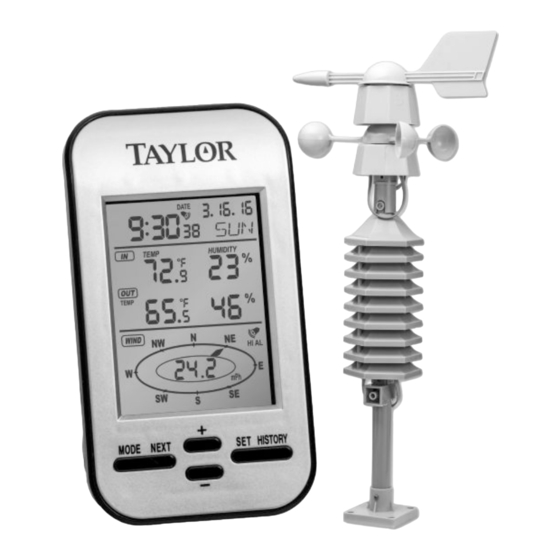
Page 3: Description Of Parts
Description of Parts Remote Wind Gauge Sensor Unit Compass & Wind vane Wind Sensor Cups Base Receiver Unit Line 1 Line 2 Line 3 Line 4 mounting bracket... - Page 4 Main Features & How to Access Functions 1 - LCD Readout : Line 1 : Displays Clock, Date, and Day of Week Line 2: Displays Indoor Temperature and Indoor Humidity Line 3: Displays Outdoor Temperature and Outdoor Humidity Line 4: Wind Speed, Wind Direction and High Wind Speed Alert 2 - LED Indicator (Wind Gauge Remote Sensor): Flashes when remote sensor transmits a reading.
-
Page 5: Display Information
Display Information (LCD Receiver Unit) Current day/ Current date Time & Alarm Current Current humidity temperature base sensor base sensor location location Current Current humidity temperature remote sensor remote sensor location location Current wind direction & Wind speed reading... - Page 6 Installing Home Unit Receiver Batteries Important: Install the receiver's batteries first, before installing batteries in the Wind Gauge Remote Sensor: 1. Remove the battery compartment cover, located on the back of the receiver unit. 2. Insert 2 AAA batteries as indicated by the polarity symbols marked inside the battery compartment.
-
Page 7: Assembling Instructions
Assembling Instructions 1. Properly align the compass and wind cup sensor together to create the wind base; do not press too hard otherwise damage may occur. Insert the connector tube to the bottom of the wind cup sensor and fasten with an M3x22 screw with nut (included). - Page 8 Selecting and Testing a Location for the Wind Gauge Remote Sensor The Wind Gauge Remote Sensor can measure temperature, relative humidity, and wind speed and direction. It will then transmit these readings back to the home receiver unit, up to a distance of 200 feet.
-
Page 9: Operation
Operation After battery installation, the total display mode will lasts 3 seconds and then enter the normal mode. The total display mode is indicated as following picture: The Wind Gauge Remote Sensor features five buttons : [MODE], [NEXT], [SET/HISTORY], [+], [-]. There are 8 modes including Normal Mode, Clock Mode, Date Mode, Indoor Temperature Mode, Indoor Humidity mode, Outdoor Temperature Mode, Outdoor Humidity Mode, Wind Speed Mode, History Record Mode. - Page 10 1. Clock Mode In normal mode, press [MODE] to enter the clock mode. Users can set clock and relative settings in this mode. Press [NEXT] to change the setting mode: Time zone setting Users can adjust time zone setting depending on their geographical position (for Europe, UK and USA customers only).
- Page 11 2. Indoor Temperature Mode In normal mode, press [MODE] six times to enter the indoor temperature mode. In this mode, users can adjust settings related to indoor temperature. Press [NEXT] to toggle the mode of parameters: Indoor temperature unit setting Users can adjust indoor temperature unit in this mode.
- Page 12 Outdoor temperature display setting Users can adjust the outdoor temperature display settings. Press [+] or [-] to adjust the outdoor temperature display value. The following diagram is the order of the outdoor temperature setting: Outdoor temperature unit setting Users can adjust outdoor temperature unit in this mode. Press [+] or [-] to toggle the unit between ºF and ºC.
- Page 13 4. Wind Speed Mode In outdoor humidity mode, press [MODE] to enter the wind speed mode. In this mode, users can adjust settings related to the wind speed. Press [NEXT] to change the parameters setting mode: Wind speed display setting Users can adjust wind speed display setting in this mode, press [+] or [-] to toggle between the average wind speed and gust speed.
- Page 14 6. Outdoor Humidity Mode In the outdoor temperature mode, press [MODE] to enter the outdoor humidity mode. In this mode, users can adjust the settings related to outdoor humidity. Press [NEXT] to change the parameters setting mode: Outdoor high humidity alarm setting Users can adjust the outdoor high humidity alarm setting in this mode.
- Page 15 7. Indoor humidity mode In the indoor temperature mode, press [MODE] to enter the indoor humidity mode. In this mode, users can adjust the settings related to indoor humidity. Press [NEXT] to change the parameters setting mode: Indoor high humidity alarm setting Users can adjust the indoor high humidity alarm setting in this mode.
- Page 16 8. Date Mode In clock mode, press [MODE] key to enter the date mode. In date mode, users can adjust settings related to date. Press [NEXT] to change the parameters setting mode: Contrast value setting Users can adjust the display contrast value in this mode. Press [+] to increase the contrast value, press [-] to decrease the contrast value.
-
Page 17: Troubleshooting
- Increase the separation between the equipment and receiver. - Connect the equipment into an outlet on a circuit different from that to which the receiver is connected. - Consult the dealer or an experienced radio/TV technician for help. FCC Code: RMW-2752N... - Page 18 Use & Care 1. The home receiver is intended for indoor use only. It is not sealed against moisture and could be damaged if used outdoors. 2. Do not immerse the receiver in water. If you spill liquid on it, dry immediately with a soft, lint-free cloth.
-
Page 19: Specification
Specification Indoor/outdoor temperature display. Display units options: ºF / ºC (user setting). Indoor temperature range: 32°F to 122°F (0°C to 50°C); Outdoor Temperature range: Alkaline batteries: -4°F to 140°F (-20°C to 60°C) Lithium batteries: -40°F to 140°F (-40°C to 60°C); Resolution (for both indoor/outdoor temperature): ±2°F/±1ºC Temperature accuracy: ±2°F/±1ºC Humidity range: 20% to 90%... -
Page 20: One (1) Year Limited Warranty
One (1) Year Limited Warranty Taylor® warrants this product to be free from defects in material or workmanship (excluding batteries) for one (1) year for the original purchaser from date of retail purchase. It does not cover damages or wear resulting from accident, misuse, abuse, commercial use, or unauthorized adjustment and/or repair. - Page 21 Caution: This device complies with Part 15 of the FCC rules and Industry Canada license‐exempt RSS standard(s). Operation is subject to the following two conditions: (1) this device may not cause harmful interference, and (2) this device must accept any interference received, including interference that may cause undesired operation. The manufacturer is not responsible for any radio or TV interference caused by unauthorized ...