Table of Contents
Advertisement
Advertisement
Table of Contents

Related Manuals for Olivetti Multisumma 22


Summary of Contents for Olivetti Multisumma 22
- Page 1 Olivetti Multisumma 22 and Elettrosumma 22 Operating Instructions Clodoveu Davis...
-
Page 2: Table Of Contents
Table of Contents Table of Contents ....................2 Foreword ....................... 3 Basic Functions ...................... 4 Keypad .......................... 4 Clearing the machine ..................... 5 Setting a number ......................5 Place indicator ....................... 5 Clearing an entry ......................5 Negative balance indicator .................... 5 Adding and Subtracting ..................6 Adding ........................... 6 Subtracting ........................6 Subtotal ......................... 6 Negative balance ......................6 Repeat lever ........................7 Printing Control ..................... 9 Numeric and Symbol Printing ..................9 Printing labels ........................ 9 Printing dates ........................ 9 Semi-automatic Multiplication ................10 Positive multiplication ....................10 Sums of products ......................11 Negative multiplication ....................12 Shortcutting Multiplications ................. 13 Technical Operation Instructions ................14 Insertion of the paper roll .................... 14 Paper release lever ...................... 14 Replacement of the ink ribbon . -
Page 3: Foreword
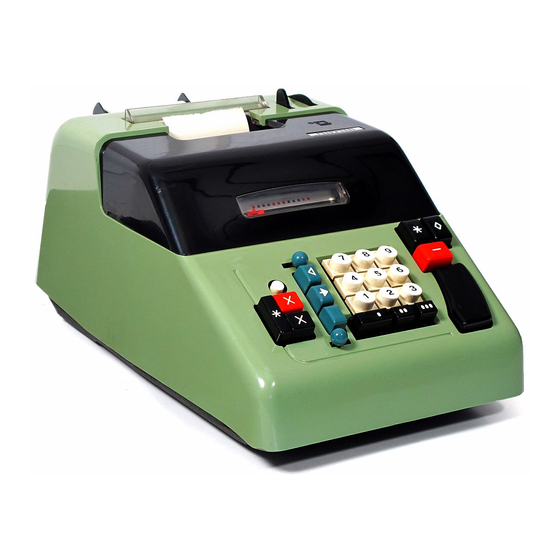
Foreword The Olivetti Multisumma 22 is a “ten-key” electromechanical printing calculator that is able to perform sums, subtractions, semi-automatic multiplication, at high speed (about 210 cycles per minute), and to calculate negative balances. This machine was designed and manufactured by Olivetti, in Italy, from 1958 to the mid-1960s, and used throughout the world. Its designers were Natale Capellaro (mechanics) and Marcelo Nizzoli (body). The Multisumma 22 is primarily a list adder. However, multiplications can be embedded within sums, so sums of two-factor products can be obtained with no re- entering of partial results. The machine can be easily, safely and quickly serviced. Its cover comes out without screws. The ribbon and the paper tape can be quickly changed. Features: · Performs calculations of up to 12 digits in the input, and 13 digits in the accumulator and output · Performs multiplications by repeated sums or subtractions, or semi- automatic, digit by digit · Calculates sums of two-factor products, in the form aÍb + cÍd + eÍf + … without re-entering partial results · Prints 4-digit dates or identification labels · Prints numeric labels from the input (non-calculating labels) · Prints factors in black, totals and subtotals in red, using two-color ink ribbons · Allows disabling the printing of calculation factors · Calculates negative balances, with visual indication throughout a calculation. All factors and results of the preceding calculation are printed to paper tape and marked with the symbol of the performed operation. -
Page 4: Basic Functions
Basic Functions Keypad The Multisumma 22 has 9 round keys for the entry of digits 1 through 9, and also three keys for the entry of zero, double zero and triple zero. Additional keys are identified in the illustrations below. (1) Numeric keys (11) Label printing key (2) Subtraction key (12) Date printing button (3) Addition key (13) Multiplication key (*) (4) Total key (14) Negative multiplication key (*) (5) Subtotal key (15) Multiplication total key (*) (6) Lever for non-printing calculation (16) Paper output (7) Zero keys (17) Paper advance knob (8) Clear key (18) Paper release lever (9) Repetition lever (19) Place indicator (10) Single delete key (20) Negative balance indicator (*) Not available in the Elettrosumma 22... -
Page 5: Clearing The Machine
Clearing the machine Before starting any process in the machine, the accumulator must be cleared. This is done by pressing the [Þ] key (4). The current accumulator contents are printed along with a “*” symbol to the right, in red, and the accumulator is cleared. Setting a number To set a number press each digit key in sequence. The decimal separator is set implicitly. Notice that the place indicator (19) advances accordingly. The input register can receive up to twelve digits (9.999.999.999,99). The accumulator capacity is up to thirteen digits (99.999.999.999,99). Place indicator When a number key is pressed, an indicator at the small window at the front of the hood advances and shows the number of entered digits. Group separators are indicated by the small squares, atop the position indication numbers. Clearing an entry To clear an entry, press the unmarked clear key (8). If a typing mistake is noticed as soon as it’s made, the last entered digit can be erased by pressing the single delete key [¢](10). The [¢](10) key can be pressed repeatedly, until the mistake is corrected. Notice that the place indicator backs up accordingly. Notice also that the clear key (8) does not clear the accumulator. To clear the accumulator, use the total key [Þ](8). Negative balance indicator A white indicator (20) shows when the machine has obtained a negative balance in its accumulator. -
Page 6: Adding And Subtracting
Adding and Subtracting Adding Example 1: 123 + 15 = 138 · Set the first term pressing the keys ‚ƒ · Press the large (unmarked) add key (3) · Set the second term pressing the buttons … · Press the add key (3) · Press the total key [Þ] (4) The result, 138, and the symbol * are printed in red. Subtracting Example 2: 321 – 301 = 20 · Set the first term, ƒ‚ · Press the add key (3) Set the second term, ƒ[Ÿ] · · Press the red subtract key [-](2) · Press the total key [Þ](4) The difference, 20, is printed in red, along with the total symbol *. Subtotal Example 3: 25.000 + 1.500 = 26.500 (subtotal) – 500 + 800 = 26.800 (total) · Input ‚… [ŸŸŸ] and press the add key (3) · Input … [ŸŸ] and press the add key (3) · Press the subtotal key [t](5) · The partial result is printed in red (26.500) beside the subtotal symbol t, and the value remains in the accumulator. -
Page 7: Repeat Lever
total and subtotal. The negative subtotal indicator window (20) shows white whenever the accumulator contains a negative value, even in the middle of a longer calculation. Example 4: 50 – 85 = -35 · Input 50 and press add (3), · Enter 85 and press subtract [-](2) · Press the total key [Þ] (4). The last line printed reads 35 * in red. Repeat lever When a number must be repeatedly added or subtracted, it is possible to keep the input mechanism from resetting. Activate the control provided for this purpose (9), moving the lever to the left. After entering the number you want to repeat, press the addition or subtraction key as many times as needed. After pressing the total key, the input register is cleared, the ball returns to its starting position to the right and the machine prints the desired result. Example 5: 125 + 250 + 250 + 250 = 875. · Input 125 and press the add key (3) · Input 250 and move the repeat lever (9) to the left · Press the addition key (3) three times Press the total key [Þ] (4) · The machine prints the result (875 *). The repeat control returns to its starting position, and the position indicator (19) returns to zero, indicating a clear input. If the setting of a constant number must be cancelled, press the clear key (8) (see clearing instructions next). The input register is cleared and the repeat lever returns to its starting position. - Page 8 Example 6: 256 Í 25 · Input 256 and move the repeat lever (9) to the left Press the add key (3) five times · · Press the zero key [Ÿ]; this has the effect of transforming the input value to 2560 · Press the add key (1) two times · Press the total key Þ (4) The result is printed as “6400 *” in red.
-
Page 9: Printing Control
Printing Control Numeric and Symbol Printing The addend and the subtrahend are printed in black. The subtrahend is printed beside the symbol –. Factor printing can be deactivated by moving the non-printing calculation lever (6) to the left. Positive or negative totals and subtotals are printed in red. The non-printing calculation lever is reset automatically (moved to the right) when a total or subtotal is printed. Printing labels (Numbers as notes) After setting a number, press the [v] key (11) (non-calculation key) to print the number, along with the symbol <, indicating that the number has not entered the calculation process, i.e., no arithmetic operation has been conducted with it. Printing dates To print dates the date button (12) must be activated, and any command button must be pressed. Dates are set manually in four rollers, at the extreme left of the printer. Example 7: · Move the rollers to show the value 2017 · Perform a sum · Before pressing the total key, activate the date preparation key (20) The date will be printed beside the total sum at the left side of the paper tape. Other numbers can be printed as the one in the example, with any meaning, such as a day/month, a year, identifying the operator, or labeling one of many machines owned by a company. -
Page 10: Semi-Automatic Multiplication
Semi-automatic Multiplication Positive multiplication Multiplications are performed by automatically repeating sums, digit by digit, from the rightmost multiplier digit to the leftmost one. Example 8: 256 Í 512 · Input the multiplicand (256), immediately followed by last digit of the multiplier, as 2562. · Press the multiplication key [Î] (13) · Input the next digit in the multiplier, 1. · Press the multiplication key [Î] (13) · Input the remaining multiplier digit, 5 Simultaneously press the multiplication key [Î] · (13)and the narrow multiplication total key(15), right beside it OR · Press the multiplication key [Î] (13) and then use the total key Þ (4). The machine prints the multiplicand and the last digit sideways, to the right. For each additional digit, the machine advances one line and prints one multiplier digit sideways, in the right side of the paper tape. When e operation is ended, the result is printed in red, “131072 *”. Does not apply to the Elettrosumma 22... -
Page 11: Sums Of Products
Sums of products Multiplications can be embedded in sequences of sums and other multiplications. If the multiplication result is not final, do not press the total key [Þ] (4) or (15). Simply clear the input register, and enter another number to be added to the multiplication total, or start another multiplication by entering another multiplicand. Example 9: 12 Í 34 + 32 Í 156 = 14808. · Set the first multiplicand, followed by the last digit of the first multiplier, 124 · Press the multiplication key [Î] (13) · Input the next digit in the multiplier, 3 · Press the multiplication key [Î] (13) · Press the clear key (8) · Set the second multiplicand, along with the last digit of the second multiplier, 326 · Press the multiplication key [Î] (13) · Set the next digit, 5 · Press the multiplication key [Î] (13) · Set the next digit, 1 · Press the multiplication key [Î] (13), now simultaneously with the narrow total key (15). The machine prints the final result, 5400. -
Page 12: Negative Multiplication
Negative multiplication Negative multiplications are performed exactly as the positive ones, except using the red multiplication key [Î] (14) instead of the black one [Î] (13). Example 10: 12 Í (-34) · Set the multiplicand and the last digit of the multiplier, 124 · Press the negative multiplication key [Î] (14) · Enter the next multiplier digit, 3 · Simultaneously press the negative multiplication key [Î] and the narrow multiplication total key (15) · Press the negative multiplication key [Î] and then press the total key [Þ] (4) The machine prints 408 * as the result. Negative terms in sums of products can also be included. Example 11: 12 Í 34 – 32 Í 156 = -4584 · Set the first multiplicand and the last digit of the multiplier, 124 · Press the multiplication key [Î] (13) · Set the next multiplier digit, 3 · Press the multiplication key [Î](13) · Clear the input (8) ·... -
Page 13: Shortcutting Multiplications
Shortcutting Multiplications The number of cycles required for a multiplication can be minimized if the operator enters the factor with the largest sum of digits as the multiplicand. Example 12: 987 Í 34 or 34 Í 987? (1) Set 9874, multiply, enter 3, multiply and press total. Total number of cycles: 7 (3 + 4) (2) Set 347, multiply, enter 8, multiply, enter 9, multiply and press total. Total number of cycles: 24 (7 + 8 + 9) Example 13: 123 Í 89 or 89 Í 123? (1) Set 1239, multiply, enter 8, multiply and press total. Total number of cycles: 17 (8 + 9) (2) Set 893, multiply, enter 2, multiply, enter 1, multiply. Total number of cycles: 6 (1 + 2 + 3) On the other hand, if the multiplier has many digits, the process can become longer from pressing many keys. Example 14: 1000001 Í 45 or 45 Í 1000001? (1) Set 10000015, multiply, press 4, multiply and press total. Cycles: 9. Keys pressed: 11. (2) Set 451, multiply, enter zero and multiply five times, enter 1, multiply and press total. -
Page 14: Technical Operation Instructions
Technical Operation Instructions Insertion of the paper roll Unwrap the paper roll and let the paper end hang back. Insert the roll between the moving paper roll holders, by pressing the two holders slightly outwards. Insert the paper under the rubber roller, and use the advance knob gently to push the paper through. Then insert the end under the cutter. The wide roller allows using 90mm rolls and narrower, up from 65mm. Paper release lever It is located to the right of the paper roll. When lightly pressed, the paper strip, which is normally held by the rubber roll, is released so it can be adjusted. Replacement of the ink ribbon Open the cover of the machine. Press the levers that hold the ink ribbon and wind the ribbon in order to empty one reel. Attach the end of the new ribbon to the empty reel, and wind some ribbon into it. Replace the other reel, passing the ribbon around the outer guides and reposition the pressure levers. Notice that the red part of the ribbon is placed downward.