Table of Contents
Advertisement
Quick Links
Advertisement
Table of Contents

Related Manuals for Ricoh PJ WX2440


Summary of Contents for Ricoh PJ WX2440
-
Page 3: Table Of Contents
Table of Contents Table of Contents ......1 Troubleshooting ......57 Usage Notice ........2 Replacing the lamp......62 Precautions .........2 Appendices ........63 Safety Labels of This Machine ..12 List of Compatible Signals ....63 Regulation & Safety Notices .....13 Configurations of Terminals ....68 Other Information ......18 Terminal: Computer In (Mini D-sub 15 pin) 68 Introduction ........19 Terminal: PC Control (D-sub 9 pin) .. -
Page 4: Usage Notice
Usage Notice Precautions Follow all warnings, precautions and maintenance as recommended in this user’s guide to maximize the life of your unit. ■ Indicates a potentially hazardous situation which, if in- Warning- structions are not followed, could result in death or serious injury. - Page 5 Usage Notice ■ Warning- The supplied power cord is for use with this machine only. Do not use it with other appliances. Doing so could result in fire or electric shock. ■ Warning- It is dangerous to handle the power cord plug with wet hands.
- Page 6 Usage Notice Do not use the machine. Doing so could result in fire or electric shock. ■ Warning- If metal objects, or water or other fluids fall inside this machine, you must turn off its power immediately. After turning off the power, be sure to disconnect the power cord plug from the wall outlet.
- Page 7 Usage Notice b) Do not open the lamp cover of a machine that is installed on a wall or ceiling. Doing so may cause the lamp cover to fall down. If the lamp is broken, pieces of glass may fall and cause an injury. c) Contact your sales or service representative to clean or replace parts for a machine that is installed on a wall or ceiling.
- Page 8 Usage Notice ■ Caution- Do not place the machine in a location where air flow is poor. Doing so may cause fire due to internal components becoming overheated. ■ Caution- Do not place or store the machine in a location where direct sunlight or heat generation might occur.
- Page 9 Failing to take these precautions could result in fire or electric shock. ■ Caution- Do not use attachments not recommended by RICOH. Use of an incompatible attachments could cause hazards or damage to the product. ■ Caution-...
- Page 10 Usage Notice ■ Caution- Do not place anything in front of the lens while the projector is operating. Things placed in front of the lens may overheat and burn or start a fire. ■ Caution- Unauthorized substitutions may result in fire, electric shock, or other hazards.
-
Page 11: About The Lamp
Usage Notice ABOUT THE LAMP ■ Warning- When the lamp reaches the end of its life, it will burn out and may make a loud popping sound. If this happens, the projector will not turn back on until the lamp module has been replaced. To replace the lamp, follow the procedures listed under “Replacing the Lamp”. - Page 12 Usage Notice ■ If the lamp explodes, a very small amount of mercury vapor in the lamp tube and broken glass pieces may be ejected from the vents or other opening. What to do if a lamp has exploded If the lamp explodes, remove the power cord from the projector, leave the room while making sure it is thoroughly ventilated.
-
Page 13: Remote Control Battery
Usage Notice REMOTE CONTROL BATTERY Warning • Never throw batteries into a fire. Using the batteries improperly may cause them to explode or leak and may result in serious injury. If battery-leaking fluid contacts skin, wash the fluid off immediately with clean water and consult a doctor. -
Page 14: Safety Labels Of This Machine
Usage Notice Safety Labels of This Machine 1 To replace the lamp, unplug the power cord and then wait for 60 minutes. 2 Do not place anything in front of the lens while the projector is operating. Things placed in front of the lens may overheat and burn or start a fire. -
Page 15: Regulation & Safety Notices
Regulation & Safety Notices This appendix lists the general notices of your Projector. Notice: Users in the United States of America FCC notice MODEL NAME: RICOH PJ S2440/ X2440/ WX2440 TRADE NAME: PROJECTOR MODEL NAME: RICOH PJ S2440/ X2440/ WX2440 Tested To Comply... - Page 16 Usage Notice RESPONSIBLE PARTY: Ricoh Americas Corporation 5 Dedrick Place, West Caldwell, NJ 07006 Phone: 973-882-2000 Notice: Shielded cables All connections to other computing devices must be made using shielded cables to maintain compliance with FCC regulations. Caution Changes or modifications not expressly approved by the manufacturer could void the user’s authority,...
-
Page 17: Declaration Of Conformity For Eu Countries
Low Voltage Directive 2014/35/EC Notice: Users in EU countries CE Marking Traceability Information (For EU Countries Only) Manufacturer: Ricoh Co., Ltd. 3-6 Nakamagome 1-chome, Ohta-ku, Tokyo. 143-8555, Japan Importer: Ricoh Europe PLC 20 Triton Street, London. NW1 3BF, United Kingdom... - Page 18 Usage Notice • The lamp contains mercury. Please dispose of this product or used lamps in accordance with local regulations. The symbol indicates that the product must not be treated as municipal waste. It must be disposed of separately via the appropriate return and collection systems available.
- Page 19 Usage Notice Notice: Users in the EU Note for the Battery and/or Accumulator Symbol In accordance with the Battery Directive 2006/66/EC Article 20 Information for end-users Annex II, the above symbol is printed on batteries and accumulators. This symbol means that in the European Union, used batteries and accumulators should be disposed of separately from your household waste.
-
Page 20: Other Information
Usage Notice Other Information Copyrights to Images When projecting images using the projector, be careful not to infringe the copyright of protected materials. The following are examples that may infringe the copyright of protected materials. • Broadcasting images or movies for commercial purposes •... -
Page 21: Introduction
Introduction Product Features Outstanding features include: True 800x600 (SVGA) / 1024x768 (XGA)/ 1280x800 (WXGA) ■ resolution, 16.7M True colors Weight <2.6kg(5.75lbs) ■ Manual focus projection 1:1.10 zoom lens ■ Built-in full screen NTSC/PAL/SECAM video capability ■ with S-video/ Composite/ component through D-sub terminals UXGA/ WXGA/ Quad VGA/ SXGA+/ SXGA/ XGA/ ■... -
Page 22: Package Overview
RGB Cable Read This First About the CD-ROM Contains the user’s manual in PDF format and the projector management software. Support languages of the user’s manual are English, Japanese and Chinese. For the other languages, visit RICOH Web site. English... -
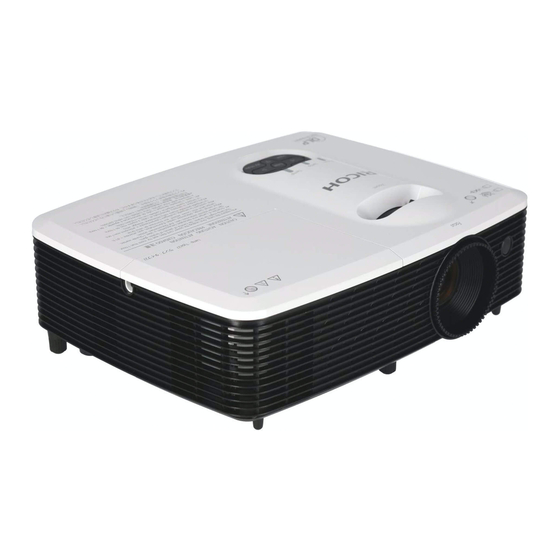
Page 23: Product Overview
Introduction Product Overview 1. Control panel 9. Ventilation (outlet) 2. Ventilation (inlet) 10. Lamp cover 3. Security Bar 11. Anti-theft lock hole 4. Remote Receiver (Kensington™ lock) 5. Focus ring 12. AC In socket 6. Lens 13. Connection ports 7. Lens cap 14. -
Page 24: Connection Ports
Introduction Connection Ports SVGA The interface is subject to model’s specifications. Compatible with MHL version 2.1, the charging current 5V@0.9A. XGA/WXGA 1. HDMI/HDMI 1 In terminal 5. Video In terminal 2. HDMI 2/MHL In terminal 6. Audio Out terminal 3. Service/5V 1.0A terminal 7. -
Page 25: Control Panel
Introduction Control Panel Power indicator Indicate the projector’s power status. Lamp indicator Indicate the projector’s lamp status. Temp indicator Indicate the inside of the projector’s temperature status. Menu Press “Menu” to launch the on screen display (OSD), or go back to the previous menu. -
Page 26: Remote Control
Introduction Remote Control AV Mute Auto Input Enter Menu Keystone Volume Computer Video HDMI Digital A Digital B Magnify Aspect Freeze Status Picture Power Refer to the “Power On/Off the Projector” section. (See pages 32~33) Input Press “Input” to choose your desired input source. - Page 27 HDMI Press “HDMI” to choose HDMI source for supports only HDMI PJ S2440 or HDMI1 and HDMI2/MHL input, MHL input is source for PJ WX2440 and PJ X2440. not supported. Magnify Zoom in the projector display. Number (0~9) Input numbers.
-
Page 28: Remote Control Battery Installation
Introduction Remote Control Battery Installation Push the clip to Install new batteries (AAA/ Close the battery cover release the battery R03). Ensure that you have and press it down until it cover. the batteries’ polarity (+/–) clicks into place. Do not mix aligned correctly. -
Page 29: Remote Control Operating Range
Introduction Remote Control Operating Range Point the remote control toward the projector (Remote Receiver) when pressing any button. Maximum operating range for the remote control is about 26.0’ (8m) and ±30° (horizontally), ±20° (vertically) in front of the projector. 26.0’ (8m) ±30°... -
Page 30: Basic Operations
Basic Operations Connecting the Projector Connect to Computer/Notebook SVGA Make sure that the power plug is fully inserted into both the Computer / Notebook projector AC inlet and the wall outlet. The AC outlet must be near this equipment and must be easily accessible. - Page 31 Basic Operations XGA/WXGA Make sure that the power plug is fully Computer / Notebook inserted into both the projector AC inlet and the wall outlet. The AC outlet must be near this equipment and must be easily accessible. Powered Speaker Due to the difference in applications for each...
-
Page 32: Connect To Av Equipment
Basic Operations Connect to AV Equipment SVGA DVD player, HDTV receiver Make sure that the power plug is fully inserted into both the projector AC inlet and the wall outlet. The AC outlet must Component be near this equipment and must be easily accessible. - Page 33 Basic Operations XGA/WXGA DVD player, HDTV receiver Make sure that the power plug is fully inserted into both the projector AC inlet and the wall outlet. The AC outlet must Component be near this equipment and must be easily accessible. Due to the Powered Speaker difference in...
-
Page 34: Powering On/Off The Projector
Basic Operations Powering On/Off the Projector Powering On the Projector 1. Ensure that the power cord and signal cable are securely connected. The Power indicator will turn red. 2. Remove the lens cap. If you connect 3. Turn on the lamp by pressing the “Power”... -
Page 35: Powering Off The Projector
Basic Operations Powering Off the Projector 1. Press the “ ” button and you will see a message as below on the on-screen display. Power Off? Press power key again. 2. Press the “ ” button again to turn off the projector lamp. 3. -
Page 36: Warning Indicator
Basic Operations Warning Indicator When the “Temp” indicator lights red, it indicates the projector has overheated. The projector will automatically shut itself down. Warning! TEMPERATURE TOO HIGH Please: 1. Make sure air in and outlets are not blocked. 2. Make sure the environment temperature is under 40 degress C. When the “Lamp”... -
Page 37: Adjusting The Projected Image
Basic Operations Adjusting the Projected Image Adjusting the Position of Projector Image The projector is equipped with adjustable feet to raise and lower the image to fill the screen. 1. Locate the adjustable foot you wish to modify on the underside of the projector. -
Page 38: Adjusting The Projector Zoom And Focus
Basic Operations Adjusting the Projector Zoom and Focus You may turn the zoom lever to zoom in or out. To focus the image, rotate the focus ring until the image is clear. Focus at distances: — SVGA / XGA: from 3.94 to 39.40 feet (from 1.2 to 12 meters) —... -
Page 39: Adjusting Projection Image Size
Basic Operations Adjusting Projection Image Size SVGA/XGA/WXGA: Projection image size from 30” to 300”. Top View Screen Screen (W) Projection Distance (D) Width Screen (H) Screen Side View Offset (Hd) Projection Distance (D) SVGA/XGA Screen Size W x H Projection Distance (D) Diagonal Offset (Hd) - Page 40 Basic Operations WXGA Screen Size W x H Projection Distance (D) Offset (Hd) Diagonal (inch) (feet) length (inch) size of 16:10 Screen Width Height Width Height wide tele wide tele (cm) (feet) 0.65 0.40 25.4 15.9 3.27 3.65 0.16 0.86 0.54 33.9 21.2...
-
Page 41: User Settings
User Settings Using the On Screen Display (OSD) The Projector has a multilingual On Screen Display that allows you to make image adjustments and change a variety of settings. How to operate To open the OSD, press “Menu” on the Control Panel or Remote Control. -
Page 42: Picture
User Settings Picture Picture Mode Standard Brightness Contrast Saturation Sharpness Gamma Color Temperature PICTURE Advanced Select Enter Exit Picture Mode There are many factory presets optimized for various types of images. The available options: Bright: Mode for emphasizing brightness. Bright function is Standard: Mode for optimizing the balance between brightness ... -
Page 43: Color Temperature
User Settings Contrast The contrast controls the degree of difference between the lightest and darkest parts of the picture. Adjusting the contrast changes the amount of black and white in the image. Contrast Press the key to decrease the contrast. ... - Page 44 User Settings NCE (Natural Color Enhancer) Use this function to enhance color and reproduce vivid colors. On: Enable NCE. Off: Disable NCE. Advanced Configure the advanced image settings. Advanced Wall Color White NCE Settings Select Enter Exit Wall Color: Use this function to obtain an optimized screen ...
- Page 45 User Settings - Color: Use the key to adjust the red, green, blue, cyan, magaenta, and yellow. - Hue: Use the key to adjust the color balance of red and green when Color is red, green, blue, cyan, magenta, and yellow.
- Page 46 User Settings - Green: Use the key to adjust the gain of green when Color is White. Green - Blue: Use the key to adjust the gain of blue when Color is White. Blue - Reset: Reset the color settings to the factory defaults. English...
-
Page 47: Screen
User Settings Screen Auto Aspect Ratio Phase Clock H. Position V. Position Keystone Normal Projection Advanced SCREEN Select Enter Exit Aspect Ratio Use this function to choose your desired aspect ratio. Aspect Ratio Auto Auto: Automatically selects the appropriate display format. ... - Page 48 User Settings H. Position (Horizontal Position) Shift the projected image position horizontally. “H. Position” and H. Position “V. Position” functions are only supported Press the key to move the image left. under Computer Signal source. Press the key to move the image right. ...
- Page 49 User Settings Advanced Configure the advanced screen settings. Advanced Magnify RGB Input Range Auto Test Pattern Select Enter Exit Magnify: Use the key to zoom in or zoom out the image. Magnify RGB Input Range: Adjust the color range of the HDMI image ...
-
Page 50: Setting
User Settings Setting English Language Auto Power Off (Min) Security Reset SETTING Select Enter Exit Language Choose the multilingual OSD. Press “Enter” to open the sub menu and then use the key to select your preferred language. Press “Enter” to finalize the selection. Language Select Enter... - Page 51 User Settings Security Configure the security settings. Security Security Change Password Select Enter Exit Security: Select “On” to use the security verification when the turning on the projector. Select “Off” to be able to switch on the projector without a password verification. Security Change Password: Set the password.
- Page 52 User Settings Audio Mute Volume AUDIO Select Enter Exit Mute Temporarily turn off the sound. “Mute” function affects both internal Mute and external speaker volume. Choose “On” to mute the sound. Choose “Off” to turn mute off. Volume Adjust the volume level.
-
Page 53: Options
User Settings Options Auto Source Input Source Lamp Settings Filter Settings High Altitude Power Settings Advanced OPTIONS Information Select Enter Exit Auto Source When this function is turned “On”, the projector will search for other signals if the current input signal is lost. When this function is turned “Off”, it will only search a specified connection port. -
Page 54: Lamp Settings
User Settings Lamp Settings Use this option to view the lamp life status and configure the lamp settings. Press “Enter” to enter the sub menu and configure the desired settings. Lamp Settings Lamp Hours Used (Normal) Lamp Power Mode Normal Lamp Life Reminder Select Enter... -
Page 55: High Altitude
Filter Settings accesories. Filter Hours Used Optional filter Filter Reminder is separately sold. Reset Filter Timer Use “RICOH PJ Replacement Air Select Enter Exit Filter Type 6 (Black)/ (White)”. Filter Hours Used: Display the filter hours. ... - Page 56 User Settings Power Settings Use this option to configure the power settings. Press “Enter” to enter the sub menu and configure the desired settings. Power Settings Direct Power On Sleep Timer (Min) Select Enter Exit Direct Power On: Select “On” to automatically power on the ...
- Page 57 User Settings Information Display the projector information. Information Source HDMI1 Resolution Color Space No Data Filter Hours Used 0 hr Lamp Time 0 hr Image ECO Lamp Power FW Version Enter Exit Source: Display the input source that is currently connected to. ...
- Page 58 User Settings 3D Sync invert Auto 3D Format Select Enter Exit 3D Sync Invert Use this option to enable/disable the 3D sync invert function. “3D Sync Invert” is only available when 3D is enabled. 3D Sync Invert This setting may Off: Choose “Off”...
-
Page 59: Troubleshooting
Troubleshooting If you experience trouble with the projector, refer to the following information. If the problem persists, please contact your local dealer or service center. Problem: No image appears on screen Ensure all the cables and power connections are correctly and ... - Page 60 Troubleshooting Problem: The screen of the Notebook computer is not displaying a presentation If you are using a Notebook PC: Some Notebook PCs may deactivate their own screens when a second display device is in use. Each has a different way to be reactivated.
- Page 61 Troubleshooting Problem: Image is reversed Select “Screen > Projection” from the OSD menu to adjust the image. Problem: Lamp burns out or makes a popping sound When the lamp reaches its end of life, it will burn out and may ...
- Page 62 Troubleshooting Problem: Indicator lighting message POWER TEMP LAMP indicator indicator indicator Message (Red/Blue) (Red) (Red) Standby (Input power cord) (Red) Normal (Power on) (Blue) Powering up (Warming up) Flashing Blue (0.5 sec) Power off (Cooling Down) Flashing Red (0.5 sec) Programming (Blue and Red) Temperature Error (Over...
-
Page 63: Environmental Condition
Troubleshooting Problem: Message Reminders Temperature Error - the projector is overheat inside. Check the environmental condition. Warning! TEMPERATURE TOO HIGH Please: 1. Make sure air in and outlets are not blocked. 2. Make sure the environment temperature is under 40 degress C. Replacing the lamp - the lamp is about to reach its maximum ... -
Page 64: Replacing The Lamp
Replacing the lamp The projector will detect the lamp life itself. It will show you a warning message: Warning! Lamp Lamp is approaching the end of its useful life. Replacement Suggested! When you see this message, change the lamp as soon as possible. -
Page 65: Appendices
Appendices List of Compatible Signals A. VGA Analog (1) VGA Analog - PC Signal V.Frequency H.Frequency Modes Resolution (Hz) (kHz) 640 x 480 31.47 640 x 480 37.86 640 x 480 37.5 640 x 480 43.27 800 x 600 35.2 800 x 600 37.88 SVGA... - Page 66 Appendices A. VGA Analog (2) VGA Analog - Extended Wide Timing V.Frequency H.Frequency Modes Resolution (Hz) (kHz) WSVGA 1024 x 600 37.3 1280 x 768 47.78 1280 x 768 60.29 1280 x 768 68.63 WXGA 1280 x 720 44.8 1280 x 800 49.6 1366 x 768 47.71...
- Page 67 Appendices B. HDMI (1) HDMI - PC Signal V.Frequency H.Frequency Modes Resolution (Hz) (kHz) 640 x 480 31.47 640 x 480 37.86 640 x 480 37.5 640 x 480 43.27 800 x 600 35.2 800 x 600 37.88 SVGA 800 x 600 48.08 800 x 600 46.88...
- Page 68 Appendices B. HDMI (2) HDMI - Extended Wide Timing V.Frequency H.Frequency Modes Resolution (Hz) (kHz) WSVGA 1024 x 600 37.3 1280 x 768 47.78 1280 x 768 60.29 1280 x 768 68.63 WXGA 1280 x 720 44.8 1280 x 800 49.6 1366 x 768 47.71...
- Page 69 Appendices C. 3D Timing Input timing 1280 x 720P @ 50Hz Top - and - Bottom 1280 x 720P @ 60Hz Top - and - Bottom 1280 x 720P @ 50Hz Frame packing HDMI 3D Input 1280 x 720P @ 60Hz Frame packing (with 3D Side- by-Side...
-
Page 70: Configurations Of Terminals
Appendices Configurations of Terminals Terminal: Computer In (Mini D-sub 15 pin) Red (R/Cr) Input [R Output] DDC 5V [NC*] Green (G/Y) Input [G Output] Ground (Ver. sync.) Blue (B/Cb) Input [B Output] DDC Data [NC*] Ground (Horiz.sync.) Horiz. sync. Input [Output] (Composite H/V sync. -
Page 71: Specifications
• Designs and specifications are subject to change without notice. • This model may not be compatible with features and/or specifications that may be added in the future. ■ Separately sold product RICOH PJ Replacement Lamp Type 27 RICOH PJ Replacement Air Filter Type6 (Black) / (White) English English... -
Page 72: Cabinet Dimensions
Appendices Cabinet Dimensions Unit: mm Holes for ceiling mount Screw size and max. length: M4.0*Ø8.2/Ø6.3*L8.0mm English... -
Page 73: Trademarks
Appendices Trademarks • DLP is trademarks or registered trademark of Texas Instruments. • IBM is a trademark or registered trademark of International Business Machines Corporation. • Macintosh, Mac OS X, iMac, and PowerBook are trademarks of Apple Inc., registered in the U.S. and other countries. •...