Table of Contents
Advertisement
Advertisement
Table of Contents

Related Manuals for Optoma ML330


Summary of Contents for Optoma ML330
- Page 1 Projector ® User manual...
-
Page 2: Table Of Contents
TABLE OF CONTENTS SAFETY ....................4 Important Safety Instruction....................... 4 3D Safety Information ........................ 5 Copyright ........................... 6 Disclaimer ..........................6 Trademark Recognition ......................6 FCC ............................6 Declaration of Conformity for EU countries ................7 WEEE ............................7 INTRODUCTION .................. 8 Package Overview........................ - Page 3 ADDITIONAL INFORMATION ............45 Compatible resolutions ......................45 Image size and projection distance ..................46 Projector dimensions and ceiling mount installation ..............47 IR remote codes ........................48 Troubleshooting ........................49 Specifications ........................... 51 Optoma global offices ....................... 52 English...
-
Page 4: Safety
SAFETY The lightning flash with arrow head within an equilateral triangle is intended to alert the user to the presence of uninsulated "dangerous voltage" within the product's enclosure that may be of sufficient magnitude to constitute a risk of electric shock to persons. The exclamation point within an equilateral triangle is intended to alert the user to the presence of important operating and maintenance (servicing) instructions in the literature accompanying the appliance. -
Page 5: 3D Safety Information
‡ Do not attempt to service the unit yourself. Opening or removing covers may expose you to dangerous voltages or other hazards. Please call Optoma before you send the unit for repair. ‡ See projector enclosure for safety related markings. -
Page 6: Copyright
‡ Watching 3D projection while wearing 3D glasses for an extended period of time may cause a headache or fatigue. If you experience a headache, fatigue or dizziness, stop viewing the 3D projection and rest. ‡ Do not use the 3D glasses for any other purpose than for watching 3D projection. ‡... -
Page 7: Declaration Of Conformity For Eu Countries
Notice: Shielded cables All connections to other computing devices must be made using shielded cables to maintain compliance with FCC regulations. Caution Changes or modifications not expressly approved by the manufacturer could void the user's authority, which is granted by the Federal Communications Commission, to operate this projector. Operation Conditions This device complies with Part 15 of the FCC Rules. -
Page 8: Introduction
INTRODUCTION Package Overview Carefully unpack and verify that you have the items listed below under standard accessories. Some of the items under optional accessories may not be available depending on the model, specification and your region of purchase. Please check with your place of purchase. Some accessories may vary from region to region. The warranty card is only supplied in some specific regions. -
Page 9: Product Overview
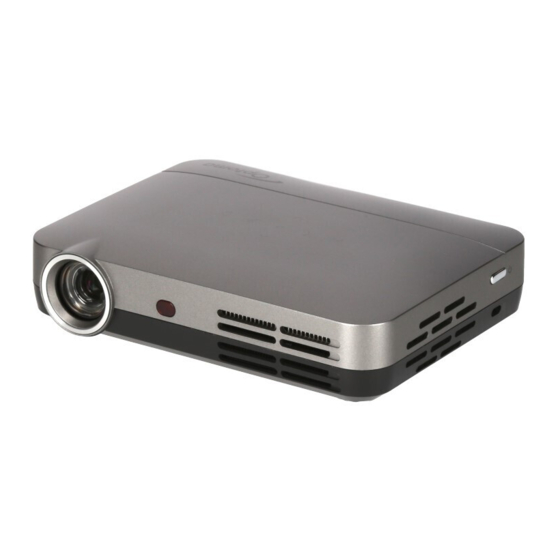
INTRODUCTION Product Overview Note: Keep a minimum distance of 20 cm between the inlet and outlet vents. Item Item Lens Input / Output IR Receiver Focus Ring Touch Control Panel Kickstand Power Button 10. Ventilation (inlet) Kensington™ Lock Port 11. Speakers Ventilation (outlet) English... -
Page 10: Connections
INTRODUCTION Connections Item DC IN Connector USB2.0 Connector HDMI SUPPORT Connector USB3.0 Connector Micro SD Card Slot Headphone and S/PDIF Output AV Connector Ethernet (RJ-45) Connector Note: Remote mouse requires special remote control. English... -
Page 11: Touch Control Panel
INTRODUCTION Touch Control Panel Item Setting Four Directional Select Keys Enter Home/Return English... -
Page 12: Remote Control
INTRODUCTION Remote control Item Item Power Volume - Four Directional Select Keys Return Setting 10. Device Setting Mouse pointer 11. Home Volume + Note: ‡ The actual remote control may vary depending on the region. ‡ Some keys may have no function for models that do not support these features. English... -
Page 13: Setup And Installation
SETUP AND INSTALLATION Tripod Mount the projector Screw a standard tripod into the screw hole on the projector. Insert Nut 1/4” - 20 UNC (Screw hole for tripod) 157mm Note: ‡ Please note that damage resulting from incorrect installation will void the warranty. ‡... -
Page 14: Connecting Sources To The Projector
SETUP AND INSTALLATION Connecting sources to the projector Item Item Power Cord Audio Out Cable 12V DC Jack Audio Out Cable HDMI Cable 10. AV Cable Bluetooth 11. USB Cable Wireless Network 12. USB Cable RJ-45 Cable 13. USB Cable Micro SD Card English... -
Page 15: Adjusting The Projector Image
SETUP AND INSTALLATION Adjusting the projector image Image height Open the kickstand to adjust the image height. Kickstand Focus Turn the focus ring up or down until the image is clear. Focus Ring English... -
Page 16: Remote Setup
SETUP AND INSTALLATION Remote setup Installing / replacing the batteries Two AAA size batteries are supplied for the remote control. Remove the battery cover on the back of the remote control. Insert AAA batteries in the battery compartment as illustrated. Replace back cover on remote control. - Page 17 SETUP AND INSTALLATION Approx. 15° English...
-
Page 18: Using The Projector
USING THE PROJECTOR Powering on / off the projector Powering on Connect one end of the power lead to the AC adapter and the AC adapter to the DC IN connector on the projector. Connect the other end of the power lead to the electrical outlet. When connected, the On/Standby LED will turn red. -
Page 19: Home Screen Navigation
USING THE PROJECTOR Home screen navigation You can navigate the Home screen by using the projector touch control panel, remote control, USB/wireless keyboard or USB/wireless mouse. Using the projector touch control panel Tap on the touch control panel to activate its keys. Note: After the activation the touch control panel keys turn blue color. -
Page 20: Home Screen Overview
USING THE PROJECTOR Home screen overview The Home screen is displayed every time you start the projector. From the Home screen, you can quickly change the input source, access your favorite apps, view date and time, configure various settings, and more. Note: All the instructions provided in this section assume that you are using the projector touch control panel when operating the device. - Page 21 USING THE PROJECTOR Select APP People Calendar Calculator Camera Clock Browser To remove or replace an app on the Home screen, do the following: Tap the , , , or key to select the app on the Home screen that you wish to remove or replace. Tap the key.
- Page 22 USING THE PROJECTOR Wireless setting Wi-Fi Add network Connected Secured with WPA/WPA2 (WP3 available) Secured with WPA/WPA2 (WPS available) WPS available WPS available Choice Back Connecting to the Bluetooth devices Before you can send or receive data using Bluetooth, you need to establish a trusted connections between your projector and the other Bluetooth device.
- Page 23 USING THE PROJECTOR Accessing fi les To search and playback your media fi les, use the fi le explorer under “Files” tab or KODI app. For adding apps, please refer to Managing your favorite apps section on page 20. Status indicators The status indicators on the top edge of the screen are illuminated if the respective connection is established or function is activated.
- Page 24 USING THE PROJECTOR Open the UShare app on your portable device and tap “UShare-1249” to connect. Then follow the on- screen controls to start streaming media fi les from your portable device to the projector. To set up AirPlay Mirroring, do the following: Note: The AirPlay Mirroring is only available for devices that use iOS.
- Page 25 USING THE PROJECTOR ± System: Manage applications, confi gure language settings, modify date and time, miracast settings, restore the factory default settings, and access the Factory menu. ± Device: A quick menu for confi guring the basic settings of your projector, such as keystone, auto keystone, projection mode, auto rotation, aspect ratio, digital zoom, horizontal and vertical scale, and power mode.
- Page 26 USING THE PROJECTOR ‡ Bluetooth devices: Displays the visibility information of your projector to other Bluetooth devices, a list of paired devices and a list of available Bluetooth devices. For connecting your projector to other Bluetooth devices, please refer to page 22. System ‡...
- Page 27 USING THE PROJECTOR System Settings Application manage Language input setting Date time setting Miracast Recovery Factory menu Choice Back Device Note: For accessing more projector settings, please refer to pages 37-44. Keystone: Adjust the image distortion caused by tilting the projector. ‡...
- Page 28 USING THE PROJECTOR Ethernet Connection ‡ Enable/Disable Wired Ethernet: Turn the wired Ethernet connection setting on or off. ‡ The automatic acquisition IP address (DHCP): Turn obtaining the network parameters automatically option on or off. Note: If the “The automatic acquisition IP address” option is turned on, the “IP address”, “Subnet mask”, “Default gateway”, “First DNS”, and “Second DNS”...
- Page 29 USING THE PROJECTOR Defi ne Settings Wallpaper Settings Bootanimation Settings Boot Setup Button Power On Input Source Setup AUTO NO Signal Auto Shutdown Choice Back ‡ Software Update: Tap the key to update your projector’s software. The available options include updating over the Internet (“Net update, also known as OTA –...
- Page 30 USING THE PROJECTOR About: Tap the ‡ key to review the projector related general information, such as the model name, system version, wireless MAC address, and many more. Device Info System Version Wireless MAC address Cable MAC address Memory information (available/total) Stored Information (available/total) Software Version Hardware Version...
- Page 31 USING THE PROJECTOR Menu Tree For a detailed overview of the Settings menu options, please see the menu tree below. Level 1 Level 2 Level 3 Level 4 Level 5 Value Wi-Fi settings Wi-Fi Wi-Fi hotspot Settings SSID WIFI WPA2 PSK Wi-Fi hotspot Security Open...
- Page 32 USING THE PROJECTOR Level 1 Level 2 Level 3 Level 4 Level 5 Value English Chinese (Traditional) Language setting German Spanish Android Keyboard (AOSP) Change the default Google Pinyin input method IQQI - International Auto-capitalization Sound on keypress Personal dictionary English Deutsch Español...
- Page 33 USING THE PROJECTOR Level 1 Level 2 Level 3 Level 4 Level 5 Value Key sound Key vibration Google Associative input PinyinSettings Switch in Chinese “Shift-space” key and English Portrait Screen: 35%~70% Landscape Screen: Keyboard Height 30%~70% Default Value Huge Keyboard Font Size Medium Smallest...
- Page 34 USING THE PROJECTOR Level 1 Level 2 Level 3 Level 4 Level 5 Value 日本語 한국어 Norsk Polski Português Languages Русский Language input IQQI - International- Español setting Settings Svenska ไทย Türkçe Open Source Licenses Copyright (pop-up menu) Through the network to be automatic gain time date...
- Page 35 USING THE PROJECTOR Level 1 Level 2 Level 3 Level 4 Level 5 Value 16:10 Aspect Ratio 16:9 Digital zoom 50%~100% Horizontal Scale 50%~100% Device Vertical Scale 50%~100% Standard Warm Power Mode Cool Enable/Disable Wired Ethernet The automatic acquisition IP address Ethernet IP address...
- Page 36 USING THE PROJECTOR Level 1 Level 2 Level 3 Level 4 Level 5 Value Auto Input Source Setup HDMI Personalize NO Signal Auto Shutdown Net update Software Update Local update Regulatory Model LDMLSSZ System Version 4.4.4 Wireless MAC by Model address About Cable MAC address...
-
Page 37: Projector Osd Menu
USING THE PROJECTOR Projector OSD menu The projector has multilingual on-screen display menus that allow you to make image adjustments and change a variety of settings. Menu navigation using the projector touch control panel Note: The projector OSD menu can be opened only by pressing the key on the remote control. - Page 38 USING THE PROJECTOR Menu navigation using the mouse Note: The projector OSD menu can be opened only by pressing the key on the remote control. Once opened, you can use the mouse keys to navigate the OSD menu and adjust the parameters. To open the OSD menu, press the key on the remote control.
-
Page 39: Osd Menu Tree
OSD Menu tree Level 1 Level 2 Level 3 Value Vivid Natural Sports Picture Mode Lightness Standard Soft Picture Quality User Contrast* 0~100 Brightness* 0~100 Saturation* 0~100 Sharpness* 0~100 Hue* 0~100 Standard Image Warm Color Temp Mode User Color Temperature Cold Red* 0~256... - Page 40 USING THE PROJECTOR Level 1 Level 2 Level 3 Value Front Ceiling Front Projection Mode* Rear Ceiling Rear Display Keystone* -40~40 Advanced Auto AUTO Keystone Auto AUTO Rotate Whether to restore the default Restore Defaults value Adaptive detecting Source Change 3D Setting LR View Swap 2D Mode...
-
Page 41: Image Menu
USING THE PROJECTOR Image menu Image picture quality menu Picture Mode Set a preset picture mode for your images or customize the picture mode manually . ‡ Vivid: Mode optimized for producing strikingly bright colorful images. ‡ Natural: Mode for projecting images in realistic and true colors. ‡... -
Page 42: Sound Menu
USING THE PROJECTOR 1080P scaling table: 16 : 9 screen 480i/p 576i/p 720p 1080i/p Scale to 1067x800. 16x9 Scale to 1280x720. Native mode - 1:1 mapping centered. - No scaling will be made; the resolution is adjusted depending on the input source. Auto -If the source is 4:3 then the image is resized to 1067x800. -
Page 43: Advanced Menu
USING THE PROJECTOR Advanced menu Advanced display menu Projection Mode Select the preferred projection between “Front”, “Ceiling Front”, “Rear”, and “Ceiling Rear”. Keystone Adjust the image distortion caused by tilting the projector manually. AUTO Keystone Adjust the image distortion caused by tilting the projector automatically. AUTO Rotate Enable to detect the projection mode automatically. -
Page 44: Power Menu
USING THE PROJECTOR Power menu Power mode menu Select your preferred projector power mode. The available options include “Standard”, “Warm”, “Cool”, “Eco”, and “Music”. Standard Warm Cool Music Power timer menu Set the countdown timer interval. The countdown timer will start, with or without a signal being sent to the projector. The projector will automatically power off when the countdown has fi nished (in minutes). -
Page 45: Additional Information
ADDITIONAL INFORMATION Compatible resolutions Digital compatibility B0/Established B0/Standard Timing B0/Detail Timing B1/Video Mode B1/Detail Timing Timing 640x480 @ 60Hz XGA / WXGA: Native timing: 640x480p @ 60Hz 1280x720p @ 60Hz 640x480 @ 72Hz 1440x900 @ 60Hz XGA: 1024x768 @ 60Hz 720x480p @ 60Hz 1366x768 @ 60Hz 640x480 @ 75Hz... -
Page 46: Image Size And Projection Distance
ADDITIONAL INFORMATION Image size and projection distance Standard throw 1080p (16:9) Diagonal Screen Size W x H Projection Distance (D) Length Size of (inch) (16:10) Screen (feet) Width Height Width Height 0.49 0.42 0.26 16.3 10.2 0.50 19.6 0.97 0.82 0.52 32.2 20.2... -
Page 47: Projector Dimensions And Ceiling Mount Installation
ADDITIONAL INFORMATION Projector dimensions and ceiling mount installation ‡ 1/4-20 UNC thread (screw hole for tripod) Lens Unit: mm Note: Please note that damage resulting from incorrect installation will void the warranty. Warning: ‡ Be sure to keep at least 10 cm gap between the ceiling and the bottom of the projector. ‡... -
Page 48: Ir Remote Codes
ADDITIONAL INFORMATION IR remote codes Remote Code Description Power Refer to the "Power On/ Off the Projector" section on 18. Press the key to decrease the volume. Volume Press the key to increase the volume. Mouse pointer Press the key to select items. Return Press the key to return to the previous page or item. -
Page 49: Troubleshooting
ADDITIONAL INFORMATION Troubleshooting If you experience a problem with your projector, please refer to the following information. If a problem persists, please contact your local reseller or service center. Image problems After selecting the input source, the image does not appear on the screen ‡... - Page 50 ADDITIONAL INFORMATION Image does not display in 3D ‡ Check if the battery of 3D glasses is drained. ‡ Check if the 3D glasses is turned on. Other problems The projector stops responding to all controls ‡ If possible, turn off the projector, then unplug the power cord and wait at least 20 seconds before reconnecting power.
-
Page 51: Specifications
ADDITIONAL INFORMATION Specifications Optical Description Native resolution WXGA (1280x800) Lens Manual focus Image size (diagonal) 19.2”~11.4” (0.49m~0.29m) Projection distance 19.6”~118.1” (0.50m~3.00m) Electrical Description Color reproduction 16.7 million colors - Horizontal scan rate: 15 kHz - 93kHz Scan rate - Vertical scan rate: 24Hz - 120Hz Built-in speaker Power requirement 100 - 240V AC 50-60Hz... -
Page 52: Optoma Global Offices
ADDITIONAL INFORMATION Optoma global offices For service or support, please contact your local office. Japan 3178 Laurelview Ct. 888-289-6786 東京都足立区綾瀬3-25-18 Fremont, CA 94538, USA 510-897-8601 info@os-worldwide.com 株式会社オーエス www.optomausa.com services@optoma.com 0120-380-495 www.os-worldwide.com コンタクトセンター: Canada Taiwan 3178 Laurelview Ct. 888-289-6786 12F., No.213, Sec. 3, Beixin Rd.,... - Page 53 www.optoma.com...