Table of Contents
Advertisement
Advertisement
Table of Contents

Related Manuals for Raymarine Race Master

Summary of Contents for Raymarine Race Master
- Page 1 Race Master User Guide...
- Page 2 Race Master EMC Conformance All Tacktick equipment is designed to the best industry standards for use in the recreational marine environment. The design and manufacture of Tacktick equipment conforms to the appropriate Electromagnetic Compatibility (EMC) standards. Correct installation is required to ensure that performance is not compromised.
-
Page 3: Table Of Contents
2.8 Audible Signals - 2.9 Safety and Disposal - Racing Functions 3.1 Some Definitions and Terminology - 3.2 Improving Race Performance with the Race Master - 3.3 Before the Race - 3.4 During the Race - Advanced Operation Setup and Calibration 5.1 Setup and Calibration Organisation -... -
Page 4: Information
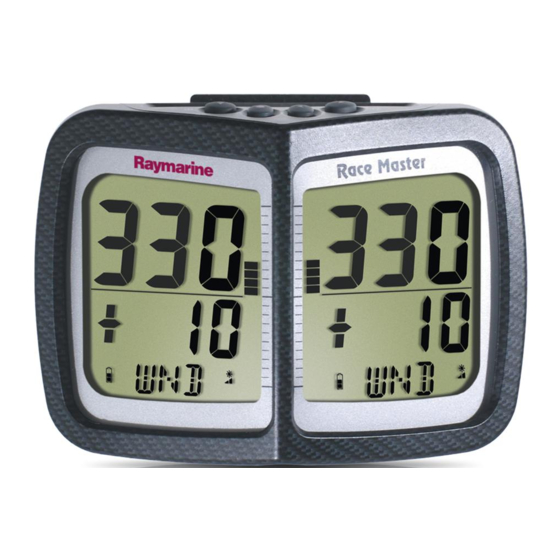
Integrated Heading Sensor The Race Master is a powerful racing compass; with functions for Race Timer, Wind Shift and Line Bias. Bar Graph display Both screens of the Micronet Race Master incorporate a bar graph to permit analogue display of Wind Shift, Speed Trim or Depth. -
Page 5: Basic Operation
Basic Operation Basic Operation Display Information Switching the System On and Off To switch your Race Master on or off, press for 2 seconds. Switch on Switch off Information Display Panes Top Pane Heading is permanently displayed in the top pane. -
Page 6: Power Management And Battery Life
12 hours of direct bright sunlight. If using the Race Master at night, power usage can be reduced dramatically by switching the Backlighting to level 1. Note: If the internal battery is fully charged then it does not matter how much the display is subjected to bright sunlight, no further charging is required and the Charge Rate Indicator will remain low. -
Page 7: Sleep Mode
Audible Signals At stages during its operation your Race Master will beep to indicate moments of importance. Power-up The display will issue a single beep as it is switched on. -
Page 8: Racing Functions
Line Bias, the angle between the heading of the start line and a line at right angles to the wind. Improving Race Performance with the Race Master Racing and Wind Shifts Like most things in sailing, the wind does not remain constant in either strength or direction. - Page 9 Race Master gives you this critical information when you are sailing both upwind AND downwind. You sail your boat for maximum speed to windward, using the Race Master to identify the headers and lifts to help you decide when to tack. Timing your tacks and gybes is absolutely critical to winning races and Race Master shows you the wind shifts more clearly than ever before.
-
Page 10: Before The Race
Race Master Before the Race Programme the Mean Wind Direction (MWD) and Tack Angle (TAK), capture the Line Bias (LiNE) and set the Race Timer (TMR). To set the Mean Wind Direction (MWD) and Tack Angle (TAK) in “Single Button” mode Go to the Wind Shift (WND) page. - Page 11 Racing Functions If the wind is coming from the starboard side, the line is starboard biased. If the wind is coming from the port side, the line is port biased. To set the Start Timer Go to the Race Timer (TMR) page. Press for 1 second, the last start countdown value is shown, flashing.
-
Page 12: During The Race
Race Master During the Race Sailing upwind Tack when headed to keep the boat sailing on the lifted tack. The bar graph indicates the Wind Shift in 2.5 degree steps from a central zero. Bar Graph above the centre line indicates a lift, Bar Graph below the centre line indicates a header. -
Page 13: Advanced Operation
Advanced Operation Advanced Operation To set the Mean Wind Direction (MWD) and Tack Angle (TAK) by sailing closehauled 1 Go to the Wind Shift (WND) page. 2. Sail upwind for several minutes to determine your average close hauled heading on each tack. 3. - Page 14 Race Master To correct the Mean Wind Direction (MWD) by going head to wind. For Wind Shift to work correctly, you must ensure that the tack angle is captured using one of the methods described above. 1 Go to the Wind Shift (WND) page.
-
Page 15: Setup And Calibration
Setup and Calibration Setup and Calibration Setup and Calibration Organisation Setup is organised into Chapters, each comprising a number of Pages. Setup pages use both the top and bottom panes of the display. The diagram shows the layout of the available chapters and pages. For a full description of each setup page refer to section 5.4. -
Page 16: Editing Setup Data
Race Master Editing Setup Data Parameter values may be one of three types: A user editable numeric value (for example, the magnetic variation may have the value 03 degrees). To edit a numeric parameter value: Press . The value data will begin to flash. - Page 17 Options Chapter Auto Networking Adds display units or transducers to the Micronet network. For information on the Auto Networking function, refer to the Race Master Sytem user guide. Key Lock Press to toggle between keylock OFF and On...
- Page 18 Available values are: 1 - 7 default 4. Demonstration Mode Allows the display to show information for demonstration purposes only. The Race Master will return to default OFF on power down. Factory Reset Returns all the calibration setting to the factory default values. Pressing starts a three second countdown, at the end of which all values are returned to their defaults.
-
Page 19: Calibration
Once the Race Master has been installed on the vessel and Auto Networking has been completed it is necessary to calibrate the compass. It is not safe to use the Race Master for navigational purposes until calibration has been carried out correctly. -
Page 20: Installation
Race Master Installation Warning: The Race Master must be mounted within 20 degrees of the vertical to permit correct functioning of the integrated compass sensor. Ideally, the display should be mounted at or below eye height; if this is not possible it may be necessary to adjust the display contrast to optimise visibility (see page 16). -
Page 21: Maintenance And Fault Finding
Switch the unit back on and ensure movement every ten minutes. b) The battery level on the Race Master is low. Check the battery icon on the display; if this flashes, the battery must be re-charged. Leave the unit in bright sunlight for 12 hours minimum to recharge the battery. -
Page 22: Specifications
Race Master Specifications Height of digits: 27mm (upper pane), 18mm (lower pane) Backlighting: 3 levels with daylight shutoff System-wide or local control Power: Solar Powered 300 hrs autonomy by day, 7 nights at brightest backlighting, 20 nights at economy backlighting without charge...