Table of Contents
Advertisement
Quick Links
Advertisement
Chapters
Table of Contents

Related Manuals for Porsche 928 ST1991


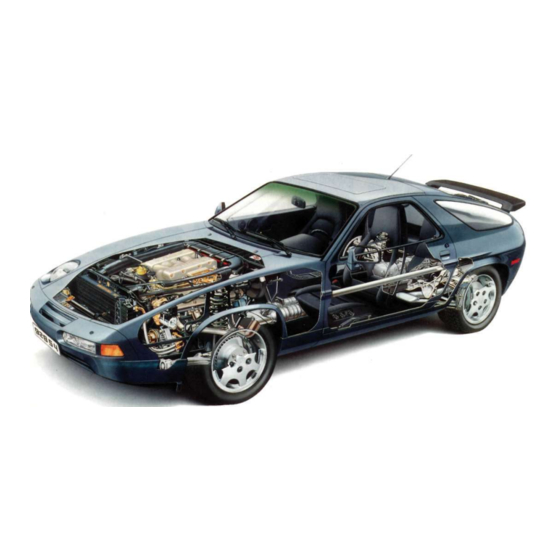
Summary of Contents for Porsche 928 ST1991
- Page 3 Porsche in top driving con WKD 928 021 91 1.1 Μ dition by having it serviced regularly. © Dr. Ing. h. c. F. Porsche Aktiengesellschaft judging by the car you have chosen, It also contains detailed information All rights reserved.
- Page 4 In Canada, this manual is also availa- to make changes in design and built into the car. Your Porsche is in- ble in French. To obtain a copy contact specifications, and to make additions tended to be used in a safe manner in...
- Page 5 Before Driving Off, Running In, Controls Maintenance, Car Care Practical Tips, Emergency Service Vehicle Identification, Technical Data Index Pocket for Additional Information...
-
Page 6: Table Of Contents
Before Driving Off, Running In, Controls Before going on a trip In the driver's seat Break-in hints Engine exhaust Keys 12-13 Theft protection Anti-theft alarm Doors Central door locking 14-15 Interior lights Power windows Seats 18-21 Mirrors Safety belts 23-25 Child restraint anchorages Air bag system 26-27... -
Page 7: Before Going On A Trip
If in doubt, have these emergency light, small shovel, first-aid kit, checks performed by your Porsche dealer. • Replace worn or cracked wiper blades. etc. -
Page 8: In The Driver's Seat
In the driver's seat... On the road... • Never drive after you have consumed al- • Check operation of horn. • When emergency repairs become neces- cohol. sary, move the vehicle well off the road. • Position seat for easy reach of controls. Turn on emergency flasher and use other •... -
Page 9: Break-In Hints
1.000 miles/1.600 kilometers There are no specific break-in rules for your Breaking-in brake pads WARNING Porsche. However, by taking a few precau- tions you can help extend the service life and Brake pads do not have maximum braking • Engine exhaust is dangerous if inhaled, performance of your engine. - Page 10 1 Light switch 2 Turn signal/headlight dimmer flasher/ parking light switch lever 3 Horn 4 Windshield wiper and windshield/ headlight washer switch lever 5 Emergency flasher switch 6 Switches for power windows 7 Controls for power seat 8 Parking brake lever 9 Side view mirror adjuster...
-
Page 11: Keys
(available from your The new format of the keys makes unau- lock. Take the key and lock the Porsche dealer). Vehicles with a rear seat thorized duplication of the keys virtually im- glove compartment receive two additional doors. -
Page 12: Keys
For the lockable wheel nuts, three identical keys, are included. When taking the vehicle to your Porsche dealer or to a workshop for wheel or tire service, remember to leave one key with the service attendant. In case of loss, duplicate wheel look keys cannot be furnished by your Porsche dealer. -
Page 13: Theft Protection
Theft protection If an alarm contact is broken, the alarm horn To protect your vehicle from theft, you will sound for approx. 4 minutes. At the same should always proceed as follows when leav- time, the interior lights and the hazard warn- ing your vehicle: ing lights flash for approx. -
Page 14: Central Door Locking
Central door locking With the central door locking system, both doors can be locked and unlocked electri- cally. The doors are locked when a key is tur- ned in either door lock or when the key is turned further counterclockwise in the lock of the luggage-compartment lid. -
Page 15: Interior Lights
Interior light in headlining Footwell light in lower part of door trim Luggage compartment light in hatchback Interior lights The interior lights, which are independent The interior lights have the following switch The interior light in the headlining and the from one another, come on, with the switch positions: luggage compartment light are switched on... -
Page 16: Power Windows
Opening windows Tapping the switches moves the windows in stages to the desired position. Pressing the switches for longer than 0.5 seconds automatically opens the windows fully. The movement of the windows can be stopped in any position by tapping the switch again. - Page 17 Front seat adjustments The correct seating position is all-important 1. Operate longitudinal adjustment until Steering wheel adjustment for safe and fatigue-free driving. In order to your leg is fully stretched with the clutch satisfy individual requirements, the seat has pedal depressed while your foot is bent. For maximum legroom and unobstructed infinitely variable adjustment.
-
Page 18: Lumbar Support
Lumbar support (Β) The backrest support can be regulated verti cally and horizontally to any position to guarantee a relaxed seated posture and pro vide individual lumbar support. Lumbar support horizontal Lumbar support vertical Seat heating system (A) Longitudinal adjustment Height adjustment, front Backrest adjustment The heating system in the seat cushion and... -
Page 19: Seat Position Memory
Selecting a position Pilot lamp Adjust the seat and the two outside mirrors A red pilot lamp is set in the memory button. to the desired position by operating the switches for seat and mirror adjustment, If adjustment is initiated, the pilot lamp lights up until the adjustment is completed. -
Page 20: Seats
In order to adjust the backrest, pull the in- side locking lever at the front of the seat up- wards, set seat to desired position and re- lease the lever. When there is no load on the backrest, it will always be pushed forwards by spring force when the lever is pulled. -
Page 21: Mirrors
Heated outside mirrors with remote con- trol When the rear window defogger/defroster is switched on, the outside mirrors are also heated electrically. The outside mirrors are adjustable from inside of the vehicle by a four direction switch and a rocker switch located on the left door next to the side window vents in the armrest. -
Page 22: Safety Belts
• For maximum safety and protection, • Porsche recommends that all infants we recommend that small children • If belts do not work properly, see your and children be restrained in child re- travel in the rear seats. -
Page 23: Safety Belts
Safety belt warning system • To fasten, grasp belt and pull belt in con- An audio-visual warning system is inter- Inertia reel retractor tinuous slow motion across your chest connected with the driver's safety belt. and lap. The combination lap/shoulder belt with iner- tia reel locking mechanism adjusts automat- •... -
Page 24: Child Restraint Anchorages
Belt tongue will spring out of use of a tether strap you will want to use the buckle. fittings are available from your Porsche dealer. anchor points provided on the panel behind the rear seats. To ensure proper installation the anchor fit-... -
Page 25: Air Bag System
Air Bag System mechanism. In the ignition process, a solid Range of Effectiveness propellant in the gas generator is combusted Even if your vehicle is equipped with an air in a fraction of a second. This combustion The "Air Bag" in combination with the safety bag, the safety belt must be worn at all generates the gas quantity and pressure belt makes up a passive safety system which... -
Page 26: Air Bag System
A malfunction in the air bag system will be Important: indicated by the illumination of the air bag If you sell your Porsche, notify the purch- warning light accompanied by the fault mes- aser that the vehicle is equipped with an sage in the information system display. -
Page 27: Brakes
Functioning of brake system release button. Keep the button depressed as you lower the lever all the way down. Your Porsche is equipped with a power as- sisted hydraulic dual circuit brake system The parking brake light and the fault mes- with disc brakes at the front and at the rear. - Page 28 Brake operation and brake warning light Brake pedal WARNING Driving through water may reduce the trac- Make it a habit to check the operation of your WARNING tion. Moisture on brakes from road water, brakes before driving. car wash, or coating of road salt may affect •...
-
Page 29: Abs Brake System
ABS brake system (Antilock brake system) The ABS system represents a major con- WARNING: On a road surface which is slippery on only tribution to the enhancement of active safety one side, the rear wheel which is braking on in your vehicle. This system prevents the In spite of the improved handling afforded the slippery surface determines the brake wheels from locking in a panic stop on al-... - Page 30 Note The control unit of the ABS brake system is set for standard tire size. If non-standard tires are fitted, the control unit may misinter- pret the speed of the vehicle, because of the variant data it receives from the sensors on the axles.
-
Page 31: Limited Slip Differential
You should then have your PSD tested at an It is an aid to driving off on road surfaces Official PORSCHE Centre as soon as possi- The lock transmits the non-transferable driv- with varying degrees of traction and serves... -
Page 32: Clutch
Should this free travel suddenly become big- ger, it could mean a malfunction of the clutch. See your Porsche dealer for rectifica- tion. Always depress the clutch pedal fully when changing gears. Do not hold the car on a steep hill with the clutch pedal partially de- pressed. -
Page 33: Steering Lock
There are 4 switch positions: To conserve battery power, the electric circuits for headlights, rear window de- fogger/defroster and wiper/washer sys- 0 Steering locked. All electric circuits tem are temporarily interrupted during wired through the ignition switch are the starting process. turned off. -
Page 34: Starting
Porsche may interfere with your electroni- cally operated garage door. To check this: • Never leave engine idling. When starting drive your Porsche close to the garage door engine, be ready to drive immediately. Stopping engine and run the engine at different speeds. -
Page 35: Instrument Cluster
Instrument cluster Park brake warning light 9 Selector lever position indicator 16 PSD warning light Air bag warning light 10 High beam indicator light 17 Coolant temperature gauge Oil pressure gauge 11 Tire pressure warning light 18 Tachometer Seat belt warning light 12 Parking light indicator 19 Information system display ABS warning light (ANTILOCK) - Page 36 Speedometer Indicator system for position Tachometer of gearshift The tachometer shows engine speed in re- Automatic transmission The speedometer indicates driving speed per hour. volutions per minute (rpm). Whenever the ignition is switched on, or the vehicle lights are switched on, the position In USA: miles per hour The red mark at the end of the scale indi-...
- Page 37 Check the engine oil level. If oil level is cor- rect, do not drive the vehicle as severe en- gine damage may result. Contact your nearest Porsche dealer for assistance. Oil pressure warning light The oil pressure warning light comes on...
- Page 38 Needle in right field - engine is warm there is a malfunction in the electrical sys- tem. If this is the case, contact your Porsche If needle enters the red mark, the engine is dealer. If the light flickers or stays on while overheating.
- Page 39 Take your vehicle to an flashes at about twice the normally fre- authorized Porsche dealter immediately. quency. The warning light comes on and goes out after depressing the brake pedal. If the light stays on a bulb is defective.
-
Page 40: Information System
Faults which could cause damage to your Messages for priority III faults are issued those of lower priority. Each fault message Porsche are indicated by red lettering and a once only. If the fault in question is not re- must be acknowledged in turn, before the symbol which does not flash. - Page 42 Selectable on-board-computer and auxiliary functions When the ignition is switched on, the following appear: Display, right: tripmeter I reading Display, left: odometer reading Display, centre: last on-board-computer function selected With the ignition on, the on-board-computer and auxiliary functions below can be called up in turn with the aid of the information-system control lever.
- Page 43 Auxiliary functions Pull the control lever to call up auxiliary functions Push the lever down to change from odome- Memory cannot be erased ter reading to digital speedometer reading and vice versa. Readings at speeds above 10 km/h (6 mph) Push the lever up to select tripmeter 1, Tripmeter for distance travelled tripmeter II or stopwatch.
-
Page 44: 10 Automatic Climate Control
Dashboard panel 10 Automatic climate control 21 Intermittent wiper interval control and 11 Center air vents intensive windshield cleaning switch 12 Central door locking button 22 Automatic speed control lever 1 Side window defogger/defroster vents 13 Inside-temperature sensor 23 Locking lever for steering wheel/ 2 Seat position memory 14 Glove compartment lock instrument cluster height adjustment... - Page 45 Fog lights Instrument illumination Light switch control With headlights on, the brightness of the in- With headlights on the fog lights can be turned Parking lights - 1st position strument illumination can be adjusted by on or off by depressing the switch. The switch Headlights - 2nd position (with ignition on) turning the thumbwheel on the left side un-...
-
Page 46: Emergency Flasher Switch
Rear window defogger/ defroster The rear window defogger/defroster heating element is actuated by a push button/rotary switch. The switch is illuminated when the heating element is energized. WARNING After the rear window has been cleared, switch off the rear window defogger to avoid unnecessary drain on the battery. - Page 47 Lane changer To indicate your intention when changing lanes on expressways, slightly push the turn signal indicator lever up or down to the resis- tance point. The lever turns off automatically when released. High beam/low beam headlight d i m m e r - with light switch in position 2, push lever for- ward to select high beam.
- Page 48 Repeat the wash windshield. Briefly depress the switch and the cycle as necessary to remove heavy dirt metering pump will pump the Special Porsche accumulation. Silicon Remover onto the windshield. Wiper interval The length off spraying is limited by a time-delay relay in order to prevent excessive use.
-
Page 49: Automatic Speed Control
To operate the automatic speed control Switching system off: To switch the au- tomatic speed control off, move the lever to- Accelerate to the desired cruising speed, ward you (arrow 3). To resume the preset push lever toward instrument cluster (arrow speed, move the lever down (arrow 2). -
Page 50: Air Outlets
Air outlets Air outlets for windshield and footwell A lever attached at the side of the nozzles provides continuous control for the air flow The air outlets for the windshield and the to the side and center nozzles. footwell are fixed in place. Only the fan switch is used to regulate the air flow. - Page 51 If in doubt, consult center console (arrow). with your Porsche dealer. In damp weather it is recommended to • Maximum heating output and fast de- If no cooling of the air is required in transi-...
- Page 52 Automatic air flow distribution for your Porsche dealer. heated air through windshield outlets and open side window vents. Heating system and fan motor are automati-...
- Page 53 Additional vaporizer for increased cooling output In vehicles with increased cooling unit out- Turning the button at the right to the right in- put there is an additional vaporizer with a fan creases the cooling output from the rear vap- installed instead of the floor console.
- Page 54 Cigarette lighter Clock Ashtray Left button: clockwise adjustment. The cigarette lighter can be operated with The ashtray is located in front of the gearshift the ignition in position 1 or 2. To operate, lever in the center console. To empty tray, Right button: anticlockwise adjust- push in knob.
-
Page 55: Power Sunroof
Opening sunroof Tapping the switch opens the sunroof in stages to the desired position. Pressing the switch for longer than 0.5 sec- onds automatically opens the sunroof fully. The movement of the sunroof can be stop- ped at any position by tapping the switch again. -
Page 56: Rear Window Wiper
The wiper action disengages or engages au- tomatically when the luggage compartment lid is opened or closed. Do not depress the rocker switch but let your When cleaning the rear window, the wiper Porsche dealer correct the fault. arm should be lifted only slightly. -
Page 57: Sun Visors
Rear seat glove compartment Sun visors Glove compartment The front sun visors can be moved to the To open the glove compartment, press the The illuminated glove compartment can be sides as well as forward (arrows). button (arrow) and lift the lid. The glove com- opened by pulling the recessed handle. -
Page 58: Luggage Compartment
Hatchback release Hatchback Luggage compartment With one or both doors open, you can re- To open... lease the hatchback by pulling either the but- Luggage and other belongings are pro- ton on the left of the driver's seat or the re- tected from the sun and "inquisitive eyes"... -
Page 59: Engine Compartment Hood
The backrests of the rear seats can be tilted forward to provide additional luggage space. To release backrest, pull the lever on side of the backrest up and, at the same time, tilt the backrest forward. WARNING Because of inherent hazards, we do not recommend transporting objects larger than those fitting safely into the luggage compartment. - Page 60 2nd to 3rd gear 25 mph/40 km/h or 2400 rpm manual transmission 3rd to 4th gear The Porsche transmission with servo-lock 40 mph/64 km/h or 2750 rpm synchronisation permits rapid and precise shifting of gears. When changing gears 4th to 5th gear...
-
Page 61: Transmission
Controls for If the selector lever is unintentionally moved Driving the automatic transmission into Neutral (N) while driving, take your foot automatic transmission The Automatic Transmission has 4 forward off the accelerator pedal and wait until the gears and one reverse. In driving positions engine speed has dropped to idle before The individual driving ranges are selected D, 3 and 2 the Automatic Transmission... - Page 62 Engine speed will sud "Emergency starting with jumper cables" or denly increase and may cause engine dam consult your authorized Porsche dealer. age and loss of vehicle control. Do not start or tow the car without ATF in Position Ν...
-
Page 63: Accelerator Pedal Position
Maneuvering Accelerator pedal position When alternating between forward (D)and • Under moderate acceleration reverse (R) (for instance, while maneuvering partload range, upshifts are effected at the car into a tight parking space), only shift low speeds for the sake of economy and into Reverse or Drive when the car has quietness. - Page 64 Maintenance, Car Care Cautions Engine oil 65-67 Transmission oil Washer reservoir 68-69 Cooling system 69-70 Power steering Air filter 6 Concentrated cleaning fluid Brake fluid reservoir 1 Refrigerant Refrigerant 2 Engine oil 7 Fuel Fuel 73-75 3 Windshield/headlight washer fluid 8 Battery electrolyte Roof racks 9 Hydraulic fluid for steering...
- Page 65 Be especially cautious of such • Your Porsche is equipped with a trans- car. If in doubt about any servicing, devices such as hot water heaters...
-
Page 66: Cautions
Do not start the lution and oxidation of the lubricant. engine but add oil immediately or contact your Porsche dealer. Because of these variables, no standard rate See "Cautions" of oil consumption can be established, but... - Page 67 Top up if necessary. and Engine Oil". The use of oil additives is freezing for extended periods, the engine oil not recommended by Porsche. should be changed more frequently. See "Cautions".
- Page 68 Your cesses (synthetic oils). These oils are struc- temperature range (see chart). Porsche dealer will be glad to advise you on turally more efficient and require fewer addi- the correct type of oil for your engine. tives than simple mineral oils.
-
Page 69: Transmission Oil
The level of the ATF can be checked visually We recommend that you have the transmis- through the transparent reservoir, located at sion oil changed at your Porsche dealer, who the rear end of the transmission housing. You has the required lubricants and the neces- have enough ATF, if the fluid level is between sary filling equipment. -
Page 70: Cooling System
Porsche dealer. Anti-freeze other than partment (see illustration). Since the expan- specified by Porsche for aluminium en- sion tank is transparent, it is not necessary gines and radiators may cause corrosion to unscrew the filler cap. - Page 71 To prevent damage and discoloration to light". paintwork, you should use only "Porsche The ratio between water and anti-freeze, Special Silicone Remover". necessary to prevent freezing, depends on Fan control the anticipated outside temperatures.
-
Page 72: Power Steering Fluid Reservoir
Changing air cleaner filter element Power steering fluid reservoir A dirty air cleaner not only reduces engine 3. Clean filter housing with lint-free rag and The reservoir is located in the engine com- performance, but can lead to premature en- install new filter element. -
Page 73: Brake Fluid Reservoir
Pull off the road, stop the engine and add brake fluid immediately contact nearest Porsche dealer to have the cause located and corrected. WARNING • Every 2 years the brake fluid has to be replaced. See your Warranty & Mainte- nance booklet. - Page 74 Fuel tank capacity is listed under "Filling we recommend you do not take your car to Capacities" areas or countries where unleaded fuel may Porsche does not recommend the use of not be available. fuel additives. If you lose your fuel filler cap, replace it im-...
-
Page 75: Fuel Economy
This mixture is sometimes called "Gasohol". You may use gasohol in your • Avoid jack rabbit starts and sudden Porsche, provided it contains no more than stops. 10 % ethanol, and the octane requirements • Do not drive longer than necessary in the for your vehicle are met. -
Page 76: Operating Your Porsche In Other Countries
• Organize your trips to take in several er- With the "New Porsche Roof Transport Sys- If you plan to take your Porsche outside the rands. tem" you can transport a wide variety of continental limits of the United States or... -
Page 77: Car Car Instructions
• Do not clean the underside of chassis, The Porsche paint finish is of a high quality fenders, wheel covers, etc., without pro- baked synthetic enamel. The color and tecting your hands and arms as you may... - Page 78 Do not resort to using Porsche polish until it dust penetrating the paint. gine compartment...
- Page 79 They stored as necessary. should therefore be removed without delay with Porsche Tar Remover or Porsche Insect Your authorized Porsche dealer is familiar Remover. with the bodyseal treatment procedures and has the necessary equipment for applying Wash the affected area immediately after factory approved materials.
- Page 80 Only by doing so can the leather The Porsche Light Alloy Wheel Cleaner (pH- patina, which emphasizes the inherent qual- value 9.5) can be used for this purpose.
- Page 81 Storing your Porsche Vehicle If you intend to store your Porsche for a pro- longed period, please consult your au- thorized Porsche dealer. The staff will be glad to advise you on the most suitable and...
- Page 82 Practical Tips, Emergency Service Cautions Tool kit, car jack Tires, wheels 84-87 Tire pressure warning system 87-89 Spare tire Lockable wheel nuts Changing a wheel 92-93 Lifting vehicle Fuses and relays Battery 95-96 Emergency starting 97-98 Replacing bulbs 99-103 Headlight adjustment Manual operation of headlights Emission control system 106-107...
- Page 83 Be especially cautious of such • Your Porsche is equipped with a trans- car. If in doubt about any servicing, devices such as hot water heaters...
-
Page 84: Tool Kit
Tool kit Car jack WARNING The tool kit is a lift-out tray fitted into the rear The car jack and the rim wrench are located • Use the jack only for changing a wheel. cross wall of the car. To remove or replace underneath the luggage compartment, to- Never jack up other vehicles or other the tray, turn both holding knobs 90°... -
Page 85: Tires/Wheels
Tires/Wheels Tire wear WARNING Incorrect tire pressures cause increased The original equipment tires on your Porsche The original equipment tires on your Porsche tire wear and adversely affect road holding have built-in wear indicators. They are comply with all applicable Federal Motor of the vehicle, leading to loss of control. - Page 86 If you do not use a Porsche recom- When fitting tires already mounted on rims, In case of tire damage, where it is uncertain mended replacement tire, make sure that...
- Page 87 Before mounting snow tires, consult with Furthermore, snow tires wear rapidly under your Porsche dealer. He has the technical The supposition that tires become long these conditions. information necessary to advise you on wearing due to storage and age is un- wheel and tire compatibility.
-
Page 88: Tire Pressure Warning System
Due to new speed and load ratings for radial or workshop, tires, new designations have come into force for snow tires for your Porsche. • takes the effect of temperature on tire pressure into account. (Style of driving, load, roadspeed, outside temperature,... - Page 89 To avoid damaging the pressure-operated function. Tire pressure is no longer moni- switches, the tire pressure applied when a tored. Contact your authorized Porsche To measure or correct tire pressure exactly, new tire is fitted must not exceed 6 bar (88...
- Page 90 Brief test of the tire pressure warning In the event of a fault message, contact system your authorized Porsche dealer. Please conduct this test every time a wheel or tire is changed. The car need travel no more than some 20 meters (66 ft) at a speed 3.
-
Page 91: Spare Tire
Replace a worn collapsible spare tire in time. Inflate the collapsible tire with the electric air compressor that comes with your Porsche. Do not use other equipment! If air compressor does not work 1. Mount spare wheel before inflating the .. - Page 92 When taking 2. Insert key all the way and turn left about until you feel it lock in. the vehicle to your Porsche dealer or to a 3 0 ° . workshop for wheel or tire service, re- 3.
-
Page 93: Changing A Wheel
Changing a wheel WARNING Failure to follow these instructions may re- sult in serious personal injuries to you or to bystanders. • If you have a flat tire, move a safe dis- tance off the road. Turn the emergency flasher on and use other warning de- vices to alert other motorists. -
Page 94: Lifting Vehicle
crosswise. When tightened crosswise, the always use safety stands specifically nuts will center the wheel correctly. Make designed for this purpose. sure that the coloured wheel bolt is closest • Jacking at any other place may damage to the valve. Screw the lockable wheel nut the vehicle or may result in personal in onto this bolt. -
Page 95: Fuses And Relays
If you need a circuit diagram, your The use of the fuses and relays is shown Porsche dealer will be glad to help you. 3. Carefully install new fuse. Use only fuses in a list on the floor board. - Page 96 • Spilled electrolyte must be rinsed off at distances only. Let your Porsche dealer test prevent short circuiting. First disconnect once with a solution of water and baking the battery's capacity before winter sets in. A...
- Page 97 The charge available in your ment. battery can be measured with a hydrometer. We recommend that battery voltage be tested by your Porsche dealer who has the Slow battery charging appropriate equipment. If the car is not dri- WARNING ven for prolonged periods, the battery must be charged at least every 6 weeks.
-
Page 98: Emergency Starting
Emergency starting with 4. Connect camp on opposite end of cable • Remove vent caps from booster battery to a bare metal part of car with dis jumper cables and discharged battery. Preferably lay a charged battery. Connect clamp as far cloth over open vents to reduce explo... - Page 99 Start assist connecting points sequence Next connect clamp at end of negative (-) cable to the negative (-) terminal of the booster battery. Then connect clamp at other end of negative (-) cable to the en- On right side of engine compartment you will gine compartment strut rod (- arrow).
-
Page 100: Replacing Bulbs
Replacing bulbs To avoid short circuits, turn off the respective electrical components when changing light bulbs. Keep bulbs free of grease and dirt. Hold them only with a clean cloth or soft paper. H e a d l i g h t s 5. - Page 101 Additional headlights (fog lights, high beam) 3. Remove Phillips screws holding the lamp 5. Remove defective bulb and replace. Be 1. Remove cover of rubber buffer. (arrowed) and pull out the lens as a unit. sure guide pins on bulb base fit into soc- ket of reflector.
-
Page 102: Tail Lights
Tail lights 3. Turn holder of defective bulb antic lockwise to limit stop and remove bulb- holder. The tail lights are housed in one unit. 1. Remove tool tray from the rear cross wall 4. Remove bulb from bulbholder and fit new inside luggage compartment. - Page 103 Additional stop light Front turn signal lights Front parking lights 1. Remove Phillips screws from light unit 1. Remove screws holding the lens and re- and remove unit. move lens. 2. Remove bulb from bulbholder and fit new 2. Lightly pull lens out and replace defective bulb.
- Page 104 License plate lights Interior lights Ashtray light The following description applies to the 1. Remove the two screws in ashtray hous- dome lights, courtesy lights and the luggage ing and pull the housing upward and out. compartment light: 1. Unscrew both screws and lift out lamp 1.
-
Page 105: Headlight Adjustment
Screw "a" (lateral adjustment) 1. Remove cover of rubber buffer. Headlight adjustment right turn = beam moves right 2. Remove Phillips screws from rubber buf- Headlight adjustment should be done with a fer and the transparent side cover with a headlight aiming device under the following screwdriver. -
Page 106: Manual Operation Of Headlights
Manual operation of retractable headlights WARNING If the retractable headlights do not work au- Do not turn the knob on the drive shaft as tomatically, they can be opened manually by long as the automatic mechanism is turning the knob on the end of the motor operating. -
Page 107: Emission Control System
Parking • Do not alter or remove any component Porsche has developed an emission control of the emission control system unless system that controls or reduces those parts • As with any vehicle, do not park or op- approved by the manufacturer. -
Page 108: How Emission Control Works
Catalytic converter Do not continue to operate your vehicle To reduce these pollutants, your Porsche is The catalytic converter is an efficient "clean- under these conditions, as otherwise fuel equipped with a precisely calibrated fuel in- up"... -
Page 109: Fuel Evaporation Control
Fuel evaporation control Fuel tank venting Vapor control system and storage Purge system When the fuel tank is filled, vapors are col- Fuel vapors from the carbon canister will be The expansion chamber and the safety valve prevent fuel from escaping to the outside at lected in the expansion chamber and filler- mixed with fresh air taken from the engine extreme high outside temperatures and... - Page 110 Vehicle Identification, Technical Data Engine number Vehicle identification number Identification plate Safety compliance sticker Paint data Vehicle identification label...
-
Page 111: Vehicle Identification
' Throughout this booklet and other Porsche publications applicable to USA vehicles, left is designated as the driver's side of the vehicle, and right as the passenger's side of the vehicle. - Page 112 Vehicle identification label The safety compliance sticker is your assur- The vehicle identification label is located un- ance that your Porsche complies with all derneath the luggage compartment floor Federal Motor Vehicle Safety Standards cover, next to the spare wheel well.
- Page 113 Technical data...
- Page 114 Engine design Design 8 cylinders in V configuration Operating cycle 4 stroke Cooling water-cooled with two electric fans Lubrication pressure-fed from sump Cylinder block and head light metal alloy Valve operation 2 overhead camshafts per cylinder bank Camshaft drive toothed belt and chain Crankshaft forged Fuel supply...
- Page 115 Rims, tires, wheel alignment front 225/50 ZR 16 on rims 7 J χ 16 Η 2 (65 mm**) Summer tires rear 245/45 ZR 16 on rims 8 J χ 16 Η 2 (52.3 mm**) or front 225/50 ZR 16 on rims 7.5 J χ 16 Η 2 (65 mm**) rear 245/45 ZR 16 on rims 9 J χ...
-
Page 116: Brake System
Performance* 928 S 4 928 GT 165 mph (265 km/h) Maximum speed 171 mph (275 km/h) 6.3 seconds Acceleration 0 - 6 0 mph 5.8 seconds 14.5 seconds Time mile 14.1 seconds 25.9 seconds Time for 1 km 25.2 seconds "... - Page 117 Filling capacities...
- Page 121 Index ι...
- Page 122 Center console Filling capacities Index Central door locking Flasher - emergency Changing a wheel 92-93 Fog lights 44, 100 Child restraint systems Fuel economy 74-75 ABS brake system 30-31 - evaporation control Cigarette lighter Acceleration kick-down Cleaning 76-80 - filler cap Accelerator pedal Climate control system 50-52...
- Page 123 Τ Interior lights 16, 103 Ρ Intermittent wiper interval Paint number Tachometer Jack 83, 90, 93 Paint damage Technical data 112-116 - lifting points 92-93 Parking brake lever Theft protection Parking brake light Tires 84-87 - lights/lever 46, 102 Tire pressure warning system 87-89 Keys 12-13, 91...
- Page 125 100 West Liberty Street, P.O.Box 30911, Reno, Nevada 89520-3911 is the sole importer and distributor of Porsche vehicles in the United States and offers these warranties on U.S. (Pocket for Customer Identification Card) model vehicles only.
- Page 127 I M P O R T A N T If you are unsuccessful in Porsche reserves the right to resolving your concerns about change this system without further notice. service of your vehicle with the dealer personnel as suggested To confirm the Informal Dispute...
- Page 128 "Warranty", but here is a quick summary of how your car is cover- Porsche pride in the quality of our cars is a tradition that began more than 40 years ago, to when the legendary Porsche 356 began setting...
- Page 129 Porsche New Car Limited Warranty described above, certifies (I) that This comprehensive, customer-oriented program* is designed to give your Porsche was designed, built and equipped to conform to all U.S. new-Porsche buyers an extra level of security and peace of mind.
- Page 130 Porsche sports car ownership in an elite segment of the motoring pub- lic. Customer Satisfaction It is very important to us at Porsche Cars North America that you are highly satisfied with your Porsche sports car. Authorized Porsche dealers are trained to help you get the most from your Porsche automobile ownership experience.
- Page 131 Ο π Owner Owner Address Address Tel. No. Tel. No. Delivery Date Purchase Date Mileage Dealer's Name Owner Owner Address Address Tel. No. Tel. No. Purchase Date Mileage Purchase Date Mileage Owner Owner Address Address Tel. No. Tel. No. Purchase Date Mileage Purchase Date Mileage...
- Page 132 Vehicle Identification Warranty Car Care Instructions Maintenance Customer Service...
- Page 134 Warranty Summary of Warranty Coverage New Car Limited Warranty 9-11 Emission Control Defects Warranty 12-13 Emission Controls Performance Warranty 14-17 California Air Resources Board California Emission Control Warranty Statement California Emission Performance and Defects Warranty 19-21 California Emission Extended Defects Warranty 22-24 Replacement Parts and Accessories...
- Page 135 SUMMARY OF WARRANTY COVERAGE provided by PORSCHE CARS NORTH AMERICA, INC. Porsche Cars North America, Inc. is the sole importer and distributor of Porsche vehicles in the United States and offers these warranties on U. S. model vehicles only.
-
Page 136: New Car Limited Warranty
This Warranty Does Not Cover: NEW CAR LIMITED WARRANTY This warranty is given to the owner of any 1991 or later Porsche auto- • Emission control systems, Corrosion or Paint. (Refer to these mobile distributed by PCNA and sold by an authorized Porsche auto- Emission Control, Corrosion and Paint Limited Warranties in mobile dealer in the United States. - Page 137 Porsche.) See your Owner's Manual for of the warranty for new Porsche vehicles for your model year in effect their locations. in the country where such authorized Porsche automobile dealer is •...
- Page 138 A vehicle which is imported by an individual into Canada must comply with all Canadian Governmental requirements. Furthermore, in order to process warranty claims, the vehicle must also be registered with the Authorized Canadian Importer of Porsche vehicles. For free vehicle registration, contact an authorized Canadian Porsche dealer.
- Page 139 Any car with an odometer that has been altered so that the actual mileage cannot be determined. This warranty is in addition to the Porsche New Car Limited Warranty. • Any car registered or normally driven outside of the United States, Puerto Rico or the U.S.
- Page 140 U.S., PCNA's warranty will not be applicable and defective parts will be repaired or replaced only within the terms and limitations of the warranty for new Porsche vehicles for your model year in effect in the country where such authorized Porsche automobile dealer is located.
- Page 141 Cleaning the convertible top Preservation 33-34 Windows Polishing Spots and stains Minor paint damage Undersealing Light lenses and plastic Door, roof and window seals Light alloy wheels Leather care 35-36 Fabric, upholstery and carpets Care of the seat belts Storing your Porsche vehicle...
-
Page 142: Washing
Do not clean the underside of chassis, Dark colors are also more susceptible to The Porsche paint finish is of a high quality fenders, wheel covers, etc., without pro- scratches because of the composition of their baked synthetic enamel. -
Page 143: Cleaning The Convertible Top
Do not use the same chamois leather for dry- a soft, antistatic cloth or with the Porsche the stains by rubbing carefully with a soft rub- ing as you use for cleaning the windshield spray-on window cleaning agent. The con- ber sponge. -
Page 144: Windows
If your car is driven frequently in areas where salt has Minor paint damage Do not resort to using Porsche polish until it been spread on the roads, the whole engine becomes evident that the normal preserv-... -
Page 145: Undersealing
The Porsche Light Alloy Wheel Cleaner (pH- day driving, it is advisable to have the under- value 9.5) can be used for this purpose. -
Page 146: Fabric, Upholstery And Carpets
Storing your Porsche Vehicle Once you have cleaned the leather (espe- cially the heavily used leather seats) treat it If you intend to store your Porsche for a pro- with the Porsche Leather Care Agent. Leather longed period, please consult your authorized should be cleaned and treated several times Porsche dealer. - Page 147 Maintenance Maintenance Schedule 39-43 Maintenance Record 44-47 Record of Brake fluid and coolant fluid renewal Record of camshaft belt check Record of Air bag system check...
- Page 149 II. Required Maintenance and Lubrication Service...
- Page 152 The recommended service intervals apply under normal driving conditions. If you drive mainly in dusty areas, check the air cleaner element more often and replace if necessary. The conditions of oil, and wear-and-tear items (such as tires, brakes, clutch lining) depend greatly on the amount of driving and on driving habits.