Table of Contents
Advertisement
Available languages
Available languages
Quick Links
Advertisement
Chapters
Table of Contents

Related Manuals for Akai STD-2001


Summary of Contents for Akai STD-2001
- Page 1 MANUEL D UTILISATION USER MANUAL www.akai-france.com STD-2001/4G STD-2001/4G Lire attentivement la notice avant d utiliser l appareil Before operating this product, please read user manual completely...
-
Page 2: Table Of Contents
Présentation Cet appareil est à la fois un terminal de réception (Set-Top-Box) des signaux télé-satellitaires et un lecteur DVD. Table des matières Précautions d’emploi .......................2 Illustrations des panneaux avant et arrière...............8 Branchement à un poste TV....................9 Connexion à un ampli A/V avec Entrée Audio Analogique 2.1 ...... -
Page 3: Précautions D'emploi
Précautions d’emploi ATTENTION RISQUE D’ELECTROCUTION NE PAS OUVRIR Ce symbole signifie à l’utilisateur la présence de courants haute-tension à l’intérieur de l’appareil ; risques électrocution. Ce symbole signifie à l’utilisateur qu’il doit se référer aux instructions d’utilisation et aux précautions d’emploi rédigées dans le manuel fourni avec l’appareil ATTENTION: Pour prévenir tout risque d’incendie ou d’électrocution, ne pas exposer l’appareil à... - Page 4 Mise au rebut en fin de vie Attention ! Ce logo apposé sur le produit indique qu’il s’agit d’un appareil dont le traitement en tant que déchet rentre dans le cadre de la directive 2002/96/CE du 27 janvier 2003, relative aux déchets d’équipements électriques et électroniques (DEEE).
- Page 8 Caractéristiques Sortie Vidéo Progressive Scan Compatible DVD, DVD+R/RW, DVD-R/RW, VCD, CD, MP3, CD Photo Kodak, CD-R et CD-RW (finalisé). Modes de lecture multiples : Programmation, Recherche, Balayage 10 secondes. Affichage dynamique du spectre Sortie audio numérique coaxiale et optique Sorties S-Vidéo, Vidéo composite, Vidéo composante (Y, Pb/Pr, Cb/Cr) Ce lecteur est muni des caractéristiques ci-après : Progressive Scan Multi-angle...
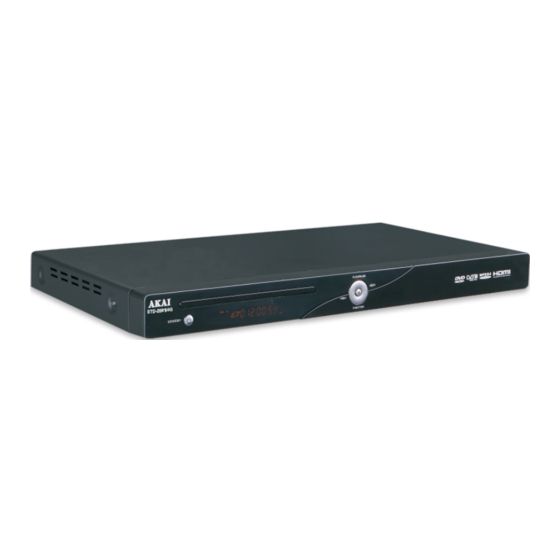
- Page 9 Panneau avant PLAY/PAUSE NEXT STD-2000 PREV POWER FUNCTION 1. ALIMENTATION (Marche/Arrêt) 2. OUVRIR/FERMER 3. LECTURE/PAUSE 4. PRECEDENT 5. SUIVANT 6. LECTEUR CARTE MEMOIRE . PORT USB 8. FONCTION Panneau arrière Cb/Pb Cr/Pr VIDEO SCART OUTPUT COAXIAL S-VIDEO OPTICAL HDMI Audio out Digital out Video out Digital out...
- Page 10 VIDEO Cb/Pb Cr/Pr SCART OUTPUT OPTICAL COAXIAL S-VIDEO HDMI Audio out Digital out Video out Digital out HDMI PERITEL Notes: Il existe quatre façons différentes de brancher la sortie audio / vidéo (AV) du lecteur à un poste 1. Câble S-Vidéo et câble chaine gauche / droite audio [passer de (Vidéo) à (S-Vidéo)]. 2.
-
Page 11: Connexion À Un Ampli A/V Avec Entrée Audio Analogique 2.1
Connexion à un Ampli A/V avec Entrée audio analogique 2 Canaux Cb/Pb Cr/Pr VIDEO SCART OUTPUT COAXIAL S-VIDEO OPTICAL HDMI Audio out Digital out Video out Digital out VOLUME INPUT SELEC TOR POWER BYPASS PRO LOGIC 3 STEREO MODE TEST CHANNEL KARAOKE MUTE... -
Page 12: Connexion À Un Ampli A/V Avec Entrée Audio Numérique
Connexion à un Ampli A/V avec Entrée audio Numérique Notes: 1. Sélectionnez la sortie audio numérique Coaxiale ou optique . 2. Réglez la sortie audio du lecteur en mode RAW ou PCM. 3. Réglez l’amplificateur à l’entrée AV connectée au lecteur DVD. TV Aerial Cb/Pb Cr/Pr... -
Page 13: Connexion D'une Clé Usb Ou Carte Memoire
Connexion d’une clé USB ou CARTE MEMOIRE PLAY/PAUSE NEXT STD-2000 PREV POWER FUNCTION Connexion d'une clé USB ou d'une carte mémoire Insérez la clé USB ou la carte mémoire dans la fente du port USB ou dans le lecteur carte en façade du lecteur DVD. Comment lire les fichiers de votre USB ou dans la carte mémoire ? 1. -
Page 14: Télécommande
Télécommande Chapitre 1: Présentation de la télécommande OPEN/CLOSE DISPLAY POWER TIME PROGRAM CLEAR SUBTITLE TITLE RETURN SETUP ENTER REPEAT V-MODE ANGLE MENU /PBC USB/CARD PLAY/PAUSE STOP LANGUAGE PREV NEXT SLOW VOL- VOL+ HDMI DVD/DVB MUTE ZOOM RADIO/TV Note: 1. Pour utiliser les fonctions de la télécommande, mettez le lecteur DVD en marche en pressant le bouton alimentation. - Page 15 Stop Presser <STOP> durant la lecture pour arrêter la lecture sans l’annuler. Presser <LECTURE> pour reprendre la lecture depuis le dernier arrêt. Presser <STOP> deux fois pour annuler la lecture. Note: L’économiseur d’écran s’active automatiquement lorsque la lecture est arrêtée pendant plus de 3 mn (Si cette fonction est activée).
- Page 16 NEXT (SUIVANT) Presser <NEXT > pour passer au chapitre ou piste suivante. MENU Presser <MENU> durant la lecture d’un DVD, VCD ou SVCD (lorsque la fonction PBC est activée), pour retourner au menu. Dans le menu Réglage, presser <MENU> pour repasser au menu principal ou basculer en mode arrêt. Presser <MENU>...
-
Page 17: Télécommande
FONCTION ENCODEUR Lorsqu’un CD est dans le lecteur DVD, appuyez sur la touche SUBTITLE de la télécommande pour démarrer l’encodage... -
Page 18: Menu Réglage - Section Dvd
Menu Réglage – Section DVD 1. Démarche à suivre AUTO a. Presser REGLAGE pour afficher le menu Réglage principal. b. Sélectionner l’icône que vous souhaitez à l’aide des touches DROITE et GAUCHE, puis touches HAUT et BAS pour ouvrir la page correspondante. Ainsi, si vous souhaitez effectuer des réglages vidéo, utiliser la touche DROITE pour sélectionner l’icône vidéo et afficher la page correspondante. - Page 19 2.1.2 ECONOMISEUR D’ECRAN Activer ou désactiver l’économiseur d’écran. 2.1.3 SORTIE HDMI Sélectionner une sortie HD, soit: HD OFF;720P;1080I et 1080P 2.1.4 SORTIE VIDEO Sélectionner S-VIDEO, YUV, P-SCAN, Y, Pb, Pr., selon le type de téléviseur. NOTE: Le mode P-SCAN n’est disponible que si le lecteur DVD est branché à un téléviseur progressive scan avec câbles Y, Cb, Cr.
- Page 20 2.1.7 CONTROLE PARENTAL Cette fonction permet d’autoriser ou de refuser le visionnage d’un film, en se référant à sa classification Elle n’est pas disponible sur tous les DVD. Elle permet d’exercer un contrôle parental. 2.1.8 REGLAGES PAR DEFAUT La fonction DEFAUT sert à retourner aux réglages initiaux. Ces derniers sont conçus pour permettre à...
- Page 21 2.2.2 LANGUE AUDIO Sélectionner l’option AUDIO LANG, puis choisir la langue souhaitée à l’aide de la touche FONCTION. Presser ENTRER pour confirmer. (Sous réserve que le disque propose la langue choisie). 2.2.3 LANGUE DES SOUS-TITRES Sélectionner l’option SOUS-TITRE, puis la langue souhaitée à l’aide de la touche FONCTION. Presser ENTRER pour confirmer.
- Page 22 2.3 REGLAGES AUDIO Les options de réglages audio sont les suivantes: 2.3.1 SORTIE AUDIO Sélectionner l’option SORTIE AUDIO, puis choisir le format audio souhaité à l’aide des touches fonctionnelles. Presser ENTRER pour confirmer. Trois modes différents sont disponibles: SPDIF / OFF, SPDIF / RAW et SPDIF /PCM.
- Page 23 2.4.2 CONTRASTE Ajuster la luminosité à l’aide des touches HAUT et BAS. 2.4.3 COULEURS Ajuster les couleurs à l’aide des touches HAUT et BAS. 2.4.4SATURATION Ajuster la saturation à l’aide des touches HAUT et BAS.
- Page 24 2.5 REGLAGE DES HAUT-PARLEURS Les options de réglage du haut-parleur sont les suivantes: 2.5.1 DOWNMIX A) LT/RT: Sélectionner cette option lorsque l’appareil est branché à une entrée audio analogique bidirectionnelle. B) STEREO: Sélectionner cette option lorsque le lecteur DVD est branché à un poste TV (qui suppose un modulateur).
- Page 25 2.6.2 GAMME DYNAMIQUE Une fois l’option LINE OUT sélectionnée ; utiliser cette option pour ajuster les différents effets isponibles. Utiliser cette option pour ajuster le volume de maniére “ dynamique” et conserver la qualité sonore d’origine. ll s’agit de la gamme (en décibels) entre le son le plus fort et celui le plus faible sur la bande son . 2.6.3 DUAL MONO Si votre amplificateur dispose d’un mode de sortie Dolby Digital,choisissez entre les options suivantes pour configurer le mode de sortie audio :...
-
Page 26: Réglage Du Système - Section Tnt
Menu Réglage du système – Section TNT 1. Réglage initial Lors du premier réglage (Image 1), un message s’affiche, demandant à l’utilisateur s’il souhaite activer la fonction assistant de réglages. En choisissant OUI, une nouvelle fenêtre apparaît (image 2), vous demandant de sélectionner le pays, la langue OSD et l’heure locale. - Page 27 2. Menu principal Appuyez sur la touche REGLAGE (SETUP) pour accéder au menu principal (image 5). Appuyez une nouvelle fois sur la touche REGLAGE (SETUP) ou sur la touche RETOUR (RETURN) pour quitter le menu. Le menu principal est composé de quatre options: Guide des chaines, Config.
- Page 28 3. Guide des chaines 3.1 Chaines TV (Image 9). Les chaines apparaissent à gauche de l’écran et une fenêtre de démo apparaît à droite. Changer de chaine en utilisant les touches HAUT et BAS, puis ENTRER pour confirmer ; DROITE et GAUCHE pour changer de thématique.
- Page 29 3.4 Personnaliser le nom des chaines (Menu Edition des chaînes) Ce menu (image 13) sert à personnaliser le nom des chaines. Sélectionner une chaine et appuyez sur ENTRER. Sélectionner les lettres une à une avec les touches de direction DROITE GAUCHE et changer les lettress avec les touches HAUT BAS;...
- Page 30 Image 16: Vidéo Image 17: Type d’écran 4.2 Réglage vidéo Ce menu (image 18) permet d’ajuster la luminosité, les contrastes et les couleurs. Sélectionner une option à l’aide des touches HAUT et BAS. Effectuer votre réglage à l’aide des touches GAUCHE et DROITE, ou bien appuyer sur ENTRER pour choisr une liste d'options.
- Page 31 Image 20: Langues 4.5 Contrôle parental Ce menu (image 21) permet de modifier le mot de passe et de bloquer les chaînes. Pour modifier le mot de passe, vous devez d’abord saisir le mot de passe initial, puis saisir le nouveau mot de passe deux fois (image 22).
- Page 32 Image 25: Réglage de l’horloge Image 26:Réglage de l’heure locale Image 27:Réglage de la fonction de veille Image 28: Infos système 4.7 Infos système Cette fonction affiche les informations relatives à la version du logiciel, sa date d'édition ainsi que les informations sur le revendeur et le modèle de l'appareil (image 28).
- Page 33 Pour lancer la recherche d’une chaine, définir le pays et la chaine de départ. Pour rechercher un bouquet de chaines, définir le pays, la chaine de départ ainsi que la chaine de destination. Sélectionner une option à l’aide des touches HAUT et BAS, puis effectuer vos réglages avec les touches GAUCHE et DROITE ;...
- Page 34 2) Appuyez sur OK pour accéder au répertoire suivant, chaque répertoire affiche uniquement le fichier du FILM et le nom du fichier. 3) Appuyez sur les touches de direction HAUT/BAS pour choisir le nom du fichier du film. Appuyez sur OK pour visualiser le film sélectionné. 4) Appuyez sur EXIT pour quitter le mode Lecture du Film et revenir au répertoire des fichiers.
- Page 35 8.2 Fonction enregistrement : 1.Enregistrement en direct Alors que vous regardez la TV numérique, vous pouvez démarrer un enregistrement en direct en appuyant sur la touche REC de la télécommande. L’émission de TV TNT que vous être en train de regarder sera enregistrée sur votre support clé USB que vous avez branché sur votre appareil. Appuyez de nouveau sur la touche REC pour stopper l’enregistrement.
-
Page 36: Lire Un Fichier Mpeg4 / Mp3
Lire un fichier MPEG4 / MP3 Nom du fichier MP3/JPEG actuel. Pour lire un fichier JPEG, son nom doit Nom du contenir l’extension JPEG. fchier principal Type et localisation de fichier: indique le type de fichier lu ainsi La lecture en que sa localisation. -
Page 37: Afficher Les Images D'un Cd Kodak
Afficher les images d’un CD Kodak Insérer un CD d’images Kodak. Le CD d’images Kodak est similaire à un CD standard. Faites-en la demande auprès de votre magasin Kodak à l’occasion du développement de vos photos. Au moment du retrait, vos photos vous sont remises avec leur négatif ainsi qu’un CD contenant une version numérique. -
Page 38: Problèmes Fréquemment Rencontrés
Problèmes fréquemment rencontrés Si vous rencontrez des problèmes au cours de l'utilisation de l'appareil, merci de vous référer à cette section. Il N'Y A PAS DE SON NI D'IMAGES -Vérifier que le bouton alimentation est enclenché. -Vérifier la prise. -Vérifier que le câble électrique n’est pas endommagé. -Vérifier que la fiche est convenablement insérée dans la prise. -
Page 39: Utilisation De La Télécommande
Utilisation de la télécommande 2. Insérer 2 piles de type 1. Ouvrer le cache LR-03 1.5 V. non fournies Assurez-vous que la 3. Refermer le cache polarisation est correcte. Précautions à observer: Une mauvaise utilisation des piles peut produire une fuite de liquide, entrainant un effet de corrosion. -
Page 40: Spécifications
Spécifications Alimentation: 110-230V - 50 / 60 Hz Consommation: 20 W Standards vidéo: NTSC / PAL / AUTO Poids: 2,0 Kilos Sortie vidéo: 1,0 V (p-p) / 75 , sinc., polarité négative Sortie vidéo S – touche (touche sortie signal, Y, C séparé): Sortie Y: 1,0 V (p-p) / 75 , sinc., polarité... -
Page 41: Maintenance
MAINTENANCE a) Manipulation ● Manier le disque par ses bords. Pour le garder propr e, ne pas toucher la surface. ● Ne pas coller de papier ni de bande sur le disque. ● Ne pas exposer le disque à la lumièr e du soleil ou à des sources de chaleur telles que des aérations à... - Page 42 Table of contents Introduction This appliance has two main functions. It can function as an access terminal (Set-Top- Box) to receive Earth Satellite TV broadcas and it can also f unction as a DVD player. Important safety instructions…………………………………………42 Precaution…………………………………………………………… 46 Features………………………………………………………………47 Front panel and rear panel illustration……………………...………..48 Connecting to a TV…………………………………………....49...
-
Page 43: Important Safety Instructions
Important Safety Instructions Introduction THE UNIT USES A LASER SYSTEM. FOR A CORRECT USE OF THE UNIT, READ THIS MANUAL CAREFULLY AND K EEP IT FOR FUTURE REFERENCE. SHOULD THE UNIT NEED TO BE RE PAIRED, CONTACT THE SALESPERSON OR READ THE THE BOLT OF LIGHTENING SYMBOL INSIDE AN EQUILATERAL TRIANGLE “TROUBLESHOOTING”... - Page 44 Important Safety Instructions Introduction...
- Page 45 Important Safety Instructions Introduction 1. Read the instructions You should read all the safety and operating instructions before using the product. may fall over, causing serious harm to children 2. Keep the instructions or adults, and damage to the product. Only use it You should keep all the safety and operating with a cart, support, tripod, bracket or table instructions for future reference.
- Page 46 Introduction Important Safety Instructions 13. Power cable protection. 11. Power supplies The power cables should be positioned in a way This appliance should only work with the type that they cannot be trodden on or pierced by of power supply specified on the corresponding , paying special objects placed on or against them label.
-
Page 47: Precaution
Precaution Introduction Please use the original pack ing box and materials for safe transportation ● appliance. of this It is normal that the cover and rear panel of the appliance reach a high ● temperature after the DVD player has been used for a long period of time. -
Page 48: Features
Features Introduction Totally compatible with MPEG4, DVD, CD, CD-R and CD-RW ● (finalised) Screen saver. ● Multiple playing modes: search program. ● Coaxial digital audio out. ● Video out-put: S-video, co mposite video and by components (Y, Pb, Pr). ● Progressive Scan Video output ●... -
Page 49: Front Panel And Rear Panel Illustration
Front and rear panel illustration Introduction Front panel PLAY/PAUSE NEXT STD-2000 PREV POWER FUNCTION 1. POWER 2. OPEN/CLOSE 3. PLAY/PAUSE 4. PREV 5. NEXT 6. CARD READER 7. USB 8. FUNCTION Rear panel C b /P b C r/P r V ID E O S C A R T O U T P U T C O A X IA L... -
Page 50: Connecting To A Tv
Connecting to a TV Connections C b /P b C r/P r V ID E O S C A R T O U T P U T C O A X IA L S -VID E O O P T IC A L H D M I A u d io o u t D ig i ta lo u t... -
Page 51: Connecting To An Av Amplifier With Analog 2.1 Audio Channel In
Connecting to an AV amplifier with analog 2.1 audio channel in Connections C b /P b C r/P r V ID E O S C A R T O U T P U T C O A X IA L S -VID E O O P T IC A L H D M I... -
Page 52: Connecting To Am Av Amplifier With Digital Audio Input
Connecting to am AV Amplifier with Digital Audio Input Notes: 1.Select the COAXIAL or OPTICAL digital audio output. 2. Set the players audio out to RAW or PCM mode. 3. Set the Amplifier to the AV input connected to the DVD player. T V Ae rial C b /P b C r/P r... -
Page 53: Connecting Usb Or Card Port
Connecting to USB or CARD port Connections PLAY/PAUSE NEXT STD-2000 PREV POWER FUNCTION Connect USB or CARD to DVD player USB or CARD port on front panel. 1. Power on you DVD player. 2. Make sure that the tray has no disc in it . 3. -
Page 54: Remote Control
Remote control Connections Stop Chapter 1: Basic features of the remote control: Press <STOP> once during playback to stop and hold The remote control function keys are detailed playback. Press <PLAY> to resume playback from the point you as follows: pressed STOP. -
Page 55: Recording Function
SETUP During DVD or CD/VCD playback, press <FWD> once to Press <SETUP>,Menu list will appear on TV screen play the next chapter, title or track. During DVD or CD/VCD playback, press and hold <FWD> Time to scan forward. The player will review The disc at 2, 4, 8 and 20 times normal speed as follows: During playba ck,pre s s <... -
Page 56: Encoding
ENCODING When a CD is loaded, Press the SUBTITLE button to start to encoding. ● Use the UP and DOWN arrow button to select speed, bitrate a nd choose the file you need. ● Use UP and DOWN button to select the tracks you want to encode, Press ENTER button to decide. -
Page 57: The Menu Setup System - Dvd Section
The menu setup system – DVD Section Advanced features 1. General steps of the menu set-up A) Press the SETUP key and the main menu setup will appear. AUTO B) Press the “left” and “right” function keys to highlight the icon of the page want and then press the “down”... - Page 58 Advanced features The menu setup system – DVD Section 2. Introduction to the setup points The system setup options are the following: SYSTEM SETUP TV SYSTEM According to the TV’s colour system, the TV system may be chosen. AUTO 2.1.2 SCREEN SAVER The screen saver can be activated or un-activated at this point.
- Page 59 The menu setup system – DVD Section Advanced features 2.1.4 VIDEO According to the TV type of line out c onnection, the choices are S-VIDEO, YUV, P-SCAN, Y, Pb, Pr. NOTE: Select P-SCAN only if your DVD player is connected to a progressive scan TV with Y, Cb, Cr cables.
- Page 60 The menu setup system – DVD Section Advanced features 2.1.7 RATING The “rating” feature is a limitation by rating system, as film rating. It works that have been assigned a rating. It helps to control the type with DVDs of DVDs your family watches. 2.1.8 DEFAULT The DEFAULT setup option RESTORES the factory settings.
- Page 61 The menu setup system – DVD Section Advanced features 2.2.2 AUDIO LANGUAGE Highlight the option AUDIO LANG and press the function keys to select prefer. Press ENTER to confirm. If the disc you are playing the audio you has that language available, it will play in that language.
- Page 62 The menu setup system – DVD Section Advanced features AUDIO SETUP The audio setup options are as follows: 2.3.1 AUDIO OUT Highlight the option AUDIO OUT and press th e function keys to choose the audio out format you prefer. Press ENTER to confirm. There are three optional audio out modes: SPDIF / OFF, SPDIF / RAW and SPDIF /PCM.
- Page 63 The menu setup system – DVD Section Advanced features 2.4.2 CONTRAST Use the “up” and “down” function keys to move the control and adjust the contrast. 2.4.3 HUE Use the “up” and “down” function keys to move the control and adjust the hue.
- Page 64 The menu setup system – DVD Section Advanced features SPEAKER SETUP The speaker setup options are as follows: 2.5.1 DOWNMIX A) LT/RT Choose this setting option when you are connected to a two-way audio in. analog B) STEREO Choose this setting option when the DVD player is connected to therefore, a modulator.
- Page 65 The menu setup system – DVD Section Advanced features 2.6.2 DYNAMIC RANGE When the LINE OUT option is selected, choos e this setting option to adjust the out relation for different effects. 2.6.3 DUAL MONO If your amplifier has Dolby digital output mode, you may choose STEREO, MONO L, MONO R and MIX MONO for the decoding method.
-
Page 66: The Menu Setup System - Dvb-T Section
The menu setup system – DVB-T Section Advanced features 1. First installation after turning on The first time you setup the unit (Picture 1) amessage appears asking if the user wishes to setup assistant to be activated. After selecting “Yes” a new frame appears, shown in Picture 2, requesting the country, OSD language and time zone be introduced. - Page 67 The menu setup system – DVB-T Section Advanced features 2. The Main Menu. Pressing the SETUP key will access the Main Menu, shown in Picture 5. From here, pressing SETUP once again, or alternatively RETURN will exit the menu. The main menu is divided into four principal selection points: Channel guide, System Config, Installation and Game, shown on the left of the screen.
- Page 68 Advanced features The menu setup system – DVB-T Section 3. Channel Guide 3.1 TV Channels The TV Channels Menu is shown in Picture 9.The channels appear on the left of the menu, and a preview window appears on the right. From here, the channel can be changed using the “up”...
- Page 69 The menu setup system – DVB-T Section Advanced features Channel edit The channel edit menu is shown in Picture 13. To change the name of a channel select the channel and press ENTER. Following this, use the left or right function keys to select a character and “up”...
- Page 70 The menu setup system – DVB-T Section Advanced features Picture 17: TV type Picture 16: Video Setting the video From the Video Settings Menu, shown in Picture 18, the brightness, contrast, hue and can be changed. Press the “up” or “down” function keys to select one of the points.
- Page 71 The menu setup system – DVB-T Section Advanced features Language The Language Menu, shown in Picture 20, allows the user to change the language of system’s software (OSD). Use the “left” or “right” function keys to select a language, or ENTER to choose amongst a list with ll the possible languages. OSD languages: English, Spanish and Italian.
- Page 72 The menu setup system – DVB-T Section Advanced features Language The Language Menu, shown in Picture 20, allows the user to change the language of system’s software (OSD). Use the “left” or “right” function keys to select a language, or ENTER to choose amongst a list with ll the possible languages. OSD languages: English, Spanish and Italian.
- Page 73 The menu setup system – DVB-T Section Advanced features Manual Scan The Manual Scan Menu is shown in Picture 31. A channel scan or search can be done establishing the following points: Country, Type of search, Start with channel,Start with frequency…, Finish with frequency… and Wide band. If the search type is single channel, then the country and start channel can be set.
- Page 74 The menu setup system – DVB-T Section Advanced features 7.USB Media Play You can connect Ex-equipments via the USB. At present, system can support usual USB media players and upgrade to system software. This product supports the play of MP3, JPEG and MPEG-4( AVI).It can support only the files displaying in the list and the file formate this product plays.
- Page 75 The menu setup system – DVB-T Section Advanced features Recording function: 1.Live recording While watching TV,you can start live recording by simply pressing the “REC” button on remote control.It will record the TV programme you are watching in to the connected USB stick. Press “REC” again to stop the recording.A live recording will end automaticall if the USB stick is full.
-
Page 76: Playing Mpeg4 / Mp3 Files
Playing MPEG4 / MP3 files Advanced features When a disc with MPEG4 or MP3 files is inserted, the screen will show the following: Name of current MP3 / JPEG file. Name of the To play a JPEG file, the name must current directory extension have the JPEG... -
Page 77: Playing Kodak Picture Cds
Playing Kodak Picture CDs Advanced features Inserting a KODAK Picture CD The KODAK Picture CD is the shape and size of a normal CD. A KODAK Picture CD can be requested simply by marking the corresponding box on the envelope handed in when getting a film developed (35mm colour film or with the Advanced Photo System (APS)) when you drop it off at a Kodak Express shop with the KODAK Picture CD symbol. -
Page 78: Preparing The Remote Control
Preparing the remote control Other Inserting the batteries Using the remote control Point the remote control towards the DVD 1. Open the cover player’s sensor. (The images below are only for reference). PLAY/PAUSE NEXT STD-2000 PREV POWER FUNCTION 2. Insert the batteries (2 x AAA size - 1.5 V batteries) OPEN/CLOSE DISPLAY... -
Page 79: Specifications
Specifications Other Power supply: 110-230V - 50 / 60 Hz Power consumption: 20 W Video standard: NTSC / PAL Unit weight: 2,0 Kilos Video out: 1,0 V (p-p) / 75Ω, sinc., negative polarity, RCA jack connection x 1 S - Video out key (signal out key, Y, C separated): Y out: 1,0 V (p-p) / 75 Ω... -
Page 80: Maintenance
Maintenance Other 1. Precautions for handling and cleaning discs a.) Handling discs ● To keep a disc clean; do not touch the play side (non-label side) of the disc. ● DO not attach paper or tape to the disc. ● Keep the disc away from direct sunlight or heat sources. ●... -
Page 81: Troubleshooting
Troubleshooting Other If you have any questions, please consult the following troubleshooting guide THERE IS NO IMAGE AND NO SOUND THE MESSAGE “BAD DISC” APPEARS ● ● Check the ON button is connected Check the disc is not bent, broken or deformed ●...