Philips Rhythmic Edge PSC703 User Manual
4-channel pci sound card
Hide thumbs
Also See for Philips Rhythmic Edge PSC703:
- User manual (34 pages) ,
- Specification sheet (2 pages)

Related Manuals for Philips Philips Rhythmic Edge PSC703


Summary of Contents for Philips Philips Rhythmic Edge PSC703
- Page 1 User’s Manual Philips Consumer Electronics Company A Division of Philips Electronics North America Corporation Knoxville, TN 37914-1810, U.S.A. Printed in the U.S.A.
- Page 2 Philips Rhythmic Edge™ 4-Channel PCI Sound Card PSC703 ____________________________ Philips Consumer Electronics Company One Philips Drive Knoxville,TN 37914 Revised 03/9/01...
- Page 3 Licensed Software and destroy all copies thereof. In addition, in the event of termination because of your failure to com- ply with your obligations, Philips reserves the right to invoke any and all other remedies available to it in law or contract including the right to claim damages.
-
Page 4: Table Of Contents
95/98/Me ....32 Technical Support ...35 Philips Rhythmic Edge™ DSP Special Effects and Algorithms ...36 Philips Rhythmic Edge™ Control Panel...37 Help Button...37 Utilities Tab...37... -
Page 5: Introduction
PC . . . … a full-blown, digital surround-sound, quadraphonic home theater experience through your new Philips Rhythmic Edge Sound Card. Philips sound cards are the first to deliver the impact of 4 distinct channels of sound from every application. Utilizing... -
Page 6: Minimum System Requirements
A 3-part video installation guide can be found on the Acoustic Edge Installation CD: If CD/DVD autorun is enabled, a Philips Edge Series Autorun window will pop up when the CD is inserted into the CD drive.Then click on the “View PSC703/PSC705 Installation Videos"... -
Page 7: Installing Rhythmic Edge
Installing Rhythmic Edge NSTALLING THE OUND Uninstall the drivers for any previously installed sound cards. Consult your previous sound card documentation for details. Turn off computer and remove existing sound card. If your computer has on-board sound, consult your PC documentation to disable it. -
Page 8: Sound Card Configuration
Installing Rhythmic Edge Remove the Rhythmic Edge™ Sound Card from the anti-static bag. Align your sound card with the selected PCI Bus-Slot and firmly push it into the slot. Be sure the sound card is aligned properly and fits snugly into the slot. Sound Card Top &... -
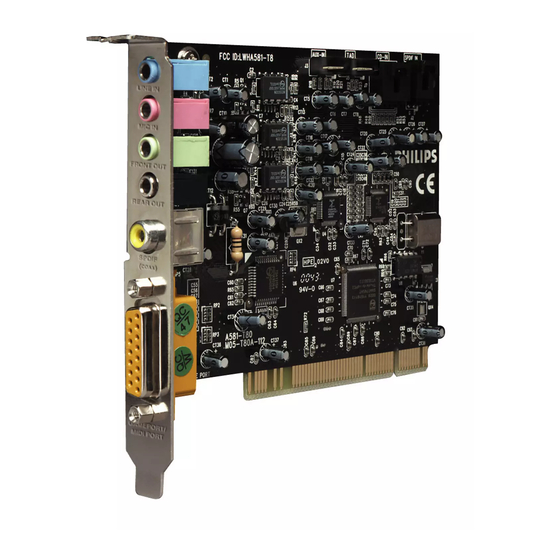
Page 9: Connecting To Your Rhythmic Edge Sound Card
OUND Speakers Connect your front speakers or headphones into the FRONT OUT stereo jack on the end bracket. Connect your rear/surround speakers to the REAR OUT stereo jack on the end bracket. If you are using a pair of digital (S/PDIF) speakers for your front or rear speakers then plug them into the S/PDIF Out phono jack as indicated below. - Page 10 To install the drivers for Windows ® 95/98/Me/2000 Turn on the computer and place the Philips Rhythmic Edge™ CD in your CD-ROM drive. When the Add New Hardware Wizard dialog box reports that a new PCI Multimedia Audio Device has been detected, click NEXT Select Search for the best driver for your device (Recommended).
- Page 11 Installing Rhythmic Edge If you are installing from the install CD or if you have copied the install to any other location, select and browse to your directory SPECIFY A LOCATION where the setup files are located. For Windows ® directory then choose english.
- Page 12 FINISH For Windows ® 2000, you must install the Philips Rhythmic Edge Audio™ and Philips Rhythmic Edge GamePort Enumerator devices. Browse to the Driver disk directory WDM\English to install these files. You will find these files in the same WDM install directory and Windows drivers for Philips Rhythmic Edge™...
- Page 13 Installing Rhythmic Edge After clicking “Finish” the Philips Rhythmic Edge™ GamePort will be installed. It is possible during gameport installation, Windows ® msanalog.vxd, vjoyd.vxd and msjstick.drv. It is recommended that you keep your existing files. Click on all 3 screens that appear.
-
Page 14: Yamaha Softsynthesizer Installation
Installing Rhythmic Edge AMAHA YNTHESIZER NSTALLATION 10. After Rhythmic Edge™ driver installation, the software launcher will prompt you to install the Yamaha SoftSynthesizer. Click 11. The Yamaha SoftSynthesizer Welcome page appears. Click 12. Enter the serial number located on the Yamaha Corporation Certificate of Authenticity included with your documentation. - Page 15 Installing Rhythmic Edge 13. The Choose Destination Location dialog box appears. Follow the instructions in this box . Click NEXT 14. Select A Program Folder dialog box appears. Click NEXT...
- Page 16 3. Double click on Sirensetup.exe 4. Follow the on-screen instructions for installation. Congratulations! You have successfully installed your Philips Rhythmic Edge™. your product now by clicking in the dialog window shown below. If you prefer to register your product at a later time, go to:...
-
Page 17: Windows Nt ® Installation
Philips Rhythmic Edge Install.exe (D: represents your CD-ROM drive). Wait a couple of minutes while the data transfers. Once it finishes the Philips Rhythmic Edge Settings window will appear. Click OK on the settings page and then when the “System Settings Change” page comes up and prompts you to restart, click the “Restart Computer Now”... -
Page 18: Joystick Configuration For Windows
Open the Control Panel and double-click on the icon. Select the tab and under ADVANCED PORT DRIVER ASSIGNMENT and select Philips Rhythmic Edge GamePort. GAME CONTROLLERS Select the tab and click the Add button. You may select any one of GENERAL... -
Page 19: Technical Support
Internet Address: www.pcsound.philips.com Product Return Before returning the Philips sound card, you must first contact the Philips Technical Support group to determine the nature of product defect. Once the nature of the problem has been determined, a Return Authorization number and address will be supplied. -
Page 20: Philips Rhythmic Edge™ Dsp Special Effects And Algorithms
(CD In, Line In, etc.) and the S/PDIF In if enabled on the control panel. QSound3DInteractive™/Q3DI™ (Automatic) Q3DI positions sounds all around you using stereo or surround speaker systems or headphones when playing 3D audio enabled applications.The proper DSP algorithm is automatically selecting based on your speaker mode. QXpander (Settings Tab) QXpander widens the sound field of stereo music and provides 3D enhancement to 2D audio games when using stereo speakers. -
Page 21: Settings Tab
3D games. Selecting “2 Speakers” will result in incorrect sound positioning when using headphones. Selecting “Headphones” when using speakers will reduce the effectiveness of 3D effects. Note: The Rhythmic Edge is designed for use with headphones or amplified (powered) speakers. Use with passive (non-amplified) speakers is not recommended. 2 Speakers Select this mode when using stereo (2 or 3 piece) speaker systems. - Page 22 Control Panel 4 Speakers Select this if you have a 4 or 5 piece speaker system (stereo front left and right and rear/surround left and right speakers and optional subwoofer). 3D sounds generat- ed by compatible applications will processed to the appropriate speaker and stereo sounds from applications will be expanded to four distinct channels using QMSS.
-
Page 23: S/Pdif Tab
Siren JukeBox application) then QMSS is used to automatically convert these sources to 4 channels (when in 4 speaker mode). S/PDIF T This page of the Philips Rhythmic Edge Control Panel will control the settings for the Digital Audio output. S/PDIF is the acronym for industry-wide standard called Sony/Philips Digital Interface. -
Page 24: Effects Tab
If you are using the Philips Rhythmic Edge (H/W) Synth rather than the Yamaha SXG (default) then the “Environment” you select will also be used when playing MIDI music and the intensity will be controlled on the reverb slider on the MIDI tab. -
Page 25: Midi Tab
Control Panel Reverb Level Sliders These sliders, used in conjunction with the “Enable” box and the “Environment” pull down menu, allow you to control the intensity and characteristics of the reverb effect applied to your sound. Reverb is an acoustic effect that simulates the interaction of sound with the environment. - Page 26 Control Panel Default MIDI Device When your card is initially installed the SXG Softsynth is selected as your default MIDI engine. To view your default selection look under “Default MIDI Device” on the MIDI tab. MIDI applications will use this default device unless they have been specially configured to use a different device.
-
Page 27: Speaker Test Tab
Control Panel PEAKER The speaker test tab is a utility to help verify proper speaker connections to your sound card. The acronyms are defined as follows: • LF – Left Front Speaker • RF – Right Front Speaker • RS – Right Surround Speaker •... -
Page 28: Information Tab
Control Panel NFORMATION The information tab provides detailed information about your sound card. This includes the model number for your product and software version information. DVD Playback Modes Using 4-channel surround speakers your Rhythmic Edge™ sound card can deliver true multi-channel surround sound from a compatible soft-DVD player application even if the player only supports stereo output. -
Page 29: About Siren™ Xpress
• From the View menu, choose the Compact/Skin Mode option. • Press Ctrl + M on your keyboard. You can expand the Philips compact mode to display the current and next songs, the Compact/Skin Mode button, and the Select Playlist button.To expand the compact mode, click the Expand control on the right end of the player.You can also use this... - Page 30 About SIREN XPress ™ Media Files A media file refers to any audio and video file that SIREN will play from your com- puter. SIREN supports the following media file formats: .wav, .mp3, .wma, .pca, .aif, .ogg, .avi, .wmv, .asf, .mpg, .mpeg, .mov, .qt. Finding Media After you install SIREN XPress, a configuration wizard will scan your local hard drives for any .mp3 and .wma files and add them to your SIREN XPress media library.
-
Page 31: About Audiopix
D:\Applications\QSound Labs\AudioPix\. Open the apixfree.txt file. Recording Source Configuration Philips Rhythmic Edge™ allows you to record sounds and music from various input sources (i.e. microphone, audio CD, line in, etc). Before you start recording, you need to configure the recording source as follow:... - Page 32 Recording Source Configuration • Choose "Recording" under “Adjust Volume for”, and check the recording source that you want to display in the Recording Mixer. • Click OK, and the Recording Mixer window will open. Now you can select the recording source you intend to use and adjust the recording volume level. •...
-
Page 33: Resolving I/O Conflicts
If you are still unable to determine which card is causing the conflict, remove all cards except the Philips Rhythmic Edge™ card and other essential cards (for example, disk controller and graphics cards). Add each card back until Device Manager indi- cates that a conflict has occurred. - Page 34 Notes:...