Electrolux ENN2801EOW User Manual
Hide thumbs
Also See for ENN2801EOW:
- User manual (64 pages) ,
- User manual (20 pages) ,
- User manual (20 pages)

Related Manuals for Electrolux ENN2801EOW


Summary of Contents for Electrolux ENN2801EOW
- Page 1 ENN2801EOW EN FRIDGE FREEZER USER MANUAL FR RÉFRIGÉRATEUR/ NOTICE D'UTILISATION CONGÉLATEUR FRIGO-CONGELATORE ISTRUZIONI PER L’USO...
-
Page 2: Table Of Contents
10. TECHNICAL INFORMATION................19 WE’RE THINKING OF YOU Thank you for purchasing an Electrolux appliance. You’ve chosen a product that brings with it decades of professional experience and innovation. Ingenious and stylish, it has been designed with you in mind. So whenever you use it, you can be safe in the knowledge that you’ll get great results every time. -
Page 3: Safety Information
ENGLISH SAFETY INFORMATION Before the installation and use of the appliance, carefully read the supplied instructions. The manufacturer is not responsible if an incorrect installation and use causes injuries and damages. Always keep the instructions with the appliance for future reference. 1.1 Children and vulnerable people safety This appliance can be used by children aged from 8 •... -
Page 4: Safety Instructions
Clean the appliance with a moist soft cloth. Only use • neutral detergents. Do not use abrasive products, abrasive cleaning pads, solvents or metal objects. Do not store explosive substances such as aerosol • cans with a flammable propellant in this appliance. -
Page 5: Care And Cleaning
ENGLISH of environmental compatibility. This gas • This appliance contains hydrocarbons is flammable. in the cooling unit. Only a qualified • If damage occurs to the refrigerant person must do the maintenance and circuit, make sure that there are no the recharging of the unit. -
Page 6: Operation
3. OPERATION 3.1 Control panel Selection is progressive, varying from 2 to 8°C. At first button touch actual setting LED keeps blinking. Any time the button is touch the set temperature is moved to 1 position . Corresponding LED will blink for a while. -
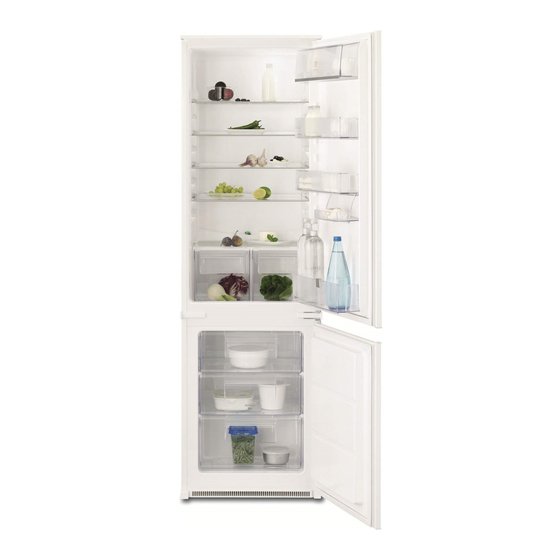
Page 7: Movable Shelves
ENGLISH 4.1 Movable shelves The maximum amount of food that can be frozen in 24 hours is specified on the rating plate, a label located on the inside of the appliance. The freezing process lasts 24 hours: during this period do not add other food to be frozen. -
Page 8: Hints And Tips
4.5 Temperature Indicator compartment or at room temperature, depending on the time available for this operation. This appliance is sold in France. In accordance with Small pieces may even be cooked still regulations valid in this frozen, directly from the freezer: in this country it must be provided case, cooking will take longer. -
Page 9: Hints For Refrigeration
ENGLISH the evaporator. If this happens, set the • the freezing process takes 24 hours. Temperature Regulator toward warmer No further food to be frozen should be settings to allow automatic defrosting added during this period; and so a saving in electricity •... -
Page 10: Care And Cleaning
6. CARE AND CLEANING 6.3 Defrosting of the refrigerator WARNING! Refer to Safety chapters. Frost is automatically eliminated from the evaporator of the refrigerator 6.1 General warnings compartment every time the motor compressor stops, during normal use. The CAUTION! -
Page 11: Troubleshooting
ENGLISH A certain amount of frost will always form After three hours reload the previously on the freezer shelves and around the top removed food into the freezer compartment. compartment. Defrost the freezer when the frost layer 6.5 Periods of non-operation reaches a thickness of about 3-5 mm. - Page 12 Problem Possible cause Solution The compressor operates Temperature is set incor- Refer to "Operation" chapter. continually. rectly. Many food products were Wait some hours and then put in at the same time. check the temperature again. The room temperature is Refer to climate class chart too high.
-
Page 13: Installation
ENGLISH Problem Possible cause Solution The food products' tem- Let the food products tem- perature is too high. perature decrease to room temperature before storage. Many food products are Store less food products at stored at the same time. the same time. The thickness of the frost Defrost the appliance. -
Page 14: Door Reversibility
Some functional problems CAUTION! might occur for some types Refer to the assembly of models when operating instructions for the installation. outside of that range. The correct operation can only be guaranteed within the 8.4 Door reversibility specified temperature range. - Page 15 ENGLISH 8. Install the lower door. 9. Tighten the middle hinge. 10. Install the spacer. 2. Install the appliance in the niche. 11. Install the upper door. 3. Push the appliance in the direction of 12. Tighten the upper pin. the arrows (1) until the upper gap Do a final check to make sure cover stops against the kitchen...
- Page 16 4 mm 44 mm 9. Attach the covers (C, D) to the lugs and the hinge holes. 7. Attach the appliance to the niche with 4 screws. 10. Install the vent grille (B). 11. Attach the hinge covers (E) to the 8.
- Page 17 ENGLISH 19. Open the appliance door and the kitchen furniture door at an angle of 90°. 14. Tighten the screws of the part (G) 20. Insert the small square (Hb) into guide again. (Ha). 15. Attach the part (H) to the part (G). 21.
-
Page 18: Noises
8 mm 23. Place the small square on the guide Do a final check to make sure that: again and fix it with the screws • All screws are tightened. supplied. • The sealing strip is attached tightly to 24. -
Page 19: Technical Information
ENGLISH SSSRRR! SSSRRR! HISSS! HISSS! BLUBB! CRACK! CRACK! BLUBB! 10. TECHNICAL INFORMATION 10.1 Technical data Dimensions of the recess Height 1780 Width Depth... -
Page 20: Environmental Concerns
Rising time Hours Voltage Volts 230 - 240 Frequency The technical information are situated in side of the appliance and in the energy the rating plate, on the external or internal label. 11. ENVIRONMENTAL CONCERNS Recycle the materials with the symbol Put the packaging in applicable containers to recycle it. - Page 21 10. CARACTÉRISTIQUES TECHNIQUES...............40 NOUS PENSONS À VOUS Merci d'avoir choisi ce produit Electrolux. Avec ce produit, vous bénéficiez de dizaines d'années d'expérience professionnelle et d'innovation. Ingénieux et élégant, il a été conçu sur mesure pour vous. Grâce à cet appareil, vous savez que chaque utilisation vous apportera satisfaction.
-
Page 22: Consignes De Sécurité
CONSIGNES DE SÉCURITÉ Avant d'installer et d'utiliser cet appareil, lisez soigneusement les instructions fournies. Le fabricant ne peut être tenu pour responsable des dommages et blessures liés à une mauvaise installation ou utilisation. Conservez toujours cette notice avec votre appareil pour vous y référer ultérieurement. -
Page 23: Instructions De Sécurité
FRANÇAIS N'endommagez pas le circuit frigorifique. • N'utilisez pas d'appareils électriques à l'intérieur des • compartiments de conservation des aliments de l'appareil, sauf s'ils sont du type recommandé par le fabricant. Ne pulvérisez pas d'eau ni de vapeur pour nettoyer •... - Page 24 Si ce n'est pas le cas, • Ne placez pas de produits contactez un électricien. inflammables ou d'éléments imbibés • Utilisez toujours une prise antichoc de produits inflammables à l'intérieur correctement installée. ou à proximité de l'appareil, ni sur •...
-
Page 25: Fonctionnement
FRANÇAIS informations sur la marche à suivre • N'endommagez pas la partie du circuit pour mettre l'appareil au rebut. de réfrigération située à proximité du condenseur thermique. 3. FONCTIONNEMENT 3.1 Bandeau de commande Lorsque vous appuyez sur la touche la première fois, le voyant LED du réglage actuel continue de clignoter. - Page 26 4.1 Glissières amovibles Placez les denrées fraîches à congeler dans le compartiment intermédiaire. La quantité maximale de denrées fraîches que vous pouvez congeler par tranche de 24 heures est indiquée sur la plaque signalétique (située à l'intérieur de l'appareil).
- Page 27 FRANÇAIS 4.7 Décongélation En cas de décongélation accidentelle, due par exemple Avant utilisation, les aliments surgelés ou à une coupure de courant, si congelés peuvent être décongelés dans le la coupure a duré plus compartiment réfrigérateur ou à longtemps qu'indiqué au température ambiante en fonction du paragraphe «...
-
Page 28: Conseils
5. CONSEILS 5.1 Bruits normaux de 5.4 Conseils pour la réfrigération fonctionnement Conseil utiles : Les bruits suivants sont normaux lorsque • Viande (tous types de viande) : l'appareil est en cours de fonctionnement : enveloppez-la dans des sachets en plastique et placez-la sur la clayette en •... -
Page 29: Entretien Et Nettoyage
FRANÇAIS plastique et assurez-vous que les • assurez-vous que les denrées emballages sont étanches ; surgelées achetées dans le commerce • Ne laissez pas des aliments frais, non ont été correctement entreposées par congelés, toucher des aliments déjà le revendeur ; congelés pour éviter une remontée en •... - Page 30 6.4 Dégivrage du congélateur L'appareil doit être nettoyé régulièrement : 1. Nettoyez l'intérieur et les accessoires ATTENTION! avec de l'eau tiède et un détergent N'utilisez en aucun cas doux. d'objets métalliques ou 2. Vérifiez régulièrement les joints de tranchants pour gratter la...
-
Page 31: En Cas D'anomalie De Fonctionnement
FRANÇAIS détachent, avant que le processus de AVERTISSEMENT! dégivrage ne soit terminé. Si, toutefois, vous n'avez pas 4. Une fois le dégivrage terminé, séchez la possibilité de débrancher bien l'intérieur. et de vider l'appareil, faites 5. Mettez l'appareil en marche. vérifier régulièrement le bon Au bout de 3 heures, replacez les produits de fonctionnement de celui-ci... - Page 32 Problème Cause probable Solution L'éclairage ne fonctionne L'éclairage est défec- Contactez le service après- pas. tueux. vente agréé le plus proche. Le compresseur fonctionne Il y a une erreur dans le Reportez-vous au chapitre en permanence. réglage de la température.
- Page 33 FRANÇAIS Problème Cause probable Solution Il est impossible de régler la La fonction FastFreeze ou Désactivez manuellement la température. Shopping Function est fonction FastFreeze ou Shop- activée. ping Function, ou attendez que la fonction se réinitialise automatiquement avant de régler la température. Repor- tez-vous au chapitre «...
-
Page 34: Installation
7.3 Fermeture de la porte 1. Nettoyez les joints de la porte. 2. Si nécessaire, ajustez la porte. Reportez-vous au chapitre « Installation ». 3. Si nécessaire, remplacez les joints de porte défectueux. Contactez le service après-vente. 8. INSTALLATION 8.1 Installation... - Page 35 FRANÇAIS Faites une dernière vérification pour vous assurer que : • Toutes les vis sont bien serrées. • Le joint magnétique adhère bien à l'appareil. • La porte s'ouvre et se ferme correctement. Si la température ambiante est basse (par exemple, en hiver), il se peut que le joint 2.
- Page 36 Assurez-vous que l'écart entre l'appareil et le meuble est de 4 mm. 6. Ouvrez le hublot. Mettez en place le cache de la charnière inférieure. 4 mm 2. Installez l'appareil dans son emplacement. 44 mm 3. Poussez l'appareil dans la direction indiquée par les flèches (1) jusqu'à...
- Page 37 FRANÇAIS 9. Fixez les protections (C, D) sur les 14. Serrez de nouveau les vis de la ergots et dans les trous des pièce (G). charnières. 15. Fixez la pièce (H) à la pièce (G). 16. Détachez les pièces (Ha), (Hb), (Hc) et (Hd).
- Page 38 8 mm 19. Ouvrez la porte de l'appareil et la 23. Placez de nouveau le petit carré sur le porte du meuble de cuisine à un angle guide et attachez-le avec les vis de 90°. prévues à cet effet.
-
Page 39: Bruits
FRANÇAIS • La porte s'ouvre et se ferme correctement. 9. BRUITS L'appareil émet certains bruits pendant son fonctionnement (compresseur, circuit frigorifique). HISSS! BRRR SSSRRR! SSSRRR! HISSS! HISSS! -
Page 40: Caractéristiques Techniques
CRACK! CRACK! BLUBB! BLUBB! 10. CARACTÉRISTIQUES TECHNIQUES 10.1 Caractéristiques techniques Dimensions de la niche d'encastre- ment Hauteur 1780 Largeur Profondeur Autonomie de fonctionnement Heures Voltage 230 - 240 Fréquence Les caractéristiques techniques figurent côté intérieur ou extérieur de l'appareil et sur la plaque signalétique située sur le... - Page 41 10. DATI TECNICI....................59 PENSATI PER VOI Grazie per aver acquistato un'apparecchiatura Electrolux. Avete scelto un prodotto che ha alle spalle decenni di esperienza professionale e innovazione. Ingegnoso ed elegante, è stato progettato pensando a voi. Quindi, in qualsiasi momento desiderate utilizzarlo, potete esser certi di ottenere sempre i migliori risultati.
-
Page 42: Informazioni Per La Sicurezza
INFORMAZIONI PER LA SICUREZZA Leggere attentamente le istruzioni fornite prima di installare e utilizzare l'apparecchiatura. Il produttore non è responsabile se un'installazione ed un uso non corretto dell'apparecchiatura provocano lesioni e danni. Tenere sempre le istruzioni a portata di mano come riferimento futuro. -
Page 43: Istruzioni Di Sicurezza
ITALIANO Non utilizzare apparecchiature elettriche all'interno dei • comparti di conservazione degli alimenti, ad eccezione di quelli consigliati dal costruttore. Non nebulizzare acqua né utilizzare vapore per pulire • l'apparecchiatura. Pulire l'apparecchiatura con un panno inumidito e • morbido. Utilizzare solo detergenti neutri. Non usare prodotti abrasivi, spugnette abrasive, solventi od oggetti metallici. - Page 44 • Non utilizzare prese multiple e sull'apparecchiatura, al suo interno o prolunghe. nelle immediate vicinanze. • Accertarsi di non danneggiare i • Non toccare il compressore o il componenti elettrici (ad es. la spina di condensatore. Sono incandescenti. alimentazione, il cavo di alimentazione, •...
-
Page 45: Uso Dell'apparecchio
ITALIANO • Non danneggiare i componenti dell'unità refrigerante che si trovano vicino allo scambiatore di calore. 3. USO DELL'APPARECCHIO 3.1 Pannello dei comandi Alla prima pressione del tasto, l'impostazione attuale LED continua a lampeggiare. Ad ogni pressione del tasto, la temperatura impostata si muove di 1 posizione. -
Page 46: Utilizzo Quotidiano
4. UTILIZZO QUOTIDIANO Per congelare piccole quantità di alimenti ATTENZIONE! freschi non è necessario modificare Fare riferimento ai capitoli l'impostazione corrente. sulla sicurezza. Per congelare alimenti freschi, attivare la funzione FastFreeze almeno 24 ore prima 4.1 Ripiani rimovibili di introdurli nel vano congelatore. - Page 47 ITALIANO 4.7 Scongelamento In caso di sbrinamento accidentale, per esempio a Prima dell'utilizzo, i cibi surgelati o causa di un'interruzione congelati possono essere scongelati nel dell'alimentazione elettrica, se vano frigorifero o, per un processo più l'alimentazione manca per un veloce, a temperatura ambiente. periodo superiore al valore Gli alimenti divisi in piccole porzioni indicato nella tabella dei dati...
-
Page 48: Consigli E Suggerimenti Utili
5. CONSIGLI E SUGGERIMENTI UTILI 5.1 Rumori normali durante il 5.4 Consigli per la refrigerazione funzionamento Consigli utili: I seguenti rumori sono da considerarsi • Carne (tutti i tipi): deve essere avvolta in normali: sacchetti di polietilene e collocata sul ripiano di vetro, sopra il cassetto delle •... -
Page 49: Pulizia E Cura
ITALIANO sale riduce la durata di conservazione • accertarsi che il tempo di trasferimento dell'alimento; dei surgelati dal punto vendita al • i ghiaccioli, se consumati appena congelatore domestico sia il più breve prelevati dal vano congelatore, possibile; possono causare ustioni da freddo; •... - Page 50 Quando tale strato raggiunge uno L'acqua di sbrinamento giunge attraverso spessore di circa 3 - 5 mm, è necessario un condotto in un apposito recipiente procedere allo sbrinamento del vano posto sul retro dell'apparecchiatura, sopra congelatore.
-
Page 51: Risoluzione Dei Problemi
ITALIANO 7. RISOLUZIONE DEI PROBLEMI ATTENZIONE! Fare riferimento ai capitoli sulla sicurezza. 7.1 Cosa fare se... Problema Causa possibile Soluzione L'apparecchiatura non fun- L'apparecchiatura è spen- Accendere l’apparecchiatura. ziona. La spina non è inserita Inserire correttamente la spi- correttamente nella presa na nella presa di alimenta- di alimentazione. - Page 52 Problema Causa possibile Soluzione La temperatura impostata Fare riferimento al capitolo non è corretta. "Uso dell'apparecchiatura". Il compressore non si avvia Ciò è normale, non si è Il compressore si avvia dopo immediatamente dopo verificato alcun errore. un certo periodo di tempo.
-
Page 53: Installazione
ITALIANO Problema Causa possibile Soluzione La funzione FastFreeze è Fare riferimento a "funzione attiva. FastFreeze". L'aria fredda non circola Adottare le misure necessarie correttamente all'interno per garantire una corretta cir- dell'apparecchiatura. colazione dell'aria fredda. Tutti i LED relativi alle im- Si è... - Page 54 Se la presa di corrente dell'impianto domestico non è collegata a terra, allacciare l'apparecchiatura a una presa di terra separata in conformità alle norme in vigore, rivolgendosi a un elettricista qualificato. • Il produttore declina ogni responsabilità qualora le suddette precauzioni di sicurezza non vengano rispettate.
- Page 55 ITALIANO Eseguire un controllo finale per accertarsi che: • Tutte le viti siano serrate. • La guarnizione magnetica aderisca all’apparecchiatura. • La porta si apra e si chiuda correttamente. Se la temperatura ambiente è bassa (ad esempio in inverno), è possibile che la guarnizione non aderisca perfettamente all'apparecchiatura.
- Page 56 Accertarsi che lo spazio fra l'apparecchiatura e il mobile sia di 4 6. Aprire la porta. Applicare il copricerniera inferiore. 4 mm 9. Applicare i cappucci (C, D) ai coprigiunti e ai fori delle cerniere. 44 mm 7. Fissare l'apparecchiatura nella nicchia con 4 viti.
- Page 57 ITALIANO 19. Aprire la porta dell'apparecchiatura e l'anta del mobile da cucina con un'angolazione di 90°. 14. Serrare nuovamente le viti della parte 20. Inserire il quadratino (Hb) nella guida (G). (Ha). 15. Fissare la parte (H) alla parte (G). 21.
-
Page 58: Rumori
8 mm 23. Riapplicare il quadratino sulla guida e Eseguire un controllo finale per accertarsi fissarlo con le viti in dotazione. che: 24. Allineare l'anta del mobile da cucina e • Tutte le viti siano serrate. la porta dell'apparecchiatura •... -
Page 59: Dati Tecnici
ITALIANO SSSRRR! SSSRRR! HISSS! HISSS! BLUBB! CRACK! CRACK! BLUBB! 10. DATI TECNICI 10.1 Dati tecnici Dimensioni nicchia di incasso Altezza 1780 Larghezza Profondità... - Page 60 Tempo di risalita Tensione Volt 230 - 240 Frequenza I dati tecnici sono riportati sulla targhetta dell'apparecchiatura e sull'etichetta dei dei dati applicata sul lato esterno o interno valori energetici. 11. CONSIDERAZIONI SULL'AMBIENTE Riciclare i materiali con il simbolo Smaltire l'imballaggio negli appositi contenitori per il riciclaggio.
- Page 61 ITALIANO...
- Page 62 www.electrolux.com...
- Page 63 ITALIANO...
- Page 64 www.electrolux.com/shop...