Table of Contents
Advertisement
Quick Links
Advertisement
Table of Contents

Related Manuals for Arturia DrumBrute


Summary of Contents for Arturia DrumBrute
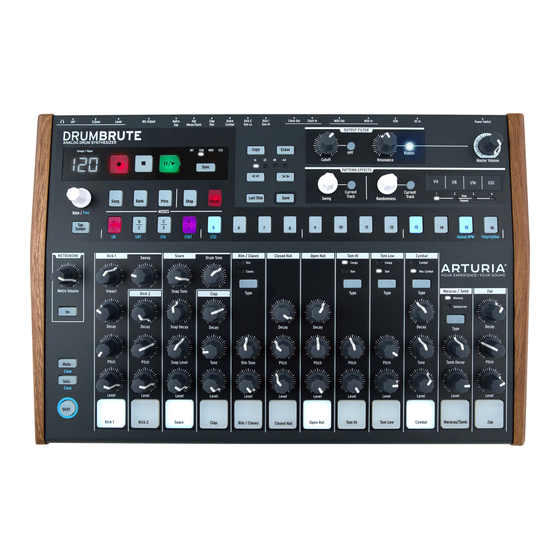
- Page 1 USER MANUAL...
-
Page 2: Special Thanks
Information contained in this manual is subject to change without notice and does not represent a commitment on the part of Arturia. The software described in this manual is provided under the terms of a license agreement or non-disclosure agreement. The software license agreement specifies the terms and conditions for its lawful use. - Page 3 • The Quick Start Guide Be sure to register your DrumBrute as soon as possible! There is a sticker on the bottom panel that contains the serial number of your unit and an unlock code. These are required during the online registration process. You may want to record these elsewhere or take a photo of the sticker in case it becomes damaged.
-
Page 4: Special Message Section
The information contained in this manual is believed to be correct at the time of printing. However, Arturia reserves the right to change or modify any of the specifications without notice or obligation to update the hardware that has been purchased. - Page 5 But most importantly, we have taken great care to make sure DrumBrute will enhance your creative experience. And we’re proud of what we’ve accomplished. Who are we kidding? We’re thrilled! DrumBrute is a ton of fun to use. You’re going to have a blast with it.
-
Page 6: Table Of Contents
Tempo/Value display ........................................6 1.2.2. Rate/Fine/Tap Tempo......................................... 6 1.2.3. Transport buttons ......................................... 7 1.2.4. Synchronization Options ......................................7 1.2.5. DrumBrute modes ........................................7 1.2.6. Step buttons ............................................. 8 1.2.7. Copy/Erase ............................................8 1.2.8. Pattern length/Last step ......................................8 1.2.9. Save button ............................................9 1.3. - Page 7 3.5. Erasing a Song ..................................26 3.6. Live performance features ............................27 3.6.1. Song-level features ........................................27 3.6.2. Pattern-level features ......................................28 Pattern Mode................................29 4.1. Pattern Creation .................................. 29 4.1.1. Control the tempo ........................................29 4.1.2. Time Division ..........................................29 4.1.3.
- Page 8 Send one pattern to DrumBrute ..................................57 8.5. Store To/Recall From............................... 58 8.5.1. The ‘Store To’ button........................................ 58 8.5.2. Recall edited patterns from the DrumBrute ............................58 8.5.3. Save, Delete, Import/Export, etc..................................59 8.6. Import/Export Device Settings..........................59 8.6.1. Export Device Settings......................................59 8.6.2.
-
Page 9: Overview
DrumBrute does not draw its power from the USB port on your computer. To supply power to the DrumBrute, simply connect the included DC power adapter to the DrumBrute and to an external power source, then set the power switch on the back of the DrumBrute to the On position. -
Page 10: With External Devices
As you can see, the DrumBrute can be the backbone of some amazing systems. 1.1.2.1. MIDI devices There are lots of great devices that only have MIDI ports (no clock sync, no USB). DrumBrute will fit right in with these systems: it will sync with MIDI sequencers, arpeggiators, and other drum machines, and its own drum sounds may be played from a MIDI keyboard. -
Page 11: Transport + Patterns
The tempo can be set using the Rate/Fine encoder or by tapping the Tap Tempo button. To fine-tune the tempo, press Shift and turn the encoder. The display will change to show the decimal values of the tempo (.00-.99) as soon as the Shift button is pressed. Arturia - User Manual DrumBrute - Overview... -
Page 12: Transport Buttons
1.2.4. Synchronization Options There are four Sync options which are accessed by pressing the Sync button repeatedly. These determine whether DrumBrute will be the master or the slave in a multi-device setup. For descriptions of the sync features see Synchronization section [p.51]. -
Page 13: Step Buttons
[p.43]. 1.2.8. Pattern length/Last step DrumBrute patterns can be up to 64 steps long, consisting of up to four 16-step subdivisions that play one after the other. Those are called the Step Groups. The four LEDs above the double arrow buttons (<< >>) are used to indicate the pattern length and which Step Group is currently playing. -
Page 14: Save Button
Your new pattern data will be lost during a power-cycle unless you have used the Save button to store it to the DrumBrute internal memory. There are three levels of the Save function: Pattern, Bank and Song. Details about these... -
Page 15: Filter + Pattern Effects
Shift+16: Polyrhythm 1.3.1. Output filter These knobs and buttons add a fun and expressive way to control the overall sound of the DrumBrute during performance. Select the filter type with the HPF button: • Off : LPF (Low Pass Filter) •... -
Page 16: Master Volume
1.3.2. Master volume This knob controls the master output level of the DrumBrute. It does not affect the headphone level; that is controlled by a recessed knob on the rear panel. The Master Volume knob will not affect the level of an instrument when a cable is plugged into the rear panel output of that instrument. -
Page 17: Roller/Looper/Step Repeat
The smallest drum roll the pattern can record is set by the timing division you have selected for the pattern. In other words, if the timing division of the pattern is 1/16, DrumBrute will not record 1/32 rolls played on the Roller strip. -
Page 18: Polyrhythm Feature
This setting is stored separately for each pattern. To enable this feature, hold the Shift button and press step button 16. To learn more about the Polyrhythm feature, see section [p.48]. Arturia - User Manual DrumBrute - Overview... -
Page 19: Instruments + Pads
1.4.3. Pads The 12 velocity-sensitive pads are used to input note data into a pattern. But they will always trigger their instruments whether DrumBrute is running or not (except if Local Control option is Off). Remember that some pads provide access to more than one instrument, each of which has its own track in the pattern sequencer. -
Page 20: Metronome, Mute/Solo + Shift
1.5. Metronome, Mute/Solo + Shift 1.5.1. Metronome To enable the metronome, press the On button. This will provide a timing reference while DrumBrute is running. Various timing values are available for the click. See section [p.20] information about this. The click level is controlled by the Metro Volume knob. The metronome also has a dedicated output jack on the rear panel. -
Page 21: Rear Panel, Part 1
DrumBrute and MIDI-compatible devices. 1.6.4. Clock input/output The Clock input allows DrumBrute to interface with pre-MIDI devices that used these connectors for synchronization, such as early drum machines by Korg and Roland. Other vintage devices may use different types of connectors which should be readily available. -
Page 22: Rear Panel, Part 2
Headphone Outputs 1.7.1. Individual Outs Each DrumBrute instrument channel has a dedicated 3.5mm output jack on the rear panel (except Close and Open Hat that share the same output). Both instruments of a shared channel will share that channel’s output. -
Page 23: Headphones
The behavior of all other connection options is the same for the headphones and the Mix Output, including the metronome: When a cable is plugged into one of the individual outputs, that instrument channel’s signal will be removed from both the headphones and the Mix Output. Arturia - User Manual DrumBrute - Overview... -
Page 24: Basic Operations
Bank mode you will need to press the Ptrn button first and then select the pattern. DrumBrute will respond in one of two ways if it is running when the selection is made: it will either change immediately to the new pattern or wait until the end of the current pattern. -
Page 25: Set The Tempo
[p.51]. Note: when external synced it is not guaranteed that the Drumbrute will work with tempi out of the range 30-300 BPM 2.1.4. Enable the metronome To enable the metronome, press the On button. You will hear a click only when DrumBrute is running. -
Page 26: Record A Pattern
Save a bank of patterns: hold the Save button and press Bank. Save the current song : hold the Save button and press Song. It’s a good idea to back up the DrumBrute memory using the MIDI Control Center, too. Section [p.58] will tell you what you need to know about that. -
Page 27: Creative Playback Options
These knobs and buttons allow you to make massive adjustments to the overall sound of the DrumBrute. There are two Filter types available: Low Pass and High Pass. A Low Pass filter allows you to roll off the higher frequencies of the sound, leaving the lower frequencies untouched until you roll them off also. -
Page 28: Looper/Roller
The touch strip has 2 exclusive behaviors : you can choose between Looper or Roller. You can switch between these two modes using Shift + Step 9 on the Drumbrute. When Step 9 is lit up (while holding Shift) the Roller Mode is selected. This option is available as well in the MCC in the Roller/Looper section. -
Page 29: Pause Or Restart
If this happens, just press the Stop button quickly three times in a row. It will then send an All Notes Off command over MIDI. Note: Incoming All Notes Off and All Sounds Off messages are echoed on MIDI port Arturia - User Manual DrumBrute - Basic Operations... -
Page 30: Song Mode
3. SONG MODE The internal memory of the DrumBrute holds 16 songs, each of which can be up to 16 patterns in length. 3.1. What’s a Song? A song allows you to set up a sequence of patterns that will play back in a specific order. -
Page 31: Creating A Song
Press the Erase button, the Erase, Song, Bank, Ptrn, and pads will blink. • Press the Song button • Choose the song to be erased by pressing one of the Step buttons. Now you can begin creating a new song. Arturia - User Manual DrumBrute - Song Mode... -
Page 32: Live Performance Features
There’s a setting called Pause mode in the MIDI Control Center. It lets you decide if the Play/ Pause button will restart the song from the beginning or continue from the current position when you resume playback. section [p.71] to learn more about these MIDI Control Center settings. Arturia - User Manual DrumBrute - Song Mode... -
Page 33: Pattern-Level Features
Global BPM. To activate this feature is simple: just hold the Shift button and press Step button 15. After this, every song and pattern in the DrumBrute will play at the same tempo, which you may then set to whichever value you like as described in section [p.29]. -
Page 34: Pattern Mode
You can set the number of taps it takes to set the Tempo using the MIDI Control Center. Note Tap tempo will not function when the DrumBrute is set to one of the external sync sources. 4.1.2. Time Division Depending on the current setting, this parameter can be a quick way to double the playback rate of your pattern or cut it in half. -
Page 35: Recording A Pattern
To record a pattern, press the Record button and press the Play button. If the pattern is already playing, use the Record button to drop in and out of Record mode. If DrumBrute isn’t running, check the Sync settings (see section [p.51]). -
Page 36: Mute/Solo Features
Rather than entering Mute/Solo mode and de-selecting each pad in the group, you can clear the group immediately by holding the Shift button and pressing the Mute/Solo button. Then make a new group by selecting the instruments you want in it. Arturia - User Manual DrumBrute - Pattern Mode... -
Page 37: Using The Roller While Recording
Notes can be erased while the pattern is looping in record mode. To do this, hold the Erase button and then tap the desired pads whenever you hear something you don’t want. The next time the pattern loops the notes will be removed from that location. Arturia - User Manual DrumBrute - Pattern Mode... -
Page 38: Swing
Swing value for the pattern. The MIDI Control Center can be used to set Swing % values for all instruments and the pattern as well. See section [p.67] for information about these parameters. Arturia - User Manual DrumBrute - Pattern Mode... -
Page 39: Randomness
Then you can select the other instruments and edit their Randomness settings as well. Note To return the entire pattern to the same Randomness value you must toggle the Current Track button off for each instrument. Arturia - User Manual DrumBrute - Pattern Mode... -
Page 40: Pattern Editing
The MIDI Control Center allows you to define what the MIDI velocity of accented steps will be. See section [p.70] for information about this MIDI Control Center feature. Arturia - User Manual DrumBrute - Pattern Mode... -
Page 41: Red State, Blue State
But if you touch a pad while the pattern is recording it will enter a note. To select an instrument without entering a note while recording, hold the Shift button and tap the desired pad. Its track data will now be displayed by the Step buttons. Arturia - User Manual DrumBrute - Pattern Mode... -
Page 42: Step Repeat
Try the same process with Step Repeat values of 3 and 4 on other steps to hear the difference between them. You will quickly see how easy it is to create exciting and innovative patterns using the Step Repeat feature! Arturia - User Manual DrumBrute - Pattern Mode... -
Page 43: Shift Timing
Alternately, if one of the instruments is always a bit ahead of the beat it can increase the sense of urgency in the music. DrumBrute allows you to shift the timing of any step forward or backward by up to 50% of the pattern’s timing value. It’s easy to do: •... -
Page 44: Copy A Drum Track
Tap the Closed Hat pad. It will flash quickly so you will know the process is complete. To copy the Closed Hat track to a different instrument in the target pattern, select that instrument’s pad in the final step instead of the Closed Hat pad. Arturia - User Manual DrumBrute - Pattern Mode... -
Page 45: Erasing A Drum Track
Press and release the Erase button. The Erase, Bank and Ptrn buttons and all of the pads will flash. • Tap the pad of the instrument track you want to erase. It will flash quickly and then stop, so you will know the process is complete. Arturia - User Manual DrumBrute - Pattern Mode... -
Page 46: Pattern Length
When the double arrow buttons (« ») are pressed at the same time, their LEDs will toggle off and on. This takes DrumBrute into and out of Pattern Follow mode. When this mode is active during a 32 step pattern, the Step Group LEDs and the Step buttons will show steps 1-16, then steps 17-32, then return to steps 1-16, and so on. -
Page 47: Save The Pattern
Press Step button 8. It will flash for half a second, and then Step buttons 2-15 will go dark so you’ll know the process is complete. To learn how to copy a pattern between banks, see section [p.44]. Arturia - User Manual DrumBrute - Pattern Mode... -
Page 48: Copy/Erase Functions
Note: Just before selecting the destination you can see which is empty or not. Empty Banks will not be lit up. Non empty ones will be lit up in red. This is also the case when you choose which Bank to erase. Arturia - User Manual DrumBrute - Copy/Erase Functions... -
Page 49: Copy Pattern To Pattern
To copy an instrument track into a different pattern in the same bank, see section [p.39]. • To copy an instrument track into a pattern in a different bank, see section [p.40]. Arturia - User Manual DrumBrute - Copy/Erase Functions... -
Page 50: Erasing A Bank
Press the Erase button. Lots of buttons will flash. • Tap the pad of the drum track you want to erase. It will flash quickly and then stop, so you will know the process is complete. Arturia - User Manual DrumBrute - Copy/Erase Functions... -
Page 51: Advanced Features
Steps 1-7 were copied / appended to step 8 Shift + >> 28 steps Steps 1-14 were copied / appended to step 15 Shift + >> 44 steps Steps 1-16 were copied / appended to step 29 Arturia - User Manual DrumBrute - Advanced Features... -
Page 52: Shorten A Pattern
To select a pattern length other than a multiple of 16, use the Last Step button and press the appropriate Step button to define the final step in the pattern. This process is described in section [p.41]. Arturia - User Manual DrumBrute - Advanced Features... -
Page 53: Polyrhythm Mode
15 steps before it plays again. But with the DrumBrute’s polyrhythm feature you can specify a different time signature for each instrument track! This could mean you’d have 16 loops of different lengths all happening at the same time. -
Page 54: Make A Polyrhythm
Press Play to confirm. The pattern is now 5 steps long, and you should hear the intersecting rhythms of all three instruments. Try your own experiments! Just be sure to save the pattern if you like what you’re hearing. Arturia - User Manual DrumBrute - Advanced Features... -
Page 55: Shift Button Chart
Shortens the length of the sequence Bank Revert bank to last saved state (i.e., load from Flash memory) Ptrn Revert pattern to last saved state (see section [p.39]) Song Revert to last saved state Arturia - User Manual DrumBrute - Advanced Features... -
Page 56: Synchronization
7. SYNCHRONIZATION DrumBrute can be the master clock for an entire MIDI rig, or it can just as happily serve as a slave to any one of several sources. See section [p.4] for connection diagrams. You can cycle through the various Sync options using the Sync button. A white LED will let you know which mode you’ve selected. -
Page 57: As Slave
7.2. As Slave DrumBrute functions as a slave to an external clock when one of the other three Sync LEDS are lit (USB, MIDI or CLK). When DrumBrute is in Slave mode: • The Tempo controls will not control the internal sequencer while the external source is running. -
Page 58: Midi Control Center
The MIDI Control Center is an application that allows you to configure the MIDI settings of your DrumBrute. It works with most of Arturia’s devices, so if you have an earlier version of the software you’ll want to download the DrumBrute version. It will work with those products as well. -
Page 59: Connection
8.1.3. Connection Connect DrumBrute to your computer using an USB cable. It’ll be ready to go after its LEDs go through the startup cycle. Now launch the MIDI Control Center. DrumBrute will be in the list of connected devices: ... -
Page 60: Mcc Basic Operations
The Working Memory functions as a sort of ‘target’ onto which Templates or patterns can be dragged and then transmitted to the DrumBrute memory. But edits made to patterns inside the MCC do not edit the patterns inside the DrumBrute. -
Page 61: Project Browser
The Template Browser shows a list of all the Templates that have been archived using the MIDI Control Center. These are divided into two main groups: Factory and User. The User Templates are the ones you have recalled from the DrumBrute using the MIDI Control Center. See section [p.58]... -
Page 62: Revise A Template
Important: The following process will send a single pattern to DrumBrute and will overwrite the pattern in that memory location. If you’d like to transfer only one pattern from a Template to the DrumBrute, find that pattern in the Local Templates window and drop it onto the Working Memory. This will send the selected pattern directly into the DrumBrute at that same pattern location. -
Page 63: Store To/Recall From
The following process will overwrite the internal memory of the DrumBrute. If you are not sure those patterns have been backed up, be sure to archive them to your computer using the Recall From button. If there is a particular Template you would like to transmit to your DrumBrute, select it in the Local Templates window. -
Page 64: Save, Delete, Import/Export, Etc
[p.59] below). These files will have the extension .drumbrute. They contain all of the internal DrumBrute parameters: a complete set of 64 patterns and all of the Device Settings. Use these files to share settings and patterns with other users. -
Page 65: Editing Basics
Each bank contains 16 patterns, and Device Settings has all of the parameters for the various DrumBrute functions. The DrumBrute tabs: Banks A-D and Device Settings Simply click on a tab to select its window. Arturia - User Manual DrumBrute - MIDI Control Center... -
Page 66: Bank Tabs
All of the Device Settings are contained within this tab. On small screens you may have to use the scroll bar on the right side of the window to view them within the MIDI Control Center. We’ll go through each group of parameters in section [p.69]. Arturia - User Manual DrumBrute - MIDI Control Center... -
Page 67: Pattern Window
Below the Pattern tabs are five parameters that operate on the entire pattern. We went through these in section [p.29], and the Polyrhythm feature is covered in section [p.48] section [p.68]. Pattern-level parameters for the Pattern tabs Arturia - User Manual DrumBrute - MIDI Control Center... -
Page 68: Set The Pattern Length
The steps are numbered along the bottom of the window: The pattern length may be changed by dragging the white line to the left or to the right: Changing the pattern length Patterns can be up to 64 steps long. Arturia - User Manual DrumBrute - MIDI Control Center... -
Page 69: Pattern Events
Just hold the Alt key (Option on a Mac), select one of the events, and drag them all into the new area. The new events will have the same velocity, shift and step repeat values as the original events. Arturia - User Manual DrumBrute - MIDI Control Center... - Page 70 It is also possible to shift the timing of several events at the same time, even events from different instrument tracks. Three events shifted +28% In the image above three Hat events from two tracks have been shifted “late” by a value of 28%. Arturia - User Manual DrumBrute - MIDI Control Center...
- Page 71 An accelerated kick fill using the Step Repeat feature When multiple events are selected they will all change to the same Step Repeat value. Simultaneous Step Repeat edits are possible. Arturia - User Manual DrumBrute - MIDI Control Center...
-
Page 72: Track-Level Settings
DrumBrute. 8.8.5.1. Swing Click and drag inside the left track window to edit the Swing value. 8.8.5.2. Randomness Click and drag the right window value to edit the Randomness setting. Arturia - User Manual DrumBrute - MIDI Control Center... -
Page 73: Polyrhythm
Maracas and Zap tracks remain at 16 steps. To return all tracks to the same pattern length value, select the Off value in the Polyrhythm pull-down menu. It will take the longer track length as new pattern length. Arturia - User Manual DrumBrute - MIDI Control Center... -
Page 74: Device Settings
Each time you connect the Drumbrute, the device settings are automatically send from device to Midi Control Center. When you change a setting on the mcc with a device plugged, the change is also automatically send to the device. -
Page 75: Global Settings
Internal clock. With Analog Clock, if the clock signal stops, the drumbrute will stop too as there is no way to differenciate a clock drop out and a stop. When Auto-sync is Off the DrumBrute will wait until it receives a signal from the front panel Sync selection. - Page 76 Step Repeat event will occur. At higher levels it also can generate Step Repeats where none existed before. 8.10.2.12. Vegas mode When this setting is active the DrumBrute front panel will begin to flash its buttons and pads if no activity has occurred for 10 minutes. 8.10.2.13. Pause mode This parameter dictates the function of the Play/Pause button.
-
Page 77: Roller/Looper Settings
Pressing a pad or playing a sequence will not produce a sound but will send messages on the MIDI Out port, while the sound-producing part of the Drumbrute will produce sound only in response to messages coming in through the MIDI In port (USB or MIDI). -
Page 78: Transport Settings
MMC, MIDI CC or both. Note: The Drumbrute will always send MIDI Clock type messages (MIDI Real Time messages) while playing, thus, it will always remotely start a gear (or a DAW) which is in Slave mode and listening to MIDI Real Time messages. -
Page 79: Software License Agreement
The License is not a sale of the original SOFTWARE. 2. Grant of License Arturia grants you a non-exclusive license for the use of the software according to the terms and conditions of this Agreement. You may not lease, loan or sub- license the software. - Page 80 (a) return of the purchase price or (b) replacement of the disk that does not meet the Limited Warranty and which is returned to Arturia with a copy of your receipt. This limited Warranty is void if failure of the software has resulted from accident, abuse, modification, or misapplication.
-
Page 81: Declaration Of Conformity
Important notice: DO NOT MODIFY THE UNIT! This product, when installed as indicate in the instructions contained in this manual, meets FCC requirement. Modifications not expressly approved by Arturia may avoid your authority, granted by the FCC, to use the product.