Table of Contents
Advertisement
Advertisement
Table of Contents

Related Manuals for Swann SDWB2020


Summary of Contents for Swann SDWB2020
-
Page 1: User Instructions
Dishwasher User Instructions SDWB2020 Swan Helpline Number: 0345 610 4118... -
Page 2: Table Of Contents
Contents Page Safety Information…………………………………….. Electrical safety……………………………………………………………..Get to know your Swan Dishwasher……………….. Installation………………………………………………. 7 Before Use………………………………………………. Setting the water hardness…………………………………………………. Filling with Salt……………………………………………………………….. Loading the baskets…………………………………………………………. Detergent usage……………………………………………………………… Rinse Aid………………………………………………………………………. Operation………………………………………………… Care and Maintenance………………………………… Cleaning……………………………………………………………………….. Cleaning the Filters…………………………………………………………… Trouble Shooting………………………………………. Warranty…………………………………………………. -
Page 3: Safety Information
Safety Information Check for any damage to your machine. Never start a machine damaged in any way. Unwrap the packaging materials as indicated and dispose of them in accordance with the rules. Choose a suitable, safe and level place to install your machine. ... - Page 4 lack of experience and knowledge if they have been given supervision or instruction concerning use of the appliance in a safe way and understand the hazards involved. After removing the machine’s packaging, make sure that the packaging material is out of reach of children. ...
-
Page 5: Electrical Safety
Electrical Safety THIS APPLIANCE MUST BE PLUGGED INTO AN EARTHED SOCKET. Before switching on, make sure that the voltage of your electricity supply is the same as that indicated on the rating plate. This product is designed to operate on 220 - 240V AC; 50Hz. Connection to any other power source may damage the unit. -
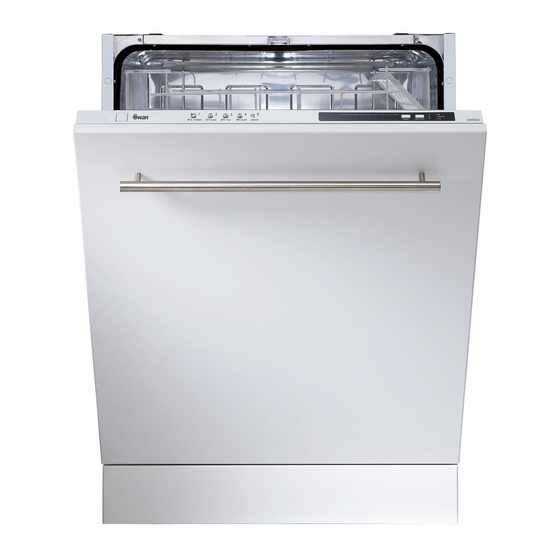
Page 6: Get To Know Your Swan Dishwasher
Get to know your Swan Dishwasher Upper basket with racks Upper spray arm Lower basket Lower spray arm Filters Rating plate Control Panel Detergent and rinse-aid dispenser Cutlery basket Salt dispenser Upper basket track latch Active drying unit: This system provides better drying performance for your dishes. -
Page 7: Installation
Installation For further Installation advice please see separate Assembly Instructions sheet. Positioning the machine When determining the location of the appliance, take care to choose a place where you can easily load and unload your dishes. Do not put your machine in any location where there is the probability for the room temperature to fall below 0°C. - Page 8 water tightness. For the safety of your machine, make sure to always turn off the water inlet tap after each wash programme is finished. Water outlet hose The water drain hose can be connected either directly to the water drain hole or to the sink outlet spigot. Using a special bent pipe (if available), the water can be drained directly into the sink via hooking the bent pipe over the edge of the sink.
-
Page 9: Before Use
Before Use Prior to using the machine for the first time remove all packaging materials inside the machine. Water Hardness and Refined Salt usage Hard water can lead to poor washing performance and the build up of limescale which overtime will not only decrease the cleaning effectiveness but can lead to the appliance being damaged. -
Page 10: Filling With Salt
Filling with salt Only use softener salt specifically produced for use in dishwashers. Do not use table salt. To put in softener salt, first remove the lower basket and then open the salt compartment cap by turning it counter-clockwise. At first fill the compartment with 1kg salt and water to overflowing level, using the funnel (4) provided will make filling easier;... - Page 11 lower section, as this area has the best washing performance in the dishwasher. Cutlery Basket Place the cutlery basket at the front of the lower basket, make sure it is stable and ensure there is minimal contact between items. Larger utensils should be placed down flat in the upper basket.
- Page 12 Avoid loading either basket in such a way that will cause either poor washing performance or damage to items. Unsuitable items Wooden items Crockery or glasses with delicate decoration. Synthetic materials Copper and tin items Items soiled with ash, wax, lubricating oil or ink. Damage to glass and crockery can be caused by: ...
-
Page 13: Detergent Usage
Empty the dishwasher as soon as the wash cycle is over. Detergent usage Use a detergent specifically designed for use in domestic dishwashers. You can find powder, gel and tablet detergents on the market that have been designed for household dishwashers. Detergent should be put into the compartment prior to starting the machine. -
Page 14: Rinse Aid
Rinse Aid Rinse aid makes it easier for crockery to dry and helps prevent streaks or marks on the crockery. The rinse aid compartment is located next to the detergent compartment in the door. To add rinse aid, remove the rinse aid compartment cap by turning it. -
Page 15: Operation
Operation Control Panel 1. Power on/off button 2. Program Selection button 3. Delay Timer button 4. Warning indicators – Salt, Rinse aid, End of program. First use Load the appliance as per “Before use” instructions (keep the door ajar). 1. Turn the power on by pressing the On/off button. 2. - Page 16 Changing the program during use 1. Open the door (slightly at first to avoid water spillage). 2. Keep the program selection button pressed for 3 seconds and the end of program indicator will flash. 3. Close the door and the machine will drain in about 30 seconds. Once the appliance beeps 5 times, it is ready to be reprogrammed.
-
Page 17: Care And Maintenance
Care and Maintenance When the product is not in use, turn off the water supply and unplug the appliance. Cleaning Unplug the appliance. The external surfaces of the machine and the control panel can be cleaned using a non-abrasive cloth which has been dampened with water. -
Page 18: Cleaning The Filters
Cleaning the Filters The filters are located underneath the lower spray arm on the inside of the appliance. The filter assembly consists of three filters:- a. Fine filter b. Coarse filter c. Metal/plastic filter Check if any food waste has remained on the coarse and fine filters. If any food wastes are left, remove the filters and clean them thoroughly under a tap. -
Page 19: Troubleshooting
Troubleshooting Failure Codes If your appliance fails to operate, check the following table to see if any of the Failure codes are indicated on the control panel: Error code - LEDS P1 P2 Error Description Solution · Ensure the water supply is on and the water Inadequate water supply. - Page 20 If you are unable to resolve the problem please contact: The Swan Help Line 0345 610 4118. Monday - Friday 8am - 6pm.Saturday 9am - 5pm. You will need to tell them the Model no.: SDWB2020 Swan Helpline Number: 0345 610 4118...
-
Page 21: Warranty
Warranty This product is guaranteed for 1 year from the date of original purchase. If the unit fails due to faulty materials or workmanship, it will be repaired, replaced or refunded at our discretion. The following conditions apply: The product must have been purchased as new from Shop Direct Group. Proof of purchase will be required before repairs can be made under guarantee. -
Page 22: Technical Specification
Technical Specification Model No. SDWB2020 Power source 220-240 Volts AC. 50Hz Total Power 2100W Heating Power 2000W Pump Power 100W Drain Pump Power 0.03MPa (0.3 bar) – 1 Water Supply pressure MPa (10 bar) Current 10 A Capacity of Dishwasher... - Page 23 This dishwasher conforms to the following European Community Directives: -2006/95/EC (Low Voltage) -2004/108/EC (Electromagnetic Compatibility) -2009/125/EC (Comm. Reg. 1016/2010) (Ecodesign) -97/17/EC (Labelling) -2012/19/EU Waste Electrical and Electronic Equipment (WEEE) Version 1.0 6/14 Postal contact L70 1AB BoxMPRC8 Swan Helpline Number: 0345 610 4118...